MyAccount_User_Manual_V2 4_02-25-101 _2 - Nefcom Internet
MyAccount_User_Manual_V2 4_02-25-101 _2 - Nefcom Internet
MyAccount_User_Manual_V2 4_02-25-101 _2 - Nefcom Internet

Create successful ePaper yourself
Turn your PDF publications into a flip-book with our unique Google optimized e-Paper software.
<strong>MyAccount</strong> Control Panel<br />
<strong>User</strong> <strong>Manual</strong><br />
Version: 2.4<br />
NEFCOM<br />
130 North 4 th Street<br />
Macclenny, FL 32063
130 N 4 th Street,Macclenny, FL 32063<br />
Branding the <strong>MyAccount</strong> Control Panel <strong>Manual</strong><br />
Brand this document before distribution!<br />
NeoNova Network Services has developed a <strong>User</strong> <strong>Manual</strong> intended for distribution to your end<br />
users that provides detailed instructions on how to manage their email account(s) and <strong>Internet</strong><br />
services. We designed this user manual to be modified with your brand names and logo to more<br />
accurately represent the services that you make available to your end users and to appear as<br />
though the manual is provided by you. After completing these instructions, delete this page and<br />
the following page, then update the table of contents before you distribute this manual to your<br />
end users. You may also want to then protect the document or convert it to a PDF.<br />
Replacing Keywords:<br />
In order to accomplish this branding, we have incorporated conventions for using keywords to<br />
find and replace within the document (Microsoft Word). Select edit and then find from the edit<br />
drop down menu. Select replace at the top of the find window. Locate the keyword in the find<br />
what: window with the brackets < > included (for instance ). Place your keyword in<br />
the replace with: window box without the brackets (for instance NewTel). Select Replace all<br />
and then OK when the function has replaced all occurrences.<br />
Keywords used in this document are shown in brackets < > as follows:<br />
- the name of your telephone or ISP company<br />
- domain name of your website where xxx typically equals “com” or “net”<br />
(Do not include www. in front of the domain name)<br />
– your Customer Service phone number<br />
– your brand name for Technical Support/Help Desk<br />
– your Technical Support or Help Desk phone number<br />
– location/URL for information about enabling SMTP Authentication<br />
- the brand name of your Accelerated Dialup service<br />
(Change to “Accelerated Dialup” with no brackets if offered without a new brand name.<br />
- the brand name of your Integrated Webmail/Calendar/IM/Files/News service<br />
(Change to “MyPlace” with no brackets if offered without a new brand name.<br />
- the brand name of your Remote Network Storage service<br />
(Change to “MyBackup” with no brackets if offered without a new brand name.<br />
Review the section on Roaming. Some Affiliates brand this service. Update this section<br />
accordingly with brand names for the service and link names on your website. If you do not plan<br />
to make MyPlace available to your customers, remove this section as it is quite lengthy.<br />
NeoNova can perform customization of this document for a small service fee. Simply provide us<br />
with your logo, keywords, brands, and phone numbers mentioned above. Contact your<br />
NeoNova Customer Service representative for pricing on <strong>MyAccount</strong> manual customization.<br />
<strong>MyAccount</strong> Control Panel<br />
- 2 -<br />
<strong>User</strong> <strong>Manual</strong> Version: 2.4
Inserting your Logo:<br />
130 N 4 th Street,Macclenny, FL 32063<br />
It is recommended that the affiliate input their logo into this document, or otherwise remove the<br />
placeholders for one. There are two locations for the logo. On the Title page and in the Header<br />
file. (Double click the header to edit this section.) Delete the table entitled “Insert Logo Here”<br />
and paste the logo file in place of the table. Sizing adjustments may be required. Microsoft<br />
Word will accept many formats, but files with extensions of .gif, .jpeg, or .png will look and print<br />
correctly in most cases.<br />
It is recommended that you insert the header logo and other header information on the first<br />
page after the Table of Contents page since these instruction pages will be deleted before you<br />
distribute this manual.<br />
Updating the Table of Contents:<br />
It is recommended that the Affiliate complete the Find and Replace functions mentioned<br />
above, insert your logo, delete these pages, and then update the table of contents to remove<br />
references to these pages and change keywords in the table of contents. After these pages<br />
are deleted, from the view menu, choose “Toolbars” and then select the “Outlining” toolbar.<br />
When this toolbar appears, click on “Update TOC”. Select “Update entire table” is prompted.<br />
The table of contents will be updated. You may want to print these pages before you delete<br />
them so that you will have these instructions available. These pages must be deleted before the<br />
Table of Contents is updated.<br />
<strong>MyAccount</strong> Customization<br />
NeoNova Network Services has a full set of <strong>Internet</strong> services that you can make available to your<br />
end users. This document is designed to provide sufficient detail to allow your end users to<br />
perform all access and maintenance functions that are available to them with our feature set.<br />
However, the document also mentions that it is completely up to you, the service provider, to<br />
determine the access and controls that you pass on to the end user by customizing the<br />
<strong>MyAccount</strong> Control Panel. As the direct link to your customers, you have the ability through your<br />
service offerings using NovaSubscriber to provision the features and account controls that you<br />
want to make available to your end customers. You may modify this document to reflect only<br />
those controls that you plan to make available to your users or provide it to them as is, in the<br />
event that your offerings change in the future. This is similar to other product manuals that<br />
include instruction on multiple models, with the understanding that some features may not apply<br />
to the model you have on hand.<br />
Throughout this document, we have made use of generic terms and sample text in web<br />
addresses, usernames, passwords and details contained in screenshots. Your actual screens<br />
may contain other information. Tabs and selection boxes or buttons and drop down menu<br />
names are shown in bold type.<br />
Delete this page and the page above before you distribute this manual to your end users.<br />
Remember to update the Table of Contents after deleting these or other pages.<br />
<strong>MyAccount</strong> Control Panel<br />
- 3 -<br />
<strong>User</strong> <strong>Manual</strong> Version: 2.4
130 N 4 th Street,Macclenny, FL 32063<br />
BRAND THIS DOCUMENT BEFORE DISTRIBUTION! ............................................. - 2 -<br />
Replacing Keywords:................................................................................................................ - 2 -<br />
Inserting your Logo: .................................................................................................................. - 3 -<br />
Updating the Table of Contents: ............................................................................................. - 3 -<br />
<strong>MyAccount</strong> Customization ...................................................................................................... - 3 -<br />
INTRODUCTION ............................................................................................................. 2<br />
Setting Up your <strong>Internet</strong> Service ................................................................................................... 2<br />
Basic Requirements ....................................................................................................................... 2<br />
MYACCOUNT CONTROL PANEL ................................................................................. 3<br />
MyCommunity Portal ..................................................................................................................... 3<br />
Change Personal Info .................................................................................................................... 4<br />
Change Password .......................................................................................................................... 4<br />
Add or Remove Basic Services .................................................................................................... 5<br />
Modify Spam and Virus Settings ................................................................................................... 5<br />
Advanced Spam Settings and Filtering Options ........................................................................ 8<br />
Add / Edit child accounts ........................................................................................................... 13<br />
Manage Website .......................................................................................................................... 14<br />
Webmail ........................................................................................................................................ 16<br />
Videomail ..................................................................................................................................... 17<br />
MyPlace ........................................................................................................................................ 21<br />
Greymail ....................................................................................................................................... 38<br />
MyPatrol ........................................................................................................................................ 39<br />
Email Settings ................................................................................................................................ 41<br />
<strong>MyAccount</strong> Control Panel<br />
1<br />
<strong>User</strong> <strong>Manual</strong> Version: 2.4
130 N 4 th Street,Macclenny, FL 32063<br />
MySecurity .................................................................................................................................... 42<br />
Remote Network Storage ................................................................................... 43<br />
MySupport (PC Diagnostics) ....................................................................................................... 47<br />
USING ACCELERATED DIALUP WITH ........................... 49<br />
Getting Started ............................................................................................................................. 49<br />
ROAMING ..................................................................................................................... 50<br />
National Roaming ........................................................................................................................ 50<br />
Roaming Access via 800 Number ............................................................................................. 51<br />
BANDWIDTH SPEED TEST ......................................................................................... 52<br />
ADDITIONAL RESOURCES ........................................................................................ 54<br />
<strong>User</strong>id and Password Attributes .................................................................................................. 54<br />
<strong>MyAccount</strong> Control Panel<br />
2<br />
<strong>User</strong> <strong>Manual</strong> Version: 2.4
Introduction<br />
130 N 4 th Street,Macclenny, FL 32063<br />
This document is a user manual for your email and <strong>Internet</strong> services. It provides instructions for<br />
managing your email account(s) with the <strong>MyAccount</strong> Control Panel, including personal<br />
information and password changes, spam and virus settings, Webmail (email access from the<br />
World Wide Web), MyPlace integrated email/IM/Calendar/News/ File Storage and File Playback,<br />
Greymail (spam and virus repository), Content Filtering and Parental Controls. It also covers<br />
features like , Roaming Access, Personal and Corporate Web Space,<br />
Videomail, Security Suite and other services. reserves the right to make these<br />
controls available to you or manage these controls on your behalf. Therefore, you may or may<br />
not have access to the controls mentioned in this manual. Screen shots used in this manual are for<br />
examples only. Your actual screens may vary depending upon the controls and services made<br />
available to you by . Contact Customer Service if you have questions<br />
regarding controls and services that are available to you.<br />
Setting Up your <strong>Internet</strong> Service<br />
has several options for establishing your email and <strong>Internet</strong> service, ranging from<br />
performing all of the necessary steps to providing you with software that guides you through the<br />
installation and account setup procedures. Contact Customer Service if you have<br />
questions related to the initial setup of your account. This manual is intended to cover managing<br />
your account and services after your account(s) is established.<br />
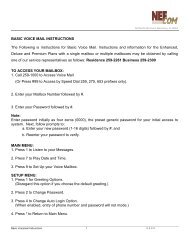
Basic Requirements<br />
<strong>User</strong>id’s and Passwords<br />
<strong>User</strong>id’s should be entered in all lower case letters, since many email systems can only<br />
accept email addresses in lower case and your userid is an email address in this system.<br />
However, passwords are case sensitive, meaning upper or lower case letters used to<br />
establish your password will be checked for matching case each time you log in. This<br />
provides an increased level of security with less likelihood of your account(s) being<br />
accessed by password generation technology employed by hackers and identity thieves.<br />
<strong>User</strong>s must log in with their full userid (bobsmith@domain.com for example) and password<br />
when initiating email sessions in order to be able to send email as detailed below. Please<br />
guard your userid and password information carefully. See the Additional Resources<br />
section for userid and password attributes, length, legal characters, etc.<br />
SMTP Authentication<br />
In order to reduce virus and spam proliferation, the outgoing email servers used to support<br />
your email account(s) require SMTP Authentication. This will require that minor<br />
configuration changes in your email program be updated to support and enable SMTP<br />
Authentication. Otherwise, you will not be authorized to send email and will receive error<br />
notifications upon attempting to send email. This is an important step in preventing<br />
unauthorized individuals from distributing attacks and junk email, and in uniquely<br />
identifying those users who launch such attacks. This support only has to be enabled once<br />
for each account. For information on how to update email applications to implement<br />
SMTP authentication go to and follow the instructions.<br />
<strong>MyAccount</strong> Control Panel<br />
2<br />
<strong>User</strong> <strong>Manual</strong> Version: 2.4
<strong>MyAccount</strong> Control Panel<br />
130 N 4 th Street,Macclenny, FL 32063<br />
The <strong>MyAccount</strong> Control Panel is a quick and easy way for you to manage your <strong>Internet</strong> account<br />
settings via the web. To access <strong>MyAccount</strong> browse to: http://myaccount..<br />
Once there, you must enter your full email address and password to log in. (See MyCommunity<br />
Portal Info below.) You will then see the home page below which shows your current usage for<br />
the month (metered Dialup), your account information, as well as your mail, radius, and personal<br />
website settings. This is a good location to check your email storage and personal web storage<br />
info. This screen is known as Home in the navigation panel menu on the left.<br />
As mentioned earlier, you may not have the ability to change all of these services shown above.<br />
The parameters shown in the account info on the right are for example only and may not reflect<br />
the settings of your account. Some screens in this manual may not appear like actual screens.<br />
MyCommunity Portal<br />
may employ a MyCommunity portal that uses “Single Sign-On” technology. This may<br />
redirect browser requests for http://myaccount. and URL’s for other services<br />
mentioned in this manual to the portal for login. Once you access the portal, login provides<br />
access links or buttons to <strong>MyAccount</strong>, Webmail, MyPlace and Greymail systems. These access<br />
methods may vary from one MyCommunity portal to another based on the implementation.<br />
<strong>MyAccount</strong> Control Panel<br />
3<br />
<strong>User</strong> <strong>Manual</strong> Version: 2.4
Change Personal Info<br />
130 N 4 th Street,Macclenny, FL 32063<br />
By clicking on this link, the screen below allows you to update your personal information.<br />
Customer Service will be notified of the changes you are making within 24 hours. Remember to<br />
click on Save after you have entered in your new information!<br />
Change Password<br />
The screen shown below allows you to change your password. Remember that passwords are<br />
case sensitive. You must input your existing password and then a new password; you will then<br />
need to verify your new password. This will ensure that you do not mistype the new password.<br />
Remember to click on Save after you have entered in your new information! It is important to<br />
remember that it could take up to 30 minutes after you click Save for this change to take effect,<br />
and it will affect all services that require you to login with userid and password. If you have a DSL<br />
account, it may be necessary to match this password in your DSL modem or router. Contact<br />
for more information.<br />
Forgot your password? Contact .<br />
See the Additional Resources section for password attributes, length, legal characters, etc.<br />
<strong>MyAccount</strong> Control Panel<br />
4<br />
<strong>User</strong> <strong>Manual</strong> Version: 2.4
Add or Remove Basic Services<br />
130 N 4 th Street,Macclenny, FL 32063<br />
This screen allows you to enable or disable your basic services. This can be useful if you add a child<br />
account and need to go in and add or remove services to it. You can turn Email, Web Space,<br />
Dialup, Accelerated Dialup and MyBackup either on or off by clicking the buttons that are<br />
labeled Turn On, or Turn Off. As the screen below mentions, by disabling Email or Web Space, you<br />
will lose any mail or web files that are stored on the server. Be sure to retrieve any mail or web files<br />
before you turn these services off.<br />
Modify Spam and Virus Settings<br />
With anti-spam and anti-virus services your time spent using the <strong>Internet</strong> is now much more<br />
enjoyable! Your emails that are classified as spam and those containing viruses are quarantined in<br />
one location for you which is called “Greymail”, so your inbox isn’t cluttered with spam and your<br />
computer and valuable data aren’t at risk of being corrupted by dangerous viruses.<br />
If your anti-spam and anti-virus services are not automatically set up for you, you may set them up<br />
by visiting the <strong>MyAccount</strong> Control Panel, and logging in to enable your service and manage your<br />
settings. There is also a link to Greymail from the <strong>MyAccount</strong> Control Panel for your convenience,<br />
and the OPTIONS tab in Greymail can also be used to adjust your spam and virus filtering options.<br />
Once you have logged in to <strong>MyAccount</strong> with your userid and password, click on Modify<br />
Spam/Virus Settings on the left-hand menu. You will then see the following items which you are<br />
allowed to modify. A brief explanation of each item is provided below:<br />
<strong>MyAccount</strong> Control Panel<br />
5<br />
<strong>User</strong> <strong>Manual</strong> Version: 2.4
130 N 4 th Street,Macclenny, FL 32063<br />
Email messages categorized as spam are left in your Greymail for 14 days as the default setting.<br />
You are allowed to change this period of time. You can leave a message in Greymail for any<br />
amount of time between 1 and 14 days. It is recommended to not set this time period too low so<br />
that you will have enough time to retrieve any email from Greymail that you would actually like to<br />
receive. Log in to Greymail, check the box beside the message(s) you would like to receive and<br />
click forward. Selected messages are then forwarded to your inbox. Set the amount of days you<br />
want messages to remain in your Greymail and then select Change. You cannot forward emails<br />
that contain viruses to your inbox.<br />
You have the ability to turn your Spam Filtering service off by selecting the Off tab. If you choose<br />
to employ Spam Filtering, then select the Content-Based tab for Content-Based Spam Filtering and<br />
then clicking Change. Spam Filtering options will be detailed later in this document.<br />
A Greymail Notification consists of an emailed report containing all of the emails you received<br />
which were either classified as spam or classified as containing a virus and were sent to your<br />
Greymail. You can decide to receive this report on a daily or weekly basis or not to receive it at all<br />
by clicking on one of the options below and then clicking on Change.<br />
The Virus Filtering Section simply allows you to turn on or off your Virus Filtering service. This action<br />
may be recommended when you use additional software to provide virus protection.<br />
( may elect to have this function on at all times regardless of the user settings to<br />
prevent proliferation of viruses.)<br />
The Virus Notification is an email which is sent to you and the email sender each time an email is<br />
flagged as containing a virus. You have the ability to turn this service on or off as shown below.<br />
<strong>MyAccount</strong> Control Panel<br />
6<br />
<strong>User</strong> <strong>Manual</strong> Version: 2.4
130 N 4 th Street,Macclenny, FL 32063<br />
By selecting Content-Based Spam Filtering option, you then have the ability to enter Advanced<br />
Spam Settings, create Blocked and Allowed Senders, and direct mail from Blocked Senders to<br />
Discard or Graymail. (See details below). Otherwise, these options do not appear on <strong>MyAccount</strong>.<br />
Advanced Spam Settings is the section you would use to edit your spam sensitivity settings and<br />
specify types of spam to quarantine to Greymail. By selecting Edit here you will then be able to<br />
modify your settings. The Advanced Spam Settings will be detailed later in this document.<br />
Blocked Senders is a mechanism for blocking emails from specific email addresses. If you do not<br />
want to receive emails from certain senders you may add their addresses in this section.<br />
Allowed Senders ensures that you always receive emails from specific senders. To ensure that a<br />
certain someone’s emails are not sent to Greymail, add them to this list.<br />
Both the Blocked and Allowed Sender functions will accept “wildcards” using an asterisk “*” as the<br />
wildcard. Using wildcards in front of a portion of an email address means every address that<br />
matches the rest of the address will be affected. For instance, if you were to put the following<br />
address in your Block Sender file: “*@bobdomain.net”, then all mail from anyone in the<br />
“bobdomain.net” domain would be sent to Greymail. Similarly, if you were to put the following<br />
address in your Allowed Senders file: “*@joedomain.net”, then all mail from anyone in the<br />
“joedomain.net” domain would be sent to your inbox, provided no viruses were detected.<br />
Finally, you also have the option of having email sent from Blocked Senders either discarded<br />
immediately, in which case you will never know it was sent to you, or you can choose to have it<br />
sent to your Greymail. The default setting is Greymail, and is recommended.<br />
<strong>MyAccount</strong> Control Panel<br />
7<br />
<strong>User</strong> <strong>Manual</strong> Version: 2.4
Advanced Spam Settings and Filtering Options<br />
130 N 4 th Street,Macclenny, FL 32063<br />
By selecting Edit on the Advanced Spam Settings section under Modify Spam/Virus settings, you<br />
will then be able to modify your settings. Advanced Spam Settings and Filtering adjustments allow<br />
you to customize your spam filters based upon the content within specific emails.<br />
Spam Scoring<br />
Every email you receive passes through the Spam filtering system, which analyzes the<br />
message, looking for certain traits normally found in Spam. There are hundreds and<br />
hundreds of traits the filtering system scans for; all capital letters in the body of the<br />
message, an Unsubscribe link, no name in the From: line are just a few. If only one of these<br />
traits is found in a message it will be assigned a low Spam score but if a message has many<br />
of these traits it will be assigned a higher score. This is how it is decided whether a message<br />
should be sent to your Inbox or to Greymail. The Spam Threshold point scale that you can<br />
adjust sets the bar for the delivery to your Inbox or Greymail (Spam repository). We<br />
recommend most users leave this at 5.0.<br />
When in Greymail, click the View Message Header icon. The line that reads X-X5: Spam:<br />
True; 6.4 / 5.0 means that this message scored a 6.4 because of the Spam traits that were<br />
found and your Spam Threshold is set to 5.0, so this message was sent to Greymail rather<br />
than your Inbox. If you find that legitimate email is being quarantined in Greymail check<br />
this X-X5: Spam: True line and tweak your Spam Threshold setting until the messages clear<br />
filtering.<br />
Spam Confidence<br />
The Confidence Threshold lets you decide at what score a message should not appear in<br />
the "Normal" confidence tab of the message list. Any message that scores above what you<br />
have set in the Confidence Threshold should rarely need review, and will be listed under<br />
the "High" confidence tab. All messages, regardless of score, will be shown together under<br />
the "Both" confidence tab.<br />
<strong>MyAccount</strong> Control Panel<br />
8<br />
<strong>User</strong> <strong>Manual</strong> Version: 2.4
Setting Specific Spam Filters<br />
130 N 4 th Street,Macclenny, FL 32063<br />
You have the ability to set the individual Spam filters to optimize receiving wanted<br />
messages and capturing Spam. Individual filters that recognize specific types of Spam can<br />
be set from Low to High or can be turned off by selecting the associated radius buttons.<br />
Experiment with the filters until you are satisfied with your exact filtering specifications.<br />
Remember to select Update to save your settings.<br />
TattleMail A password and an email address are options for TattleMail on the screen shot at left.<br />
TattleMail is a mechanism that allows parents to be notified if their children or someone using their<br />
account is trying to access the contents of Greymail. Oftentimes, the nature of the spam emails in<br />
your Greymail can be unsuitable for children, and by providing an email address and password for<br />
TattleMail, you will be able to make sure your children don’t access Greymail and if they try, you<br />
will be notified via email to the address you specify. This is now included in Spam/Virus options.<br />
<strong>MyAccount</strong> Control Panel<br />
9<br />
<strong>User</strong> <strong>Manual</strong> Version: 2.4
130 N 4 th Street,Macclenny, FL 32063<br />
Real Time Blocks are a method of blocking emails from specific countries that originate spam.<br />
Once you make changes, you must click Update so that your new selections go into effect. It is<br />
recommended to leave RBL and Dialup List checked, as these are lists of addresses known to<br />
generate spam. You can Edit and Save your Blocked Senders and Allowed Senders lists as shown.<br />
<strong>MyAccount</strong> Control Panel<br />
10<br />
<strong>User</strong> <strong>Manual</strong> Version: 2.4
130 N 4 th Street,Macclenny, FL 32063<br />
The screens below are used to select your Blocked Senders actions, Spam Life, Virus Notification,<br />
and Greymail Notification settings as described earlier in this document.<br />
<strong>MyAccount</strong> Control Panel<br />
11<br />
<strong>User</strong> <strong>Manual</strong> Version: 2.4
130 N 4 th Street,Macclenny, FL 32063<br />
<strong>MyAccount</strong> Control Panel<br />
12<br />
<strong>User</strong> <strong>Manual</strong> Version: 2.4
Add / Edit child accounts<br />
130 N 4 th Street,Macclenny, FL 32063<br />
A child account is an additional email account associated with the main (parent) account. After<br />
a parent account is established, child accounts can be opened under that parent account via<br />
the <strong>MyAccount</strong> link called Add / Edit child accounts. Child accounts typically have features<br />
available similar to parent accounts, but this may vary from one product offering (package) to<br />
another.<br />
Contact Customer Service if you have questions or concerns about how to create<br />
child accounts and how many you can create at no additional charge. (Exceeding the number<br />
of child accounts allowed by your service provider may result in incremental charges.)<br />
Child accounts are identified in the upper left hand corner of their <strong>MyAccount</strong> Home page as a<br />
child account and as being associated with their parent account. Select Return to Parent tab to<br />
return to the parent account’s <strong>MyAccount</strong> home page. Child account features may vary or be<br />
limited from what is shown below, but typically have many attributes similar to the parent account.<br />
<strong>MyAccount</strong> Control Panel<br />
13<br />
<strong>User</strong> <strong>Manual</strong> Version: 2.4
Manage Website<br />
130 N 4 th Street,Macclenny, FL 32063<br />
The Manage Website link will take you to the control panel shown below. Personal web space is a<br />
repository for you to store a website, documents, images, files or photos. This space is “write”<br />
accessible by you, the site owner, by using your <strong>Internet</strong> browser, Web Page Editor, or ftp (File<br />
Transfer Protocol) Application. It is also “read” accessible to the rest of the world by typing the<br />
web space URL (Uniform Resource Locator, also known as your web address) into their <strong>Internet</strong><br />
browser. Your web space administration is password protected so your files will stay safe and<br />
secure and will only be available for others to view or copy by surfing to your URL. Uploads are<br />
limited to a file size of 20MB.<br />
How do I put files into my web space?<br />
In order for files to become available from your personal web space, you must first put<br />
them there. The method of doing this is called “File Transfer Protocol” (ftp). FTP is the<br />
method of delivery, but you must have a way to use this method known as an ftp client.<br />
An ftp client is a software application that allows you to put files on the server (upload),<br />
and get files from the server (download). There are several types of clients that can be<br />
used, as mentioned below. When you select Manage Website, you see the one above.<br />
What clients can I use to put files in my web space?<br />
As mentioned before, there are several types of ftp clients. Programs such as “WsFTP®”<br />
and “SmartFTP®” are 100% ftp clients. This means that their only function is to put files on a<br />
server and get files from a server. These are great for people who are only storing files in<br />
their web space or are using a text editor (like Notepad or WordPad) to create web pages<br />
and then uploading them when they are done. Programs like “Dream Weaver®” and<br />
“FrontPage®” are webpage editors (also known as HTML editors) that, in addition to<br />
creating and editing web pages, also have a built-in ftp client. This is handy for creating<br />
many web pages and then uploading them quickly. And lastly, there is the web based<br />
software that you access from the Manage Website link. This ftp tool allows you to upload<br />
files from your <strong>Internet</strong> browser without the need for these third-party programs. Simply go<br />
to our ftp site, log in with your userid (email address) and password, choose the directory<br />
that you would like to put your files in and then upload. This site can also be reached using<br />
the Manage Website link in the <strong>MyAccount</strong> Control Panel. See details below:<br />
<strong>MyAccount</strong> Control Panel<br />
14<br />
<strong>User</strong> <strong>Manual</strong> Version: 2.4
What steps do I take to use the web-based ftp tool?<br />
1. Surf to http://webftp.<br />
2. Enter your userid (email address) and password.<br />
3. Click the link of the folder you want to upload your files<br />
130 N 4 th Street,Macclenny, FL 32063<br />
Once you are inside your desired folder, you are presented with three options:<br />
• Upload A File: Allows you to put a file from your computer to your web space.<br />
There is an upload file size limit of 20MB.<br />
• Create A Directory: Organize your web space by creating additional folders.<br />
• Advanced Mode: View important information about your files and change<br />
permissions.<br />
The “public_html” folder is where you would place all of your webpage related files and<br />
images. This public_html folder is accessible to the rest of the world by surfing to<br />
http:///~username where “<strong>User</strong>name” is the portion of your email<br />
address in front of the “@” symbol; for instance bob@Info.com would have a username of<br />
“bob”. (be sure to put a “~” in front of your username.)<br />
The ftp folder is also accessible by anonymous ftp, which means a user can surf to<br />
ftp://ftp./username. (No Tilde ~ needed)<br />
What are the addresses that I give to friends and family?<br />
All addresses are composed of two things, the domain of your ISP and your userid.<br />
Listed below is the format you would use to access these “sites”.<br />
• I want to access my files directly from an <strong>Internet</strong> Browser using ftp:<br />
o ftp://ftp./username (no Tilde ~)<br />
• I want my friends/family to see my webpage:<br />
o http:///~username<br />
• I made a folder called “images” in my public_html directory, how do I access it:<br />
o http:///~username/images<br />
<strong>MyAccount</strong> Control Panel<br />
15<br />
<strong>User</strong> <strong>Manual</strong> Version: 2.4
Webmail<br />
130 N 4 th Street,Macclenny, FL 32063<br />
The Webmail link on <strong>MyAccount</strong> takes you to your Webmail account. You can also access your<br />
Webmail account by browsing to http://webmail. and logging in with your full<br />
email address and password. Webmail allows you to access your email from the Web. You can<br />
create and send new messages, import or create contact lists, reply to or forward email, add<br />
audio and video messages to your email, or set up folders to file and store email on the server.<br />
See the section on Videomail for more information about how to insert audio and/or video<br />
messages into your email.<br />
You can use the personal calendar, create notes and reminders, or access Greymail to check<br />
quarantined spam emails or emails containing viruses from the Greymail link. A link to the<br />
<strong>MyAccount</strong> Control Panel (<strong>MyAccount</strong>) has also been provided. For more information on using<br />
Webmail, see the built in Help files. You may see references to SquirrelMail in the Help files. Your<br />
Webmail Interface is customized and is built to run in the SquirrelMail environment. (Third party<br />
software)<br />
Address Book Groups and Sorting Contacts<br />
Options and then Address Groups, and then Enable this functionality.<br />
WebMail now has the<br />
ability to create address<br />
book groups. This function<br />
must be enabled for each<br />
account by selecting<br />
Additionally, you can sort your Address Book contacts based on<br />
First or Last Name by clicking on the First or Last Name column<br />
headers when viewing your Address Book(s).<br />
<strong>MyAccount</strong> Control Panel<br />
16<br />
<strong>User</strong> <strong>Manual</strong> Version: 2.4
Videomail<br />
130 N 4 th Street,Macclenny, FL 32063<br />
Now you can send an audio or video message just as easily as sending a text email. Videomail<br />
allows you to record audio and video content to a streaming server. A link is then automatically<br />
placed in the email that directs the recipient to a webpage to initiate the audio and/or video<br />
stream playback. Email inboxes are never overloaded by large audio or video file attachments<br />
because there are none! Audio and video messages simply "stream" across the <strong>Internet</strong> from<br />
streaming servers. A broadband connection is recommended for recording and playback. Use<br />
of dialup connection, wireless routers or other connectivity options may impact recording and<br />
playback quality.<br />
Videomail is supported on computers running Windows NT/2000/XP/Vista and MacIntosh OS X<br />
Operating systems. Adobe FlashPlayer 10.0 (www.adobe.com) or later must be installed and<br />
Java Script must be enabled in your Web Browser options for recording and playback of audio<br />
and video files. There may be additional charges for using this service and it may be necessary<br />
to contact Customer Service to enable this feature.<br />
Videomail is made available to you via the Webmail Interface (see below). When composing a<br />
message in Webmail, you can record an audio or video message by selecting the Add Video<br />
button. A microphone and camera are required to record audio and video messages,<br />
respectively. It is possible to send audio only or video only messages if you do not have both a<br />
microphone and camera available. A portion of the Webmail interface is shown below:<br />
<strong>MyAccount</strong> Control Panel<br />
17<br />
<strong>User</strong> <strong>Manual</strong> Version: 2.4
130 N 4 th Street,Macclenny, FL 32063<br />
Enter the Webmail interface in order to record Videomail. The first step is to create a new email<br />
with a recipient email address, a subject, and a body of text. Once the email is created, you can<br />
insert video messages into the email by selecting the Add Video button, launching the recorder<br />
window shown below. The first time you attempt to add video, you will be asked to review and<br />
accept an End <strong>User</strong> License Agreement. Once this agreement is accepted, the following screens<br />
may also appear. You may experience difficulties with video recording if you do not have the<br />
correct device driver associated with the built in or external camera. Follow the instructions in the<br />
panel on the left below to associate the correct driver with your camera hardware. You must left<br />
click your mouse once in this panel to activate the controls, and then right click for the settings<br />
panel.<br />
The video recorder panel may ask for access to your camera and microphone as shown above<br />
on the right. The user may select Allow or Deny and can also right click on this panel to bring up<br />
the settings option and tell the application to remember to allow this access as shown below:<br />
<strong>MyAccount</strong> Control Panel<br />
18<br />
<strong>User</strong> <strong>Manual</strong> Version: 2.4
130 N 4 th Street,Macclenny, FL 32063<br />
Click on the Record button to record a message; and click on the Stop button when you have<br />
finished recording. You will then be asked to review the video, save the video, or start over as<br />
shown below. If you click on the save button, then the recorder window will close and the link to<br />
the video will be placed in the email. Start over will discard and begin re-recording the video. If<br />
you select Exit, the recorder window will be closed and the video will not be saved.<br />
Performance Recommendations<br />
It is recommended that you have only<br />
one browser window open to minimize<br />
conflicts with the recorder. You should<br />
not be running the computer’s CD<br />
player, MP3 player, or other audio or<br />
video software before starting the Video<br />
Mail recorder. If you have only a<br />
microphone (many PC’s today have<br />
built-in microphones), the recording<br />
page will record an audio only message<br />
that can be reviewed or saved just like a<br />
video mail recording. You may need to<br />
click the mouse inside the Recorder and<br />
Playback panels once to activate the<br />
controls.<br />
Depending on your connection to the<br />
<strong>Internet</strong>, you may experience problems<br />
transmitting or uploading messages. The<br />
items listed below could cause<br />
transmission problems.<br />
• If using a modem, you should disable Call Waiting. If Call Waiting is NOT disabled, you may<br />
experience an error in sending if Call Waiting tones are received during transmission.<br />
• If the <strong>Internet</strong> connection has been disconnected, this will cause an error while transmitting<br />
your message. This may occur due to inactivity with your Web browser.<br />
• A valid email address in the “To:” field is required. You should not terminate your <strong>Internet</strong><br />
connection until you receive a confirmation that your message has been sent or video links<br />
may not be properly sent to the recipient.<br />
<strong>MyAccount</strong> Control Panel<br />
19<br />
<strong>User</strong> <strong>Manual</strong> Version: 2.4
Receiving Videomail<br />
130 N 4 th Street,Macclenny, FL 32063<br />
When others receive a Videomail, they will see a Web link URL similar to this:<br />
(http://fms.domain.vd...., where “domain” is your main domain name) embedded in the body of<br />
the email for playing back audio or video via their Web Browser. They either click on this link or<br />
copy and paste the link into their Web Browser and hit Enter to initiate the audio/video stream.<br />
There will be a brief delay while the computer gets ready and the message is sent across the<br />
<strong>Internet</strong>, then the playback window below will be displayed.<br />
<strong>User</strong>s can control the volume setting, Play/Pause the playback, Restart the video or Auto Hide the<br />
menu in order to view the full video. By selecting the Auto Hide box and moving the cursor<br />
outside the window, this menu will hide and return when the cursor is returned within the window.<br />
<strong>MyAccount</strong> Control Panel<br />
20<br />
<strong>User</strong> <strong>Manual</strong> Version: 2.4
MyPlace<br />
130 N 4 th Street,Macclenny, FL 32063<br />
MyPlace is a single interface, for email, secure instant messaging, news feeds, file storage, and<br />
calendaring. It allows you to use services, store content and maintain a presence on the network.<br />
Whether you are in your office, at home, or on the road, you can access your email, IM, or files<br />
with the click of a mouse.<br />
MyPlace unifies all forms of <strong>Internet</strong> Communications - from email and IM, to chat, rich media; in a<br />
sleek, easy-to-use, easy-to-manage client interface.<br />
There are two ways to access MyPlace:<br />
1. From the MyPlace link, on the <strong>MyAccount</strong> Control Panel. You can login to the control panel by<br />
browsing to http://myaccount..<br />
2. Or, by browsing to: http://myplace.. You must login to MyPlace using your<br />
full email address and password. (Note: Contact if you forgot your password.)<br />
Proxy-Safe Mode<br />
Proxy-safe mode allows MyPlace to communicate with the server via standard HTTP calls, rather<br />
than using the XIMSS protocol. Therefore, if a client is behind a restrictive firewall, for example, that<br />
only allows outbound HTTP traffic; proxy-safe mode allows that client to use MyPlace.<br />
When you select Proxy-Safe mode, two other checkboxes appear. To increase security, the server<br />
remembers the IP address from which each new session is started. It refuses to serve new requests<br />
for the same session from other IP addresses. In rare cases where a client's web traffic is being<br />
proxied through a farm of proxy servers, where each request for a session could come from<br />
different IPs, you can disable the fixed address check. Disable cookie check is related to browser<br />
cookie support and can also be disabled. Most users do not need to select these boxes.<br />
<strong>MyAccount</strong> Control Panel<br />
21<br />
<strong>User</strong> <strong>Manual</strong> Version: 2.4
<strong>User</strong> Interface<br />
130 N 4 th Street,Macclenny, FL 32063<br />
Once you have logged in, you can access email, set up and share calendars, use the Instant<br />
Messaging client with other MyPlace and GoogleTalk users, upload files to the File Storage area,<br />
activate RSS News Feeds, and upload photos, videos, and music files. You can reference the<br />
online help for information on how each of these functions work, but key functions are described<br />
later in this manual. The main user interface is illustrated below:<br />
<strong>MyAccount</strong> Control Panel<br />
22<br />
<strong>User</strong> <strong>Manual</strong> Version: 2.4
Settings<br />
130 N 4 th Street,Macclenny, FL 32063<br />
Upon initial login, please take the time to review and configure your personal settings. Click on the<br />
Settings icon on the MyPlace toolbar to customize your personal settings.<br />
The Settings window allows you to personalize configurations such as Language, Text Size, email<br />
Signatures, Calendar settings, Vacation Messages, and much, much more. The following settings<br />
can be customized or left as the default value:<br />
• General: allows you to configure and view Language, Preferred Character Set, Time Zone, Layout,<br />
Text Size, Previous Login, Last Failed Login, and MyPlace Version.<br />
• Folders: allows you to configure the Display INBOX as, Fields, and Send Read Receipts<br />
• Compose: allows you to configure Real Name, From Address Signature, Reply Header, Reply<br />
Quoting, Store Draft In, Save Sent Message In, and Auto-Save Every<br />
• Delete: allows you to configure Message Delete Method and the Trash Folder<br />
• IM: allows you to configure IM Audio Alert, Auto-save IM Chats, and the History Folder.<br />
• Calendar: allows you to configure the Main Calendar, the Time Slice, Calendar View, Starts At,<br />
Working Hours, Days to Publish<br />
• Contacts: allows you to configure the Main Contact folder<br />
• Mail Control: allows you to enable or disable a Vacation Message and Redirection of All Mail, control<br />
Junk Mail, and create and configure customized Rules. (Most users will use GreyMail, not Junk Mail.)<br />
For many of the above settings there is a default value, indicated in the drop down menu. Please<br />
refer to the on-line help for additional information about the above settings.<br />
<strong>MyAccount</strong> Control Panel<br />
23<br />
<strong>User</strong> <strong>Manual</strong> Version: 2.4
Instant Messaging (IM)<br />
130 N 4 th Street,Macclenny, FL 32063<br />
The IM icon, on the MyPlace toolbar, enables you to turn the IM view on and off. You can select<br />
the Online drop down menu to indicate your IM online status (Away, Be Right Back, Out to Lunch,<br />
etc.), as shown below.<br />
You can add IM Buddies allowing you to chat with other MyPlace or GoogleTalk users. Click the<br />
Create icon in the lower left hand portion of the IM window. The Buddies window will appear<br />
allowing you to add a buddy’s email address, select an IM user group, or provide a buddy name.<br />
The names you add will automatically display in your IM buddy list, as shown below:<br />
<strong>MyAccount</strong> Control Panel<br />
24<br />
<strong>User</strong> <strong>Manual</strong> Version: 2.4
130 N 4 th Street,Macclenny, FL 32063<br />
When you are ready to begin a new chat session, highlight the contact or group you wish to<br />
message and select the Chat icon. After constructing your message, use the Send IM icon to<br />
send. The recipient will receive your invitation and must accept in order to become your Buddy.<br />
After your invitation is approved, the invitee will appear in your buddy list. You can also initiate an<br />
email to them by highlighting a Buddy and selecting the Compose icon.<br />
To delete a buddy, highlight a buddy name from the list and click on the Delete icon.<br />
Help<br />
The Help icon provides you with a MyPlace Quick Start Guide and Help document detailing the<br />
features, icons, configurations, and much more. If you have additional questions, you can<br />
contact your Customer Service Center at .<br />
Greymail<br />
The Greymail icon allows you to check quarantined spam emails or emails containing viruses from<br />
the Greymail interface (see the Greymail section of this document for detailed information).<br />
Email<br />
Use MyPlace email to create and send new messages, reply to or forward email, add audio and<br />
video messages to your email, or set up folders to file and store email on the server. See the<br />
section titled VideoMail for more information about how to insert audio and/or video messages<br />
into your email. (Note, please review the Calendar section of this document for details on using<br />
your email account to send meeting invitations.)<br />
<strong>MyAccount</strong> Control Panel<br />
<strong>25</strong><br />
<strong>User</strong> <strong>Manual</strong> Version: 2.4
Managing email Folders<br />
130 N 4 th Street,Macclenny, FL 32063<br />
Right click on any of the Folders within the Email feature. You can perform any of the<br />
following four functions for each Folder:<br />
• Create Folder: allows you to create a New Folder for your Mailbox, Calendar, Address Book, Notes,<br />
or Tasks<br />
• Rename Folder: allows you to rename any existing Folder<br />
• Remove Folder: allows you to remove any Folder from your list<br />
• Access Control List: allows you set access privileges for individual users, as illustrated below<br />
<strong>MyAccount</strong> Control Panel<br />
26<br />
<strong>User</strong> <strong>Manual</strong> Version: 2.4
VideoMail<br />
130 N 4 th Street,Macclenny, FL 32063<br />
VideoMail is supported on computers running Windows NT/2000/XP/Vista and MacIntosh OS X<br />
Operating systems. Adobe FlashPlayer 9.0 (www.adobe.com) or later must be installed and Java<br />
Script must be enabled in your Web Browser options for recording and playback of audio and<br />
video files. There may be additional charges for using this service and it may be necessary to<br />
contact Customer Service to enable this feature. .<br />
VideoMail is made available to you via the Myplace Interface. When composing a message in<br />
MyPlace, you can record an audio or video message by selecting the Add Video icon. A<br />
microphone and camera are required to record audio and video messages, respectively (Note,<br />
please refer to the section titled VideoMail for additional VideoMail information, including<br />
information on Camera Settings).<br />
It is possible to send audio only or video only messages if you do not have both a microphone and<br />
camera available. A portion of the MyPlace interface, including the Add VideoMail icon, is shown<br />
below:<br />
Now you can send an audio or video message just as easily as sending a text email. VideoMail<br />
allows you to record audio and video content to a streaming server. A link is then automatically<br />
placed in the email that directs the recipient to a webpage to initiate the audio and/or video<br />
stream playback. Email inboxes are never overloaded by large audio or video file attachments<br />
because there are none. Audio and video messages simply "stream" across the <strong>Internet</strong> from<br />
streaming servers. A broadband connection is recommended for recording and playback. Use<br />
of dialup connection, wireless routers or other connectivity options may impact recording and<br />
playback quality.<br />
<strong>MyAccount</strong> Control Panel<br />
27<br />
<strong>User</strong> <strong>Manual</strong> Version: 2.4
Calendar<br />
130 N 4 th Street,Macclenny, FL 32063<br />
MyPlace delivers powerful calendaring features, including shared calendar management. The<br />
figure below illustrates some of these features: Shared calendars, Calendar Merge and Meeting<br />
Management.<br />
The Calendar toolbar allows you to view your Calendar, or a Shared Calendar, in four different<br />
views: Daily, Work Week, Weekly or Monthly. The Calendar view in the left-hand column can be<br />
used to view a simple month at a glance while the Calendar view to the right allows you to view<br />
the daily, weekly and monthly tasks in more detail. To remove a Shared Calendar from view,<br />
remove the check next to the icon of any given individual’s calendar.<br />
Within the Calendar view, there are three Icons (functions) that allow you to:<br />
Create Folder: used to create a new Calendar<br />
Shared Folder: allows you to access and share other MyPlace Calendars<br />
Import Calendar Data: used to import other MyPlace calendar data into your Calendar<br />
<strong>MyAccount</strong> Control Panel<br />
28<br />
<strong>User</strong> <strong>Manual</strong> Version: 2.4
130 N 4 th Street,Macclenny, FL 32063<br />
Using the Merge check box in the top right corner of the Calendar screen allows you to merge all<br />
Calendar views into one simple view, as shown below. You can undo this view by un-checking<br />
the Merge check box.<br />
Share a Calendar<br />
From the New drop down menu, on the MyPlace toolbar, select Folder. Type the name of<br />
the user whose folder you wish to share, select Calendar from the drop down menu the<br />
click Save. This will automatically add the user to the list of calendars. Next, right click on<br />
the new calendar and select Access Control List. Check the controls that you want to<br />
allow the user, as shown below. Click Save. (Note, do NOT assign the ‘Delete’ or ‘Admin’<br />
privileges to the other users. These functions should be used by the Network Administrator.)<br />
Note, to successfully share a calendar, the other calendar holder must configure his/her<br />
calendar for Sharing.<br />
<strong>MyAccount</strong> Control Panel<br />
29<br />
<strong>User</strong> <strong>Manual</strong> Version: 2.4
Meeting Management<br />
130 N 4 th Street,Macclenny, FL 32063<br />
Planning a meeting is as easy as a few simple steps. Whether it is blocking time for a<br />
particular task or scheduling an office-wide meeting, you can manage your calendar and<br />
time in minutes. To add an event or task to your Calendar, click on the New drop down<br />
menu from the MyPlace toolbar. Select Event. Within the Event window, you can<br />
schedule time on your calendar for planned meetings or tasks, as shown below.<br />
Click the Attendees button to construct a Meeting request and invite Attendees from your<br />
Address Book, as shown below. Once you have chosen the attendees, click the Save to<br />
send the meeting invitation. The invitation will go directly to the attendee’s email address.<br />
<strong>MyAccount</strong> Control Panel<br />
30<br />
<strong>User</strong> <strong>Manual</strong> Version: 2.4
Within the Event window are the following icons (functions):<br />
130 N 4 th Street,Macclenny, FL 32063<br />
Attendees: populates the Event window that provides access to your contacts<br />
list and a view of the availability of potential attendees<br />
Contact: populates your Address Book allowing you to select your meeting<br />
attendees<br />
Recurrence: allows you to establish a recurring meeting, as illustrated below:<br />
Attachments: allows you to attach a file to your meeting request<br />
Show Availability: allows you to view the status/availability of a potential<br />
meeting attendee, as illustrated below (Calendar sharing required):<br />
To delete a meeting at any time from your calendar, double click on the meeting within the<br />
Calendar View. From the Event window, click the Delete icon.<br />
<strong>MyAccount</strong> Control Panel<br />
31<br />
<strong>User</strong> <strong>Manual</strong> Version: 2.4
Managing Calendar Folders<br />
130 N 4 th Street,Macclenny, FL 32063<br />
Right click on any of the listed Calendars in the Calendar view. You can perform any of<br />
the five functions listed below.<br />
• Create Folder: allows you to create a New Folder for your Mailbox, Calendar, Address Book,<br />
Notes, or Tasks<br />
• Rename Folder: allows you to rename any existing Calendar<br />
• Remove Folder: allows you to remove any Calendar from your list<br />
• Access Control List: allows you set access privileges for individual users, as illustrated below<br />
• Import Calendar Data: allows you to upload iCalendar files (see the section below for<br />
instructions on importing iCalendar files)<br />
Importing iCalendar files<br />
You can import iCalendar files using this one-time set of steps to import calendar<br />
information in the iCalendar file format.<br />
1. From your former calendar management program, you need to export your<br />
calendar files into an iCalendar file format (.iCal).<br />
2. Right click on the Calendar Folder in MyPlace and select Import Calendar Data.<br />
3. Select the path where the new .iCal file resides and click OK.<br />
<strong>MyAccount</strong> Control Panel<br />
32<br />
<strong>User</strong> <strong>Manual</strong> Version: 2.4
Contacts<br />
130 N 4 th Street,Macclenny, FL 32063<br />
The Contacts feature allows you to enter and organize data for individuals in your address book.<br />
Select New from the MyPlace toolbar then select Contact. The Contact window allows you to<br />
enter data such as Full Name, Job Title, Organization, Unit, Profession, Telephone number, email<br />
address, individual’s photo, address and web site, as shown below. When selected, the Full<br />
Name, Photo, and Address buttons populate new windows for detailed data entry.<br />
After new contacts have been added and saved, the entries will display in the Contacts view.<br />
A list of all Contacts will display in the middle window while an individual’s detailed contact<br />
information will display in the right-hand window. This feature provides a search engine allowing<br />
you to search for an individual in your contact list. Using the Search<br />
box, type the name of the desired contact then click the magnifying glass.<br />
Managing Contacts Folders<br />
The MyPlace toolbar allows you to move and copy contact information into specified<br />
folders. In addition, after right clicking on any of the listed Folders in the Contact view, you<br />
can perform any of the following 5 functions for each Folder:<br />
• Create Folder: allows you to create a new contacts folder<br />
• Rename Folder: allows you to rename any existing folder<br />
• Remove Folder: allows you to remove any folder from your list<br />
• Access Control List: allows you set access privileges for individual users<br />
• Import VCard Data: allows you to import virtual business cards to your list of contacts (see the<br />
section below for instructions on importing your email contacts from another email client.)<br />
<strong>MyAccount</strong> Control Panel<br />
33<br />
<strong>User</strong> <strong>Manual</strong> Version: 2.4
File Storage<br />
130 N 4 th Street,Macclenny, FL 32063<br />
Import Your email Contacts<br />
You can import contacts from another email client using this one-time set of steps to<br />
convert contact information to the proper VCard file format. There are two ways to import<br />
your email Contacts list:<br />
1. If you are an existing WebMail user, select the “Export to MyPlace” link in the WebMail<br />
Address Book Interface to automatically export your contacts to MyPlace.<br />
2. If you keep your contacts in another email client (i.e., Outlook or Outlook Express),<br />
export your contacts to a Vcard or Comma Separated Values format (.csv) and import<br />
them into MyPlace. (Note: MyPlace supports Contact import only in the Vcard format<br />
(.vcf.) A CSV to Vcard conversion tool can be accessed using the following link):<br />
http://homepage.mac.com/phrogz/CS<strong>V2</strong>vCard_v2.html (Only a recommendation)<br />
The File Storage feature/view (as shown below) is a file management feature allowing you to<br />
Create, Delete, and Rename Folders, Upload and Download files, email a file, and Share Folders.<br />
<strong>MyAccount</strong> Control Panel<br />
34<br />
<strong>User</strong> <strong>Manual</strong> Version: 2.4
My Stuff Files<br />
130 N 4 th Street,Macclenny, FL 32063<br />
My Stuff contains the following three management tools for storing and viewing photos, uploading<br />
and playing music and playlists, and uploading and playing videos: My Photos, My Music, and My<br />
Videos. More about these management tools is described in the sections below.<br />
My Photos<br />
The My Photos interface provides a management tool allowing you to store, view, search<br />
and show slideshows of your favorite photos in jpeg format (.jpg.) You can view photos in<br />
a “thumbnail” format as shown below or individually in full screen mode. Clicking on the<br />
blue up or down arrow, in the middle of the My Photos screen, allows you to toggle<br />
between a more condensed screen, displaying your photos (as illustrated below) and the<br />
full screen, displaying your photos and file data.<br />
The My Photos full screen allows you to view all file data as well as personalize your photos,<br />
by adding descriptive text. As your photo library grows, the Search/Filter function will<br />
come in handy allowing you to find files instantly. The Slideshow function allows you to turn<br />
your library of photos into a continual display of photos on your screen.<br />
<strong>MyAccount</strong> Control Panel<br />
35<br />
<strong>User</strong> <strong>Manual</strong> Version: 2.4
My Music<br />
130 N 4 th Street,Macclenny, FL 32063<br />
The My Music interface allows you to upload music files in MP3 format (.mp3), manage<br />
playlists, repeat, shuffle and search for music files.<br />
To create or add a new playlist, click the New… button (the Add New Playlist window will<br />
display) and type the name of your new playlist in the List Name… field. To add the new<br />
playlist, click Save.<br />
My Videos<br />
The My Videos interface provides an interface to upload, download and play videos in the<br />
Flash format (.flv.) You can control the playback, volume, repeat play, and see the<br />
counter of how much video has played and the total time for each video.<br />
<strong>MyAccount</strong> Control Panel<br />
36<br />
<strong>User</strong> <strong>Manual</strong> Version: 2.4
News<br />
130 N 4 th Street,Macclenny, FL 32063<br />
Within the MyPlace News feature, users can view the current news headlines in real time. These<br />
news feeds can be established using a simple graphical interface. The news headlines will be<br />
listed by Subject and Date, much like email listings in your email inbox. If more than one news sight<br />
is established, the user can simply highlight the news sight in the left window to view the current<br />
headlines.<br />
To view any news story in its entirety, simply highlight the headline and click the icon.<br />
Use the following functions to configure the personalized RSS News feeds:<br />
Allows the user to Subscribe to an automated news feed. The Add News Feed<br />
Source (see the next section, Add a News Feed, for instructions) window will display prompting the user to<br />
add the address (URL) for the site of the desired news feed.<br />
Allows the user to remove an automated news feed.<br />
Allows the user to Refresh the current news headlines at any time.<br />
Add a News Feed<br />
You can establish your news feeds using the Subscribe icon on the toolbar. From the site of<br />
the desired news feed, copy the RSS link. Click the Subscribe icon and paste the RSS URL<br />
into the Address (URL): box and click Save, as shown below. This will immediately add the<br />
RSS News feed and current headlines to your headlines list.<br />
<strong>MyAccount</strong> Control Panel<br />
37<br />
<strong>User</strong> <strong>Manual</strong> Version: 2.4
Greymail<br />
This link on <strong>MyAccount</strong> takes you to your Greymail account, where you will find emails determined<br />
to be spam or containing viruses. Yo You u may also access Greymail by browsing to<br />
http://greymail.
MyPatrol<br />
130 N 4 th Street,Macclenny, FL 32063<br />
This section of the <strong>MyAccount</strong> Control Panel allows you to manage your MyPatrol - Content<br />
Filtering and MyPatrol - Parental Controls. See below for descriptions of the options available on<br />
this screen. (Note: MyPatrol - Content Filtering and My Patrol - Parental Controls may not be<br />
available to all users. These features require specific authentication methods in order to perform<br />
their function. Contact for further information.)<br />
In the screen shot above, you have the option to enable MyPatrol - Content Filtering and choose<br />
which level of filtering you want. Your three choices are described below.<br />
You will not notice that MyPatrol - Content Filtering is in effect until you try to reach a site that has<br />
been deemed unacceptable, in which case you will see an “Access Denied” screen similar to the<br />
one below.<br />
<strong>MyAccount</strong> Control Panel<br />
39<br />
<strong>User</strong> <strong>Manual</strong> Version: 2.4
If enabled, the content filter automatically activates upon logging in, using the selected filter:<br />
• No Porn:<br />
No public proxies or pornography sites are allowed to be accessed<br />
• Super Clean:<br />
No alcohol, Anarchy, Criminal Skills, Cults, Drugs, Gambling, Hate Groups, Obscene &<br />
Tasteless, Public ic Proxies, Pornography, or RR-Rated<br />
Rated sites are allowed to be accessed.<br />
• Business:<br />
No Alcohol, Anarchy, Chat, Criminal Skills, Drugs, Employment, Financial, Gambling,<br />
Games, Hate Groups, Humor, Obscene & Tasteless, Public Proxies, Personals, Pornography,<br />
R- Rated, ated, Shopping, Sports, Web Based Email, Web Based Newsgroups.<br />
Once you have made your selections, you must click Save and your requests will be made within<br />
30 minutes. You must logoff and re re-enter enter the system for these changes to take effect, or they will<br />
take effect the next time you log in.<br />
MyPatrol - Parental Controls Under the section labeled “ “MyPatrol - Parental Controls” above, you<br />
can add and delete time blocks for which you want an account to be able to access the<br />
<strong>Internet</strong>. You simply select the day(s) of the week, the start time and the end time, then hit Add.<br />
You will see your changes go into effec effect t within 30 minutes. Again, you must logoff and re-enter re<br />
the system for these changes to take effect, or they will take effect the next time you log in. (No<br />
entry allows access at any time.)<br />
<strong>MyAccount</strong> Control Panel<br />
<strong>User</strong> <strong>Manual</strong><br />
40<br />
130 N 4 th Street,Macclenny, FL 32063<br />
Version: 2.4
Email Settings<br />
130 N 4 th Street,Macclenny, FL 32063<br />
In the Email Settings panel, you have the ability to set-up email aliases, email forwards, alternate<br />
email addresses for Bulletins, and vacation messages, as well as opt-out of bulletin emails.<br />
reserves the right to make these controls available to you or manage them on your<br />
behalf. Upon clicking on the Email Settings link, you will see a screen like the one below:<br />
The Email Alias section above allows you to add up to 100 addresses for which email arrives at<br />
your one main account. For example, if your userid is “Bob” and you make an alias called “Jim”,<br />
any mail sent to “Jim@domain.com” will be delivered to your “Bob@domain.com” account.<br />
In the section labeled “Forward all mail to:” above, you can insert a new address for which you<br />
would like all email sent to your email address to be forwarded to. A number of options like<br />
keeping a copy of your email on the server, etc. are available. To remove a forwarder or alias,<br />
simply delete it, then click on Save.<br />
You can create an Alternate email address for delivering bulletin messages, as well as opt-out of<br />
Bulletins using the checkbox above Save.<br />
You can create a vacation message by inputting a message in the box and clicking active. Your<br />
vacation message will be sent once to each person that sends you email while the vacation<br />
message is active. Remember to select Save to implement changes to all panel settings.<br />
<strong>MyAccount</strong> Control Panel<br />
41<br />
<strong>User</strong> <strong>Manual</strong> Version: 2.4
MySecurity<br />
130 N 4 th Street,Macclenny, FL 32063<br />
In order to make your <strong>Internet</strong> experience safer and less risky, has introduced<br />
MySecurity, enabled by ZoneAlarm <strong>Internet</strong> Security Suite, provided by ZoneLabs, an independent<br />
software package. It can be accessed from the <strong>MyAccount</strong> Home page by selecting the<br />
MySecurity link. A screen with your license key will be displayed and you will be sent an email with<br />
this license key that must be entered during installation of the software. Save this email for future<br />
reference. (The license key is also displayed on the <strong>MyAccount</strong> Home page.)<br />
The install process will activate a Configuration Wizard that will help configure your security suite.<br />
Select Help in the upper-right corner of the user interface or right click the Zone Labs Icon in the<br />
system tray and choose Help if you need help understanding how to use ZoneAlarm Security Suite.<br />
You can also download a user manual by selecting the Download the <strong>User</strong> <strong>Manual</strong> link.<br />
Downloading this product may result in incremental charges. It is usually not necessary to Contact<br />
Customer Service to activate this feature. Contact Customer Service if you have any questions<br />
about using this service or questions regarding billing for this service. If you decide to no longer use<br />
this product, it is recommended that you disable your license key by selecting the Disable button.<br />
ZoneAlarm provides PC users with the following:<br />
• Triple Defense Firewall – makes your computer invisible to <strong>Internet</strong> users, blocks hackers,<br />
and protects your programs and operating system from malicious programs and worms<br />
• Anti-Spyware/anti-virus – automatically updates, scans and removes Spyware viruses and<br />
worms in a single operation, clears legitimate monitoring software (cookies) so they do not<br />
get picked up in spyware scans<br />
• SmartDefense Advisor – automatically distributes new spyware and virus signatures to your<br />
PC for up-to-date protection<br />
• Identity and Privacy Protection – prevents your personal data from leaving your computer<br />
without your approval and automatically stops pop-up ads<br />
• IM Protection – protects your instant messages so they cannot be monitored<br />
• Automatically detects wireless networks and secures your PC from hackers<br />
<strong>MyAccount</strong> Control Panel<br />
42<br />
<strong>User</strong> <strong>Manual</strong> Version: 2.4
Remote Network Storage<br />
130 N 4 th Street,Macclenny, FL 32063<br />
Storing critical files on the network reduces the risk or impact of malicious attacks, viruses,<br />
hardware problems, accidental deletion and lost or damaged equipment. Remote<br />
Network Storage provides a safe and secure storage facility on a network server for storing text<br />
documents, photos, web pages, spreadsheets and other files. combines the security<br />
of network storage with the convenience of a local drive. Once is enabled, the<br />
network drive is accessible from within applications just like a local drive on your computer. You<br />
can drag and drop or copy files to or from the network drive server using Windows Explorer or<br />
using DOS commands or Save/Save-as commands within many applications. Searches can also<br />
be extended to network drives. can also be accessed via <strong>MyAccount</strong> by selecting<br />
the Manage button, providing ftp access from anywhere to your files<br />
similar to the Manage Website button. Upload file size is limited to 20MB on this interface.<br />
Backups can be scheduled and run automatically using the File Transfer Manager, and full or<br />
incremental backups are supported. makes using remote storage quick, easy, and<br />
reliable. allows users to securely transfer, store and access files, without having to<br />
learn a new application. FTPS using Secure Sockets Layer (SSL) is supported by by<br />
creating an encrypted “tunnel” through which FTP transfers data. Secure FTP or SFTP is also<br />
supported by and provides 128-bit encryption of all transmitted data. Server side<br />
support is required for both of these secure protocols. These capabilities are dependent upon<br />
Operating Systems, SSL certificates for domains as well as other factors and may not be available<br />
for all users. Contact Customer Service if you are interested in ensuring you have this capability.<br />
Downloading the Client<br />
Selecting the link on the <strong>MyAccount</strong> Control Panel will display the System<br />
Requirements/Download page shown below. Selecting the Download link will begin the<br />
download process. Versions of Windows Operating systems not shown on the System<br />
Requirements page will not work with . It is recommended that you upgrade<br />
to a supported Operating System in order to use this product. It is necessary to contact<br />
Customer Service to activate this product. Be sure and ask about a number of storage<br />
capacities that are available. This product may incur additional billing when used.<br />
<strong>MyAccount</strong> Control Panel<br />
43<br />
<strong>User</strong> <strong>Manual</strong> Version: 2.4
Installing the Client<br />
130 N 4 th Street,Macclenny, FL 32063<br />
After selecting the download box, you will be asked if you want to run or save the installer<br />
application. Select Run or Save. If Run is selected, the installer will begin and open the<br />
Install Wizard. If Save is selected, the installer file will be downloaded to the location<br />
specified in the Save As dialog box. Once saved, locate the installer application and<br />
double click on it to begin the install process. The installer application is typically named<br />
setupXYZ.exe, where XYZ refers to the version of the Windows Operating system supported<br />
by the installer.<br />
The Install Wizard will prompt you for the folder destination to install the <br />
program files. You can browse to select the folder for the installation and then click on<br />
Next to install or click on Cancel to exit the Install Wizard. The Install Wizard will copy the<br />
program files to the destination folder and then install the program. A restart is required to<br />
activate the application.<br />
The Install Wizard will also create shortcuts in the Start Menu\All Programs\<br />
folder for and Uninstall . Select the shortcut to run the program.<br />
The Uninstall shortcut is used to uninstall the program, should this be required.<br />
Starting <br />
When the program is initiated for the first time by selecting the program icon<br />
in the Start Menu Programs list, system tray, or double clicking the shortcut, the following<br />
screen is shown: (Your <strong>User</strong>id will be displayed in the <strong>User</strong>name field.)<br />
This screen serves several functions as detailed below:<br />
<strong>MyAccount</strong> Control Panel<br />
44<br />
<strong>User</strong> <strong>Manual</strong> Version: 2.4
Using <br />
130 N 4 th Street,Macclenny, FL 32063<br />
• Allow access to network storage functionality through your full email username and<br />
password. (This functionality must be activated by Customer Service.)<br />
• Selecting the Drive letter associated with the network drive from the drop down<br />
menu (Typically, letters D thru Z can be assigned as the drive designator.)<br />
• Selecting whether you want the drive to connect at system startup by clicking on<br />
this checkbox. This will connect the drive each time your system starts or restarts.<br />
• Select whether you want SSL (Secure Sockets Layer) protocol used in file transfers<br />
by clicking on this checkbox.<br />
• Access to General settings for the network storage application by clicking on the<br />
Settings tab (It is recommended to leave these settings at their default values.)<br />
• Access to Advanced settings for the network storage application by clicking on the<br />
Advanced tab (It is recommended to leave these settings at their default values.)<br />
• When the username, password, and drive letter selections are complete, and<br />
choices are made for Connection at startup, SSL encryption, General, and<br />
Advanced Settings, click on Connect to connect the network drive and finish the<br />
initiation of the program.<br />
If users elect not to have the network drive connect on system start-up, they can connect<br />
the drive by selecting the Start Menu, All Programs, and the program icon<br />
from the program list to connect the drive. The same starting network storage connection<br />
screen above will appear. The username and password will already be populated and<br />
should not be re-input unless a change is required (Your <strong>User</strong>id will be displayed in the<br />
<strong>User</strong>name field.) The same selections are available for Connection at startup, SSL<br />
encryption, General, and Advanced settings. Click on Connect to connect the drive.<br />
Alternatively, you can access your files by selecting the Manage<br />
link on <strong>MyAccount</strong>, similar to the Manage Website link. This link can provide<br />
ftp access to your files remotely from the Web. See the Manage Website<br />
section above for details about using this interface.<br />
The network drive will appear in most Windows applications when users select a Save As<br />
function and can be chosen as the target drive for saving files or creating folders. The<br />
network drive is available for file and directory manipulation using DOS commands. The<br />
network drive is also available for most search applications and will display folders or files<br />
matching the search criteria.<br />
<strong>MyAccount</strong> Control Panel<br />
45<br />
<strong>User</strong> <strong>Manual</strong> Version: 2.4
130 N 4 th Street,Macclenny, FL 32063<br />
The network drive will appear when the user selects My Computer to display other hard disk<br />
drives and devices with removable storage (Hard Drive/CD/DVD/Floppy drives**). Files<br />
and folders can be “dragged and dropped” onto the drive icon to create copies of these<br />
files and folders on the network drive.<br />
** Note: (100GB free space for network storage is shown incorrectly in these screens and is<br />
a function of how the Windows Operating System interacts with network drives. Actual<br />
capacity will be determined by the network storage package/offering.<br />
We hope you find this to be a safe, secure and convenient method of using network<br />
storage to reduce the risk of lost, deleted or damaged information by scheduling<br />
automatic backups of your critical files.<br />
Contact Customer Service if you have additional questions.<br />
<strong>MyAccount</strong> Control Panel<br />
46<br />
<strong>User</strong> <strong>Manual</strong> Version: 2.4
MySupport (PC Diagnostics)<br />
130 N 4 th Street,Macclenny, FL 32063<br />
MySupport is a desktop application designed to detect and correct common computer<br />
networking and connectivity issues without the need to call into a Technical Support Center or<br />
Help Desk. MySupport can run in the background and monitor connectivity, or can be invoked<br />
when problems occur. MySupport runs a series of tests on your computer to ensure that all systems<br />
are running properly, and can provide the status of your computer using a series of Global Status<br />
ID’s (GSID’s) and a decoder (Help Desk use only) that translates these GSID’s into specific<br />
computer or connectivity problem descriptions.<br />
Within MySupport you are able to perform tasks such as add, modify and delete email accounts in<br />
variety of supported email clients, retrieve system and network information, request an online Chat<br />
session with a Help Desk Agent, request a remote Desktop Assistance session with a Help Desk<br />
Agent, view ISP news and alerts, and see the status of your home network and modem.<br />
Additionally, MySupport will also help restore <strong>Internet</strong> connectivity and repair email account<br />
settings automatically, or through guided help suggestions.<br />
System Requirements<br />
MySupport is designed to work with the following Operating Systems: Windows® 2000 Professional,<br />
Windows® XP platforms, and Windows® Vista, (32 and 64 bit), and Windows® 7 (32 and 64 bit.)<br />
MySupport requires that <strong>Internet</strong> Explorer 6.0 or later be installed and that the latest service pack(s)<br />
be installed to ensure full functionality. The main MySupport interface is shown below:<br />
<strong>MyAccount</strong> Control Panel<br />
47<br />
<strong>User</strong> <strong>Manual</strong> Version: 2.4
Installing MySupport<br />
130 N 4 th Street,Macclenny, FL 32063<br />
Select the MySupport link on your <strong>MyAccount</strong> Control Panel and you will be taken to the<br />
download page for MySupport. Select the Download tab and follow the instructions in the<br />
installation wizard to complete the installation. A desktop icon is created for easy access upon<br />
installation. In order to run the MySupport program, double-click the MySupport desktop icon.<br />
During the installation process you will have the option of selecting to run MySupport when<br />
Windows starts. This is required in order for MySupport to solve email, networking and various other<br />
system issues automatically. Otherwise, you can start MySupport by double-clicking the desktop<br />
icon when issues arise. (This method will consume less of your computer’s resources on an ongoing<br />
basis, but you lose some of the auto response corrective actions until the program is initiated.)<br />
System Tests<br />
Once MySupport is activated, it will run a series of tests to determine if the computer is in good<br />
working order and it will continue to run these tests on a periodic basis. These four tests are<br />
Computer Details, E-mail tests, Network Tests, and Modem Status. It is therefore recommended<br />
that your computer and email programs be in good working condition when you download the<br />
MySupport software and initiate the program so that a valid initial test run can be completed.<br />
MySupport Banner<br />
The top banner of MySupport is used to provide feedback to the end user with regards to the<br />
outcome of the above tests. When the top banner is Green, it means there are no system issues,<br />
when it is Yellow it means that some system items are at warning levels and when it is Red it means<br />
that the tests have resulted in a critical error. For example, if you receive a Red banner error, you<br />
can click on the Solutions Center Details links to gather details on the system warnings and errors,<br />
as shown in the figure below. Note the GSID shown in the lower right hand corner of the Banner:<br />
MySupport Help Files<br />
Additional information about the use of MySupport, requesting a Chat session or a Remote<br />
Desktop support session, viewing status of your modem or network is available from the Help file on<br />
the MySupport Download page. Click on the Help Link to display the MySupport Help file.<br />
<strong>MyAccount</strong> Control Panel<br />
48<br />
<strong>User</strong> <strong>Manual</strong> Version: 2.4
Using Accelerated Dialup with <br />
130 N 4 th Street,Macclenny, FL 32063<br />
With , you can now surf at near DSL speeds and still keep your low cost dialup<br />
connection. This service speeds up your <strong>Internet</strong> experience by up to five times, using your existing<br />
dialup phone line and modem at just a fraction of the cost of DSL. Contact or log in<br />
to www. for pricing and availability of in your area.<br />
This high speed solution with the convenience of dialup is easy to install, runs seamlessly and<br />
doesn’t alter any of your existing software. The compression process allows a smaller amount of<br />
data to be sent, up to five times smaller in some cases, making the download time of your web<br />
pages and your online experience that much faster.<br />
In addition to accelerating web pages, images, animations, and email, is<br />
bundled with a pop-up blocker and an integrated diagnostic support tool.<br />
Getting Started<br />
Install<br />
Download<br />
service is enabled by downloading a program from the <br />
website. To download the program, visit www. and click on the link<br />
associated with . You may be required to contact the Customer<br />
Service department to activate this service.<br />
Follow the instructions for installing the program. Once the installation finishes you will be<br />
prompted for a userid and password. The userid should be in the form of your full email<br />
address. Enter your email userid and password. In order to avoid having to keep entering<br />
your userid and password each time, ensure that the Save password box is checked (if<br />
your Operating System supports this feature.)<br />
Starting <br />
is automatically started when your computer starts up.<br />
Acceleration will begin as soon as a supported browser (such as <strong>Internet</strong> Explorer or<br />
Netscape) or a supported email client (such as Microsoft Outlook or Eudora) is started.<br />
On some Windows platforms a bubble icon will appear when service<br />
has been established. On other Windows platforms, you can verify that<br />
has been established by hovering over the system tray icon (you<br />
should see a "Service Enabled..." message).<br />
Using <br />
Browse the web or download email as you normally would. Your web and email access<br />
will be automatically accelerated. If you desire to stop the application, right click the<br />
system tray icon and select Stop from the pop-up menu, or if you desire to exit the<br />
application completely, click Exit from the pop-up menu.<br />
<strong>MyAccount</strong> Control Panel<br />
49<br />
<strong>User</strong> <strong>Manual</strong> Version: 2.4
Roaming<br />
130 N 4 th Street,Macclenny, FL 32063<br />
Tired of traveling with no access to the <strong>Internet</strong>? We’ve got you covered. Roaming allows you to<br />
access your <strong>Internet</strong> services while traveling or when you are away from your home or business<br />
connections. Several types of roaming may be available and are reviewed below. Contact<br />
or log in to www. for pricing and availability of Roaming Access<br />
services in your area. You may be required to contact the Customer Service department to<br />
activate either of these services.<br />
National Roaming<br />
With National Roaming, you can now travel all over the country with access to local dialup<br />
numbers anywhere in the United States! Remember, even while roaming, to log in, you must use<br />
your full email address and password.<br />
Before you leave your local service area, please visit ’s website or log in to<br />
www. and click on the Roaming or Remote Access link. You will then see the<br />
map of the United States below:<br />
<strong>MyAccount</strong> Control Panel<br />
50<br />
<strong>User</strong> <strong>Manual</strong> Version: 2.4
130 N 4 th Street,Macclenny, FL 32063<br />
The coverage map above will help you determine the local dialup number you will need to use<br />
while traveling. To find the number for your location you can do one of three things:<br />
Interactive Map Search:<br />
Click on the state in which you wish to find a local access number. If available, the<br />
numbers will be listed as in the example below.<br />
Search By Area Code:<br />
Select an area code from the drop-down list and click Go! to view a listing of all access<br />
numbers in that area code.<br />
Search By State:<br />
Select a state from the drop-down list and click Go! to view a listing of all access numbers<br />
in that state.<br />
Roaming Access via 800 Number<br />
Roaming access via an 800 number will also enable traveling subscribers to access their email<br />
account(s) while away from their home or business connections. Contact or log in<br />
to www. for pricing and availability of Roaming Access services in your area.<br />
You may be required to contact the Customer Service department to activate this service. Again<br />
remember, to log in, you must use your full email address and password.<br />
<strong>MyAccount</strong> Control Panel<br />
51<br />
<strong>User</strong> <strong>Manual</strong> Version: 2.4
Bandwidth Speed Test<br />
130 N 4 th Street,Macclenny, FL 32063<br />
Ever wonder what kind of speed you are really getting? With Speed Test you can find out easily<br />
and quickly by running a test on your upload and download connection speeds. Here’s how….<br />
First enable JavaScript in your Web Browser settings. To access the speed test, you must visit the<br />
following website: http://speedtest., or click the Speedtest link on <strong>MyAccount</strong>.<br />
You must enter in your email address and click on Go! (This may be optional.) Once your email<br />
address is verified, you will see the following screen:<br />
Select Begin Test and the Speed Test will begin calculating your download and upload speeds.<br />
<strong>MyAccount</strong> Control Panel<br />
52<br />
<strong>User</strong> <strong>Manual</strong> Version: 2.4
130 N 4 th Street,Macclenny, FL 32063<br />
Speed Test will display a “Tachometer” and test results while your download and upload speeds<br />
are analyzed.<br />
When the Speed Test is complete, the screen below will be displayed showing your download<br />
and upload speeds and allowing you to initiate a speed test from another network in your<br />
geographic region or to restart the local test by selecting Restart.<br />
This third party software may contain links to additional services not associated with your <strong>Internet</strong><br />
service provider.<br />
<strong>MyAccount</strong> Control Panel<br />
53<br />
<strong>User</strong> <strong>Manual</strong> Version: 2.4
Additional Resources<br />
130 N 4 th Street,Macclenny, FL 32063<br />
Log in to for further information regarding your email and <strong>Internet</strong> services.<br />
You can contact our Customer Service department at .<br />
For technical support questions regarding your email or <strong>Internet</strong> services, contact our<br />
at .<br />
<strong>User</strong>id and Password Attributes<br />
The following attributes represent the acceptable parameters for <strong>User</strong>id’s and passwords.<br />
<strong>User</strong>id’s<br />
Passwords<br />
<strong>User</strong>id’s must be at least 2, but not more than 20 characters in length. (No spaces)<br />
<strong>User</strong>id’s may only contain the following characters:<br />
Letters A thru Z,<br />
Digits 0-9<br />
Underscore (_)<br />
Dash (-)<br />
Period or Dot (.),<br />
<strong>User</strong>id’s may not begin or end with dot, dash or underscore.<br />
Upper and lower case <strong>User</strong>id’s will be accepted, but any uppercase characters will<br />
converted to lowercase automatically. Many email systems only accept lower case<br />
email addresses or convert them to lower case. (Since our systems use the email address<br />
as the userid, this convention ensures that Bob@domain.com and bob@domain.com do<br />
not get each others email.)<br />
Passwords must be at least 2 but no more than 16 charters in length. (No spaces)<br />
Passwords are case sensitive. Case matching will be enforced for passwords.<br />
Passwords may only contain the following characters:<br />
Letters A thru Z,<br />
Digits 0-9<br />
Special Characters: The following special characters are NOT ALLOWED in passwords:<br />
Spaces, Single Quotes (Apostrophes), Colons, Semicolons, and Equal Signs<br />
Other special characters are generally accepted in passwords.<br />
<strong>MyAccount</strong> Control Panel<br />
54<br />
<strong>User</strong> <strong>Manual</strong> Version: 2.4