AutoScan Spectrophotometer Instrument Operator's Manual - X-Rite
AutoScan Spectrophotometer Instrument Operator's Manual - X-Rite
AutoScan Spectrophotometer Instrument Operator's Manual - X-Rite

You also want an ePaper? Increase the reach of your titles
YUMPU automatically turns print PDFs into web optimized ePapers that Google loves.
4<br />
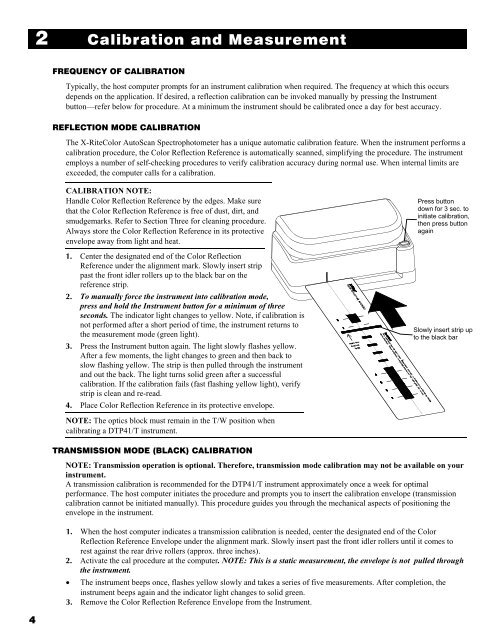
2 Calibration and Measurement<br />
FREQUENCY OF CALIBRATION<br />
Typically, the host computer prompts for an instrument calibration when required. The frequency at which this occurs<br />
depends on the application. If desired, a reflection calibration can be invoked manually by pressing the <strong>Instrument</strong><br />
button—refer below for procedure. At a minimum the instrument should be calibrated once a day for best accuracy.<br />
REFLECTION MODE CALIBRATION<br />
The X-<strong>Rite</strong>Color <strong>AutoScan</strong> <strong>Spectrophotometer</strong> has a unique automatic calibration feature. When the instrument performs a<br />
calibration procedure, the Color Reflection Reference is automatically scanned, simplifying the procedure. The instrument<br />
employs a number of self-checking procedures to verify calibration accuracy during normal use. When internal limits are<br />
exceeded, the computer calls for a calibration.<br />
CALIBRATION NOTE:<br />
Handle Color Reflection Reference by the edges. Make sure<br />
that the Color Reflection Reference is free of dust, dirt, and<br />
smudgemarks. Refer to Section Three for cleaning procedure.<br />
Always store the Color Reflection Reference in its protective<br />
envelope away from light and heat.<br />
1. Center the designated end of the Color Reflection<br />
Reference under the alignment mark. Slowly insert strip<br />
past the front idler rollers up to the black bar on the<br />
reference strip.<br />
2. To manually force the instrument into calibration mode,<br />
press and hold the <strong>Instrument</strong> button for a minimum of three<br />
seconds. The indicator light changes to yellow. Note, if calibration is<br />
not performed after a short period of time, the instrument returns to<br />
the measurement mode (green light).<br />
3. Press the <strong>Instrument</strong> button again. The light slowly flashes yellow.<br />
After a few moments, the light changes to green and then back to<br />
slow flashing yellow. The strip is then pulled through the instrument<br />
and out the back. The light turns solid green after a successful<br />
calibration. If the calibration fails (fast flashing yellow light), verify<br />
strip is clean and re-read.<br />
4. Place Color Reflection Reference in its protective envelope.<br />
NOTE: The optics block must remain in the T/W position when<br />
calibrating a DTP41/T instrument.<br />
Press button<br />
down for 3 sec. to<br />
initiate calibration,<br />
then press button<br />
again<br />
Slowly insert strip up<br />
to the black bar<br />
TRANSMISSION MODE (BLACK) CALIBRATION<br />
NOTE: Transmission operation is optional. Therefore, transmission mode calibration may not be available on your<br />
instrument.<br />
A transmission calibration is recommended for the DTP41/T instrument approximately once a week for optimal<br />
performance. The host computer initiates the procedure and prompts you to insert the calibration envelope (transmission<br />
calibration cannot be initiated manually). This procedure guides you through the mechanical aspects of positioning the<br />
envelope in the instrument.<br />
1. When the host computer indicates a transmission calibration is needed, center the designated end of the Color<br />
Reflection Reference Envelope under the alignment mark. Slowly insert past the front idler rollers until it comes to<br />
rest against the rear drive rollers (approx. three inches).<br />
2. Activate the cal procedure at the computer. NOTE: This is a static measurement, the envelope is not pulled through<br />
the instrument.<br />
• The instrument beeps once, flashes yellow slowly and takes a series of five measurements. After completion, the<br />
instrument beeps again and the indicator light changes to solid green.<br />
3. Remove the Color Reflection Reference Envelope from the <strong>Instrument</strong>.