Hiniker 700 Manual - Snow Plow Stuff
Hiniker 700 Manual - Snow Plow Stuff
Hiniker 700 Manual - Snow Plow Stuff

You also want an ePaper? Increase the reach of your titles
YUMPU automatically turns print PDFs into web optimized ePapers that Google loves.
Check that the plow headlamps and turn signals<br />
are operational, and headlamps are aimed correctly.<br />
Test the lift and angling cylinders in a safe<br />
area before using the plow.<br />
To make alignment of the plow easier in the future,<br />
mark a point on the back of the headlamp, a point<br />
on the hood near the front of the truck and a point<br />
on the windshield that are in line when you are<br />
seated behind the steering wheel. Line up these<br />
three points when driving into the plow.<br />
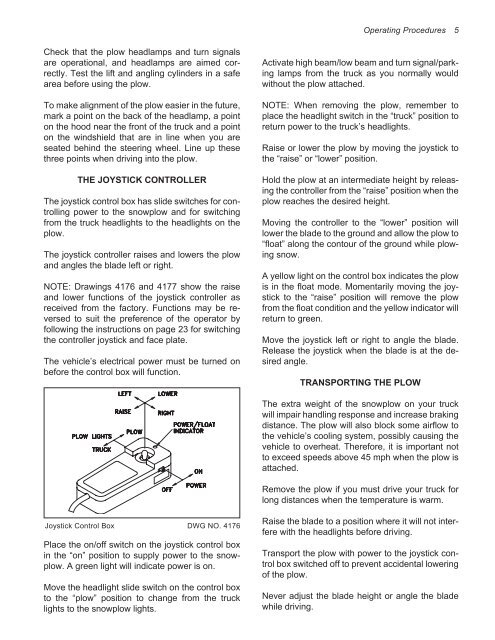
THE JOYSTICK CONTROLLER<br />
The joystick control box has slide switches for controlling<br />
power to the snowplow and for switching<br />
from the truck headlights to the headlights on the<br />
plow.<br />
The joystick controller raises and lowers the plow<br />
and angles the blade left or right.<br />
NOTE: Drawings 4176 and 4177 show the raise<br />
and lower functions of the joystick controller as<br />
received from the factory. Functions may be reversed<br />
to suit the preference of the operator by<br />
following the instructions on page 23 for switching<br />
the controller joystick and face plate.<br />
The vehicle’s electrical power must be turned on<br />
before the control box will function.<br />
Joystick Control Box DWG NO. 4176<br />
Place the on/off switch on the joystick control box<br />
in the “on” position to supply power to the snowplow.<br />
A green light will indicate power is on.<br />
Move the headlight slide switch on the control box<br />
to the “plow” position to change from the truck<br />
lights to the snowplow lights.<br />
Operating Procedures 5<br />
Activate high beam/low beam and turn signal/parking<br />
lamps from the truck as you normally would<br />
without the plow attached.<br />
NOTE: When removing the plow, remember to<br />
place the headlight switch in the “truck” position to<br />
return power to the truck’s headlights.<br />
Raise or lower the plow by moving the joystick to<br />
the “raise” or “lower” position.<br />
Hold the plow at an intermediate height by releasing<br />
the controller from the “raise” position when the<br />
plow reaches the desired height.<br />
Moving the controller to the “lower” position will<br />
lower the blade to the ground and allow the plow to<br />
“float” along the contour of the ground while plowing<br />
snow.<br />
A yellow light on the control box indicates the plow<br />
is in the float mode. Momentarily moving the joystick<br />
to the “raise” position will remove the plow<br />
from the float condition and the yellow indicator will<br />
return to green.<br />
Move the joystick left or right to angle the blade.<br />
Release the joystick when the blade is at the desired<br />
angle.<br />
TRANSPORTING THE PLOW<br />
The extra weight of the snowplow on your truck<br />
will impair handling response and increase braking<br />
distance. The plow will also block some airflow to<br />
the vehicle’s cooling system, possibly causing the<br />
vehicle to overheat. Therefore, it is important not<br />
to exceed speeds above 45 mph when the plow is<br />
attached.<br />
Remove the plow if you must drive your truck for<br />
long distances when the temperature is warm.<br />
Raise the blade to a position where it will not interfere<br />
with the headlights before driving.<br />
Transport the plow with power to the joystick control<br />
box switched off to prevent accidental lowering<br />
of the plow.<br />
Never adjust the blade height or angle the blade<br />
while driving.