CRAFTSMAN COFFEE TABLE - Woodsmith Shop
CRAFTSMAN COFFEE TABLE - Woodsmith Shop
CRAFTSMAN COFFEE TABLE - Woodsmith Shop
You also want an ePaper? Increase the reach of your titles
YUMPU automatically turns print PDFs into web optimized ePapers that Google loves.
End Frames<br />
Broken into its basic parts, the coffee<br />
table is nothing more than a couple<br />
of end frames joined by a top and a<br />
shelf. And each end frame contains<br />
a pair of legs, a pair of end rails, and<br />
a row of spindles. I started building<br />
these frames by making the legs.<br />
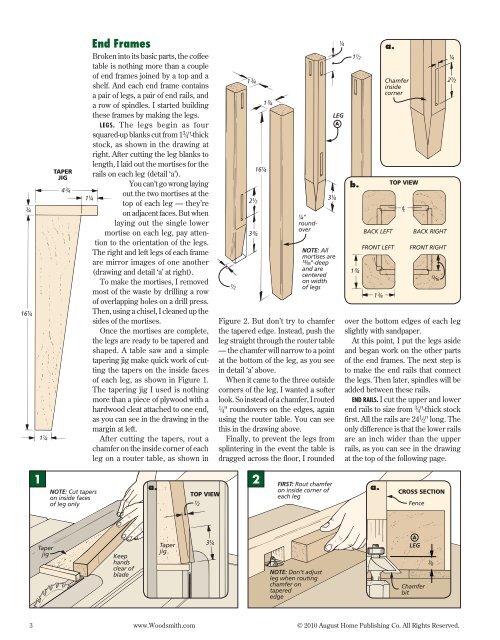
LEGS. The legs begin as four<br />
squared-up blanks cut from 1 3 ⁄4"-thick<br />
stock, as shown in the drawing at<br />
right. After cutting the leg blanks to<br />
length, I laid out the mortises for the<br />
rails on each leg (detail ‘a’).<br />
You can’t go wrong laying<br />
out the two mortises at the<br />
top of each leg — they’re<br />
on adjacent faces. But when<br />
laying out the single lower<br />
mortise on each leg, pay attention<br />
to the orientation of the legs.<br />
The right and left legs of each frame<br />
are mirror images of one another<br />
(drawing and detail ‘a’ at right).<br />
To make the mortises, I removed<br />
most of the waste by drilling a row<br />
of overlapping holes on a drill press.<br />
Then, using a chisel, I cleaned up the<br />
sides of the mortises.<br />
Once the mortises are complete,<br />
the legs are ready to be tapered and<br />
shaped. A table saw and a simple<br />
tapering jig make quick work of cutting<br />
the tapers on the inside faces<br />
of each leg, as shown in Figure 1.<br />
The tapering jig I used is nothing<br />
more than a piece of plywood with a<br />
hardwood cleat attached to one end,<br />
as you can see in the drawing in the<br />
margin at left.<br />
After cutting the tapers, rout a<br />
chamfer on the inside corner of each<br />
leg on a router table, as shown in<br />
Figure 2. But don’t try to chamfer<br />
the tapered edge. Instead, push the<br />
leg straight through the router table<br />
— the chamfer will narrow to a point<br />
at the bottom of the leg, as you see<br />
in detail ‘a’ above.<br />
When it came to the three outside<br />
corners of the leg, I wanted a softer<br />
look. So instead of a chamfer, I routed<br />
1 ⁄4" roundovers on the edges, again<br />
using the router table. You can see<br />
this in the drawing above.<br />
Finally, to prevent the legs from<br />
splintering in the event the table is<br />
dragged across the floor, I rounded<br />
1 2<br />
a. a.<br />
over the bottom edges of each leg<br />
slightly with sandpaper.<br />
At this point, I put the legs aside<br />
and began work on the other parts<br />
of the end frames. The next step is<br />
to make the end rails that connect<br />
the legs. Then later, spindles will be<br />
added between these rails.<br />
END RAILS. I cut the upper and lower<br />
end rails to size from 3 ⁄4"-thick stock<br />
first. All the rails are 24 1 ⁄2" long. The<br />
only difference is that the lower rails<br />
are an inch wider than the upper<br />
rails, as you can see in the drawing<br />
at the top of the following page.<br />
3 www.<strong>Woodsmith</strong>.com © 2010 August Home Publishing Co. All Rights Reserved.<br />
b.<br />
a.


