CRAFTSMAN COFFEE TABLE - Woodsmith Shop
CRAFTSMAN COFFEE TABLE - Woodsmith Shop
CRAFTSMAN COFFEE TABLE - Woodsmith Shop

Create successful ePaper yourself
Turn your PDF publications into a flip-book with our unique Google optimized e-Paper software.
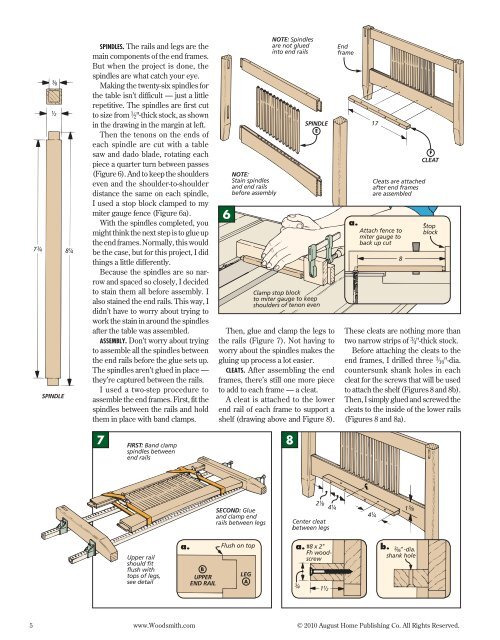
SPINDLES. The rails and legs are the<br />
main components of the end frames.<br />
But when the project is done, the<br />
spindles are what catch your eye.<br />
Making the twenty-six spindles for<br />
the table isn’t difficult — just a little<br />
repetitive. The spindles are first cut<br />
to size from 1 ⁄2"-thick stock, as shown<br />
in the drawing in the margin at left.<br />
Then the tenons on the ends of<br />
each spindle are cut with a table<br />
saw and dado blade, rotating each<br />
piece a quarter turn between passes<br />
(Figure 6). And to keep the shoulders<br />
even and the shoulder-to-shoulder<br />
distance the same on each spindle,<br />
I used a stop block clamped to my<br />
miter gauge fence (Figure 6a).<br />
With the spindles completed, you<br />
might think the next step is to glue up<br />
the end frames. Normally, this would<br />
be the case, but for this project, I did<br />
things a little differently.<br />
Because the spindles are so narrow<br />
and spaced so closely, I decided<br />
to stain them all before assembly. I<br />
also stained the end rails. This way, I<br />
didn’t have to worry about trying to<br />
work the stain in around the spindles<br />
after the table was assembled.<br />
ASSEMBLY. Don’t worry about trying<br />
to assemble all the spindles between<br />
the end rails before the glue sets up.<br />
The spindles aren’t glued in place —<br />
they’re captured between the rails.<br />
I used a two-step procedure to<br />
assemble the end frames. First, fit the<br />
spindles between the rails and hold<br />
them in place with band clamps.<br />
7<br />
a.<br />
6<br />
Then, glue and clamp the legs to<br />
the rails (Figure 7). Not having to<br />
worry about the spindles makes the<br />
gluing up process a lot easier.<br />
CLEATS. After assembling the end<br />
frames, there’s still one more piece<br />
to add to each frame — a cleat.<br />
A cleat is attached to the lower<br />
end rail of each frame to support a<br />
shelf (drawing above and Figure 8).<br />
5 www.<strong>Woodsmith</strong>.com © 2010 August Home Publishing Co. All Rights Reserved.<br />
8<br />
a.<br />
a.<br />
These cleats are nothing more than<br />
two narrow strips of 3 ⁄4"-thick stock.<br />
Before attaching the cleats to the<br />
end frames, I drilled three 3 ⁄16"-dia.<br />
countersunk shank holes in each<br />
cleat for the screws that will be used<br />
to attach the shelf (Figures 8 and 8b).<br />
Then, I simply glued and screwed the<br />
cleats to the inside of the lower rails<br />
(Figures 8 and 8a).<br />
b.