Revere Fireplace Insert Owner's Manual - Lopi
Revere Fireplace Insert Owner's Manual - Lopi
Revere Fireplace Insert Owner's Manual - Lopi

You also want an ePaper? Increase the reach of your titles
YUMPU automatically turns print PDFs into web optimized ePapers that Google loves.
10 Stove Installation (for qualified installers only)<br />
Hearth Requirements<br />
Must extend in front of the insert and on both sides (see <strong>Insert</strong> Placement Requirements for details)<br />
Must be non-combustible and at least .018" thick (26 gauge)<br />
Drafting Performance<br />
This appliance relies upon natural draft to operate. External forces, such as wind, barometric pressure, topography,<br />
or factors of the home (negative pressure from exhaust fans, chimneys, air infiltration, etc.), may adversely affect<br />
draft. Travis Industries cannot be responsible for external forces leading to less than optimal performance.<br />
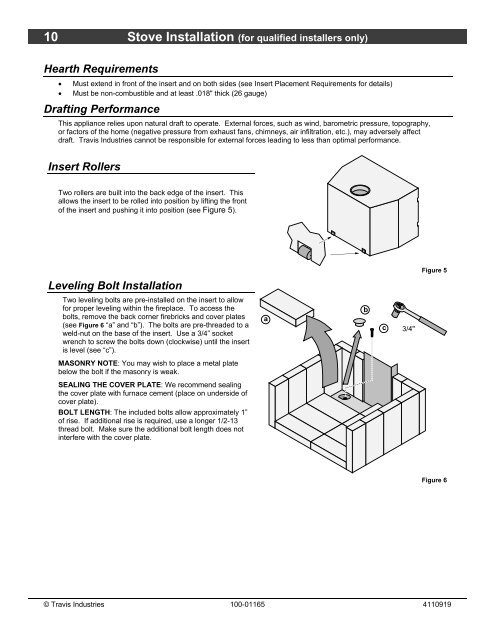
<strong>Insert</strong> Rollers<br />
Two rollers are built into the back edge of the insert. This<br />
allows the insert to be rolled into position by lifting the front<br />
of the insert and pushing it into position (see Figure 5).<br />
Leveling Bolt Installation<br />
Two leveling bolts are pre-installed on the insert to allow<br />
for proper leveling within the fireplace. To access the<br />
bolts, remove the back corner firebricks and cover plates<br />
(see Figure 6 “a” and “b”). The bolts are pre-threaded to a<br />
weld-nut on the base of the insert. Use a 3/4” socket<br />
wrench to screw the bolts down (clockwise) until the insert<br />
is level (see “c”).<br />
MASONRY NOTE: You may wish to place a metal plate<br />
below the bolt if the masonry is weak.<br />
SEALING THE COVER PLATE: We recommend sealing<br />
the cover plate with furnace cement (place on underside of<br />
cover plate).<br />
BOLT LENGTH: The included bolts allow approximately 1”<br />
of rise. If additional rise is required, use a longer 1/2-13<br />
thread bolt. Make sure the additional bolt length does not<br />
interfere with the cover plate.<br />
Figure 5<br />
Figure 6<br />
© Travis Industries 100-01165 4110919<br />
a<br />
b<br />
c 3/4"