Revere Fireplace Insert Owner's Manual - Lopi
Revere Fireplace Insert Owner's Manual - Lopi
Revere Fireplace Insert Owner's Manual - Lopi

You also want an ePaper? Increase the reach of your titles
YUMPU automatically turns print PDFs into web optimized ePapers that Google loves.
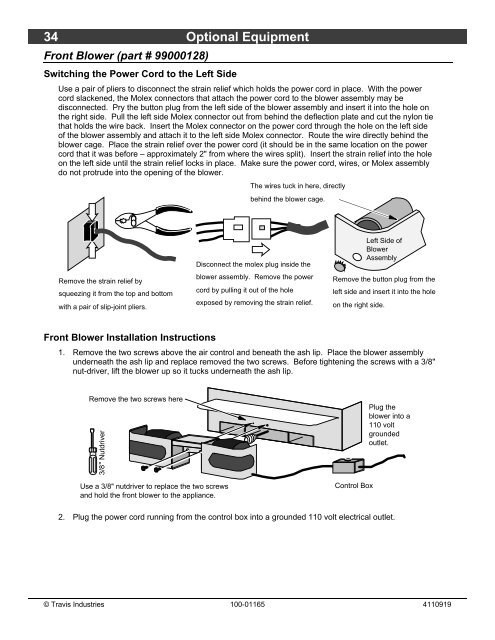
34 Optional Equipment<br />
Front Blower (part # 99000128)<br />
Switching the Power Cord to the Left Side<br />
Use a pair of pliers to disconnect the strain relief which holds the power cord in place. With the power<br />
cord slackened, the Molex connectors that attach the power cord to the blower assembly may be<br />
disconnected. Pry the button plug from the left side of the blower assembly and insert it into the hole on<br />
the right side. Pull the left side Molex connector out from behind the deflection plate and cut the nylon tie<br />
that holds the wire back. <strong>Insert</strong> the Molex connector on the power cord through the hole on the left side<br />
of the blower assembly and attach it to the left side Molex connector. Route the wire directly behind the<br />
blower cage. Place the strain relief over the power cord (it should be in the same location on the power<br />
cord that it was before – approximately 2" from where the wires split). <strong>Insert</strong> the strain relief into the hole<br />
on the left side until the strain relief locks in place. Make sure the power cord, wires, or Molex assembly<br />
do not protrude into the opening of the blower.<br />
Remove the strain relief by<br />
squeezing it from the top and bottom<br />
with a pair of slip-joint pliers.<br />
Front Blower Installation Instructions<br />
Disconnect the molex plug inside the<br />
blower assembly. Remove the power<br />
cord by pulling it out of the hole<br />
exposed by removing the strain relief.<br />
1. Remove the two screws above the air control and beneath the ash lip. Place the blower assembly<br />
underneath the ash lip and replace removed the two screws. Before tightening the screws with a 3/8"<br />
nut-driver, lift the blower up so it tucks underneath the ash lip.<br />
Remove the two screws here<br />
3/8" Nutdriver<br />
Use a 3/8" nutdriver to replace the two screws<br />
and hold the front blower to the appliance.<br />
The wires tuck in here, directly<br />
behind the blower cage.<br />
Left Side of<br />
Blower<br />
Assembly<br />
Remove the button plug from the<br />
left side and insert it into the hole<br />
on the right side.<br />
Control Box<br />
Plug the<br />
blower into a<br />
110 volt<br />
grounded<br />
outlet.<br />
2. Plug the power cord running from the control box into a grounded 110 volt electrical outlet.<br />
© Travis Industries 100-01165 4110919