Tile, Shake & Shingle Plus Installation Guide - Decra
Tile, Shake & Shingle Plus Installation Guide - Decra
Tile, Shake & Shingle Plus Installation Guide - Decra

Create successful ePaper yourself
Turn your PDF publications into a flip-book with our unique Google optimized e-Paper software.
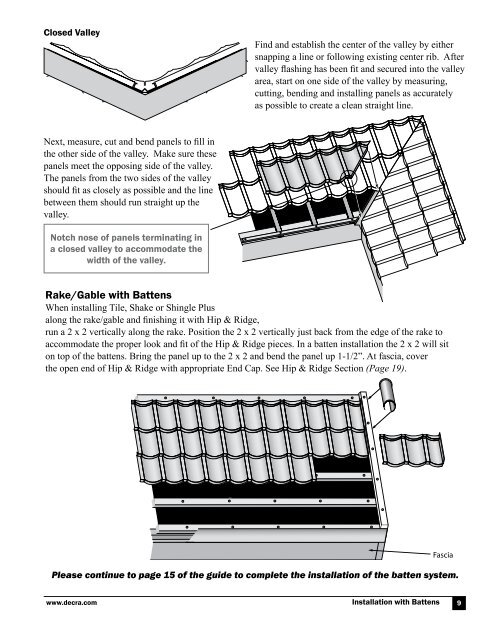
Closed Valley<br />
Next, measure, cut and bend panels to fill in<br />
the other side of the valley . Make sure these<br />
panels meet the opposing side of the valley.<br />
The panels from the two sides of the valley<br />
should fit as closely as possible and the line<br />
between them should run straight up the<br />
valley .<br />
Notch nose of panels terminating in<br />
a closed valley to accommodate the<br />
width of the valley.<br />
Find and establish the center of the valley by either<br />
snapping a line or following existing center rib. After<br />
valley flashing has been fit and secured into the valley<br />
area, start on one side of the valley by measuring,<br />
cutting, bending and installing panels as accurately<br />
as possible to create a clean straight line .<br />
Rake/Gable with Battens<br />
When installing <strong>Tile</strong>, <strong>Shake</strong> or <strong>Shingle</strong> <strong>Plus</strong><br />
along the rake/gable and finishing it with Hip & Ridge,<br />
run a 2 x 2 vertically along the rake. Position the 2 x 2 vertically just back from the edge of the rake to<br />
accommodate the proper look and fit of the Hip & Ridge pieces. In a batten installation the 2 x 2 will sit<br />
on top of the battens. Bring the panel up to the 2 x 2 and bend the panel up 1-1/2”. At fascia, cover<br />
the open end of Hip & Ridge with appropriate End Cap. See Hip & Ridge Section (Page 19) .<br />
Please continue to page 15 of the guide to complete the installation of the batten system.<br />
www.decra.com <strong>Installation</strong> with Battens 9