Tile, Shake & Shingle Plus Installation Guide - Decra
Tile, Shake & Shingle Plus Installation Guide - Decra
Tile, Shake & Shingle Plus Installation Guide - Decra

Create successful ePaper yourself
Turn your PDF publications into a flip-book with our unique Google optimized e-Paper software.
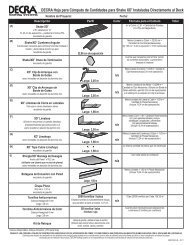
Preparation for Panel <strong>Installation</strong> without Battens<br />
Over a prepared deck, position a 1 x 4 flush with fascia<br />
as a starter batten. Install necessary 2 x 2 battens for hips,<br />
ridges and rakes using a 16d minimum common nail or<br />
equivalent at a maximum of 24” on center.<br />
12<br />
Starter Batten must be parallel with the ridge.<br />
Adjust placement of first batten to<br />
accommodate uneven fascia.<br />
Roof Jacks without Battens<br />
In cases where roof jacks will be installed, apply a 1 x 4 to the<br />
bottom of the roof jack (See diagram).<br />
Fasten the front (nose) of the panel when the jack is removed.<br />
Panel Layout without Battens<br />
Panels will be laid out and fastened as you go along starting<br />
at the fascia and working up to the ridge. <strong>Shingle</strong> <strong>Plus</strong> must<br />
be laid right to left. The overlapping panel must cover the<br />
overlap channel . See Fastening Panels without Battens<br />
(Page 13) .<br />
NOTE: BEGIN FASTENING PANELS AS YOU GO.<br />
REFER TO FASTENING SECTION (Page 13) .<br />
<strong>Installation</strong> Direct to Deck without Battens<br />
1 x 4<br />
2 x 2<br />
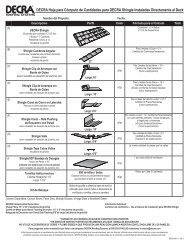
Fascia Metal Flashing<br />
Flashing is required along the fascia to cover the<br />
build up at the first batten.<br />
Stone coated Fascia Metal is available in 3 .5” and<br />
5” exposures in all colors.<br />
DO NOT rack panels (DO NOT line<br />
them vertically up the roof) or use<br />
even panel offsets that will detract<br />
from the appearance of the roof.<br />
Do Not Make A Pattern<br />
The first course at the eave may be secured<br />
through the top, at the panel highpoints, when<br />
the situation calls for it.<br />
www.decra.com