Tile, Shake & Shingle Plus Installation Guide - Decra
Tile, Shake & Shingle Plus Installation Guide - Decra
Tile, Shake & Shingle Plus Installation Guide - Decra

Create successful ePaper yourself
Turn your PDF publications into a flip-book with our unique Google optimized e-Paper software.
The following information applies to installations both<br />
with battens and direct to deck without battens.<br />
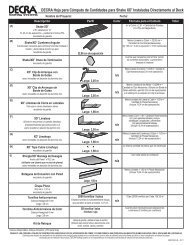
Penetrations:<br />
Roof penetrations are to be flashed with aluminum, galvanized, or aluminum-zinc alloy coated steel,<br />
standard roof jacks and flashings as required by code. DO NOT USE COPPER OR LEAD WITH THIS<br />
ROOFING SYSTEM. Use the correct Underpan for <strong>Tile</strong>, <strong>Shake</strong> or <strong>Shingle</strong> <strong>Plus</strong> to properly flash pipe<br />
penetrations. Cut the Underpan to fit tightly around the plumbing stack. The Underpan must lap over<br />
the lower field panel when positioned around the pipe. Cut the pipe-flashing apron so it will fit onto the<br />
Underpan. Apply sealant on three sides. Finish with field panel by measuring and cutting panel to fit snugly<br />
around pipe flashing. Cut hole according to flashing profile. Align roofing panel and seal around base using<br />
a polyurethane sealant and finish with Touch-Up Kit.<br />
<strong>Shake</strong> and <strong>Shingle</strong> <strong>Plus</strong> installations follow the same procedures.<br />
Care should be taken to adequately weatherproof the flashings and to support them with additional blocking<br />
or roof framing as necessary.<br />
Paint pipes and flashings prior<br />
to installing panels.<br />
www.decra.com General <strong>Installation</strong> 15