Tile, Shake & Shingle Plus Installation Guide - Decra
Tile, Shake & Shingle Plus Installation Guide - Decra
Tile, Shake & Shingle Plus Installation Guide - Decra

Create successful ePaper yourself
Turn your PDF publications into a flip-book with our unique Google optimized e-Paper software.
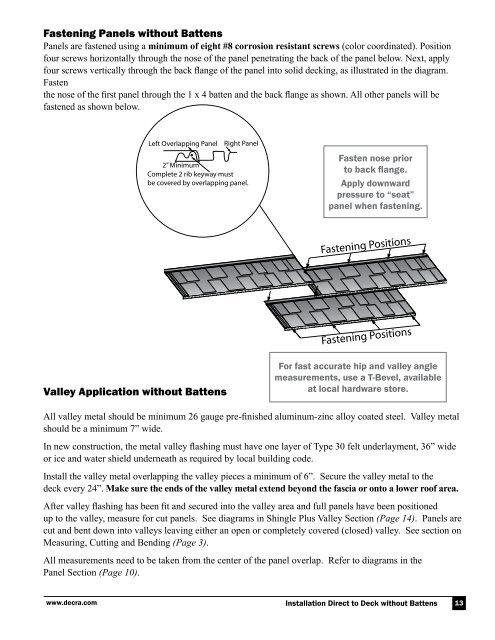
Fastening Panels without Battens<br />
Panels are fastened using a minimum of eight #8 corrosion resistant screws (color coordinated) . Position<br />
four screws horizontally through the nose of the panel penetrating the back of the panel below. Next, apply<br />
four screws vertically through the back flange of the panel into solid decking, as illustrated in the diagram.<br />
Fasten<br />
the nose of the first panel through the 1 x 4 batten and the back flange as shown. All other panels will be<br />
fastened as shown below .<br />
Valley Application without Battens<br />
Fasten nose prior<br />
to back flange.<br />
Apply downward<br />
pressure to “seat”<br />
panel when fastening.<br />
For fast accurate hip and valley angle<br />
measurements, use a T-Bevel, available<br />
at local hardware store.<br />
All valley metal should be minimum 26 gauge pre-finished aluminum-zinc alloy coated steel. Valley metal<br />
should be a minimum 7” wide.<br />
In new construction, the metal valley flashing must have one layer of Type 30 felt underlayment, 36” wide<br />
or ice and water shield underneath as required by local building code.<br />
Install the valley metal overlapping the valley pieces a minimum of 6”. Secure the valley metal to the<br />
deck every 24” . Make sure the ends of the valley metal extend beyond the fascia or onto a lower roof area.<br />
After valley flashing has been fit and secured into the valley area and full panels have been positioned<br />
up to the valley, measure for cut panels. See diagrams in <strong>Shingle</strong> <strong>Plus</strong> Valley Section (Page 14) . Panels are<br />
cut and bent down into valleys leaving either an open or completely covered (closed) valley. See section on<br />
Measuring, Cutting and Bending (Page 3) .<br />
All measurements need to be taken from the center of the panel overlap. Refer to diagrams in the<br />
Panel Section (Page 10) .<br />
www.decra.com <strong>Installation</strong> Direct to Deck without Battens<br />
13