Tile, Shake & Shingle Plus Installation Guide - Decra
Tile, Shake & Shingle Plus Installation Guide - Decra
Tile, Shake & Shingle Plus Installation Guide - Decra

You also want an ePaper? Increase the reach of your titles
YUMPU automatically turns print PDFs into web optimized ePapers that Google loves.
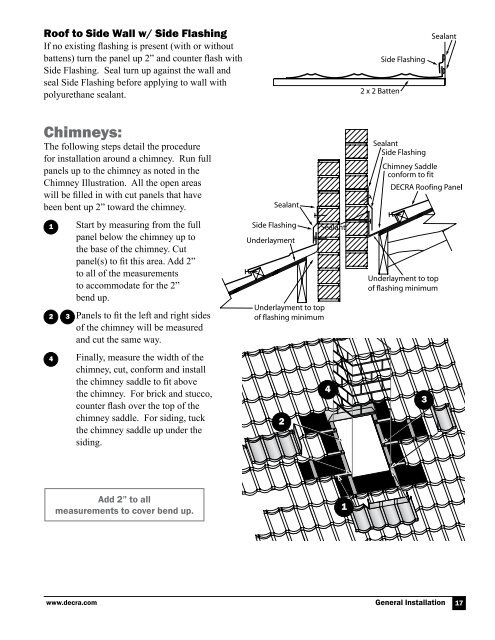
Roof to Side Wall w/ Side Flashing<br />
If no existing flashing is present (with or without<br />
battens) turn the panel up 2” and counter flash with<br />
Side Flashing . Seal turn up against the wall and<br />
seal Side Flashing before applying to wall with<br />
polyurethane sealant .<br />
Chimneys:<br />
The following steps detail the procedure<br />
for installation around a chimney. Run full<br />
panels up to the chimney as noted in the<br />
Chimney Illustration. All the open areas<br />
will be filled in with cut panels that have<br />
been bent up 2” toward the chimney.<br />
1<br />
2 3<br />
4<br />
Start by measuring from the full<br />
panel below the chimney up to<br />
the base of the chimney. Cut<br />
panel(s) to fit this area. Add 2”<br />
to all of the measurements<br />
to accommodate for the 2”<br />
bend up .<br />
Panels to fit the left and right sides<br />
of the chimney will be measured<br />
and cut the same way.<br />
Finally, measure the width of the<br />
chimney, cut, conform and install<br />
the chimney saddle to fit above<br />
the chimney. For brick and stucco,<br />
counter flash over the top of the<br />
chimney saddle. For siding, tuck<br />
the chimney saddle up under the<br />
siding .<br />
Add 2” to all<br />
measurements to cover bend up.<br />
www.decra.com General <strong>Installation</strong> 17<br />
2<br />
4<br />
1<br />
3