Waterproofing Systems - DR. FIXIT
Waterproofing Systems - DR. FIXIT
Waterproofing Systems - DR. FIXIT

You also want an ePaper? Increase the reach of your titles
YUMPU automatically turns print PDFs into web optimized ePapers that Google loves.
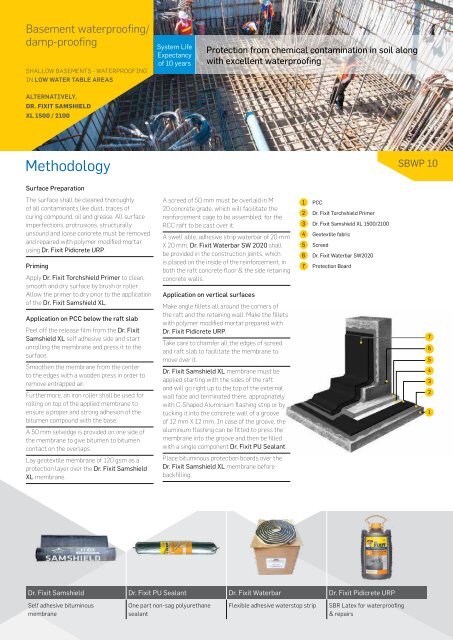
Basement waterproofing/<br />
damp-proofing<br />
SHaLLoW BaSEMENTS - WaTERPRooFING<br />
IN low wAter tAble AreAs<br />
AlterNAtIVelY,<br />
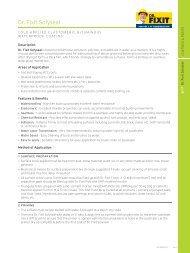
Dr. Fixit SamShielD<br />
xl 1500 / 2100<br />
Methodology SBWP 10 Methodology<br />
Surface Preparation<br />
The surface shall be cleaned thoroughly<br />
of all contaminants like dust, traces of<br />
curing compound, oil and grease. All surface<br />
imperfections, protrusions, structurally<br />
unsound and loose concrete must be removed<br />
and repaired with polymer modified mortar<br />
using Dr. Fixit Pidicrete URP.<br />
Priming<br />
Apply Dr. Fixit Torchshield Primer to clean,<br />
smooth and dry surface by brush or roller.<br />
Allow the primer to dry prior to the application<br />
of the Dr. Fixit Samshield XL.<br />
Application on PCC below the raft slab<br />
Peel off the release film from the Dr. Fixit<br />
Samshield XL self adhesive side and start<br />
unrolling the membrane and press it to the<br />
surface.<br />
Smoothen the membrane from the center<br />
to the edges with a wooden press in order to<br />
remove entrapped air.<br />
Furthermore, an iron roller shall be used for<br />
rolling on top of the applied membrane to<br />
ensure a proper and strong adhesion of the<br />
bitumen compound with the base.<br />
A 50 mm selvedge is provided on one side of<br />
the membrane to give bitumen to bitumen<br />
contact on the overlaps.<br />
Lay geotextile membrane of 120 gsm as a<br />
protection layer over the Dr. Fixit Samshield<br />
XL membrane.<br />
System Life<br />
Expectancy<br />
of 10 years<br />
A screed of 50 mm must be overlaid in M<br />
20 concrete grade, which will facilitate the<br />
reinforcement cage to be assembled, for the<br />
RCC raft to be cast over it.<br />
A swell able, adhesive strip waterbar of 20 mm<br />
X 20 mm, Dr. Fixit Waterbar SW 2020 shall<br />
be provided in the construction joints, which<br />
is placed on the inside of the reinforcement, in<br />
both the raft concrete floor & the side retaining<br />
concrete walls.<br />
Application on vertical surfaces<br />
Make angle fillets all around the corners of<br />
the raft and the retaining wall. Make the fillets<br />
with polymer modified mortar prepared with<br />
Dr. Fixit Pidicrete URP.<br />
Take care to chamfer all the edges of screed<br />
and raft slab to facilitate the membrane to<br />
move over it.<br />
Dr. Fixit Samshield XL membrane must be<br />
applied starting with the sides of the raft<br />
and will go right up to the top of the external<br />
wall face and terminated there, appropriately<br />
with C-Shaped Aluminium flashing strip or by<br />
tucking it into the concrete wall of a groove<br />
of 12 mm X 12 mm. In case of the groove, the<br />
aluminium flashing can be fitted to press the<br />
membrane into the groove and then be filled<br />
with a single component Dr. Fixit PU Sealant.<br />
Place bituminous protection boards over the<br />
Dr. Fixit Samshield XL membrane before<br />
backfilling.<br />
Dr. Fixit Samshield Dr. Fixit PU Sealant Dr. Fixit Waterbar Dr. Fixit Pidicrete URP<br />
Self adhesive bituminous<br />
membrane<br />
one part non-sag polyurethane<br />
sealant<br />
Protection from chemical contamination in soil along<br />
with excellent waterproofing<br />
1 PCC<br />
2 Dr. Fixit Torchshield Primer<br />
3 Dr. Fixit Samshield XL 1500/2100<br />
4 Geotextile fabric<br />
5 Screed<br />
6 Dr. Fixit Waterbar SW2020<br />
7 Protection Board<br />
Flexible adhesive waterstop strip SBR Latex for waterproofing<br />
& repairs<br />
7<br />
6<br />
5<br />
4<br />
3<br />
2<br />
1<br />
Basement waterproofing<br />
DEEP BaSEMENTS – WaTERPRooFING IN<br />
hIgh wAter tAble AreAs<br />
Dr. Fixit torchShielD<br />
SP 4160 (SBS)<br />
in double layer<br />
Surface Preparation<br />
The surface shall be cleaned thoroughly<br />
of all contaminants like dust, traces of<br />
curing compound, oil and grease. All surface<br />
imperfections, protrusions, structurally<br />
unsound and loose concrete must be removed<br />
and repaired with polymer modified mortar<br />
using Dr. Fixit Pidicrete URP.<br />
Priming<br />
All over the blinding concrete or PCC that is<br />
properly leveled, Dr. Fixit Torchshield Primer<br />
priming shall be done with a roller or brush,<br />
over a dried surface. Allow the primer to dry<br />
for 8 to 10 hrs.<br />
Application on PCC below the raft slab<br />
Dr. Fixit Torchshield SP 4160, a SBS based<br />
polyester reinforced membrane, shall be laid<br />
by providing an overlap of at least 100 mm.<br />
A 2nd layer of SBS based membrane Dr. Fixit<br />
Torchshield SP 4160 shall be laid with an<br />
overlap 50 % above the 1st layer.<br />
Torchshield membrane Dr. Fixit Torchshield<br />
SP 4160, shall be extended to maximum<br />
extent of the full area of the blinding concrete.<br />
Lay geotextile membrane of 120 gsm as a<br />
protection layer over the Dr. Fixit Torchshield<br />
SP 4160 membrane.<br />
A screed of 50 mm must be overlaid in M<br />
20 concrete grade, which will facilitate the<br />
reinforcement cage to be assembled, for the<br />
RCC raft to be cast over it.<br />
A swellable, adhesive strip waterbar of 20 mm<br />
X 20 mm, Dr. Fixit Waterbar SW 2020 shall<br />
be provided in the construction joints, which<br />
System Life<br />
Expectancy<br />
of 10 years<br />
8<br />
7<br />
1 PCC<br />
2 Primer<br />
3 Dr. Fixit Torchshield SP4160 (2 layers)<br />
4 Geotextile<br />
5 Screed<br />
6 Dr. Fixit Waterbar SW2020<br />
7 Angle Filet<br />
8 Protection board<br />
Dr. Fixit Torchshield Dr. Fixit Waterbar Dr. Fixit PU Sealant Dr. Fixit Pidicrete URP<br />
aPP / SBS modified bitumen<br />
based membrane<br />
is placed on the inside of the reinforcement, in<br />
both the raft concrete floor & the side retaining<br />
concrete walls.<br />
Application on vertical surfaces<br />
Over the RCC raft, the side retaining walls are<br />
cast in concrete.<br />
Prepare the retaining wall surface to receive<br />
waterproofing system as detailed in surface<br />
preparation above.<br />
After the application of primer and drying it, 2<br />
layers of Dr. Fixit Torchshield SP 4160, a SBS<br />
based polyester reinforced membrane shall<br />
be laid.<br />
A 4 mm thick bituminous protection board or<br />
a HDPE dimpled drain board (12 mm thick)<br />
shall be placed, vertically over the Torchshield<br />
membrane, allowing the soil backfill.<br />
As the activity goes upward, the application<br />
of Dr. Fixit Torchshield membrane, along<br />
with the protection system shall be carried<br />
out minimum 300 mm above the ground level<br />
or as per finished floor level, with C-Shaped<br />
Aluminium flashing strip or by tucking it into<br />
the concrete wall of a groove of 12 mm X 12<br />
mm. In case of the groove, the aluminium<br />
flashing can be fitted to press the membrane<br />
into the groove and then be filled with a single<br />
component Dr. Fixit PU Sealant.<br />
AlterNAtIVelY<br />
Robust tanking system for high performance<br />
basement waterproofing<br />
Dr. Fixit Torchshield AP 4160 (APP)<br />
membrane in two layers can be used in place<br />
of Dr. Fixit Torchshield SP 4160<br />
Flexible adhesive waterstop strip one part non-sag polyurethane<br />
sealant<br />
SBR Latex for waterproofing &<br />
repairs<br />
DBWP 10<br />
6<br />
5<br />
4<br />
3<br />
2<br />
1<br />
11 11