Waterproofing Systems - DR. FIXIT
Waterproofing Systems - DR. FIXIT
Waterproofing Systems - DR. FIXIT

Create successful ePaper yourself
Turn your PDF publications into a flip-book with our unique Google optimized e-Paper software.
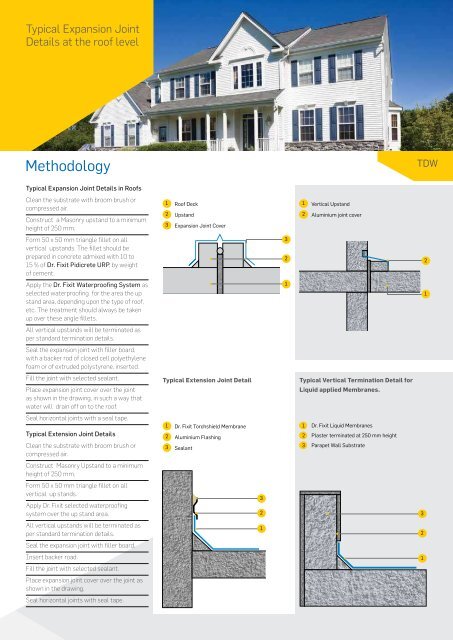
Typical Expansion Joint<br />
Details at the roof level<br />
Methodology<br />
Typical Expansion Joint Details in Roofs<br />
Clean the substrate with broom brush or<br />
compressed air.<br />
Construct a Masonry upstand to a minimum<br />
height of 250 mm.<br />
Form 50 x 50 mm triangle fillet on all<br />
vertical upstands. The fillet should be<br />
prepared in concrete admixed with 10 to<br />
15 % of Dr. Fixit Pidicrete URP, by weight<br />
of cement.<br />
Apply the Dr. Fixit <strong>Waterproofing</strong> System as<br />
selected waterproofing for the area the up<br />
stand area, depending upon the type of roof,<br />
etc. The treatment should always be taken<br />
up over these angle fillets.<br />
All vertical upstands will be terminated as<br />
per standard termination details.<br />
Seal the expansion joint with filler board,<br />
with a backer rod of closed cell polyethylene<br />
foam or of extruded polystyrene, inserted.<br />
Fill the joint with selected sealant.<br />
Place expansion joint cover over the joint<br />
as shown in the drawing, in such a way that<br />
water will drain off on to the roof.<br />
Seal horizontal joints with a seal tape.<br />
Typical Extension Joint Details<br />
Clean the substrate with broom brush or<br />
compressed air.<br />
Construct Masonry Upstand to a minimum<br />
height of 250 mm.<br />
Form 50 x 50 mm triangle fillet on all<br />
vertical up stands.<br />
Apply Dr. Fixit selected waterproofing<br />
system over the up stand area.<br />
All vertical upstands will be terminated as<br />
per standard termination details.<br />
Seal the expansion joint with filler board.<br />
Insert backer road.<br />
Fill the joint with selected sealant.<br />
Place expansion joint cover over the joint as<br />
shown in the drawing.<br />
Seal horizontal joints with seal tape.<br />
1 Roof Deck<br />
2 Upstand<br />
3 Expansion Joint Cover<br />
typical extension joint Detail<br />
1 Dr. Fixit Torchshield Membrane<br />
2 Aluminium Flashing<br />
3 Sealant<br />
3<br />
2<br />
1<br />
3<br />
2<br />
1<br />
1 Vertical Upstand<br />
2 Aluminium joint cover<br />
typical Vertical termination Detail for<br />
liquid applied membranes.<br />
1 Dr. Fixit Liquid Membranes<br />
2 Plaster terminated at 250 mm height<br />
3 Parapet Wall Substrate<br />
TDW<br />
3<br />
2<br />
1<br />
2<br />
1