Waterproofing Systems - DR. FIXIT
Waterproofing Systems - DR. FIXIT
Waterproofing Systems - DR. FIXIT

You also want an ePaper? Increase the reach of your titles
YUMPU automatically turns print PDFs into web optimized ePapers that Google loves.
Roof Garden<br />
TERRaCE GaRDEN WaTERPRooFING<br />
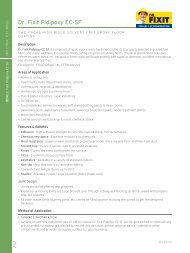
Dr. Fixit torchShielD<br />
aP 4160<br />
Methodology RGW 15 Methodology<br />
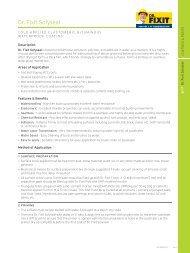
Surface Preparation<br />
All surfaces must be cleaned with compressed<br />
air, free of loose materials, oils and other<br />
contaminants.<br />
Make angle fillets all around the periphery of<br />
the podium wall with polymer modified mortar<br />
prepared with Dr. Fixit Pidicrete URP.<br />
Priming<br />
Apply Dr. Fixit Torchshield Primer with a<br />
roller or brush. Allow the primer to dry for 8 to<br />
10 hrs.<br />
Application<br />
Start the application of a first layer of Dr. Fixit<br />
Torchshield AP 4160 (plain finish APP based)<br />
The application must start from the outlet,<br />
going towards the centre of the roof area.<br />
This 1st layer is laid, up to over the angle<br />
fillet only.<br />
The 2nd layer of Dr. Fixit Torchshield AP 4160<br />
must be laid in a perpendicular direction to the<br />
1st membrane, starting from 15 to 20 mm on<br />
the parapet wall, downward and covering the<br />
angle fillet.<br />
System Life<br />
Expectancy<br />
of 15 years<br />
Reliable, lightweight waterproofing<br />
system for roof garden<br />
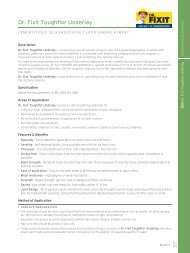
A geotextile fabric of 120 gsm shall be placed<br />
over the membrane with about 300 mm<br />
overlaps before laying the screed of 75 mm<br />
average mixed with Dr. Fixit Pidiproof LW+<br />
with 1:100 slope properly aligned with drain<br />
outlets for efficient drainage of water.<br />
For extensive roof gardens, after application<br />
of Dr. Fixit Torchshield Primer and Dr.ying of<br />
same, torch-apply Dr. Fixit Torchshield AR<br />
(anti-root membrane) on the screed.<br />
Place drainage board as needed over the<br />
concrete screed. Place a loosely laid geotextile<br />
fabric of 150 gsm again, over the entire<br />
drainage board to contain the soil.<br />
Place soil for vegetation accordingly.<br />
Dr. Fixit Torchshield Dr. Fixit Pidiproof LW+ Dr. Fixit Pidicrete URP<br />
aPP / SBS modified bitumen based membrane Integral liquid waterproofing compound for<br />
plaster and concrete<br />
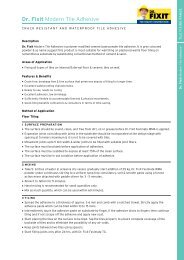
9<br />
8<br />
7<br />
6<br />
5<br />
4<br />
3<br />
1 Slab<br />
2 Angle Fillet<br />
3 Dr. Fixit Torchshield Primer<br />
4 Dr. Fixit Torchshield AP 4160<br />
5 Geotextile<br />
6 Screed<br />
7 Dr. Fixit Torchshield AR 4160<br />
8 HDPE drain board<br />
9 Soil<br />
10 Vegetation<br />
11 Gravel<br />
12 Drip mould<br />
SBR Latex for waterproofing & repairs<br />
12<br />
11<br />
10<br />
2<br />
1<br />
Wet areas<br />
33