

Download Manual - Security Camera Systems
Download Manual - Security Camera Systems
Download Manual - Security Camera Systems

Create successful ePaper yourself
Turn your PDF publications into a flip-book with our unique Google optimized e-Paper software.
Picture 5-14<br />
5.3.2.2 Schedule<br />
22<br />
User <strong>Manual</strong><br />
Click [Main MenuRecordSchedule] to enter into the interface shown as Picture 5-15.<br />
[Channel] option allows you select one channel<br />
you desired.<br />
To setup weekly schedules, tick-select the box<br />
of the record status you want (Alarm, General, or No<br />
Record) and then click on each box in the schedule<br />
time line that you want this method to apply to. You<br />
can use the [Copy – To] pull-down menus and Copy<br />
button to copy settings from one day to another day<br />
or all days.<br />
Picture 5-15<br />
After you complete the schedule you activate it by clicking the [Apply] button.<br />
You can also click on the Default button to use the system defaults.<br />
Explanation: Under the menu and menu, original color stands for no<br />
record, “Red” stands for alarm record, “yellow” stands for Motion record and “Green”<br />
stands for normal record.<br />
5.3.2.3 Main Stream<br />
Go to [Main menuRecordMain Stream] to enter into the interface shown as Picture 5-16.<br />
Picture 5-16<br />
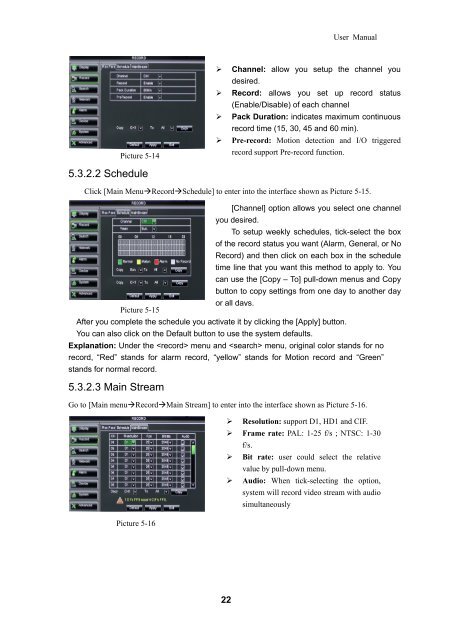
Channel: allow you setup the channel you<br />
desired.<br />
Record: allows you set up record status<br />
(Enable/Disable) of each channel<br />
Pack Duration: indicates maximum continuous<br />
record time (15, 30, 45 and 60 min).<br />
Pre-record: Motion detection and I/O triggered<br />
record support Pre-record function.<br />
Resolution: support D1, HD1 and CIF.<br />
Frame rate: PAL: 1-25 f/s ; NTSC: 1-30<br />
f/s.<br />
Bit rate: user could select the relative<br />
value by pull-down menu.<br />
Audio: When tick-selecting the option,<br />
system will record video stream with audio<br />
simultaneously