

Download Manual - Security Camera Systems
Download Manual - Security Camera Systems
Download Manual - Security Camera Systems

You also want an ePaper? Increase the reach of your titles
YUMPU automatically turns print PDFs into web optimized ePapers that Google loves.
33<br />
User <strong>Manual</strong><br />
NO: indicate HDD no pre-seted by system.<br />
Status::It will be available only when HDD have been formatted.<br />
Total Space – Total size of the hard drive currently installed.<br />
Free Space – Total amount of free space available on the hard drive currently<br />
installed.<br />
Useable Rec. Time – Free space currently available in hours.<br />
Auto-overwrite – When set to ENABLE the DVR will record over the oldest files on<br />
the hard drive. The DVR will always be able to record events as they happen, however, it<br />
does means that you’ll need to get important events off the HDD before they’re<br />
overwritten; and if overwrite is set to DISABLE the DVR will stop record once the DVR is<br />
full. Whilst you won’t lose old footage, you run the risk of missing new events as they<br />
happen. Be sure you want to do this before selecting it.<br />
HDD Format – Formatting the HDD will erase all data (i.e. footage) which is stored on<br />
it, and re-create the FAT (file allocation table).<br />
USB Format - If you have a USB flash drive connected to the DVR, you can format<br />
that, too. To do this, click the [USB Format] button and click [OK].<br />
Note: It is an important first step when configuring your DVR to make sure that the<br />
hard drive (HDD) options are correctly set. So, strongly suggest that you do format<br />
the HDD before start the first record.<br />
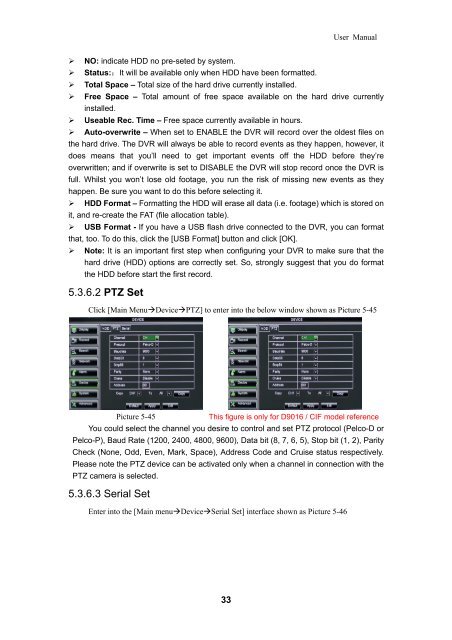
5.3.6.2 PTZ Set<br />
Click [Main MenuDevicePTZ] to enter into the below window shown as Picture 5-45<br />
Picture 5-45<br />
This figure is only for D9016 / CIF model reference<br />
You could select the channel you desire to control and set PTZ protocol (Pelco-D or<br />
Pelco-P), Baud Rate (1200, 2400, 4800, 9600), Data bit (8, 7, 6, 5), Stop bit (1, 2), Parity<br />
Check (None, Odd, Even, Mark, Space), Address Code and Cruise status respectively.<br />
Please note the PTZ device can be activated only when a channel in connection with the<br />
PTZ camera is selected.<br />
5.3.6.3 Serial Set<br />
Enter into the [Main menuDeviceSerial Set] interface shown as Picture 5-46