Start-Up, Operation, and Maintenance Instructions - Carrier
Start-Up, Operation, and Maintenance Instructions - Carrier
Start-Up, Operation, and Maintenance Instructions - Carrier

Create successful ePaper yourself
Turn your PDF publications into a flip-book with our unique Google optimized e-Paper software.
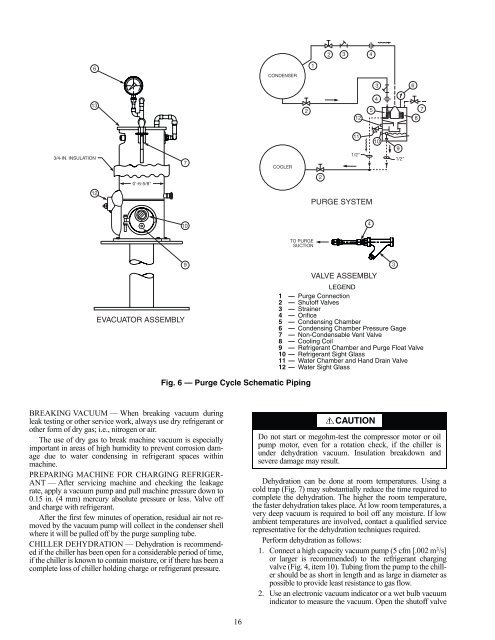
3/4-IN. INSULATION<br />
EVACUATOR ASSEMBLY<br />
a17-577<br />
BREAKING VACUUM — When breaking vacuum during<br />
leak testing or other service work, always use dry refrigerant or<br />
other form of dry gas; i.e., nitrogen or air.<br />
The use of dry gas to break machine vacuum is especially<br />
important in areas of high humidity to prevent corrosion damage<br />
due to water condensing in refrigerant spaces within<br />
machine.<br />
PREPARING MACHINE FOR CHARGING REFRIGER-<br />
ANT — After servicing machine <strong>and</strong> checking the leakage<br />
rate, apply a vacuum pump <strong>and</strong> pull machine pressure down to<br />
0.15 in. (4 mm) mercury absolute pressure or less. Valve off<br />
<strong>and</strong> charge with refrigerant.<br />
After the first few minutes of operation, residual air not removed<br />
by the vacuum pump will collect in the condenser shell<br />
where it will be pulled off by the purge sampling tube.<br />
CHILLER DEHYDRATION — Dehydration is recommended<br />
if the chiller has been open for a considerable period of time,<br />
if the chiller is known to contain moisture, or if there has been a<br />
complete loss of chiller holding charge or refrigerant pressure.<br />
Fig. 6 — Purge Cycle Schematic Piping<br />
16<br />
PURGE SYSTEM<br />
VALVE ASSEMBLY<br />
LEGEND<br />
1 — Purge Connection<br />
2 — Shutoff Valves<br />
3 — Strainer<br />
4 — Orifice<br />
5 — Condensing Chamber<br />
6 — Condensing Chamber Pressure Gage<br />
7 — Non-Condensable Vent Valve<br />
8 — Cooling Coil<br />
9 — Refrigerant Chamber <strong>and</strong> Purge Float Valve<br />
10 — Refrigerant Sight Glass<br />
11 — Water Chamber <strong>and</strong> H<strong>and</strong> Drain Valve<br />
12 — Water Sight Glass<br />
CAUTION<br />
Do not start or megohm-test the compressor motor or oil<br />
pump motor, even for a rotation check, if the chiller is<br />
under dehydration vacuum. Insulation breakdown <strong>and</strong><br />
severe damage may result.<br />
Dehydration can be done at room temperatures. Using a<br />
cold trap (Fig. 7) may substantially reduce the time required to<br />
complete the dehydration. The higher the room temperature,<br />
the faster dehydration takes place. At low room temperatures, a<br />
very deep vacuum is required to boil off any moisture. If low<br />
ambient temperatures are involved, contact a qualified service<br />
representative for the dehydration techniques required.<br />
Perform dehydration as follows:<br />
1. Connect a high capacity vacuum pump (5 cfm [.002 m 3 /s]<br />
or larger is recommended) to the refrigerant charging<br />
valve (Fig. 4, item 10). Tubing from the pump to the chiller<br />
should be as short in length <strong>and</strong> as large in diameter as<br />
possible to provide least resistance to gas flow.<br />
2. Use an electronic vacuum indicator or a wet bulb vacuum<br />
indicator to measure the vacuum. Open the shutoff valve