Start-Up, Operation, and Maintenance Instructions - Carrier
Start-Up, Operation, and Maintenance Instructions - Carrier
Start-Up, Operation, and Maintenance Instructions - Carrier

Create successful ePaper yourself
Turn your PDF publications into a flip-book with our unique Google optimized e-Paper software.
<strong>Start</strong>-<strong>Up</strong>, <strong>Operation</strong>, <strong>and</strong> <strong>Maintenance</strong> <strong>Instructions</strong><br />
Centrifugal liquid chillers are designed to provide safe <strong>and</strong><br />
reliable service when operated within design specifications.<br />
When operating this equipment, use good judgment<br />
<strong>and</strong> safety precautions to avoid damage to equipment <strong>and</strong><br />
property or injury to personnel.<br />
Be sure you underst<strong>and</strong> <strong>and</strong> follow the procedures <strong>and</strong><br />
safety precautions contained in the chiller instructions as<br />
well as those listed in this guide.<br />
DANGER<br />
DO NOT VENT refrigerant relief valves within a building. Outlet<br />
from rupture disc or relief valve must be vented outdoors in accordance<br />
with the latest edition of ANSI/ASHRAE 15 (American<br />
National St<strong>and</strong>ards Institute/American Society of Heating, Refrigeration,<br />
<strong>and</strong> Air Conditioning Engineers). The accumulation of refrigerant<br />
in an enclosed space can displace oxygen <strong>and</strong> cause asphyxiation.<br />
PROVIDE adequate ventilation in accordance with ANSI/ASHRAE<br />
15, especially for enclosed <strong>and</strong> low overhead spaces. Inhalation of<br />
high concentrations of vapor is harmful <strong>and</strong> may cause heart irregularities,<br />
unconsciousness, or death. Misuse can be fatal. Vapor is heavier<br />
than air <strong>and</strong> reduces the amount of oxygen available for breathing.<br />
Product causes eye <strong>and</strong> skin irritation. Decomposition products are<br />
hazardous.<br />
DO NOT USE OXYGEN to purge lines or to pressurize a chiller for<br />
any purpose. Oxygen gas reacts violently with oil, grease, <strong>and</strong> other<br />
common substances.<br />
NEVER EXCEED specified test pressures, VERIFY the allowable<br />
test pressure by checking the instruction literature <strong>and</strong> the design pressures<br />
on the equipment nameplate.<br />
DO NOT USE air for leak testing. Use only refrigerant or dry<br />
nitrogen.<br />
DO NOT VALVE OFF any safety device.<br />
BE SURE that all pressure relief devices are properly installed <strong>and</strong><br />
functioning before operating any chiller.<br />
RISK OF INJURY OR DEATH by electrocution. High voltage is<br />
present on motor leads even though the motor is not running when a<br />
solid-state or inside-delta mechanical starter is used. Open the power<br />
supply disconnect before touching motor leads or terminals.<br />
WARNING<br />
DO NOT WELD OR FLAMECUT any refrigerant line or vessel until<br />
all refrigerant (liquid <strong>and</strong> vapor) has been removed from chiller.<br />
Traces of vapor should be displaced with dry air or nitrogen <strong>and</strong> the<br />
work area should be well ventilated. Refrigerant in contact with an<br />
open flame produces toxic gases.<br />
DO NOT USE eyebolts or eyebolt holes to rig chiller sections or the<br />
entire assembly.<br />
DO NOT work on high-voltage equipment unless you are a qualified<br />
electrician.<br />
DO NOT WORK ON electrical components, including control panels,<br />
switches, starters, or oil heater until you are sure ALL POWER IS<br />
OFF <strong>and</strong> no residual voltage can leak from capacitors or solid-state<br />
components.<br />
LOCK OPEN AND TAG electrical circuits during servicing. IF<br />
WORK IS INTERRUPTED, confirm that all circuits are deenergized<br />
before resuming work.<br />
AVOID SPILLING liquid refrigerant on skin or getting it into the<br />
eyes. USE SAFETY GOGGLES. Wash any spills from the skin with<br />
17DA<br />
Open-Drive Centrifugal Liquid Chillers<br />
50/60 Hz<br />
HFC-134a<br />
SAFETY CONSIDERATIONS<br />
soap <strong>and</strong> water. If liquid refrigerant enters the eyes, IMMEDIATELY<br />
FLUSH EYES with water <strong>and</strong> consult a physician.<br />
NEVER APPLY an open flame or live steam to a refrigerant cylinder.<br />
Dangerous over pressure can result. When it is necessary to heat<br />
refrigerant, use only warm (110 F [43 C]) water.<br />
DO NOT REUSE disposable (nonreturnable) cylinders or attempt to<br />
refill them. It is DANGEROUS AND ILLEGAL. When cylinder is<br />
emptied, evacuate remaining gas pressure, loosen the collar <strong>and</strong><br />
unscrew <strong>and</strong> discard the valve stem. DO NOT INCINERATE.<br />
CHECK THE REFRIGERANT TYPE before adding refrigerant to<br />
the chiller. The introduction of the wrong refrigerant can cause damage<br />
or malfunction to this chiller.<br />
<strong>Operation</strong> of this equipment with refrigerants other than those<br />
cited herein should comply with ANSI/ASHRAE 15 (latest edition).<br />
Contact <strong>Carrier</strong> for further information on use of this chiller with other<br />
refrigerants.<br />
DO NOT ATTEMPT TO REMOVE fittings, covers, etc., while<br />
chiller is under pressure or while chiller is running. Be sure pressure is<br />
at 0 psig (0 kPa) before breaking any refrigerant connection.<br />
CAREFULLY INSPECT all relief devices, rupture discs, <strong>and</strong> other<br />
relief devices AT LEAST ONCE A YEAR. If chiller operates in a<br />
corrosive atmosphere, inspect the devices at more frequent intervals.<br />
DO NOT ATTEMPT TO REPAIR OR RECONDITION any relief<br />
device when corrosion or build-up of foreign material (rust, dirt, scale,<br />
etc.) is found within the valve body or mechanism. Replace the<br />
device.<br />
DO NOT install relief devices in series or backwards.<br />
USE CARE when working near or in line with a compressed spring.<br />
Sudden release of the spring can cause it <strong>and</strong> objects in its path to act<br />
as projectiles.<br />
CAUTION<br />
DO NOT STEP on refrigerant lines. Broken lines can whip about <strong>and</strong><br />
release refrigerant, causing personal injury.<br />
DO NOT climb over a chiller. Use platform, catwalk, or staging. Follow<br />
safe practices when using ladders.<br />
USE MECHANICAL EQUIPMENT (crane, hoist, etc.) to lift or<br />
move inspection covers or other heavy components. Even if components<br />
are light, use mechanical equipment when there is a risk of slipping<br />
or losing your balance.<br />
BE AWARE that certain automatic start arrangements CAN<br />
ENGAGE THE STARTER, TOWER FAN, OR PUMPS. Open the<br />
disconnect ahead of the starter, tower fans, or pumps.<br />
USE only repair or replacement parts that meet the code requirements<br />
of the original equipment.<br />
DO NOT VENT OR DRAIN waterboxes containing industrial brines,<br />
liquid, gases, or semisolids without the permission of your process<br />
control group.<br />
DO NOT LOOSEN waterbox cover bolts until the waterbox has been<br />
completely drained.<br />
DOUBLE-CHECK that coupling nut wrenches, dial indicators, or<br />
other items have been removed before rotating any shafts.<br />
DO NOT LOOSEN a packing gl<strong>and</strong> nut before checking that the nut<br />
has a positive thread engagement.<br />
PERIODICALLY INSPECT all valves, fittings, <strong>and</strong> piping for corrosion,<br />
rust, leaks, or damage.<br />
PROVIDE A DRAIN connection in the vent line near each pressure<br />
relief device to prevent a build-up of condensate or rain water.<br />
Manufacturer reserves the right to discontinue, or change at any time, specifications or designs without notice <strong>and</strong> without incurring obligations.<br />
Catalog No. 04-53170002-01 Printed in U.S.A. Form 17DA-3SS Pg 1 3-09 Replaces: 17DA-2SS,<br />
17DA-3SO
CONTENTS<br />
Page<br />
SAFETY CONSIDERATIONS . . . . . . . . . . . . . . . . . . . . . . 1<br />
INTRODUCTION . . . . . . . . . . . . . . . . . . . . . . . . . . . . . . . . 3-6<br />
General. . . . . . . . . . . . . . . . . . . . . . . . . . . . . . . . . . . . . . . . . . . 3<br />
Factory Test . . . . . . . . . . . . . . . . . . . . . . . . . . . . . . . . . . . . . . 3<br />
Job Data. . . . . . . . . . . . . . . . . . . . . . . . . . . . . . . . . . . . . . . . . . 3<br />
Field-Supplied Tools. . . . . . . . . . . . . . . . . . . . . . . . . . . . . . 3<br />
Inspect Machine Room . . . . . . . . . . . . . . . . . . . . . . . . . . . 3<br />
Drive Arrangement . . . . . . . . . . . . . . . . . . . . . . . . . . . . . . . 3<br />
Piping . . . . . . . . . . . . . . . . . . . . . . . . . . . . . . . . . . . . . . . . . . . . 3<br />
Wiring . . . . . . . . . . . . . . . . . . . . . . . . . . . . . . . . . . . . . . . . . . . . 3<br />
• AUXILIARY EQUIPMENT WIRING<br />
• TURBINE DRIVE WIRING<br />
• GAS ENGINE DRIVE WIRING<br />
Safety Controls. . . . . . . . . . . . . . . . . . . . . . . . . . . . . . . . . . . 3<br />
Motor Drive. . . . . . . . . . . . . . . . . . . . . . . . . . . . . . . . . . . . . . . 4<br />
Gas Engine Drive. . . . . . . . . . . . . . . . . . . . . . . . . . . . . . . . . 4<br />
Turbine Drive . . . . . . . . . . . . . . . . . . . . . . . . . . . . . . . . . . . . . 4<br />
Pumpout System . . . . . . . . . . . . . . . . . . . . . . . . . . . . . . . . . 4<br />
Leak Test <strong>and</strong> Dehydration . . . . . . . . . . . . . . . . . . . . . . . 4<br />
Charge Machine with Water . . . . . . . . . . . . . . . . . . . . . . 5<br />
Charge Machine with Oil . . . . . . . . . . . . . . . . . . . . . . . . . 5<br />
Final Pre-<strong>Operation</strong> Alignment Check . . . . . . . . . . . . 5<br />
Operate Drive . . . . . . . . . . . . . . . . . . . . . . . . . . . . . . . . . . . . 6<br />
Set Purge Valves . . . . . . . . . . . . . . . . . . . . . . . . . . . . . . . . . 6<br />
Check Water Supply . . . . . . . . . . . . . . . . . . . . . . . . . . . . . . 6<br />
Check Air Supply (Pneumatic Machines) . . . . . . . . . 6<br />
START-UP . . . . . . . . . . . . . . . . . . . . . . . . . . . . . . . . . . . . . 6-10<br />
Pre-<strong>Operation</strong> Settings . . . . . . . . . . . . . . . . . . . . . . . . . . . 6<br />
Drive <strong>Operation</strong> . . . . . . . . . . . . . . . . . . . . . . . . . . . . . . . . . . 6<br />
Initial Refrigerant Charge. . . . . . . . . . . . . . . . . . . . . . . . . 6<br />
Initial Compressor <strong>Operation</strong>. . . . . . . . . . . . . . . . . . . . . 6<br />
Adjust Refrigerant Charge. . . . . . . . . . . . . . . . . . . . . . . . 6<br />
Hot Alignment Check <strong>and</strong> Doweling . . . . . . . . . . . . . . 7<br />
<strong>Operation</strong>al Testing . . . . . . . . . . . . . . . . . . . . . . . . . . . . . . 7<br />
Instruct Customer Operator . . . . . . . . . . . . . . . . . . . . . . 7<br />
• CONTROL PANEL<br />
• VFD<br />
• STEAM TURBINE<br />
• GAS ENGINE<br />
• OPERATING PROCEDURES<br />
• LOG SHEETS<br />
Operator Duties . . . . . . . . . . . . . . . . . . . . . . . . . . . . . . . . . . 8<br />
<strong>Start</strong> Machine . . . . . . . . . . . . . . . . . . . . . . . . . . . . . . . . . . . . 8<br />
OPERATION . . . . . . . . . . . . . . . . . . . . . . . . . . . . . . . . . . 10-13<br />
Manual <strong>Operation</strong> . . . . . . . . . . . . . . . . . . . . . . . . . . . . . . . 10<br />
Cold Weather <strong>Operation</strong> . . . . . . . . . . . . . . . . . . . . . . . . . 10<br />
Stop Machine. . . . . . . . . . . . . . . . . . . . . . . . . . . . . . . . . . . . 10<br />
Extended Shutdown . . . . . . . . . . . . . . . . . . . . . . . . . . . . . 10<br />
Pumpout System <strong>Operation</strong> . . . . . . . . . . . . . . . . . . . . . 11<br />
• LUBRICATION<br />
• CONTROL DESCRIPTION<br />
• CONTROL SETTING<br />
• MACHINE AND STORAGE TANK EVACUATION<br />
(No Refrigerant in System)<br />
• REMOVE AIR AFTER OPENING CHILLER TO<br />
ATMOSPHERE (Refrigerant Charge in Storage Tank)<br />
• TRANSFER REFRIGERANT CHARGE (From Storage<br />
Tank to Machine)<br />
• TRANSFER REFRIGERANT CHARGE (From<br />
Machine to Storage Tank Located Below Machine)<br />
• TRANSFER REFRIGERANT CHARGE (From<br />
Machine to Storage Tank Located Above or Level with<br />
Machine)<br />
• PRESSURIZE MACHINE AND STORAGE TANK (No<br />
Refrigerant in System)<br />
• DISTILL REFRIGERANT CHARGE<br />
• CHARGE REFRIGERANT<br />
MAINTENANCE. . . . . . . . . . . . . . . . . . . . . . . . . . . . . . . 13-17<br />
Weekly <strong>Maintenance</strong>. . . . . . . . . . . . . . . . . . . . . . . . . . . . . 13<br />
• CHECK OIL LEVEL<br />
2<br />
Page<br />
• CHECK PURGE FREQUENCY<br />
• WATER IN PURGE WATER CHAMBER<br />
Yearly <strong>Maintenance</strong>. . . . . . . . . . . . . . . . . . . . . . . . . . . . . . 13<br />
• CHECK/CALIBRATE WATER TEMPERATURE<br />
SENSORS<br />
• CHECK REFRIGERANT LOW-PRESSURE CUTOUT<br />
• CHECK CONDENSER HIGH-PRESSURE CUTOUT<br />
• CHECK AUXILIARY OIL PUMP CONTROL<br />
• CHECK SEAL OIL DIFFERENTIAL PRESSURE<br />
TRANSDUCER<br />
• CHECK THRUST BEARING OIL PRESSURE<br />
TRANSDUCER<br />
• CHECK DISCHARGE GAS HIGH-TEMPERATURE<br />
CUTOUT<br />
• CHECK THRUST BEARING OIL HIGH-TEMPERA-<br />
TURE CUTOUT<br />
• CHECK SHAFT MOVEMENT SWITCH<br />
• CHECK COOLER AND CONDENSER MINIMUM<br />
FLOW PROTECTION<br />
• CHECK AUXILIARY INTERLOCKS<br />
• CHECK CONDENSER SUBCOOLER LEVEL<br />
CONTROL<br />
• CHECK COMPRESSOR GUIDE VANE CONTROL<br />
• CHECK STARTERS AND VFDS<br />
• CHECK PRESSURE REGULATORS<br />
• COMPRESSOR BEARING AND GEAR<br />
MAINTENANCE<br />
• CHANGE OIL AND OIL FILTER<br />
• INSPECT COOLER TUBES<br />
• INSPECT CONDENSER TUBES<br />
• INSPECT PURGE RECOVERY UNIT<br />
General <strong>Maintenance</strong> . . . . . . . . . . . . . . . . . . . . . . . . . . . . 15<br />
• REFRIGERANT LEVEL<br />
• LEAK TESTING<br />
• CHECK LEAKAGE RATE<br />
• BREAKING VACUUM<br />
• PREPARING MACHINE FOR CHARGING<br />
REFRIGERANT<br />
• CHILLER DEHYDRATION<br />
• REMOVING REFRIGERANT<br />
• WATER TREATMENT<br />
• CLEARANCES<br />
• GEAR AND DRIVE<br />
• PUMPOUT SYSTEM<br />
GENERAL DATA . . . . . . . . . . . . . . . . . . . . . . . . . . . . . . 17-20<br />
Machine Nameplate . . . . . . . . . . . . . . . . . . . . . . . . . . . . . 17<br />
Refrigerant Properties. . . . . . . . . . . . . . . . . . . . . . . . . . . 17<br />
Relief Valve Assembly. . . . . . . . . . . . . . . . . . . . . . . . . . . 17<br />
System Components . . . . . . . . . . . . . . . . . . . . . . . . . . . . 17<br />
Refrigeration Cycle. . . . . . . . . . . . . . . . . . . . . . . . . . . . . . 18<br />
Oil Cycle . . . . . . . . . . . . . . . . . . . . . . . . . . . . . . . . . . . . . . . . 18<br />
Purge Cycle . . . . . . . . . . . . . . . . . . . . . . . . . . . . . . . . . . . . . 19<br />
TROUBLESHOOTING. . . . . . . . . . . . . . . . . . . . . . . . . 20-22<br />
Compressor Will Not <strong>Start</strong>. . . . . . . . . . . . . . . . . . . . . . . 20<br />
Compressor Surge . . . . . . . . . . . . . . . . . . . . . . . . . . . . . . 20<br />
Chilled Water Temperature Too High . . . . . . . . . . . . 20<br />
Chilled Water Temperature Too Low with<br />
Compressor Running. . . . . . . . . . . . . . . . . . . . . . . . . . 22<br />
Refrigerant Temperature Too Low . . . . . . . . . . . . . . . 22<br />
Leaving Chilled Water Temperature Fluctuates . . 22<br />
Condenser Pressure Too High. . . . . . . . . . . . . . . . . . . 22<br />
Oil Pressure Too Low. . . . . . . . . . . . . . . . . . . . . . . . . . . . 22<br />
Oil Pressure Too High . . . . . . . . . . . . . . . . . . . . . . . . . . . 22<br />
Oil Reservoir Temperature Too Low . . . . . . . . . . . . . 22<br />
Oil Reservoir Temperature Too High. . . . . . . . . . . . . 22<br />
Compressor Discharge Gas Temperature<br />
Too High. . . . . . . . . . . . . . . . . . . . . . . . . . . . . . . . . . . . . . . 22<br />
CONTROLS. . . . . . . . . . . . . . . . . . . . . . . . . . . . . . . . . . . 22-27<br />
Safety Controls. . . . . . . . . . . . . . . . . . . . . . . . . . . . . . . . . . 22<br />
Operating Controls . . . . . . . . . . . . . . . . . . . . . . . . . . . . . . 23<br />
PRE-START UP CHECK LIST . . . . . . . . . . . . . . . . . CL-1
INTRODUCTION<br />
General — All persons concerned with the start-up <strong>and</strong> operation<br />
of the centrifugal refrigeration machine should be familiar<br />
with the equipment involved. This instruction book is intended<br />
to cover general rules for start-up procedures, followed<br />
by operation <strong>and</strong> maintenance instructions.<br />
Because of machine variations it is not possible to prepare<br />
an instruction book covering all minor details. This instruction<br />
book will fulfill common requirements. Additional information<br />
pertaining to this particular chiller is included in the special job<br />
binder provided with the chiller upon delivery. This includes<br />
the prime mover, custom controls, instruments, etc.<br />
Special attention should be given to precautionary instructions<br />
emphasized in this book to avoid start-up difficulties.<br />
These precautions are, in general, applicable to all sizes of<br />
17DA centrifugal refrigeration machines.<br />
<strong>Instructions</strong> for the prime mover if not included with <strong>Carrier</strong><br />
Air Conditioning instructions should be obtained from the<br />
manufacturer.<br />
Factory Test — Prior to shipment, the compressor is completely<br />
assembled <strong>and</strong> tested. Performance as to lubrication,<br />
speed balance <strong>and</strong> general mechanical operation has been determined<br />
to be satisfactory.<br />
Job Data — The job consists of the following:<br />
1. 17DA <strong>Start</strong>-<strong>Up</strong>, <strong>Operation</strong> <strong>and</strong> <strong>Maintenance</strong> <strong>Instructions</strong><br />
2. Job drawings showing:<br />
a. Machine assembly<br />
b. Machine wiring<br />
c. Machine piping<br />
d. Controls <strong>and</strong> related wiring<br />
3. Manufacturer's Installation <strong>and</strong> <strong>Start</strong>-<strong>Up</strong> <strong>Instructions</strong> for:<br />
a. Drive<br />
b. Gear (if applicable)<br />
Field-Supplied Tools — The following field-supplied<br />
tools are need for installation <strong>and</strong> start up of the 17DA chiller:<br />
• General mechanics tools<br />
• Alignment tools consisting of a laser alignment instrument<br />
or dial indicators <strong>and</strong> brackets <strong>and</strong> a low profile hydraulic<br />
cylinder jack with hydraulic pump. These are used to<br />
accomplish initial alignment <strong>and</strong> “hot check.”<br />
• Digital volt-ohmmeter. This is used for instrument calibration.<br />
(Test voltage from analog ohmmeters can destroy RTD<br />
[resistance temperature detector] sensors.)<br />
• 4-20 mA signal generator. This is used for instrument calibration<br />
including valve positioners.<br />
• Portable vacuum pump capable of reaching dehydration<br />
vacuum with a capacity of 5 cfm or greater used for chiller<br />
evacuation <strong>and</strong> dehydration.<br />
• Electronic or wet-bulb vacuum indicator for measurement<br />
of vacuum level.<br />
• Electronic leak detector suitable for non-chlorinated<br />
refrigerants.<br />
Inspect Machine Room — All installation work as<br />
outlined in 17DA Installation <strong>Instructions</strong> book should be completed,<br />
<strong>and</strong> all construction debris must be removed from the<br />
immediate area of the machinery prior to initial start-up of the<br />
machine.<br />
Drive Arrangement — Inspect drive mounting, location,<br />
coupling, speed rating, etc., for agreement with job drawings<br />
<strong>and</strong> specifications. Gear assembly (if used) must agree<br />
with installation recommendations outlined in gear manufacturer's<br />
instructions.<br />
3<br />
Piping — Check the following piping installation locations:<br />
1. Refrigerant pumpout system<br />
2. External or auxiliary oil system<br />
3. All bypass lines <strong>and</strong> valves<br />
4. Turbine drive piping<br />
a. Blowdown valves for each turbine stage installed<br />
per manufacturer's instructions.<br />
b. Trace all field installed piping to the turbine to<br />
ensure that it conforms to the turbine manufacturers<br />
installation instructions.<br />
c. Steam supply line condensate traps must be properly<br />
installed to keep condensate out of the turbine.<br />
A condensate drain should be located immediately<br />
ahead of the trip <strong>and</strong> throttle valve so that all condensate<br />
may be cleared from the steam line immediately<br />
before steam is admitted to the turbine.<br />
d. Proper supports on steam supply <strong>and</strong> exhaust line<br />
to prevent stress or strain on the turbine at operating<br />
temperatures.<br />
e. Coupling alignment should be checked before <strong>and</strong><br />
after the steam pipe is heated <strong>and</strong> before the turbine<br />
warm-up has begun. A change in alignment<br />
indicates a possible pipe strain that must be<br />
corrected.<br />
5. Gas engine drive piping (check the following piping<br />
for agreement with job blueprints):<br />
a. Gas pressure reducing valves with shutoff valves.<br />
b. Engine coolant piping with coolant thermostatic<br />
valve installed so that water flows in direction<br />
marked on valve.<br />
c. Oil cooler package piping<br />
d. Exhaust piping<br />
NOTE: Exhaust piping is critical. Refer to drive manufacturer's<br />
recommendations for installation of exhaust piping.<br />
Wiring — Refer to job wiring diagrams. All wiring must<br />
agree with these drawings.<br />
AUXILIARY EQUIPMENT WIRING — Check the<br />
following:<br />
1. Brine pump<br />
2. Condenser water pump<br />
3. Cooling tower fan motor<br />
4. Auxiliary oil pump<br />
5. Oil heater<br />
6. Overload selections in all motor starters. Overload values<br />
must agree with motor nameplate data.<br />
TURBINE DRIVE WIRING — Check the following:<br />
1. Turbine solenoid trip mechanism.<br />
2. Auxiliary oil pump if used. Check pump starter for proper<br />
voltage, amperage, <strong>and</strong> overload setting. Operate pump to<br />
determine direction of rotation. Do not operate dry of oil.<br />
3. Check job drawings for other electrical devices used with<br />
the turbine. Ensure that their wiring agrees with the job<br />
wiring blueprints.<br />
GAS ENGINE DRIVE WIRING — All wiring must agree<br />
with job wiring diagrams. Refer to engine manufacturer's instructions<br />
for starting techniques.<br />
Safety Controls — Safety controls can be a combination<br />
of electronic sensors supplying information to the programmable<br />
logic controller (PLC), mechanical switches which supply<br />
an open/closed signal to the PLC, <strong>and</strong> mechanical devices that<br />
act directly on the equipment with follow-up action provided<br />
by the PLC. The PLC is shown in Fig. 1. A turbine overspeed
trip is a good example of the type of safety that acts directly. If<br />
specified, there may be both sensor inputs <strong>and</strong> mechanical<br />
switches monitoring some points.<br />
Refer to Table 1 for set points, except for the settings supplied<br />
with the machine documentation. Job documentation will take<br />
precedence over these st<strong>and</strong>ard settings.<br />
Temperature switches should be set in a temperature bath <strong>and</strong><br />
compared to an accurate st<strong>and</strong>ard or electronic thermometer.<br />
Pressure switches should be set using an accurate gage <strong>and</strong> a<br />
controlled pressure source.<br />
Pressure transducers should be checked using an accurate<br />
gage <strong>and</strong> a controlled pressure source.<br />
Thermistor <strong>and</strong> RTD sensor panel readouts should be compared<br />
to the temperature to which they are exposed. If possible,<br />
hold the sensor in ambient air <strong>and</strong> compare the reading with an<br />
accurate thermometer.<br />
Mechanical interlock <strong>and</strong> limit switch operation must be confirmed<br />
by testing the actuator.<br />
The turbine overspeed linkage should be tested before the turbine<br />
is powered. The trip actuator in the shaft can only be tested<br />
by running the turbine. Once the turbine can run, it should be<br />
gradually brought up to trip speed. If the turbine fails to trip at<br />
the trip speed, then it should be shut down immediately <strong>and</strong> not<br />
be started until a turbine manufacturer’s representative corrects<br />
the problem.<br />
Motor Drive — Accurate communication between the controls<br />
<strong>and</strong> the starter/VFD (variable frequency drive) must be confirmed<br />
by test. For equipment of the size <strong>and</strong> capacity of the<br />
17DA chiller, it is likely that the control panel <strong>and</strong> the starter/<br />
VFD will communicate through a data line, not through hardwired<br />
circuits. There may be an “Emergency Stop” button hardwired<br />
between the control panel <strong>and</strong> the starter.<br />
Where the chiller controls <strong>and</strong> ancillary equipment controls<br />
are connected to a building automation system via data lines, it<br />
must be confirmed that the central system cannot override the<br />
chiller safeties nor energize any chiller component directly. The<br />
starter or VFD, in particular, must be protected from being energized<br />
by a comm<strong>and</strong> from anywhere other than the chiller controls.<br />
With the starter in a safety mode or disconnected from the<br />
motor, attempts to energize the starter should be made from the<br />
building controls to confirm that the building control system cannot<br />
energize the starter directly.<br />
If the starter can be energized, reprogramming of the control<br />
system is essential before the starter is put on-line. Accidental<br />
starting of the motor could have extreme consequences to the<br />
chiller.<br />
The program correction should be made in the starter/VFD<br />
control system rather than in the building control system so that<br />
future updates to the building controls do not remove this<br />
protection.<br />
4<br />
Gas Engine Drive — Engine drives will be tested <strong>and</strong><br />
started by the engine manufacturer's representative. Control interfaces<br />
will be tested by the <strong>Carrier</strong> technician in co-operation<br />
with the engine manufacturer's representative. A check list from<br />
the engine manufacturer must be completed before the engine<br />
service representative is called.<br />
Turbine Drive — Turbines have their own safety systems<br />
which should be tested according to the instructions found in<br />
their manufacturer’s literature. If the manufacturer’s instructions<br />
are not available, they must be obtained from the local <strong>Carrier</strong><br />
representative or from the turbine manufacturer.<br />
Interlocks between the chiller controls <strong>and</strong> the turbine controls<br />
must be tested. The chiller must energize a solenoid which<br />
then allows the trip <strong>and</strong> throttle valve to be set. If the solenoid is<br />
deenergized, then the turbine trip <strong>and</strong> throttle valve must immediately<br />
close.<br />
A feedback switch to the chiller controls is located on the trip<br />
<strong>and</strong> throttle valve. The switch must close when the valve is<br />
opened. This provides a RUN signal to the chiller controls which<br />
will then start to load the compressor. If the trip <strong>and</strong> throttle<br />
valve is closed by a trip from either the chiller or turbine controls,<br />
then this switch will open. This is a signal to the chiller that<br />
the turbine has tripped <strong>and</strong> the chiller will enter a safety shutdown<br />
mode.<br />
Other interlocks, signals <strong>and</strong> feedbacks will vary with the job.<br />
Consult the job controls manual <strong>and</strong> the field control drawings<br />
for the entire chiller <strong>and</strong> for the turbine.<br />
All items on Pre-<strong>Start</strong>-<strong>Up</strong> Checklist must be completed before<br />
the turbine service representative is called.<br />
Pumpout System — The low-pressure cutout should be<br />
set at the saturated pressure of refrigerant R-134a at 34 F (1 C).<br />
A manual bypass switch is required to allow complete evacuation<br />
of the cooler. See Table 2.<br />
Leak Test <strong>and</strong> Dehydration — Check the absolute<br />
pressure on the refrigerant side of the machine. The final operation<br />
of the 17DA installation is to leak test the machine <strong>and</strong> dehydrate<br />
it to the point where it maintains a pressure of 0.21 psia<br />
(1 kPa) (equivalent to 29.48 in. [749 mm] mercury vacuum referenced<br />
to a 30 in. [762 mm] barometer). Refer to the Leak Testing<br />
<strong>and</strong> Chiller Dehydration sections on pages 15 <strong>and</strong> 16.<br />
If the machine absolute pressure is higher than the above values,<br />
repeat the evacuation <strong>and</strong> dehydration pumpdown operations<br />
until the machine proves to have a leak rate or vacuum loss<br />
at a rate less than 0.1 in. (2 mm) mercury column in 24 hours.<br />
The oil will always contain a minimal amount of dissolved<br />
refrigerant. It is normal for a refrigerant sensor to sense refrigerant<br />
if placed too near the vent caps. If the seal allows refrigerant<br />
vapor to pass, a sensor located at floor level 3 to 4 ft (0.9 to<br />
1.2 m) from the sump vent cap will be quickly triggered as the<br />
heavy refrigerant vapor will drop into the sump <strong>and</strong> flow out the<br />
vent cap to floor level.<br />
Table 1 — Control Settings<br />
CONTROL LOCATION<br />
English<br />
SETTING<br />
Metric<br />
Low Chilled Water Temperature<br />
Cutout<br />
Cooler Water Box<br />
36 F or 5 F lower than brine temperature<br />
2.2 C or 3 C lower than brine temperature<br />
High Discharge Gas Temperature<br />
Cutout<br />
Compressor End Wall 220 F 104 C<br />
High Thrust Bearing Temperature Compressor Bearing Chamber 185 F 85 C<br />
High Condenser Pressure Cutout Instrument Panel 185 psig 13.0 kg/sq cm<br />
Low Cooler Pressure Cutout Instrument Panel<br />
2 psi below design suction<br />
pressure<br />
0.14 kg/sq cm<br />
Low Seal Oil Pressure Cutout Instrument Panel Trip 11 psid Trip 0.76 kg/sq cm<br />
Low Bearing Oil Pressure Cutout Instrument Panel<br />
Trip 8 psig<br />
Reset 13 psig<br />
Trip 0.56 kg/sq cm<br />
Reset 0.90 kg/sq cm<br />
Auxiliary Oil Pump Differential<br />
Pressure Control<br />
Instrument Panel<br />
Stop 27 psid<br />
<strong>Start</strong> 23 psid<br />
Stop 1.90 kg/sq cm<br />
<strong>Start</strong> 1.60 kg/sq cm
Table 2 — Pumpout System Ratings<br />
SATURATED CONDITIONS<br />
PUMPOUT<br />
(R-134a)<br />
SYSTEM<br />
SETTING<br />
Pressure<br />
Maximum<br />
Temperature<br />
psig kPa F C<br />
Normal Condensing Pressure 146 1007 110 43<br />
Low-Pressure Cutout 31.5 217 36 2<br />
High-Pressure Cutout 175 1207 121 49<br />
Relief Valve 185 1276 125 52<br />
Charge Machine with Water — When the machine<br />
has been proved leak tight <strong>and</strong> dry, it may be filled with water,<br />
brine or other process fluid as the case may be. Vent all lines<br />
<strong>and</strong> check for leaks.<br />
It is advisable to install indicators on the coupling halves between<br />
the compressor <strong>and</strong> drive or gear to check for alignment<br />
drift while charging with water <strong>and</strong> refrigerant. The weight of<br />
these materials will always cause a shift in the position of the<br />
machine components. Before <strong>and</strong> after indicator readings will<br />
give a good clue to the direction final alignment should take.<br />
Charge Machine with Oil — The 17DA chiller has an<br />
integral lubrication system mounted on a common base with<br />
the compressor. A parallel auxiliary oil pump system may also<br />
be furnished. Charge the oil system with 35 gallons (132.5 L)<br />
of oil, <strong>Carrier</strong> P/N PP23BZ106.<br />
Fig. 1 — Typical PLC Screen on Control Panel<br />
5<br />
a17-578<br />
Refrigerant R-134a requires the use of polyolester oil. Polyolester<br />
oils have a different molecular structure proprietary to<br />
each manufacturer <strong>and</strong> have property differences that may or<br />
may not make them suitable for operation in the 17DA chiller.<br />
<strong>Carrier</strong> supplied oil has been laboratory tested by <strong>Carrier</strong> <strong>and</strong><br />
has been field tested in the 17DA chiller.<br />
Ensure that there is adequate lubrication prior to the operation<br />
of all drive line components. Check the gear <strong>and</strong> drive<br />
manufacturer’s instructions for proper initial lubrication<br />
procedure.<br />
Oil pressure from the main pump is set to maintain a pressure<br />
35 psi (241 kPa) greater than the refrigerant pressure behind<br />
the shaft seal. If the oil pressure differential across the seal<br />
falls below 23 psid (158 kPa), the auxiliary oil pump will start.<br />
Final Pre-<strong>Operation</strong> Alignment Check — Prior<br />
to operating the compressor <strong>and</strong> speed increasing gear (if<br />
used), coupling alignment <strong>and</strong> separation must be checked.<br />
1. Ensure that coupling alignment is within coupling manufacturer's<br />
specified tolerances.<br />
2. Refer to the coupling vendor’s drawing for hub separation<br />
tolerances.<br />
3. When checking hub separation, electric motor shaft must<br />
be in center position of shaft float or in magnetic center as<br />
specified by the motor manufacturer.
4. If realignment is required, follow instructions supplied by<br />
coupling manufacturer. <strong>Carrier</strong> St<strong>and</strong>ard Service Techniques,<br />
Form SM-15, Rev A, also details realignment<br />
techniques.<br />
Operate Drive — It is good practice to operate the drive<br />
uncoupled from the compressor first <strong>and</strong> then couple it to the<br />
compressor. Refer to the drive manufacturer’s instructions for<br />
drive protection devices <strong>and</strong> settings. Check turbine overspeed<br />
<strong>and</strong> confirm correct motor direction of rotation at this time. Reassemble<br />
coupling after operating the drive successfully.<br />
NOTE: If there is a gear between the motor <strong>and</strong> compressor,<br />
then it reverses rotation. Make sure that the gear output shaft is<br />
turning in the correct direction.<br />
Set Purge Valves — Open all the purge service valves.<br />
Check Water Supply — Be certain that chilled water,<br />
condensing water <strong>and</strong> oil cooler water supplies are available<br />
<strong>and</strong> that pumps will run before operating compressor.<br />
Check Air Supply (Pneumatic Machines) —<br />
Make sure that control air is 35 psig (241 kPa).<br />
START-UP<br />
Pre-<strong>Operation</strong> Settings — Complete these settings<br />
before starting compressor for first time.<br />
Drive <strong>Operation</strong> — Refer to drive manufacturer's startup<br />
instructions. Complete drive starting requirements before<br />
operating compressor.<br />
Initial Refrigerant Charge<br />
CAUTION<br />
When liquid refrigerant R-134a is injected into a low vacuum<br />
of 29.48 in. (749 mm) mercury, it will immediately<br />
flash to a gas at a temperature lower than –100 F (–73 C). It<br />
is for this reason that water must be circulating before<br />
charging liquid refrigerant. Non-circulating water would<br />
quickly freeze <strong>and</strong> damage the machine. If an auxiliary<br />
refrigerant storage tank (receiver) is furnished, then liquid<br />
refrigerant may be charged directly into this evacuated<br />
receiver without damage.<br />
Large machines run with liquid refrigerant in the cooler so<br />
refrigerant is charged into the cooler or low-pressure side of the<br />
machine. For general instructions on how to h<strong>and</strong>le refrigerant<br />
refer to <strong>Carrier</strong> St<strong>and</strong>ard Service Techniques, Form SM-1. Use<br />
the Charging by Weight method, cross checking with the machine's<br />
refrigerant sight glass provided on the back of the cooler<br />
shell, <strong>and</strong> the suction pressure gage.<br />
Charge refrigerant as follows:<br />
1. <strong>Start</strong> cooler <strong>and</strong> condenser water circulating pumps.<br />
2. Charge the first refrigerant in the vapor state, continuing<br />
until the machine pressure exceeds 35 psig (241 kPa).<br />
The refrigerant temperature corresponding to this pressure<br />
is high enough to prevent water freezing damage <strong>and</strong><br />
will also satisfy the refrigerant low-pressure cutout safety<br />
switch setting (31.5 psig [217 kPa]).<br />
3. Turn the refrigerant bottles or drums over <strong>and</strong> begin<br />
charging the refrigerant in the liquid phase. Continue<br />
charging liquid refrigerant until about 2/3 of the estimated<br />
full load charge is in the machine.<br />
6<br />
Initial Compressor <strong>Operation</strong><br />
CAUTION<br />
Do not apply power to any system or instrument that is<br />
exposed to dehydration vacuum. Insulation breakdown<br />
<strong>and</strong> serious damage can result.<br />
1. Energize the control panel.<br />
2. Place the guide vanes in MANUAL operation.<br />
3. Manually energize the oil cooler solenoid <strong>and</strong> verify flow<br />
through the oil cooler. Return the solenoid to automatic<br />
control.<br />
4. Observe whether the compressor shaft moves forward<br />
(toward the suction) off the shutdown seal. Manually energize<br />
a compressor oil pump. Observe the shaft <strong>and</strong> verify<br />
that the seal movement indication changes on the PLC.<br />
5. Turn off the oil pump <strong>and</strong> observe the shaft move back toward<br />
the driver. The PLC should indicate that the shutdown<br />
seal is closed. If the PLC does not indicate the shaft<br />
position to be on the shutdown seal, terminate the startup.<br />
Correct the shaft feedback before attempting a start to<br />
prevent damage to the shaft <strong>and</strong> seal.<br />
6. Place Compressor Oil Pumps into AUTOMATIC mode.<br />
7. Place Capacity Control in MANUAL mode.<br />
8. Open all valves to seal oil separator pot. Energize the separation<br />
pot heater if manually controlled. If the heater is<br />
PLC controlled verify its operation after the compressor<br />
starts.<br />
9. Ensure that there is water in the cooling tower <strong>and</strong> that it<br />
is operational.<br />
CAUTION<br />
No brine or water over 100 F (37 C) can be allowed to flow<br />
through the cooler. Damage to unit will result.<br />
10. Open chilled <strong>and</strong> condenser water valves <strong>and</strong> start the<br />
water pumps. If these are automatically controlled, verify<br />
that they have opened <strong>and</strong> started.<br />
11. <strong>Start</strong> the compressor <strong>and</strong> let it run for approximately<br />
5 minutes. While it is running, observe bearing temperatures,<br />
vibration levels, <strong>and</strong> oil pressure. Listen for unusual<br />
sounds.<br />
12. Stop the compressor. During coast down again verify that<br />
the compressor is rotating in the correct direction which is<br />
counterclockwise if it is seen from the drive.<br />
13. Observe the shaft movement to verify that the shutdown<br />
seal has closed. If the shutdown seal is manually controlled,<br />
open the bleed valve on the inboard side of the<br />
bearing chamber (inboard is the heat exchanger side.)<br />
Adjust Refrigerant Charge — To adjust the refrigerant<br />
charge, perform the following procedure.<br />
1. Adjust control station to operate at MANUAL. Ensure<br />
that the guide vanes are closed as indicated on the main<br />
guide vane indicator.<br />
2. The condenser liquid level control consists of a level<br />
transmitter, the liquid line valve <strong>and</strong> a control program in<br />
the PLC. As an initial set point, place the level setting<br />
even with the condensed liquid thermowell. The well is<br />
located on the same end of the vessel as the level transmitter.<br />
It can be on either side of the vessel. After the machine<br />
has reached stable operation, the level should be set<br />
such that the condensed liquid temperature is 1 to 3° F<br />
(0.5 to 1.6° C) below saturated condensing temperature.
The proportional b<strong>and</strong> can be adjusted on the PLC to stabilize<br />
the level if necessary.<br />
3. <strong>Start</strong> the compressor. Observe the machine's operation for<br />
15 to 20 minutes before increasing the load. During this<br />
period, make the following checks <strong>and</strong> adjustments:<br />
a. Check oil pressure.<br />
b. Adjust water flow thru oil cooler so that bearing<br />
temperatures stay between 150 <strong>and</strong> 170 F (65 <strong>and</strong><br />
77 C) approximately.<br />
c. Watch bearing temperatures carefully. This is the<br />
first time that the machine has been run under<br />
refrigeration load. Bearing temperatures may level<br />
off at some temperature slightly higher than 170 F<br />
(77 C) listed above. This may be the normal stable<br />
condition for this bearing. High thrust bearing temperature<br />
will shut the machine down at 180 F<br />
(82 C).<br />
d. Watch the discharge temperature <strong>and</strong> if the temperature<br />
climbs past 150 F (65.5 C), open the guide<br />
vanes in small steps of 5% or less until the discharge<br />
temperature starts to decrease.<br />
4. Slowly open the guide vanes, by manual control, thus increasing<br />
the load. Do not exceed the current rating of the<br />
electric motor. Watch for other signs of overloading a turbine<br />
or engine drive.<br />
5. Add liquid refrigerant, trimming the charge off at the<br />
point where the machine reaches design operating temperature<br />
<strong>and</strong> pressure conditions.<br />
CAUTION<br />
Excessive overcharge may cause liquid refrigerant carryover<br />
into the compressor, causing severe overload <strong>and</strong> possible<br />
compressor damage.<br />
6. Shut the machine off. When the refrigerant level settles<br />
down, mark this optimum level on the sight glass. Maintain<br />
this shutdown level.<br />
7. To determine the approximate refrigerant charge for the<br />
machine, add the cooler charge to the applicable condenser<br />
charge as listed in Tables 3A <strong>and</strong> 3B.<br />
Hot Alignment Check <strong>and</strong> Doweling — After the<br />
machine has been running at about full load for 4 hours, its<br />
components will have come up to steady state operating temperature<br />
conditions <strong>and</strong> the final hot alignment check may be<br />
made.<br />
7<br />
Realign component locations until angular <strong>and</strong> parallel<br />
alignments are within coupling manufacturer's specified tolerances.<br />
Dowel all equipment into place as soon as the hot alignment<br />
check proves that the machine is within these running tolerances.<br />
See <strong>Carrier</strong> St<strong>and</strong>ard Service Techniques, Form SM-15,<br />
Rev A, for these operations.<br />
<strong>Operation</strong>al Testing — When the chiller is in operation,<br />
<strong>and</strong> it is time to set the flows <strong>and</strong> confirm that the machine<br />
is operating according to design conditions, a heat balance<br />
must be determined. In brief, a heat balance is the sum of the<br />
energy being absorbed by the cooler plus the energy supplied<br />
through the driver (turbine, motor) compared with the energy<br />
being discharged through the condenser.<br />
Cooler Tons + Motor Tons = Condenser Tons<br />
When these two items are equal it is certain that the readings<br />
<strong>and</strong> measurements are accurate. The motor kW must be corrected<br />
for motor efficiency <strong>and</strong> gear losses must be subtracted<br />
from motor kW to get actual compressor input horsepower.<br />
Motor kW is converted to equivalent tons by this formula:<br />
Tons = kW / 3.515<br />
Cooler <strong>and</strong> condenser tons: (for fresh water, specific heat<br />
[sp ht] = 1 <strong>and</strong> specific gravity [sp gr] = 1)<br />
Tons = (gpm * T * sp ht * sp gr) / 24<br />
A perfect heat balance is 0, but this is practically impossible<br />
to achieve. With laboratory quality instrumentation, less than a<br />
2% heat balance at full load conditions should be achievable.<br />
Greater than 5% should be regarded as very inaccurate <strong>and</strong> requires<br />
further investigation of the start-up conditions.<br />
Instruct Customer Operator — Ensure the operator(s)<br />
underst<strong>and</strong> all operating <strong>and</strong> maintenance procedures.<br />
Point out the various chiller parts <strong>and</strong> explain their function as<br />
part of the complete system.<br />
CONTROL PANEL<br />
1. Internal safeties<br />
2. Communication with chiller controls<br />
3. <strong>Start</strong>er operational sequence<br />
4. Current <strong>and</strong> voltage monitor operation<br />
VFD<br />
1. Detailed description of component, section, purpose, <strong>and</strong><br />
operation<br />
2. Control section processor <strong>and</strong> access to screens<br />
3. Procedures to switch from bypass to VFD operation (if<br />
bypass equipped)<br />
Table 3A — Typical 17DA Cooler <strong>and</strong> Condenser Charges (R-134a) (lb)<br />
COOLER<br />
SIZE<br />
15-FT TUBES 18-FT TUBES 22-FT TUBES CONDENSER<br />
SIZE<br />
15-FT TUBES 18-FT TUBES 22-FT TUBES<br />
61 3,000 3,600 4,400 61 2,000 2,400 2,900<br />
63 3,600 4,300 5,300 63 2,000 2,400 2,900<br />
65 3,600 4,300 5,300 65 2,500 3,000 3,600<br />
67 4,200 5,100 6,200 67 2,500 3,000 3,600<br />
71 4,600 5,500 6,800 71 2,600 3,100 3,800<br />
73 5,000 5,900 7,300 73 2,600 3,100 3,800<br />
75 5,600 6,600 8,100 75 3,100 3,700 4,500<br />
81 6,500 7,700 9,500 81 3,500 4,100 5,000<br />
82 7,700 9,300 11,300 83 4,000 4,700 5,800<br />
83 6,900 8,300 10,200 85 4,600 5,400 6,700<br />
84 8,200 9,900 12,200 87 4,500 5,300 6,500<br />
85 7,700 9,200 11,300<br />
86 10,200 12,300 15,200<br />
87 8,600 10,400 12,600<br />
88 11,000 13,500 16,500<br />
90 13,000 15,600 19,200
Table 3B — Typical 17DA Cooler <strong>and</strong> Condenser Charges (R-134a) (Kg)<br />
COOLER<br />
SIZE<br />
4.6 M TUBES 5.5 M TUBES 6.7 M TUBES CONDENSER<br />
SIZE<br />
4.6 M TUBES 5.5 M TUBES 6.7 M TUBES<br />
61 1362.0 1634.4 1997.6 61 908.0 1089.6 1316.6<br />
63 1634.4 1952.2 2406.2 63 908.0 1089.6 1316.6<br />
65 1634.4 1952.2 2406.2 65 1135.0 1362.0 1634.4<br />
67 1906.8 2315.4 2814.8 67 1135.0 1362.0 1634.4<br />
71 2088.4 2497.0 3087.2 71 1180.4 1407.4 1725.2<br />
73 2270.0 2678.6 3314.2 73 1180.4 1407.4 1725.2<br />
75 2542.4 2996.4 3677.4 75 1407.4 1679.8 2043.0<br />
81 2951.0 3495.8 4313.0 81 1589.0 1861.4 2270.0<br />
82 3495.8 4222.2 5130.2 83 1816.0 2133.8 2633.2<br />
83 3132.6 3768.2 4630.8 85 2088.4 2451.6 3041.8<br />
84 3722.8 4494.6 5538.8 87 2043.0 2406.2 2951.0<br />
85 3495.8 4176.8 5130.2<br />
86 4630.8 5584.2 6900.8<br />
87 3904.4 4721.6 5720.4<br />
88 4994.0 6129.0 7491.0<br />
90 5902.0 7082.4 8716.8<br />
4. Location of isolation transformer, incoming switch gear.<br />
5. <strong>Operation</strong> <strong>and</strong> servicing of the VFD Cooling system<br />
(where applicable).<br />
6. Interface with chiller control sequence.<br />
7. Communication with chiller controls (hard wired, data<br />
line)<br />
STEAM TURBINE<br />
1. Control interface with chiller controls<br />
2. Turbine operation <strong>and</strong> maintenance training should be<br />
done by the turbine manufacturer service representative.<br />
GAS ENGINE<br />
1. Control interface with chiller controls.<br />
2. Engine operation <strong>and</strong> maintenance training should be<br />
done by the engine manufacturer service representative.<br />
OPERATING PROCEDURES<br />
1. <strong>Start</strong>ing <strong>and</strong> stopping of chiller including preparation of<br />
turbine when applicable.<br />
2. Valves that should be closed while machine is idle.<br />
3. Move liquid refrigerant to storage tank for extended shutdowns.<br />
Vapor pressure in the chiller should remain above<br />
atmosphere to prevent air from entering <strong>and</strong> to allow periodic<br />
leak checking.<br />
LOG SHEETS<br />
1. Information to be recorded <strong>and</strong> how often.<br />
2. Spotting trends in the data for advanced warning of impending<br />
service needs.<br />
Operator Duties<br />
1. Become familiar with the chiller <strong>and</strong> related equipment<br />
before operating the chiller.<br />
2. Prepare the system for start-up, start <strong>and</strong> stop the chiller,<br />
<strong>and</strong> place the system in a shutdown condition.<br />
3. Maintain a log of operating conditions <strong>and</strong> document any<br />
abnormal readings.<br />
4. Inspect the equipment <strong>and</strong> make routine adjustments.<br />
Maintain the proper oil <strong>and</strong> refrigerant levels.<br />
5. Protect the system from damage during shutdown<br />
periods.<br />
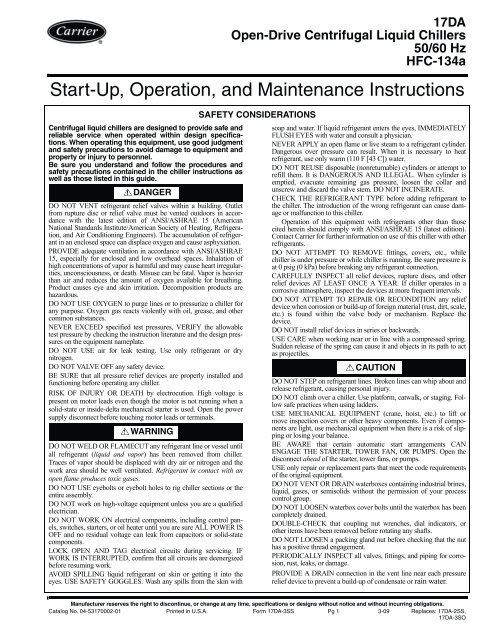
<strong>Start</strong> Machine — These are general instructions for<br />
17DA machines. Individual machines may vary in equipment<br />
furnished. See Fig. 2 <strong>and</strong> 3.<br />
8<br />
1. Energize controls. Investigate any alarm messages <strong>and</strong><br />
make appropriate corrections.<br />
2. Check refrigerant level in cooler to be sure it is within operating<br />
limits (at least 1/2 sight glass). If level appears<br />
low, check the subcooler sight glass to see if missing refrigerant<br />
is in the subcooler. This refrigerant will redistribute<br />
soon after machine starts.<br />
3. Check oil levels for compressor, gear, drive, <strong>and</strong> other<br />
auxiliary equipment.<br />
4. Ensure that shutdown seal bleed valve (Fig. 3) is open.<br />
5. Supply air to pneumatic controls. Check pressure <strong>and</strong><br />
cleanliness.<br />
6. <strong>Start</strong> water pumps, if not controlled by the chiller.<br />
7. Close shutdown seal bleed valve if it is a manual valve.<br />
See Fig. 3. Valve must remain closed until the machine<br />
has stopped <strong>and</strong> the shaft is at full stop.<br />
8. Open isolation valves to refrigerant/oil separator.<br />
9. If the chiller is a motor drive, press the START button <strong>and</strong><br />
then the machine will start.<br />
10. If the chiller is a turbine drive, perform the following:<br />
a. Push the START button on control panel. The<br />
operator may now evacuate the surface condenser.<br />
b. When the surface condenser is under vacuum, set<br />
the governor for minimum speed. Open throttle<br />
valve slowly <strong>and</strong> bring turbine up to minimum<br />
speed. When the governor takes control, open the<br />
throttle valve fully.<br />
c. Run the turbine at minimum speed for the time<br />
specified by the manufacturer. Adequate oil pressure<br />
must be present on all drive components. If<br />
adequate oil pressure is not seen, shut down<br />
machine.<br />
d. Bring the turbine to operating speed. The machine<br />
controls will assume control of the turbine <strong>and</strong><br />
begin to load the chiller.<br />
11. Listen for unusual sounds which may indicate malfunction.<br />
If heard, shut down immediately.<br />
12. Adjust oil cooling water to supply 120 F (49 C) oil to machine<br />
bearings. Observe oil temperatures on compressor,<br />
gear, <strong>and</strong> drive until they have leveled off satisfactorily.<br />
13. <strong>Start</strong> thermal purge unit.
DATE<br />
REFRIGERATION LOG CARRIER 17DA CENTRIFUGAL REFRIGERATION MACHINE<br />
Plant MACHINE MODEL NO. MACHINE SERIAL NO. REFRIGERANT TYPE<br />
DATE COOLER CONDENSER COMPRESSOR GEAR OIL PRIME MOVER*<br />
OPERATOR<br />
REMARKS<br />
Pressure Temp A B C D<br />
Refrigerant Brine Refrigerant<br />
Bearing<br />
Water<br />
Oil<br />
Temp<br />
Temp<br />
Temp Damper<br />
Shut<br />
Pressure<br />
Position<br />
Temp<br />
Thrust Seal<br />
Press. Temp Down<br />
Press. Temp<br />
End End<br />
Seal (reser-<br />
Level In Out In Out Supply<br />
Housing voir)<br />
TIME<br />
Level<br />
9<br />
* ELECTRIC MOTOR STEAM TURBINE GAS ENGINE<br />
A Volts Steam Pressure Gas Pressure<br />
B Amps Load Steam Pressure Manifold Pressure<br />
C Bearing Temp Bearing Temp Jacket Water Temp<br />
D Oil Level Oil Pressure Oil Temp<br />
REMARKS: Indicate shutdowns on safety controls, repairs made <strong>and</strong> oil or refrigerant added or removed. Include amounts.<br />
Fig. 2 — Refrigeration Log
1<br />
9<br />
2<br />
14. See Table 4 for normal operating ranges. Check these<br />
characteristics hourly, recording readings in refrigeration<br />
log. Refrigeration log should include all temperatures <strong>and</strong><br />
pressures mentioned above plus other machine history.<br />
This important data helps service engineers determine<br />
kind <strong>and</strong> frequency of service required. See your <strong>Carrier</strong><br />
Service Representative for refrigeration log forms (see<br />
Fig. 2).<br />
Table 4 — Normal Operating Ranges<br />
ITEM DESCRIPTION RANGE<br />
1 Chilled Water Temperature<br />
36-45 F<br />
(2-7 C)<br />
2 Condenser Entering Water<br />
65-85 F<br />
(18-29 C)<br />
3 Compressor Supply Oil<br />
110-120 F<br />
(43-49 C)<br />
4 Compressor Seal End Bearing<br />
140-180 F<br />
(60-82 C)<br />
5<br />
Compressor Drive End Journal<br />
Bearing<br />
140-180 F<br />
(60-82 C)<br />
6<br />
Compressor Drive End Drive<br />
Bearing<br />
140-180 F<br />
(60-82 C)<br />
7 Condenser Temperature 105 F (41 C) Avg<br />
8 Cooler Suction Temperature 28 F (-2 C) min<br />
35 psi (241 kPa)<br />
9 Seal Oil Supply Pressure greater than item<br />
10<br />
Approx. 2 lb (0.9<br />
10 Back of Seal Pressure<br />
kg) higher than<br />
suction pressure<br />
11<br />
Thrust Bearing Oil Supply Pressure<br />
18-22 psig<br />
(124-152 kPa)<br />
12 Cooler Refrigerant Level Varies with load*<br />
Speeds<br />
Compressor<br />
(17DA7,17DA8)<br />
13<br />
Maximum Continuous Speed 6350, 5300 rpm<br />
(106, 88 r/s)<br />
Nominal Speed<br />
5350, 4510 rpm<br />
(89, 75 r/s)<br />
* Compare refrigerant level with optimum level when machine is shut<br />
down.<br />
3 4 5 6<br />
OPERATION<br />
Manual <strong>Operation</strong> — Control machine manually at the<br />
PLC by setting guide vanes on MANUAL <strong>and</strong> adjusting guide<br />
Fig. 3 — Compressor Details<br />
10<br />
7<br />
8<br />
LEGEND<br />
1 — Shaft End Labyrinth, Seal End<br />
2 — Journal Bearing, Seal End<br />
3 — Journal Bearing Labyrinth,<br />
Seal End, Thrust End<br />
4 — Seal Movement Switch<br />
5 — Journal Bearing, Thrust End<br />
6 — Shutdown Seal Bleed Line<br />
(valve on opposite side)<br />
7 — Shaft End Labyrinth, Thrust End<br />
8 — Seal ring<br />
9 — Balancing Piston Labyrinth<br />
a17-572<br />
vane position. Operator must watch chilled water temperature<br />
constantly when running machine in this manner.<br />
Cold Weather <strong>Operation</strong> — Leaving condenser water<br />
should be maintained at 65 F (18 C) minimum. Throttle condenser<br />
water flow or cycle cooling tower fans to suit.<br />
Stop Machine<br />
1. Check drive manufacturer's recommendations for adjustments<br />
required before shutdown.<br />
2. Push STOP button. Drive will immediately slow down<br />
with a change in sound level. The compressor should<br />
come to rest within a minute or two. Check drive <strong>and</strong><br />
gear, when used, to be sure lubrication is maintained.<br />
3. After compressor shaft has stopped rotating, shut off condensing<br />
water, chilled water <strong>and</strong> oil pumps.<br />
4. Shut off cooling water to compressor oil, gear oil. <strong>and</strong> turbine<br />
oil coolers.<br />
5. Shut off main steam (or gas) valve.<br />
6. Open shutdown seal bleed valve (Fig. 3) after machine<br />
completely stops rotating.<br />
CAUTION<br />
Open seal shutdown valve only after machine comes to a<br />
full stop. If this valve is opened before the machine is fully<br />
stopped, the Teflon shutdown seal surface will be damaged.<br />
A damaged seal will allow the full refrigerant charge<br />
to be lost unless detected by the operator. If a hissing sound<br />
is heard coming from the chamber or the odor of refrigerant<br />
is detected, immediately start the oil pump <strong>and</strong> inform<br />
the servicing contractor. Leave the oil pump running until<br />
the leak can be fixed.<br />
7. Leave controls energized for except for seasonal shutdowns.<br />
8. Leave oil separation tank heaters energized.<br />
9. Isolate oil separation tank from the oil sump.<br />
Extended Shutdown<br />
1. Pump refrigerant into storage tank <strong>and</strong> valve it off to prevent<br />
loss.
2. If the machine will be exposed to freezing temperatures,<br />
drain all water from cooler <strong>and</strong> condenser. Blow out oil<br />
cooler lines to remove all traces of water. Leave water<br />
box drains open until time to refill.<br />
3. Deenergize the drive controls <strong>and</strong> refrigeration machine<br />
control panels.<br />
4. If refrigerant charge is to be left in machine, the shutdown<br />
seal bleed valve must be left open to seal off the refrigerant<br />
side of machine. Best practice is to remove liquid refrigerant<br />
<strong>and</strong> pump vapor pressure down to be equal with<br />
atmospheric pressure.<br />
5. Protect drive equipment as outlined in drive manufacturer's<br />
instructions. Before putting machine back into operation<br />
after an extended shutdown period, it may be wise to<br />
flush condenser <strong>and</strong> cooler water circuits with clean water<br />
to remove soft rust which may have formed.<br />
Pumpout System <strong>Operation</strong> — The pumpout system<br />
operation permits transfer of refrigerant (liquid or gas)<br />
from cooler to storage tank (or reverse). It can also be used for<br />
machine evacuation <strong>and</strong> removal of contaminants.<br />
Machines not containing refrigerant may be pressurized<br />
with the pumpout unit. Since the pressurizing agent is unprocessed<br />
air, some moisture <strong>and</strong> contaminants can be introduced to<br />
the machine by this method. Pressurizing with dry air or nitrogen<br />
is recommended. Procedures are based on typical piping<br />
arrangements. See Fig. 4 for a typical piping schematic <strong>and</strong><br />
valve number designations.<br />
The system consists of storage tank, pumpout compressor,<br />
condenser, valves, <strong>and</strong> piping. Liquid refrigerant drains by<br />
gravity if storage tank is below cooler. If tank is above cooler,<br />
liquid is forced up by compressed refrigerant gas pressure. Gas<br />
remaining in cooler is pumped out, condensed, <strong>and</strong> passed<br />
through a high-pressure trap into the tank. Pressures may then<br />
be equalized, by valve adjustment, permitting gravity flow of<br />
refrigerant in opposite direction.<br />
Compressor must rotate per arrow on crankcase for proper<br />
lubrication.<br />
NOTE: Numbers in schematic correspond to valve numbers in Pumpout System<br />
<strong>Operation</strong> section <strong>and</strong> are used in conjuction with the tables <strong>and</strong> text to specify which<br />
valves should be open <strong>and</strong> closed.<br />
Fig. 4 — Pumpout System Schematic<br />
11<br />
LUBRICATION — Pumpout compressors are factory<br />
charged with oil. The 5F20 open-drive is charged with 5 pints<br />
plus 1 pint for the oil separator. Use <strong>Carrier</strong> oil part no.<br />
PP23BZ103-001. This is a one gallon container. The oil level<br />
should be at the center of the sight glass when the compressor<br />
is not running. Always check the oil level before operating the<br />
compressor.<br />
CONTROL DESCRIPTION — The pumpout unit is<br />
equipped with a low pressure safety, a high pressure safety, <strong>and</strong><br />
a time delay low oil pressure safety.<br />
CONTROL SETTING — Set the safety switches using a metered<br />
air supply. The high-pressure switch setting can be<br />
checked by operating the pumpout compressor while throttling<br />
the pumpout condenser water. Exercise care when performing<br />
the check in this manner. Watch the discharge pumpout discharge<br />
pressure gage to prevent exceeding the specified cutout<br />
pressure.<br />
Safety Device Setting<br />
Low Oil Pressure 14 psig (96 kPa)<br />
Low Suction Pressure 31 psig (214 kPa)<br />
High Discharge Pressure 165 psig (448 kPa)<br />
The pumpout compressor is operated by a ON-OFF-AUTO<br />
switch. The AUTO position enables the Low Suction Pressure<br />
switch. This position is used to prevent a freeze-up when applying<br />
suction to a heat exchanger containing liquid refrigerant.<br />
Otherwise, the ON position is used.<br />
MACHINE AND STORAGE TANK EVACUATION (No<br />
Refrigerant in System) — Perform the following procedure.<br />
See Fig. 4 for valve numbers.<br />
1. Place the control switch in the OFF position.<br />
2. Close valves 2, 4, 9, 10, <strong>and</strong> 13.<br />
3. Open valves 1, 3, 5, 6, 7, 8, 11, <strong>and</strong> 12.<br />
Valve 1 2 3 4 5 6 7 8 9 10 11 12 13<br />
Condition O C O C O O O O C C O O C<br />
a17-573
4. <strong>Start</strong> the pumpout compressor (control switch at ON<br />
position).<br />
5. Operate pumpout compressor until suction gage reads<br />
highest sustained vacuum (about 28 in. Hg VAC or 1<br />
psia [6.9 kPa]).<br />
6. Close valve 8.<br />
7. Stop compressor (control switch at OFF position).<br />
REMOVE AIR AFTER OPENING CHILLER TO ATMO-<br />
SPHERE (Refrigerant Charge in Storage Tank) — Perform<br />
the following procedure. See Fig. 4 for valve numbers.<br />
1. Place the control switch in the OFF position.<br />
2. Close valves 2, 4, 5, 9, 10, 11 <strong>and</strong> 13.<br />
3. Open valves 1, 3, 6, 7, 8, <strong>and</strong> 12.<br />
Valve 1 2 3 4 5 6 7 8 9 10 11 12 13<br />
Condition O C O C C O O O C C C O C<br />
4. <strong>Start</strong> pumpout compressor by putting control switch in<br />
the ON position.<br />
5. Operate pumpout compressor until suction gage reads<br />
highest sustained vacuum (about 28 in. hg or 1 psia<br />
[6.9 kPa]).<br />
6. Close valve 8.<br />
7. Stop compressor by placing the control switch in the OFF<br />
position.<br />
TRANSFER REFRIGERANT CHARGE (From Storage<br />
Tank to Machine) — Perform the following procedure. See<br />
Fig. 4 for valve numbers.<br />
1. Place control switch in OFF position.<br />
2. Operate cooler water pump <strong>and</strong> ensure that there is water<br />
flow through the cooler.<br />
3. Close valves 2, 4, 5, 6, 7, 8, 9, 10, <strong>and</strong> 11.<br />
4. Open valves 1, 3, 12, <strong>and</strong> 13.<br />
Valve 1 2 3 4 5 6 7 8 9 10 11 12 13<br />
Condition O C O C C C C C C C C O O<br />
CAUTION<br />
Follow steps 5 <strong>and</strong> 6 carefully to prevent damage from a<br />
freeze-up.<br />
5. Slowly open valve 5 <strong>and</strong> allow refrigerant vapor into the<br />
chiller until chiller pressure increases to 35 psig (141 kPa)<br />
for R-134a. Feed refrigerant slowly to avoid freeze-up.<br />
6. Close valve 5.<br />
7. <strong>Start</strong> the pumpout compressor (control switch in the<br />
AUTO position).<br />
8. When the cooler pressure is lower than storage tank pressure,<br />
open valve 11 <strong>and</strong> refrigerant will flow from the<br />
storage tank to the machine.<br />
9. Shut valve 11 when refrigerant level reaches the charge<br />
level mark on the cooler sight glass.<br />
10. Turn off the pumpout compressor (control switch in the<br />
OFF position).<br />
11. Close valves 3, 4, <strong>and</strong> 12.<br />
TRANSFER REFRIGERANT CHARGE (From Machine<br />
to Storage Tank Located Below Machine) — Perform the<br />
following procedure. See Fig. 4 for valve numbers.<br />
1. Vent storage tank to machine by opening valves 1, 2, 4,<br />
<strong>and</strong> 12.<br />
2. Open valves 11 <strong>and</strong> drain liquid from the cooler.<br />
Valve 1 2 3 4 5 6 7 8 9 10 11 12 13<br />
Condition O O C O C C C C C C O O C<br />
12<br />
3. Operate the cooler water pump.<br />
4. Open valves 3, 6, 7, <strong>and</strong> 9.<br />
5. Close valves 2, 4, 5, 10 ,11, <strong>and</strong> 13.<br />
Valve 1 2 3 4 5 6 7 8 9 10 11 12 13<br />
Condition O C O C C O O C O C C O C<br />
6. Run cooling water through the pumpout condenser.<br />
7. Operate the pumpout compressor (control switch in the<br />
ON position).<br />
8. At 25 in. Hg VAC (2.5 psia, 17.21 kPa) in cooler, stop the<br />
pumpout compressor. Close all valves <strong>and</strong> shut off<br />
pumps.<br />
TRANSFER REFRIGERANT CHARGE (From Machine<br />
to Storage Tank Located Above or Level with Machine) —<br />
Perform the following procedure. See Fig. 4 for valve<br />
numbers.<br />
1. Operate the cooler <strong>and</strong> machine condenser water pumps.<br />
2. Open valves 1, 2, 5, 6, 7, <strong>and</strong> 12.<br />
3. Close valves 3, 4, 8, 9, 10 ,11, <strong>and</strong> 13.<br />
Valve 1 2 3 4 5 6 7 8 9 10 11 12 13<br />
Condition O O C C O O O C C C C O C<br />
4. Operate the pumpout compressor (control switch in the<br />
ON position).<br />
5. When the storage tank pressure is less than machine pressure,<br />
open valve 11.<br />
6. After the liquid has been transferred, stop the pumpout<br />
compressor <strong>and</strong> the condenser water pump.<br />
Continue to operate the cooler water pump.<br />
7. Open valves 3, 6, 7 <strong>and</strong> 9.<br />
8. Close valves 2, 4, 5, 10, 11, <strong>and</strong> 13.<br />
Valve 1 2 3 4 5 6 7 8 9 10 11 12 13<br />
Condition O C O C C O O C O C C O C<br />
9. Run cooling water through the pumpout condenser.<br />
10. Operate the pumpout compressor (control switch in the<br />
ON position).<br />
11. At 25 in. Hg VAC (2.5 psia, 17.21 kPa) in cooler, stop the<br />
pumpout compressor. Close all valves <strong>and</strong> shut off<br />
pumps.<br />
PRESSURIZE MACHINE AND STORAGE TANK (No<br />
Refrigerant in System) — Perform the following procedure.<br />
See Fig. 4 for valve numbers.<br />
1. Open valves 3, 4, 6, 7, 9, 11, <strong>and</strong> 13.<br />
2. Close valves 1, 2, 5, 8, 10 , <strong>and</strong> 12.<br />
Valve 1 2 3 4 5 6 7 8 9 10 11 12 13<br />
Condition C C O O C O O C O C O C O<br />
3. Operate the pumpout compressor (control switch in the<br />
ON position) until desired pressure is reached. Do not exceed<br />
design pressure of vessels.<br />
4. Stop the pumpout compressor (control switch in the OFF<br />
position).<br />
5. Close valve 13.<br />
WARNING<br />
Do not use refrigerant or air for leak testing. Personal<br />
injury could result. Only use nitrogen for leak testing.<br />
DISTILL REFRIGERANT CHARGE — Water, oil, <strong>and</strong> impurities<br />
can be removed from the refrigerant while transferring<br />
the charge from storage tank to machine. Perform the following<br />
procedure. See Fig. 4 for valve numbers.<br />
1. Operate the cooler <strong>and</strong> machine condenser water pumps.
2. Open valves 1, 2, 5, 6, 7, <strong>and</strong> 12.<br />
3. Close valves 3, 4, 8, 9, 10 ,11, <strong>and</strong> 13.<br />
Valve 1 2 3 4 5 6 7 8 9 10 11 12 13<br />
Condition O O C C O O O C C C C O C<br />
4. Operate the pumpout compressor (control switch in the<br />
ON position).<br />
5. When all of the liquid refrigerant has been removed from<br />
the storage tank, stop the pumpout compressor <strong>and</strong> close<br />
valves 1, 2, 5, 6, 7, <strong>and</strong> 12 (all valves closed).<br />
6. Open valve 10 <strong>and</strong> plugged drain connection 14. Drain<br />
water <strong>and</strong> impurities. Do not allow storage tank pressure<br />
to drop below 0 psig.<br />
7. Close valve 10 <strong>and</strong> plugged drain connection 14.<br />
8. If, after distilling the refrigerant, there is excess refrigerant<br />
in the cooler over the normal operating charge, then<br />
return the excess to the storage tank. Follow the procedure<br />
Transfer Refrigerant from Machine to Storage Tank<br />
on page 12.<br />
CHARGE REFRIGERANT — The pumpout unit can aid in<br />
charging refrigerant into a dehydrated machine. Perform the<br />
following procedure. See Fig. 4 for valve numbers.<br />
1. Follow the procedure for Machine <strong>and</strong> Storage Tank<br />
Evacuation (No Refrigerant in System) on page 11 to remove<br />
any non-condensable gases, if present.<br />
2. Using temporary charging lines, connect the vent of the<br />
refrigerant supply cylinder to valve 13 <strong>and</strong> the cylinder<br />
liquid drain to valve 10. Purge the lines as final connection<br />
is made to the valves.<br />
3. Open valves 2, 4, 5, 6, 7, 10, <strong>and</strong> 13.<br />
4. Close valves 1, 3, 8, 9, 11, <strong>and</strong> 12.<br />
Valve 1 2 3 4 5 6 7 8 9 10 11 12 13<br />
Condition C O C O O O O C C O C C O<br />
5. Drain any remaining liquid by raising cylinder pressure<br />
above storage tank pressure. Close valve 4 <strong>and</strong> operate<br />
pumpout compressor with control switch in ON position.<br />
MAINTENANCE<br />
The primary controls, both operating <strong>and</strong> safety are now incorporated<br />
into the programmable logic controller (PLC)<br />
which is incorporated into the chiller main control panel. Customer<br />
specifications may require some or all of the sensors <strong>and</strong><br />
safeties to be duplicated by mechanical switched. For this reason<br />
both types of sensors <strong>and</strong> safeties will be covered in the following<br />
procedures.<br />
Weekly <strong>Maintenance</strong><br />
CHECK OIL LEVEL — Mark edge of sight glass at normal<br />
oil level using grease pencil. Record date <strong>and</strong> amount of oil<br />
added in refrigeration log.<br />
CHECK PURGE FREQUENCY — Operate the purge only<br />
when there is air in the system as indicated by the pressure in<br />
the purge chamber when the machine is in operation. When<br />
purge chamber pressure is within 8 psid of condenser pressure,<br />
the vent valve can be opened to bleed air from the chamber.<br />
Close the valve when the differential is higher than 16 psid.<br />
WATER IN PURGE WATER CHAMBER — Refrigerants<br />
R-22 <strong>and</strong> R-134a hold a greater percentage of water in the liquid<br />
state than in the vapor state. As a result, a typical condensing<br />
purge does not separate water from refrigerant. Alternate<br />
methods such as refrigerant analysis are used to detect water in<br />
these refrigerants.<br />
Yearly <strong>Maintenance</strong><br />
NOTE: The primary controls, both operating <strong>and</strong> safety, are<br />
now incorporated into the PLC, which is incorporated into the<br />
13<br />
chiller main control panel. Customer specifications may<br />
require some or all of the sensors <strong>and</strong> safeties to be duplicated<br />
by mechanical switches. For this reason both types of sensors<br />
<strong>and</strong> safeties will be covered in the following procedures.<br />
CHECK/CALIBRATE WATER TEMPERATURE SEN-<br />
SORS — The water temperature sensors are located in the outlet<br />
piping near the water nozzles.<br />
1. Each sensor should be compared against a calibrated sensor<br />
in a calibration bath or dry block calibrator.<br />
2. Compare the reading of the calibrated sensor with the<br />
temperature reading on the PLC screen. Replace or calibrate<br />
the sensor as required.<br />
3. Confirm that any set points on the PLC match the recommended<br />
alarm or trip points for the chiller.<br />
CHECK REFRIGERANT LOW-PRESSURE CUTOUT —<br />
The primary low-pressure cutout will be a function of the PLC<br />
<strong>and</strong> the pressure will be transmitted to the PLC from a transducer.<br />
An optional mechanical secondary switch may also be<br />
installed which will send an open-closed signal to the PLC.<br />
1. Compare the reading of the cooler pressure transducer<br />
with a test gage <strong>and</strong>/or the condenser pressure transducer<br />
when the machine is not in operation. Confirm that the<br />
correct cutout pressure is configured in the PLC.<br />
2. The chilled water low-temperature cutout set point must<br />
be temporarily set low enough that the refrigerant lowpressure<br />
cutout will react first. A mechanical low chiller<br />
water temperature switch should be jumpered for the duration<br />
of the test.<br />
3. <strong>Start</strong> the machine <strong>and</strong> observe both chilled water temperature<br />
<strong>and</strong> refrigerant temperature.<br />
4. Slowly reduce the chilled water temperature control<br />
point. Watch the thermometer in the leaving chilled water<br />
line <strong>and</strong>/or the leaving chilled water temperature display<br />
on the PLC screen. Do not allow chilled water temperature<br />
to drop below 35 F.<br />
5. The machine should shut down when refrigerant temperature<br />
reaches one degree below design suction temperature<br />
or 28 F (-2.22 C) minimum (chilled water duty).<br />
6. Restore the chilled water low-temperature cutout to its<br />
normal set point. Remove the jumper on the mechanical<br />
chilled water low-temperature cutout switch.<br />
CHECK CONDENSER HIGH-PRESSURE CUTOUT —<br />
This PLC function <strong>and</strong> optional mechanical pressure switch<br />
senses condenser gas pressure <strong>and</strong> shuts down the compressor<br />
when the condenser pressure exceeds 165 psig (1138 kPa) for<br />
R-134a or 275 psig (1896 kPa) for R-22. Do not attempt to test<br />
this safety by forcing the condensing pressure to rise during<br />
machine operation.<br />
1. Compare the reading of the condenser pressure transducer<br />
with a test gage <strong>and</strong>/or the cooler pressure transducer<br />
when the machine is not in operation. Confirm that the<br />
correct cutout pressure is configured in the PLC.<br />
2. To check a mechanical cutout switch, first turn off the<br />
control power.<br />
3. Use an air or nitrogen supply which can be regulated to<br />
the desired pressure.<br />
4. Check the control with an ohmmeter to determine if the<br />
switch has opened when the desired pressure is reached.<br />
Adjust as necessary.<br />
CHECK AUXILIARY OIL PUMP CONTROL — The purpose<br />
of the auxiliary oil pump is to take over the job of supplying<br />
lubricating oil at the required pressure to the bearings <strong>and</strong><br />
the seal in the event that the main oil pump loses pressure. The<br />
auxiliary oil pump should start before the machine trips on low<br />
oil pressure. The pressure being measured is the differential<br />
pressure between the machine internal pressure on the
efrigerant side of the seal <strong>and</strong> the oil supply being controlled<br />
by the differential pressure regulator. The pressure being supplied<br />
to the seal is maintained at 35 psid above the pressure on<br />
the refrigerant side of the shaft seal. The auxiliary oil pump<br />
should start if the differential pressure falls to or below 23 psid.<br />
Lower the oil pressure by adjusting the differential oil pressure<br />
regulator until the oil pressure drops to 23 psid. On completion<br />
of the test, reset the oil pressure regulator to its normal<br />
setting of 35 psid. The auxiliary pump will stop when the oil<br />
pressure rises above 27 psid.<br />
CHECK SEAL OIL DIFFERENTIAL PRESSURE<br />
TRANSDUCER — This function shuts down the compressor<br />
if the seal oil pressure differential drops below its fault limit.<br />
The transducer should be checked for proper calibration by<br />
comparing against a known pressure gage. If two individual<br />
single input transducers are used instead of a differential transducer,<br />
the measured pressures will be compared by the PLC to<br />
calculate the differential pressure reading.<br />
CHECK THRUST BEARING OIL PRESSURE TRANS-<br />
DUCER — This function shuts down the compressor if the<br />
thrust bearing oil pressure drops below its fault limit. The thrust<br />
bearing is in the ambient atmosphere so the oil pressure is referenced<br />
to ambient pressure. The transducer should be checked<br />
for proper calibration by comparing against a known pressure<br />
gage <strong>and</strong> the set point should be checked on the PLC screen.<br />
CHECK DISCHARGE GAS HIGH-TEMPERATURE<br />
CUTOUT — This function shuts down the compressor if the<br />
compressor discharge gas temperature exceeds its fault limit.<br />
The sensor is located in a temperature well in the back wall of<br />
the compressor. It is located to the immediate right of the bearing<br />
chamber on the 7 frame compressor <strong>and</strong> to the immediate<br />
left of the bearing chamber on the 8 frame compressor. The<br />
sensor should be compared against a calibrated sensor in a calibration<br />
bath or dry block calibrator.<br />
CHECK THRUST BEARING OIL HIGH-TEMPERA-<br />
TURE CUTOUT — This function shuts down the compressor<br />
if the temperature of the oil leaving the compressor exceeds its<br />
fault limit. The sensor is located in the bearing chamber <strong>and</strong> is<br />
inserted into the leaving oil temperature well that is an integral<br />
part of the thrust bearing housing.<br />
The sensor should be compared against a calibrated sensor<br />
in a calibration bath or dry block calibrator.<br />
CHECK SHAFT MOVEMENT SWITCH — The shaft<br />
movement switch will shut down the compressor if the thrust<br />
bearing has been damaged. This protects the impeller from<br />
damage. The switch is mounted inside the bearing chamber at<br />
splitline level. It is actuated by a trigger screw that protrudes<br />
from the main shaft.<br />
With the shaft in the thrust position, the clearance between<br />
the screw head <strong>and</strong> the switch should be 0.014 to 0.015 in.<br />
(0.356 to 0.038 mm) as shown in Fig. 5.<br />
Check the integrity of the wiring <strong>and</strong> connections between<br />
this switch <strong>and</strong> the bulkhead terminals. If this switch has<br />
opened during compressor operation, do not restart the machine.<br />
Contact a <strong>Carrier</strong> service representative immediately.<br />
CHECK COOLER AND CONDENSER MINIMUM<br />
FLOW PROTECTION — Flow monitoring devices are specified<br />
per job, however the common purpose is to prevent damage<br />
to the chiller due to insufficient water flow. With the chiller<br />
not in operation, reduce water flow to each vessel in turn until<br />
the low flow cutout function activates. Confirm the flow rate is<br />
correct. Calibrate the monitor(s) as required.<br />
CHECK AUXILIARY INTERLOCKS — Refer to the job<br />
wiring drawing for interlock wiring. Interlocks <strong>and</strong> safety controls<br />
must deenergize the main holding coil, turbine solenoid<br />
trip, etc. to shut down the refrigeration compressor under unsafe<br />
conditions. Serious damage to the machine could result if<br />
safety devices are bypassed.<br />
14<br />
a17-574<br />
Fig. 5 — Shaft Movement Switch Detail<br />
CHECK CONDENSER SUBCOOLER LEVEL CON-<br />
TROL — The purpose of this function is to control the liquid<br />
valve in the condenser drain line. The liquid level in the condenser<br />
shell should be as close as possible to the deck that divides<br />
the condenser section from the subcooler section. When<br />
the level is correct <strong>and</strong> the chiller is running near design conditions,<br />
the correct level should result in a temperature reading of<br />
0 to 2° F below saturated condensing temperature at the condensed<br />
liquid thermowell near the subcooler inlet.<br />
The control consists of a level transmitter with the PLC supplying<br />
the signal to the liquid valve. A self-contained pneumatic<br />
or electronic level control may also be supplied which controls<br />
the liquid valve directly.<br />
To calibrate either type of control, initially set the level so<br />
that the sight glass or transmitter output indicates that the level<br />
is approximately at the level of the condensed liquid thermowell.<br />
Make final adjustment based on the condensed liquid<br />
temperature. If the temperature is too low, drop the level. If the<br />
temperature is too high, raise the level.<br />
CHECK COMPRESSOR GUIDE VANE CONTROL —<br />
The st<strong>and</strong>ard guide vane actuator is a pneumatic piston actuator<br />
controlled by a built-in positioner. The positioner receives a<br />
3 to 15 psig signal. The signal comes from an electric-to-pneumatic<br />
transducer controlled by the PLC. The actuator is<br />
equipped with a solenoid operated “quick-dump” valve. This<br />
allows the vanes to immediately close on compressor shutdown<br />
<strong>and</strong> prevents the guide vanes from operating until the<br />
chiller is fully in “run” condition. The solenoid is controlled by<br />
the PLC.<br />
The maximum guide vane opening should be set in the PLC<br />
such that the vanes stop opening when the position indicator<br />
beneath the actuator points to 90.<br />
Set the supply air pressure regulator for 80 psig minimum,<br />
100 psig maximum. The cushion air supply to the bottom of<br />
the piston should be set for 40 psig. The cushion air pressure<br />
may be varied to suit job conditions. Cushion air pressure closes<br />
the guide vanes. If an adjustment is made it must be proven<br />
that the vanes can readily close before the compressor is started.<br />
Increasing cushion air pressure slows the vane opening<br />
speed <strong>and</strong> increases the vane closing speed. Ensure that the air<br />
supply is filtered <strong>and</strong> dry.<br />
CHECK OIL PRESSURE REGULATORS — Maintain by<br />
making proper adjustments <strong>and</strong> providing clean <strong>and</strong> ample oil<br />
supply. See Oil Cycle section on page 18 for more information.<br />
Thrust Bearing Oil Pressure Regulator — The regulator reduces<br />
the main oil pump discharge pressure to 18 psig for drive<br />
end journal bearing <strong>and</strong> thrust bearing lubrication.<br />
Differential Back-Pressure Regulator — The regulator maintains<br />
a differential pressure of 35 psid between oil pump discharge<br />
pressure <strong>and</strong> pressure in refrigerant side, back-of-seal<br />
section of compressor. Excess oil is relieved directly to oil<br />
sump. This control maintains oil supply pressure higher than
machine refrigerant pressure, so that any oil leakage through<br />
the seal is always in an inward direction.<br />
CHECK STARTERS AND VFDS — Refer to the starter/<br />
VFD manufacturer’s instructions for specific procedures.<br />
General items that must be addressed (where applicable):<br />
• Tightness of all power cable <strong>and</strong> other wire connections<br />
• Inspect all connections for evidence of excessive temperature<br />
<strong>and</strong> investigate cause when evidence is found, clean<br />
<strong>and</strong> remake the connection:<br />
• <strong>Operation</strong> of cooling fans<br />
• Dirt, corrosion, carbon tracking <strong>and</strong> oily contamination of<br />
mechanisms <strong>and</strong> contacts<br />
• Soot, stained areas, evidence of smoke must be investigate<br />
before cleaning<br />
• Megohm testing of power cables<br />
• Lubrication <strong>and</strong> free operation of contactor mechanisms<br />
• Contact condition, alignment <strong>and</strong> remaining overtravel.<br />
Manufacturer’s literature will provide the minimum overtravel<br />
• Circuit breaker calibration<br />
• <strong>Operation</strong> of all safeties <strong>and</strong> interlocks<br />
• Calibration of safeties<br />
• Isolation switch operation<br />
COMPRESSOR BEARING MAINTENANCE — The key<br />
to good bearing maintenance is proper lubrication. Use the<br />
proper grade of oil, maintained at recommended level, temperature,<br />
<strong>and</strong> pressure. Inspect the lubrication system regularly<br />
<strong>and</strong> thoroughly.<br />
CHANGE OIL AND OIL FILTER — Periodic oil samples<br />
should be used as guidance regarding the necessity of oil<br />
changes. Contaminants <strong>and</strong> evidence of deterioration by the<br />
presence of acid are of primary importance. Synthetic oil does<br />
not break down <strong>and</strong> lose viscosity over time under normal<br />
operation.<br />
The oil filters should be changed at a minimum of one year<br />
intervals. The oil charge is 35 gallons. <strong>Carrier</strong> supplies suitable<br />
oil under part number PP23BZ106.<br />
To remove oil charge from oil reservoir, proceed as follows:<br />
1. Find two 1/2-in. plugs in the side of the reservoir located<br />
beneath the pump motor end. Use bottom plug.<br />
2. Remove plug. Drain oil into suitable container <strong>and</strong> replace<br />
plug.<br />
INSPECT COOLER TUBES — Inspect tubes <strong>and</strong> clean at<br />
the end of the first operating season. Condition indicates frequency<br />
of cleaning required in future <strong>and</strong> also whether or not<br />
water treatment is required in chilled water circuit.<br />
A yearly eddy current test of the heat exchanger tubes will<br />
reveal most damage <strong>and</strong> enable corrective action to prevent an<br />
eventual failure.<br />
INSPECT CONDENSER TUBES — Inspect tubes <strong>and</strong> clean<br />
yearly or more often if water is contaminated. Higher than normal<br />
condenser pressure usually indicates dirty tubes. Air in machine<br />
also results in high pressures.<br />
Open systems <strong>and</strong> make-up water result in condenser tubes<br />
fouled by scale <strong>and</strong> algae. A specialist should analyze water<br />
<strong>and</strong> recommend treatment required.<br />
Brushes designed to prevent scraping of tube walls are sold<br />
through <strong>Carrier</strong> Service Center. Hard scale may require chemical<br />
cleaning.<br />
INSPECT PURGE RECOVERY UNIT — Close purge service<br />
valves. This unit h<strong>and</strong>les corrosive mixtures at their highest<br />
concentration <strong>and</strong> protects machine. Keep it in good operating<br />
condition. See Fig. 6 for purge evacuator assembly components.<br />
Proceed as follows:<br />
1. Remove purge cover from purge evacuator assembly.<br />
15<br />
2. Remove evacuator valve <strong>and</strong> float assembly.<br />
3. Clean refrigerant float chamber.<br />
4. Operate float valve through full travel. Valve must move<br />
freely without binding.<br />
5. Examine valve plunger <strong>and</strong> seat for dirt <strong>and</strong> wear. Replace<br />
plunger <strong>and</strong> seal assembly if worn.<br />
6. Reinstall components using new sealing gaskets.<br />
7. Check 1/16-in. orifice in strainer/orifice assembly (Item<br />
6, Fig. 6). Clean strainer (Item 7, Fig. 6).<br />
8. Replace the strainer.<br />
General <strong>Maintenance</strong><br />
REFRIGERANT LEVEL — Excessive refrigerant in cooler<br />
causes liquid droplets to be pulled into compressor suction <strong>and</strong><br />
requires excess power for tonnage produced.<br />
Too little refrigerant reduces the number of tubes that cool<br />
the water, causing inlet guide vanes to open, thus further reducing<br />
cooler pressure. The machine may shut down on refrigerant<br />
low-pressure cutout even though chilled water temperature is<br />
too high.<br />
Proper refrigerant charge is indicated when difference between<br />
leaving chilled water temperature <strong>and</strong> cooler temperature<br />
reaches design conditions, or becomes a minimum at design<br />
load conditions. To determine the approximate refrigerant<br />
charge for your machine, add the cooler charge to the applicable<br />
condenser charge as listed in Table 3.<br />
The optimum operating charge for the machine must be determined<br />
by adjusting the charge during operation at or near<br />
full design load. See Charge Refrigerant in the <strong>Start</strong>-up section<br />
of this manual. The optimum charge level should be marked on<br />
the cooler level sight glass. This allows the correct amount of<br />
refrigerant to be returned to the machine after service or a seasonal<br />
shutdown.<br />
Refrigerant loss is always due to leaks, since the 17DA machine<br />
operates at pressures above atmospheric. Check over the<br />
machine frequently with approved refrigerant leak-detecting<br />
equipment. Repair all leaks.<br />
LEAK TESTING — Since HFC-134a is above atmospheric<br />
pressure at normal operating temperatures, effective leak testing<br />
can be done with refrigerant in the machine. Refrigerant<br />
may have to be pumped out to storage tank before leaks are<br />
repaired.<br />
If the machine is empty of refrigerant, proceed as follows:<br />
1. Use HFC-134a as a tracer gas. Pressurize the machine<br />
with HFC-134a vapor to 20 psig (138 kPa).<br />
2. Complete the pressurization using a dry gas (nitrogen) to<br />
90 to 100 psig (620 to 690 kPa). Maximum test pressure<br />
is 150 psig (1034 kPa). Never use air to pressurize machine<br />
for a leak test. A serious explosion may result.<br />
3. Leak test using an electronic leak detector suitable for<br />
HFC-134a. Test all joints <strong>and</strong> flanges, including the<br />
pumpout <strong>and</strong> purge units. Repair all leaks <strong>and</strong> repeat tests<br />
until machine is tight. A heavy concentration of refrigerant<br />
in the machine room decreases leak testing efficiency.<br />
Ventilate the room well with ample fresh air before attempting<br />
final leak test operation.<br />
CHECK LEAKAGE RATE — Proceed as follows:<br />
1. <strong>Start</strong> the chilled water <strong>and</strong> condensing water pumps.<br />
2. Use external vacuum pump to pull 25 in. (635 mm) mercury<br />
vacuum on machine.<br />
3. Valve machine off. Turn vacuum pump off. Stop water<br />
pumps. Leave oil pump running.<br />
4. A vacuum loss rate of 0.05 in. (1 mm) mercury per 24<br />
hours or less indicates acceptable leak tightness.
3/4-IN. INSULATION<br />
EVACUATOR ASSEMBLY<br />
a17-577<br />
BREAKING VACUUM — When breaking vacuum during<br />
leak testing or other service work, always use dry refrigerant or<br />
other form of dry gas; i.e., nitrogen or air.<br />
The use of dry gas to break machine vacuum is especially<br />
important in areas of high humidity to prevent corrosion damage<br />
due to water condensing in refrigerant spaces within<br />
machine.<br />
PREPARING MACHINE FOR CHARGING REFRIGER-<br />
ANT — After servicing machine <strong>and</strong> checking the leakage<br />
rate, apply a vacuum pump <strong>and</strong> pull machine pressure down to<br />
0.15 in. (4 mm) mercury absolute pressure or less. Valve off<br />
<strong>and</strong> charge with refrigerant.<br />
After the first few minutes of operation, residual air not removed<br />
by the vacuum pump will collect in the condenser shell<br />
where it will be pulled off by the purge sampling tube.<br />
CHILLER DEHYDRATION — Dehydration is recommended<br />
if the chiller has been open for a considerable period of time,<br />
if the chiller is known to contain moisture, or if there has been a<br />
complete loss of chiller holding charge or refrigerant pressure.<br />
Fig. 6 — Purge Cycle Schematic Piping<br />
16<br />
PURGE SYSTEM<br />
VALVE ASSEMBLY<br />
LEGEND<br />
1 — Purge Connection<br />
2 — Shutoff Valves<br />
3 — Strainer<br />
4 — Orifice<br />
5 — Condensing Chamber<br />
6 — Condensing Chamber Pressure Gage<br />
7 — Non-Condensable Vent Valve<br />
8 — Cooling Coil<br />
9 — Refrigerant Chamber <strong>and</strong> Purge Float Valve<br />
10 — Refrigerant Sight Glass<br />
11 — Water Chamber <strong>and</strong> H<strong>and</strong> Drain Valve<br />
12 — Water Sight Glass<br />
CAUTION<br />
Do not start or megohm-test the compressor motor or oil<br />
pump motor, even for a rotation check, if the chiller is<br />
under dehydration vacuum. Insulation breakdown <strong>and</strong><br />
severe damage may result.<br />
Dehydration can be done at room temperatures. Using a<br />
cold trap (Fig. 7) may substantially reduce the time required to<br />
complete the dehydration. The higher the room temperature,<br />
the faster dehydration takes place. At low room temperatures, a<br />
very deep vacuum is required to boil off any moisture. If low<br />
ambient temperatures are involved, contact a qualified service<br />
representative for the dehydration techniques required.<br />
Perform dehydration as follows:<br />
1. Connect a high capacity vacuum pump (5 cfm [.002 m 3 /s]<br />
or larger is recommended) to the refrigerant charging<br />
valve (Fig. 4, item 10). Tubing from the pump to the chiller<br />
should be as short in length <strong>and</strong> as large in diameter as<br />
possible to provide least resistance to gas flow.<br />
2. Use an electronic vacuum indicator or a wet bulb vacuum<br />
indicator to measure the vacuum. Open the shutoff valve
to the vacuum indicator only when taking a reading.<br />
Leave the valve open for 3 minutes to allow the indicator<br />
vacuum to equalize with the chiller vacuum.<br />
3. If the entire chiller is to be dehydrated, open all isolation<br />
valves (if present).<br />
4. With the chiller ambient temperature at 60 F (15.6 C) or<br />
higher, operate the vacuum pump until the manometer<br />
reads 29.8 in. Hg vac, ref 30 in. bar. (0.1 psia)<br />
(–100.61 kPa) or a vacuum indicator reads 35 F (1.7 C).<br />
Operate the pump an additional 2 hours.<br />
Do not apply a vacuum greater than 29.82 in. hg vac<br />
(757.4 mm hg) or allow the temperature to drop below<br />
33 F (0.5 C) on the wet bulb vacuum indicator. At this<br />
temperature <strong>and</strong> pressure, isolated pockets of moisture<br />
can turn into ice. The slow rate of evaporation (sublimation)<br />
of ice at these low temperatures <strong>and</strong> pressures greatly<br />
increases dehydration time.<br />
Filling the heat exchanger tubes with warm water (100 F<br />
[38 C] or cooler) will warm any moisture clinging to the<br />
tubes <strong>and</strong> thus will increase the evaporation rate. If the<br />
waterbox covers are open warm air can be blown through<br />
the tubes. Again observe the 100 F (38 C) limit.<br />
5. Valve off the vacuum pump, stop the pump, <strong>and</strong> record<br />
the instrument reading.<br />
6. After a 2-hour wait, take another instrument reading. If<br />
the reading has not changed, dehydration is complete. If<br />
the reading indicates vacuum loss, repeat Steps 4 <strong>and</strong> 5.<br />
7. If the reading continues to change after several attempts,<br />
perform a leak test up to the maximum 160 psig<br />
(1103 kPa) pressure. Locate <strong>and</strong> repair the leak, <strong>and</strong><br />
repeat dehydration.<br />
a19-661<br />
Fig. 7 — Dehydration Cold Trap<br />
REMOVING REFRIGERANT — Machines with refrigerant<br />
are usually provided with a storage tank <strong>and</strong> pumpout unit<br />
to permit refrigerant removal when performing service work.<br />
Refer to Pumpout System <strong>Operation</strong> section.<br />
WATER TREATMENT — In hard water areas, the condensing<br />
water system must be cleaned frequently (at least yearly) to<br />
prevent a rise in condenser pressure. Proper water treatment<br />
<strong>and</strong> cooling tower bleedoff reduces the amount of scaling <strong>and</strong>,<br />
thereby, reduces frequency of tube cleaning required.<br />
Since water conditions vary in all parts of the country, it is<br />
recommended that a reliable water treatment specialist be consulted<br />
<strong>and</strong> a sample of the condenser water tested to determine<br />
the type of water treatment required.<br />
CLEARANCES — Clearances for compressor components<br />
shown in Fig. 4 <strong>and</strong> listed in Table 5 are a guide to be used<br />
when checking or fitting a replacement part.<br />
GEAR AND DRIVE — Refer to gear <strong>and</strong> drive manufacturer's<br />
instructions for maintenance requirements.<br />
PUMPOUT SYSTEM — Refer to <strong>Carrier</strong> Service <strong>Instructions</strong><br />
for 5F,H condensing units for maintenance.<br />
17<br />
Table 5 — Clearances<br />
DESCRIPTION<br />
Shaft End Labyrinth<br />
ITEM<br />
(Fig. 4)<br />
DIMENSION<br />
(in.)<br />
Min Max<br />
MEASURE<br />
TYPE<br />
Seal End<br />
1 .008 .011 Dia.<br />
Thrust End<br />
Journal Bearing<br />
8 .001 .003 Dia.<br />
Labyrinth<br />
Seal <strong>and</strong> Thrust End<br />
3 .005 .009 Dia.<br />
Impeller Eye — .026 .034 Dia.<br />
Balancing Piston 10 .032 .036 Dia.<br />
Journal Bearings 2, 5 .0035 .0055 Dia.<br />
Thrust Clearance — .008 .012 Axial<br />
Thrust Disc Face<br />
Runout<br />
7 .0005 TIR Axial<br />
Seal Ring 9 .0015 .004 Dia.<br />
Seal Shoulder to Seal<br />
Housing Face<br />
— 1 50/64 1 61/64 Axial<br />
Shaft Movement<br />
(Safety) Switch<br />
Fig. 5 .014 .018 Fig. 5<br />
Seal Movement<br />
(Safety) Switch*<br />
4 .020 .025 Axial<br />
TIR — Total Indicator Reading<br />
GENERAL DATA<br />
Machine Nameplate — The machine nameplate with<br />
machine serial number <strong>and</strong> machine designation is located on<br />
the safety panel. These numbers include information about the<br />
machine. For example, 17DA81 indicates:<br />
17 - Open-drive centrifugal refrigeration compressor<br />
DA - Single-stage<br />
81 - Compressor size<br />
The overall assembly as well as each major component has<br />
a serial number. When corresponding with your <strong>Carrier</strong> representative,<br />
always give machine designation, machine serial<br />
number, <strong>and</strong> component serial numbers.<br />
Refrigerant Properties — Refrigerant is relatively<br />
safe. The sweet-smelling vapor is nonflammable <strong>and</strong> nontoxic.<br />
Heavy concentrations may cause dizziness, headache, <strong>and</strong> loss<br />
of consciousness. When subjected to flame, refrigerant breaks<br />
down into toxic gases. Avoid breathing fumes.<br />
Refrigerant dissolves oils <strong>and</strong> destroys natural rubber <strong>and</strong><br />
all components containing rubber. Carefully selected neoprenes<br />
are safe to use.<br />
Air or water floats on top of refrigerant in gas or liquid state<br />
respectively. Being heavier than air, refrigerant will settle in all<br />
low places. See Tables 6A <strong>and</strong> 6B for refrigerant temperature<br />
vs pressure (saturated) relationships.<br />
Relief Valve Assembly — The relief valve assembly is<br />
located on the refrigerant storage tank. It prevents dangerous<br />
high pressure from developing within the machine from fire or<br />
any other reason.<br />
System Components — The system components consist<br />
of the following:<br />
• Cooler - Heat exchanger which cools "brine" passing<br />
through the tubes by evaporation of the refrigerant in which<br />
tubes are immersed.<br />
• Compressor - Machine which compresses the evaporated<br />
refrigerant <strong>and</strong> discharges it to the condenser.<br />
• Condenser - Heat exchanger which liquefies the evaporated<br />
refrigerant discharged into it from the compressor.<br />
• Purge Recovery Unit - A small condensing unit with separator<br />
which continuously extracts gas from the top of the condenser<br />
<strong>and</strong> purifies it by removing air which may be<br />
present.
• Controls - Instruments which control the brine temperature,<br />
protect the various elements of the machine, <strong>and</strong> automatically<br />
start <strong>and</strong> stop the compressor. When specified, additional<br />
controls for automatic operation of interconnecting<br />
equipment such as fans <strong>and</strong> pumps are furnished.<br />
• Drive - Prime mover which supplies the power to drive the<br />
compressor.<br />
• A refrigerant pumpout <strong>and</strong> storage unit is usually furnished<br />
with this equipment. The refrigeration cycle covers the first<br />
three major components; the others are described in other<br />
portions of this manual.<br />
Refrigeration Cycle — See Fig. 8. In the cooler, heat is<br />
transferred from water flowing thru the tubes to cold refrigerant<br />
around the tubes. The cooler refrigerant temperature corresponds<br />
to cooler pressure as listed in Tables 6A <strong>and</strong> 6B. Heat<br />
extracted from the water evaporates the liquid refrigerant, releasing<br />
large volumes of refrigerant gas which pass into the<br />
compressor.<br />
Eliminators in the top of the cooler prevent any liquid refrigerant<br />
from being carried over into the compressor.<br />
The compressor impeller raises the gas from cooler pressure<br />
up to condenser pressure. Gas flow into the compressor is controlled<br />
by adjusting the suction inlet guide vanes <strong>and</strong> the variable<br />
diffuser width. This controls cooler pressure <strong>and</strong>, therefore,<br />
machine capacity.<br />
In the condenser, heat is transferred from the high-pressure<br />
refrigerant gas to water flowing through the tubes. The gas condenses<br />
on the tubes <strong>and</strong> the liquid drains in to the condenser<br />
subcooler section. A subcooler level control keeps the subcooler<br />
tubes covered with refrigerant <strong>and</strong> provides an effective liquid<br />
seal, preventing refrigerant gas flow from high-pressure to<br />
low-pressure side of the machine.<br />
Fig. 8 — Refrigeration Cycle<br />
18<br />
Since the coldest condenser water flows through the subcooler<br />
tubes, the temperature of the refrigerant is reduced as<br />
much as possible before it enters the cooler.<br />
When the refrigerant clears the refrigerant flow valve <strong>and</strong> is<br />
once again at cooler pressure, the refrigeration cycle is complete.<br />
Oil Cycle — See Fig. 9. External, positive displacement oil<br />
pump (Item 9) mounted on reservoir (Item 11) discharges to<br />
cooler (Item 7) <strong>and</strong> filter (Item 6). Auxiliary oil pump (Item 10)<br />
is provided to maintain continuous lubrication during<br />
emergencies.<br />
Supply oil temperature is read on thermometer (Item 5) located<br />
in line between cooler <strong>and</strong> filter. Oil temperature is controlled<br />
by regulating water flow to the cooler. Differential pressure<br />
regulator (Item 8) maintains seal <strong>and</strong> seal end journal<br />
bearing (Item 15) oil pressure at 35 psid (241 kPa) above backof-seal<br />
refrigerant pressure. Seal oil low pressure cutout (Item<br />
1) shuts down compressor if seal oil pressure drops below cutout<br />
pressure. Seal end journal bearing temperature is read on<br />
thermometer (Item 14).<br />
Pressure regulating valve (Item 4) regulates oil supply pressure<br />
to thrust bearing <strong>and</strong> seal-end journal bearing (Item 15).<br />
Bearing oil pressure is read on bearing oil supply pressure gage<br />
(optional). Thrust bearing oil low-pressure cutout safety function<br />
shuts down compressor if bearing oil pressure drops below<br />
cutout pressure.<br />
Oil from the seal <strong>and</strong> bearings returns by gravity flow thru a<br />
common drain line to the oil reservoir. Oil leakage thru the seal<br />
to the refrigerant side drains to a separation tank (Item 13)<br />
where absorbed refrigerant is driven from the oil by a small<br />
heater.<br />
The refrigerant gas is vented to the compressor suction. The<br />
oil is returned to the reservoir thru a float valve (Item 12) which<br />
controls the oil level in the separation tank.<br />
a17-575
14<br />
13<br />
12<br />
Auxiliary oil pump, if used, operates when seal oil <strong>and</strong><br />
back-of-seal oil pressure difference is less than 23 psi. Control<br />
is located on machine safety panel.<br />
Purge Cycle — See Fig. 6. Non-condensable gases, water<br />
vapor, <strong>and</strong> refrigerant vapor pass from top of machine condenser<br />
through strainer (Item 3) <strong>and</strong> orifice (Item 4) to purge condensing<br />
chamber (Item 5). Water <strong>and</strong> refrigerant vapors are<br />
condensed by cooling coil (Item 8) which is supplied with filtered<br />
refrigerant (Item 3) through orifice (Item 4) in machine<br />
condenser liquid line.<br />
NOTE: Refrigerants HCFC-22 <strong>and</strong> HFC-134a hold a greater<br />
percentage of water in the liquid state than in the vapor state.<br />
As a result, HCPC-22 <strong>and</strong> HFC-134a refrigerants will not<br />
release water in the purge. Use another method to detect water<br />
in these refrigerants.<br />
11<br />
15 16<br />
LEGEND<br />
1 — Seal Oil Supply Pressure Transmitter 10 — Auxiliary Oil Pump<br />
2 — Back-of-Seal Oil Pressure Transmitter 11 — Oil Resevoir<br />
3 — Bearing Oil Supply Pressure Transmitter 12 — Seal Oil Return Float Valve<br />
4 — Low Pressure Regulator 13 — Oil/Refrigerant Separator<br />
5 — Oil Supply Temperature Gage 14 — Seal-End Journal Bearing Thermometer<br />
6 — Oil Filter 15 — Seal <strong>and</strong> Seal-End Journal Bearing<br />
7 — Oil Cooler 16 — Seal Movement Switch<br />
8 — Differental Pressure Regulator 17 — Thrust Bearing <strong>and</strong> Drive-End Journal Bearing<br />
9 — Main Oil Pump 18 — Shutdown Seal Automatic <strong>and</strong> Manual Bleed Valves<br />
19<br />
10<br />
17<br />
9<br />
18<br />
Fig. 9 — Schematic Oil Diagram<br />
8<br />
6 5<br />
The condensed vapors fall in the condensing chamber (Item<br />
5) <strong>and</strong> separate by gravity. Refrigerant collects in the lower<br />
chamber (Item 9) <strong>and</strong> water in the upper chamber (Item 11). As<br />
the refrigerant level in the lower chamber rises, float valve<br />
(Item 9) opens <strong>and</strong> refrigerant flows through valve (Item 2) to<br />
the cooler. Refrigerant vaporized in the cooling coil also returns<br />
to the cooler.<br />
Air <strong>and</strong> any other non-condensables accumulate in the condensing<br />
chamber. As the pressure in the chamber rises to approach<br />
within 8 psi of the chiller condenser pressure, the noncondensables<br />
must be vented through the non-condensable<br />
Vent valve (Item 7). Watch the condensing chamber gage (Item<br />
6), <strong>and</strong> close the vent valve when the chamber pressure drops<br />
to 16 psi below chiller condenser pressure.<br />
4<br />
7<br />
PT<br />
PT<br />
PT<br />
1<br />
2<br />
3<br />
a17-576
During shutdown all pressures equalize <strong>and</strong> refrigerant will<br />
not separate from air in the purge. Do not vent the purge when<br />
the machine is not running.<br />
TROUBLESHOOTING<br />
When troubleshooting the 17DA machine, check the PLC<br />
display on the control panel first. Messages on the main screen<br />
will indicate the fault or faults, plus further information can be<br />
found on the screens applicable to that function or functions related<br />
to the fault.<br />
Compressor Will Not <strong>Start</strong><br />
SAFETY SWITCH MALFUNCTION — There are st<strong>and</strong>ard<br />
mechanical switches on the chiller along with sensors that provide<br />
information to the PLC. Two st<strong>and</strong>ard sensors that are always<br />
provided are the seal movement safety switch <strong>and</strong> the<br />
shaft movement safety switch. If either switch or its wiring is<br />
open circuited, then the PLC will show an alarm.<br />
Mechanical switches for various temperatures <strong>and</strong> pressures<br />
may be provided in addition to the sensors of the PLC, if specified<br />
by the customer. These mechanical switches are also connected<br />
to PLC inputs <strong>and</strong> the switch or circuit that is open will<br />
be reported by the PLC.<br />
DRIVE MALFUNCTION — Safety switches <strong>and</strong> sensors on<br />
the motor, speed increaser or turbine normally are connected to<br />
<strong>and</strong> identified by the PLC. Variable frequency (speed) drives<br />
(VFD) will have their own display panel. <strong>Start</strong>ers of the size<br />
used for the 17DA chillers generally have monitoring instruments<br />
that will provide information on internal problems, problems<br />
with incoming power, etc.<br />
Compressor Surge — Surge is a repeated loss <strong>and</strong> recovery<br />
of the compressors aerodynamic lift. This loss of lift is<br />
characterized by a reversal of flow back through the compressor.<br />
During surge there will be an intermittent high pitched<br />
whistle signifying the reversal of the flow through the compressor.<br />
The pressure gages <strong>and</strong> the motor amps will rise <strong>and</strong><br />
fall.<br />
Intermittent operation in surge is not normally detrimental<br />
to the machine. Prolonged operation in surge can cause damage<br />
related to heat build-up.<br />
The ability of a centrifugal compressor to produce pressure<br />
is directly related to the amount of gas passing through it, <strong>and</strong><br />
the lift characteristics on the compressor at these load points.<br />
All of the possible causes are related to this fact. Computer<br />
modeling of the 17DA compressor for each application can<br />
provide guidance on how to adjust the characteristics of the operation<br />
to minimize the occurrence of surge.<br />
The amount of required condenser water temperature reduction<br />
versus load reduction varies widely among centrifugal<br />
compressors based on design <strong>and</strong> duty. The 17DA chiller is<br />
able to h<strong>and</strong>le deep load reductions without a major drop in<br />
condenser water temperature. This does not imply that condenser<br />
water temperature should be held near design temperature<br />
at all times. It is an advantage to power consumption to<br />
keep the condenser water temperature as low as possible down<br />
to a minimum temperature. The minimum <strong>and</strong> maximum temperatures<br />
vary with machine <strong>and</strong> duty. They may be obtained<br />
through your <strong>Carrier</strong> Service Office.<br />
The following sections are some of the causes of surge <strong>and</strong><br />
corrections associated with them.<br />
INSUFFICIENT LOAD TO MAINTAIN STABILITY —<br />
Increase load on the machine. Open the optional hot gas<br />
bypass. Reduce condenser water temperature. If none of these<br />
20<br />
can be done, stop the machine until load on the system<br />
increases.<br />
CONDENSER WATER TEMPERATURE IS TOO<br />
HIGH — As machine cooling load drops below design, entering<br />
condenser water temperature must also drop. The ability of<br />
a centrifugal compressor to produce pressure is directly related<br />
to the amount of gas passing through it. Lower the condenser<br />
water pressure or temporarily raise the chilled water set point.<br />
FOULED TUBES IN EITHER HEAT EXCHANGER —<br />
Clean the tubes.<br />
LOW WATER FLOW IN EITHER HEAT<br />
EXCHANGER — Condenser water should remain at design<br />
flow. Cooler water flow can be varied to meet system needs.<br />
The allowable minimum must be determined for each machine.<br />
If surge occurs the load on the machine may seem sufficient<br />
when it is not unless flow rate <strong>and</strong> delta T are both checked.<br />
VARIABLE SPEED DRIVE OPERATING TOO<br />
SLOWLY. — When leaving chiller water temperature is controlled<br />
by varying the compressor speed, it is possible that during<br />
low load conditions the rpm required for the capacity may<br />
be too low to maintain the required lift. In this case, the speed<br />
must be temporarily increased <strong>and</strong> the guide vanes used to control<br />
the water temperature. Conditions allowing return to speed<br />
control are indicated by the full opening of the guide vanes.<br />
Chilled Water Temperature Too High — Following<br />
are some of the causes of a high chilled water temperature<br />
<strong>and</strong> corrections associated with them.<br />
CHILLED WATER SET POINT TOO HIGH — Lower set<br />
point.<br />
MOTOR IS LOAD LIMITED BELOW THE REQUIRED<br />
POWER TO MAINTAIN CHILLED WATER TEMPERA-<br />
TURE — Reset limit.<br />
CHILLED WATER SET POINT HAS BEEN OVERRID-<br />
DEN BY THE BUILDING CONTROL SYSTEM —<br />
Check settings of building control system.<br />
GUIDE VANES NOT FULLY OPENING (for reasons other<br />
than the above)<br />
• Check supply air pressure to the actuator<br />
• Check the instrument air signal<br />
• Guide vane travel limited in the PLC<br />
• Defective electronic-to-air signal transducer<br />
• Guide vanes mechanically stuck<br />
• Actuator or positioner malfunctioning<br />
• “Quick dump” solenoid operated valve on the positioner is<br />
leaking<br />
HIGH CONDENSER PRESSURE — See section entitled<br />
Condenser Pressure Too High.<br />
COOLER WATERBOX DIVISION PLATE GASKET OUT<br />
OF PLACE — Fix gasket.<br />
LEAVING CHILLED WATER SENSOR DEFECTIVE —<br />
Replace sensor.<br />
EXCESSIVE WATER FLOW THROUGH THE<br />
COOLER — Check chiller configuration.<br />
EXCESSIVE DIFFERENCE BETWEEN CHILLED<br />
WATER TEMPERATURE AND REFRIGERANT TEM-<br />
PERATURE<br />
• Low refrigerant charge<br />
• Fouled cooler tubes<br />
• Debris in waterbox blocking tubes<br />
The temperature difference will increase at low flow.<br />
Check refrigerant-leaving chilled water difference at design<br />
flow.
Table 6A — HFC-134a Pressure —<br />
Temperature (F)<br />
TEMPERATURE,<br />
PRESSURE<br />
F<br />
(psig)<br />
0 6.50<br />
2 7.52<br />
4 8.60<br />
6 9.66<br />
8 10.79<br />
10 11.96<br />
12 13.17<br />
14 14.42<br />
16 15.72<br />
18 17.06<br />
20 18.45<br />
22 19.88<br />
24 21.37<br />
26 22.90<br />
28 24.48<br />
30 26.11<br />
32 27.80<br />
34 29.53<br />
36 31.32<br />
38 33.17<br />
40 35.08<br />
42 37.04<br />
44 39.06<br />
46 41.14<br />
48 43.28<br />
50 45.48<br />
52 47.74<br />
54 50.07<br />
56 52.47<br />
58 54.93<br />
60 57.46<br />
62 60.06<br />
64 62.73<br />
66 65.47<br />
68 68.29<br />
70 71.18<br />
72 74.14<br />
74 77.18<br />
76 80.30<br />
78 83.49<br />
80 86.17<br />
82 90.13<br />
84 93.57<br />
86 97.09<br />
88 100.70<br />
90 104.40<br />
92 108.18<br />
94 112.06<br />
96 116.02<br />
98 120.08<br />
100 124.23<br />
102 128.47<br />
104 132.81<br />
106 137.25<br />
108 141.79<br />
110 146.43<br />
112 151.17<br />
114 156.01<br />
116 160.96<br />
118 166.01<br />
120 171.17<br />
122 176.45<br />
124 181.83<br />
126 187.32<br />
128 192.93<br />
130 198.66<br />
132 204.50<br />
134 210.47<br />
136 216.55<br />
138 222.76<br />
140 229.09<br />
21<br />
Table 6B — HFC-134a Pressure —<br />
Temperature (C)<br />
TEMPERATURE,<br />
PRESSURE<br />
C<br />
(kPa)<br />
–18.0 44.8<br />
–16.7 51.9<br />
–15.6 59.3<br />
–14.4 66.6<br />
–13.3 74.4<br />
–12.2 82.5<br />
–11.1 90.8<br />
–10.0 99.4<br />
–8.9 108.0<br />
–7.8 118.0<br />
–6.7 127.0<br />
–5.6 137.0<br />
–4.4 147.0<br />
–3.3 158.0<br />
–2.2 169.0<br />
–1.1 180.0<br />
0.0 192.0<br />
1.1 204.0<br />
2.2 216.0<br />
3.3 229.0<br />
4.4 242.0<br />
5.0 248.0<br />
5.6 255.0<br />
6.1 261.0<br />
6.7 269.0<br />
7.2 276.0<br />
7.8 284.0<br />
8.3 290.0<br />
8.9 298.0<br />
9.4 305.0<br />
10.0 314.0<br />
11.1 329.0<br />
12.2 345.0<br />
13.3 362.0<br />
14.4 379.0<br />
15.6 396.0<br />
16.7 414.0<br />
17.8 433.0<br />
18.9 451.0<br />
20.0 471.0<br />
21.1 491.0<br />
22.2 511.0<br />
23.3 532.0<br />
24.4 554.0<br />
25.6 576.0<br />
26.7 598.0<br />
27.8 621.0<br />
28.9 645.0<br />
30.0 669.0<br />
31.1 694.0<br />
32.2 720.0<br />
33.3 746.0<br />
34.4 773.0<br />
35.6 800.0<br />
36.7 828.0<br />
37.8 857.0<br />
38.9 886.0<br />
40.0 916.0<br />
41.1 946.0<br />
42.2 978.0<br />
43.3 1010.0<br />
44.4 1042.0<br />
45.6 1076.0<br />
46.7 1110.0<br />
47.8 1145.0<br />
48.9 1180.0<br />
50.0 1217.0<br />
51.1 1254.0<br />
52.2 1292.0<br />
53.3 1330.0<br />
54.4 1370.0<br />
55.6 1410.0<br />
56.7 1451.0<br />
57.8 1493.0<br />
58.9 1536.0<br />
60.0 1580.0
Chilled Water Temperature Too Low with<br />
Compressor Running<br />
CHILLED WATER SET POINT IN THE PLC SET TOO<br />
LOW — Correct set point <strong>and</strong> check for overrides from the<br />
building control system.<br />
LOW COOLING LOAD — The compressor cannot unload<br />
completely. If there is so little load that the guide vanes close<br />
fully, then the water temperature will continue to drop until the<br />
recycle function or chilled water low-temperature safety stops<br />
the machine.<br />
INACCURATE THERMISTOR — The reading on the panel<br />
will not coincide with other sensors monitoring the leaving<br />
chilled water.<br />
SENSORS OUTSIDE OF THE CHILLER CONTROLS<br />
ARE INACCURATE — The machine sensor could be correct<br />
<strong>and</strong> other sensor(s) are out of calibration.<br />
GUIDE VANES NOT CLOSING<br />
• Check pressure of supply air <strong>and</strong> cushion air pressure.<br />
• Confirm that the air signal from the transducer matches the<br />
signal output from the PLC.<br />
• Calibrate the positioner.<br />
• Test the actuator for leakage past the piston seal.<br />
Refrigerant Temperature Too Low<br />
COOLER WATERBOX DIVISION PLATE GASKET OUT<br />
OF PLACE — Fix gasket.<br />
LOW REFRIGERANT CHARGE — When the machine can<br />
be stopped, allow time for liquid to flow to the cooler. Compare<br />
the liquid level with the charging mark on the cooler level<br />
sightglass. Add refrigerant if required.<br />
Check for leaks <strong>and</strong> check shutdown seal operation. Test refrigerant<br />
alarm sensors.<br />
Leaving Chilled Water Temperature Fluctuates<br />
RETURN CHILLED WATER TEMPERATURE FLUCTU-<br />
ATING FASTER THAN CONTROLS CAN RESPOND —<br />
Adjust controls.<br />
CAPACITY CONTROL IN PLC NEEDS ADJUST-<br />
ING — Adjust capacity controls.<br />
GUIDE VANES MOVING ERRATICALLY<br />
• Check actuator (see Guide Vanes Not Closing section<br />
above)<br />
• With machine not running, disconnect the actuator <strong>and</strong><br />
move the guide vanes manually. There should be a resistance,<br />
easily overcome, at the point where the discharge diffuser<br />
starts opening or closing. Check for obstructions.<br />
Condenser Pressure Too High<br />
LOW WATER FLOW OR HIGH WATER TEMPERA-<br />
TURE — Check the following:<br />
• Check condensing water pump for proper operation.<br />
• Check delta P <strong>and</strong> delta T across the condenser water side to<br />
determine if there is bypassing around the division plate.<br />
• Check delta P across the condenser water pump.<br />
• Check cooling tower controls <strong>and</strong> fans. Check to see if<br />
tower bypass is open.<br />
• Check for correct level in the cooling tower.<br />
• Check flow meter readings.<br />
• If the condenser water valves automatically regulate condenser<br />
flow, check the control settings <strong>and</strong> valve operation.<br />
• Ensure that condenser water strainers are clean.<br />
AIR IN THE CONDENSER — Air or other non-condensable<br />
gases in the condenser will cause a rise in normal condensing<br />
pressures. Because of the subcooler, true condensing temperatures<br />
cannot be determined. If the subcooler level is set according<br />
to the method in the Charge Refrigerant section, then<br />
the actual condensing temperature will be close to the<br />
22<br />
temperature at the subcooler inlet thermowell. This is located<br />
adjacent to the level control/transmitter.<br />
If air is suspected, then check the purge. See the Purge Cycle<br />
section on page 19.<br />
FOULED CONDENSER TUBES — Check for fouled or obstructed<br />
tubes. Clean as required.<br />
Oil Pressure Too Low<br />
PLUGGED FILTERS — Switch to alternate filter cartridge.<br />
Replace plugged filter.<br />
PRESSURE REGULATOR SET TOO LOW — Adjust as<br />
required.<br />
FAULTY PRESSURE REGULATOR — Replace regulator.<br />
FAULTY PUMP OR MOTOR — Replace faulty component.<br />
Oil Pressure Too High<br />
PRESSURE REGULATOR SET TOO HIGH — Adjust as<br />
required.<br />
RESTRICTION IN PRESSURE SENSING LINE —<br />
Check pressures <strong>and</strong> temperatures throughout lubrication system.<br />
Correct as required.<br />
Oil Reservoir Temperature Too Low<br />
EXCESSIVE WATER FLOWING THROUGH OIL<br />
COOLER<br />
• Adjust water flow.<br />
• If equipped with an automatic regulator, adjust the<br />
regulator.<br />
• Check for good thermal contact between the regulator sensing<br />
bulb <strong>and</strong> the oil line leaving the oil cooler. Check the<br />
capillary tube for damage.<br />
• Replace the regulator if faulty.<br />
Oil Reservoir Temperature Too High<br />
INSUFFICIENT WATER FLOW THROUGH OIL<br />
COOLER<br />
• Adjust water flow.<br />
• If equipped with an automatic regulator, then adjust the<br />
regulator.<br />
• Check for good thermal contact between the regulator sensing<br />
bulb <strong>and</strong> the oil line leaving the oil cooler. Check the<br />
capillary tube for damage. Check for contamination plugging<br />
the regulator valve.<br />
• Replace the regulator if faulty.<br />
FOULED OR OBSTRUCTED OIL COOLER<br />
TUBES — Check oil cooler. Clean if necessary.<br />
TEMPERATURE OF OIL RETURNING FROM BEAR-<br />
INGS TOO HIGH — Check for bearing wear, in particular<br />
the thrust bearing. Check the bearings for foreign particles or<br />
any indication of wiping.<br />
A bad bearing can cause extensive damage to machine. Be<br />
sure to diagnose <strong>and</strong> correct reasons for overheated bearings<br />
before restarting the machine.<br />
Compressor Discharge Gas Temperature Too<br />
High<br />
EXTREMELY LOW LOAD — Verify low load condition.<br />
Add load to machine if possible.<br />
LOW COOLER REFRIGERANT LEVEL — Insufficient<br />
charge in the machine or condenser refrigerant level too high.<br />
EXCESSIVE TRAVEL OF DIFFUSER THROTTLING<br />
RING — This can only be determined through compressor<br />
disassembly.<br />
CONTROLS<br />
Safety Controls — Safety controls come in multiple<br />
forms. Safety functions are programmed into the PLC which
use the same sensors as the operating functions. Per customer<br />
specifications, these may be supplemented by mechanical<br />
switches which directly measure pressures or temperatures.<br />
These switches are connected to discrete inputs of the PLC <strong>and</strong><br />
the PLC controls the machine.<br />
<strong>Start</strong>ers <strong>and</strong> VFDs contain their own safeties that will shut<br />
down the starter/drive <strong>and</strong> then report the trip to the PLC via<br />
the communications line. It may be necessary to go to the drive<br />
control panel to read the actual trip code. On the PLC, the display<br />
may only show that the trip was initiated by the drive.<br />
STANDARD SAFETY FUNCTIONS — The following<br />
safety functions are st<strong>and</strong>ard:<br />
• low chilled water flow<br />
• low condenser water flow<br />
• high discharge gas temperature<br />
• chilled water low temperature<br />
• condenser high pressure<br />
• cooler low pressure<br />
• seal oil pressure<br />
• bearing oil pressure<br />
• thrust bearing high temperature<br />
• seal movement switch<br />
• excess shaft movement switch<br />
• gear <strong>and</strong> turbine oil pressure switches<br />
JOB SPECIFIC SAFETY FUNCTIONS — The settings for<br />
job specific safety functions will be found in the custom operating<br />
manuals provided with the machine. Examples of job<br />
specific safety functions are:<br />
• vibration monitoring<br />
• optional RTD bearing temperature sensors for the compressor<br />
<strong>and</strong> the drive components<br />
• turbine overspeed<br />
• failure of a synchronous motor to synchronize<br />
• TEWAC (totally enclosed, water cooled) motor cooling coil<br />
leak<br />
Operating Controls — Figures 10 <strong>and</strong> 11 are schematic<br />
representations of the basic control system governing water<br />
temperature, power dem<strong>and</strong> limit, <strong>and</strong> condenser liquid level<br />
(liquid flow control). A comprehensive description of the complete<br />
control logic specific to each machine is provided in the<br />
custom operating manual. A brief description of the basic schematic<br />
follows.<br />
The primary control devices are the compressor guide<br />
vanes, the hot gas bypass valve (optional) <strong>and</strong> the condensed<br />
liquid valve. Compressor speed may also be varied on some<br />
jobs. That will not be covered here.<br />
Compressor inlet guide vanes control the amount of refrigerant<br />
gas that the compressor pulls from the cooler. By varying<br />
this capacity, the control system maintains correct leaving water<br />
temperature. The correct temperature is set on the PLC <strong>and</strong><br />
can be also be set remotely. The PLC directs the position of the<br />
guide vanes based on the leaving water temperature. The guide<br />
vanes can also be controlled manually from the PLC.<br />
The guide vane position signal is sent to an actuator that<br />
moves the guide vanes in proportion to the control signal. The<br />
st<strong>and</strong>ard actuator is pneumatic <strong>and</strong> the signal from the PLC is<br />
converted to a 3 to 15 psi instrument signal to the actuator<br />
23<br />
positioner. A solenoid valve in the instrument line prevents the<br />
actuator from opening the guide vanes until the start-up sequence<br />
is complete. The solenoid will also cause the guide<br />
vanes to close immediately upon machine shut down. This prevents<br />
the pressure equalization gas flow from the condenser to<br />
the cooler from back spinning the compressor <strong>and</strong> driver.<br />
In case of supply air failure, the reserve air tank has sufficient<br />
volume to close the vanes.<br />
The hot gas bypass valve works together with the guide<br />
vanes. At low loads, the guide vane opening will be small. The<br />
hot gas valve will start to open as the guide vanes approach the<br />
minimum opening. The purpose of the hot gas bypass is to provide<br />
enough gas flow to the compressor to allow it to operate in<br />
a stable way at low chiller loads.<br />
The guide vane position as determined by water temperature<br />
can be overridden by other functions. Functions can override<br />
only to close the vanes <strong>and</strong> reduce the machines capacity.<br />
No override can increase the guide vane position.<br />
Override functions are:<br />
• refrigerant temperature too low<br />
• condenser pressure too high<br />
• motor current too high, based on the dem<strong>and</strong> limit set point.<br />
Inside the compressor, the guide vane actuator shaft also<br />
moves a diffuser throttle ring. Its position is determined by<br />
cams. During low loads, typically below 50%, the guide vanes<br />
<strong>and</strong> throttle ring move together. The diffuser throttling ring provides<br />
optimum performance down to 10% load. At higher<br />
loads the throttle ring is fully open <strong>and</strong> capacity is controlled by<br />
the guide vanes alone or in conjunction with variable compressor<br />
speed.<br />
Variable frequency drives (VFDs) can be used along with<br />
the guide vanes to control machine capacity. When a variable<br />
speed drive or turbine is used, refer to the custom operating<br />
manual for specific details of the control sequence.<br />
Figure 12 shows a typical turbine control which determines<br />
the required compressor speed using the difference between<br />
leaving chilled water <strong>and</strong> entering condenser water. This is not<br />
the only way to determine speed <strong>and</strong> sometimes the speed <strong>and</strong><br />
guide vane position are varied together to optimize power consumption.<br />
As long as the compressor speed required to maintain<br />
the desired leaving chilled water temperature is sufficient<br />
to maintain the required condenser pressure, it is most economical<br />
to control capacity by varying speed alone. If higher compressor<br />
rpm is required to maintain condenser pressure, the<br />
guide vanes will temporarily take control of capacity. The sequence<br />
is chosen based on individual job requirements.<br />
Condenser refrigerant level is set when the machine is commissioned.<br />
The level ensures that the subcooler tubes are covered<br />
with liquid <strong>and</strong> the liquid level does not reach the condenser<br />
tubes. A level control on the condenser operates the<br />
control valve in the line connecting the condenser drain with<br />
the cooler liquid inlet.<br />
The level control function can reside in the PLC. In that<br />
case a level transmitter is mounted on the condenser in place of<br />
a level controller. The control still operates the liquid line<br />
valve.
a17-579<br />
24<br />
PLC — Programmable Logic Controller<br />
Fig. 10 — Typical 17DA Motor-Driven Machine Control Diagram
25<br />
PLC — Programmable Logic Controller<br />
Fig. 11 — Typical 17DA Turbine-Driven Machine Control Diagram
FRONT VIEW<br />
REAR VIEW<br />
Fig. 12 — Machine Configuration<br />
26
COMPRESSOR FRONT VIEW<br />
1 — Free Cooling Vapor Valve (optional)<br />
2 — Sub-Cooler Refrigerant Level Controller<br />
3 — Cooler Sight Glass<br />
4 — Hot Gas Bypass Valve (optional)<br />
5 — Compressor Auxiliary Oil Pump<br />
6 — Purge Vapor Connection<br />
7 — Cooler Entering Water Temperature Instrument<br />
8 — Cooler Entering Water Flow Instrument<br />
9 — Cooler Leaving Water Temperature Instrument<br />
10 — Condenser Entering Water Temperature Instrument<br />
11 — Condenser Entering Water Flow Instrument<br />
12 — Condenser Leaving Water Temperature Instrument<br />
13 — Refrigerant Level Control Valve<br />
14 — Free Cooling Liquid Valve (optional)<br />
15 — Relief Valve<br />
16 — Purge<br />
17 — Condenser Refrigerant Liquid Temperature Instrument<br />
18 — Sub-Cooler Refrigerant Liquid Temperature Instrument<br />
19 — Discharge Temperature Instrument Connection<br />
20 — Cooler Refrigerant Liquid Temperature Instrument<br />
21 — Guide Vane Actuator<br />
22 — Positioner<br />
23 — Solenoid Valve<br />
24 — High Discharge Temperature Switch<br />
LEGEND<br />
Fig. 12 — Machine Configuration (cont)<br />
27<br />
COMPRESSOR REAR VIEW<br />
25 — Thrust Bearing Temperature Instrument<br />
26 — Oil Filter<br />
27 — Oil Cooler<br />
28 — Oil Reservoir<br />
29 — Oil Reservoir Level Sightglass<br />
30 — Oil Reservoir Vent<br />
31 — Bearing Housing Vent<br />
32 — Compressor Seal End Journal Bearing RTD<br />
33 — Compressor Thrust End Journal Bearing RTD<br />
34 — Thrust Bearing Oil Return RTD<br />
35 — Oil Supply RTD<br />
36 — Bearing Supply Oil Pressure Transmitter<br />
37 — Oil Pump <strong>and</strong> Motor<br />
38 — OIl Differential Pressure Regulator Valve<br />
39 — Oil Pressure Regulator Valve<br />
40 — Shut Down Seal Solenoid Valve<br />
41 — Seal Supply Oil Pressure Transmitter<br />
42 — Seal Oil Return Pressure Transmitter<br />
43 — Thrust End Journal Bearing Transducer (X)<br />
44 — Thrust End Journal Bearing Transducer (Y)<br />
45 — Thrust End Bearing Transducer<br />
46 — Seal End Journal Bearing Transducer (X)<br />
47 — Seal End Journal Bearing Transducer (Y)
Copyright 2009 <strong>Carrier</strong> Corporation<br />
Manufacturer reserves the right to discontinue, or change at any time, specifications or designs without notice <strong>and</strong> without incurring obligations.<br />
Catalog No. 04-53170002-01 Printed in U.S.A. Form 17DA-3SS Pg 28 3-09 Replaces: 17DA-2SS,<br />
17DA-3SO
PRE-START UP CHECK LIST<br />
1. Steam System<br />
a. Is steam available? ______<br />
b. Have the steam lines been blown out <strong>and</strong> checked for cleanliness? ______<br />
c. Have the turbine steam inlet <strong>and</strong> exhaust chambers been checked for foreign material before steam lines are attached? ______<br />
d. Are there adequate pipe hangers <strong>and</strong> supports on the steam lines <strong>and</strong> has an analysis of the piping been concluded to eliminate<br />
piping stress on the turbine? ______<br />
e. Have limiting rods been placed on expansion joints when they are used? ______<br />
f. If a trip <strong>and</strong> throttle valve is supplied, does it have adequate support under it so that no weight or stress is placed<br />
on the turbine? ______<br />
g. Have all steam leak-off lines <strong>and</strong> drains been piped as indicated on the Dresser-R<strong>and</strong> Outline drawing? ______<br />
h. Has an atmospheric relief valve been installed in the exhaust line between the turbine <strong>and</strong> the first block valve? ______<br />
2. Turbine Preparation<br />
a. Has the turbine been rough aligned to the driven machine <strong>and</strong> grouted in? ______<br />
b. Have all shipping plugs <strong>and</strong>/or blind flanges been removed from the oil pipes <strong>and</strong> lube console <strong>and</strong> oil lines cleaned<br />
prior to installing? ______<br />
c. Has oil tank been cleaned <strong>and</strong> inspected in preparation to filling with oil? ______<br />
d. When oil console is supplied by others, has provisions been made to circulate oil <strong>and</strong> checked for cleanliness without<br />
passing oil through the turbine? ______<br />
e. Is piping complete <strong>and</strong> water available for oil cooler? ______<br />
f. Has proper oil for turbine <strong>and</strong> driven machine been obtained <strong>and</strong> brought to jobsite? ______<br />
g. Has auxiliary oil pump, where supplied, been checked for correct rotation? ______<br />
h. Are pneumatic <strong>and</strong> electrical connections to the turbine governor <strong>and</strong> safety devices completed? ______<br />
i. Is piping <strong>and</strong> wiring to gauge board, where furnished, complete? ______<br />
3. Condensing Turbines Only<br />
a. Has a means been provided to drain the casing while under vacuum? ______<br />
b. Have the condenser condensate pumps been checked for correct rotation? ______<br />
c. Has the condenser hot well level control been checked for correct operation? ______<br />
Signed By: ____________________________________ Date: ____________<br />
Firm Name: ______________________________________________________<br />
Copyright 2009 <strong>Carrier</strong> Corporation<br />
Manufacturer reserves the right to discontinue, or change at any time, specifications or designs without notice <strong>and</strong> without incurring obligations.<br />
Catalog No. 04-53170002-01 Printed in U.S.A. Form 17DA-3SS Pg CL-1 3-09 Replaces: 17DA-2SS,<br />
17DA-3SO<br />
- - - - - - - - - - - - - - - - - - - - - - - - - - - - - - - - - - - - - - - - - - - - - - - - - - - - - - - - - - - - - - - - - - - - - - - - - - - - - - - - - - - - - - - - - - - - - - - - - - - - - - - - - - - - - - - - - - - - - - - - - - - - - - - - - - - - - - - - - - - - - - - - - - - - - - - - - - - - - - - - - - - - - - - - - - - - -- - - - - - - - - - - - - - - - - - - -<br />
CUT ALONG DOTTED LINE CUT ALONG DOTTED LINE