Toshiba 40RV525R PDF Manual - static.highspeedb...
Toshiba 40RV525R PDF Manual - static.highspeedb...
Toshiba 40RV525R PDF Manual - static.highspeedb...
Create successful ePaper yourself
Turn your PDF publications into a flip-book with our unique Google optimized e-Paper software.
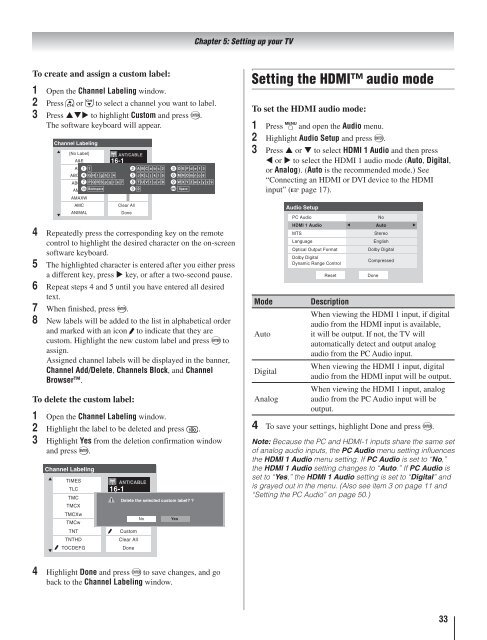
To create and assign a custom label:<br />
1<br />
2<br />
3<br />
4<br />
5<br />
6<br />
7<br />
8<br />
Open the Channel Labeling window.<br />
Press or to select a channel you want to label.<br />
Press to highlight Custom and press .<br />
The software keyboard will appear.<br />
Repeatedly press the corresponding key on the remote<br />
control to highlight the desired character on the on-screen<br />
software keyboard.<br />
The highlighted character is entered after you either press<br />
a different key, press key, or after a two-second pause.<br />
Repeat steps 4 and 5 until you have entered all desired<br />
text.<br />
When finished, press .<br />
New labels will be added to the list in alphabetical order<br />
and marked with an icon to indicate that they are<br />
custom. Highlight the new custom label and press to<br />
assign.<br />
Assigned channel labels will be displayed in the banner,<br />
Channel Add/Delete, Channels Block, and Channel<br />
Browser.<br />
To delete the custom label:<br />
1<br />
2<br />
3<br />
4<br />
Open the Channel Labeling window.<br />
Highlight the label to be deleted and press .<br />
Highlight Yes from the deletion confirmation window<br />
and press .<br />
Highlight Done and press to save changes, and go<br />
back to the Channel Labeling window.<br />
Chapter 5: Setting up your TV<br />
S<br />
Setting the HDMI audio mode<br />
To set the HDMI audio mode:<br />
1<br />
2<br />
3<br />
Press and open the Audio menu.<br />
Highlight Audio Setup and press .<br />
Press or to select HDMI 1 Audio and then press<br />
or to select the HDMI 1 audio mode (Auto, Digital,<br />
or Analog). (Auto is the recommended mode.) See<br />
“Connecting an HDMI or DVI device to the HDMI<br />
input” ( page 17).<br />
Audio Setup<br />
PC<br />
Audio<br />
HDMI 1 Audio<br />
MTS<br />
Language<br />
Optical Output Format<br />
Dolby Digital<br />
Dynamic Range Control<br />
Reset<br />
Mode Description<br />
Auto<br />
Digital<br />
Analog<br />
4<br />
No<br />
Auto<br />
Stereo<br />
English<br />
Dolby Digital<br />
Compressed<br />
Done<br />
When viewing the HDMI 1 input, if digital<br />
audio from the HDMI input is available,<br />
it will be output. If not, the TV will<br />
automatically detect and output analog<br />
audio from the PC Audio input.<br />
When viewing the HDMI 1 input, digital<br />
audio from the HDMI input will be output.<br />
When viewing the HDMI 1 input, analog<br />
audio from the PC Audio input will be<br />
output.<br />
To save your settings, highlight Done and press .<br />
Note: Because the PC and HDMI-1 inputs share the same set<br />
of analog audio inputs, the PC Audio menu setting influences<br />
the HDMI 1 Audio menu setting. If PC Audio is set to “No,”<br />
the HDMI 1 Audio setting changes to “Auto.” If PC Audio is<br />
set to “Yes,” the HDMI 1 Audio setting is set to “Digital” and<br />
is grayed out in the menu. (Also see item 3 on page 11 and<br />
“Setting the PC Audio” on page 50.)<br />
33


