Toshiba 40RV525R PDF Manual - static.highspeedb...
Toshiba 40RV525R PDF Manual - static.highspeedb...
Toshiba 40RV525R PDF Manual - static.highspeedb...

You also want an ePaper? Increase the reach of your titles
YUMPU automatically turns print PDFs into web optimized ePapers that Google loves.
Using the GameTimer ®<br />
You can use the GameTimer to set a time limit for playing a<br />
video game (30–120 minutes). When the GameTimer expires,<br />
the TV enters Input Lock mode and locks out the input source<br />
for the video game device..<br />
To set the GameTimer ® :<br />
1<br />
2<br />
3<br />
4<br />
From the Locks menu, press to display the PIN code<br />
entering screen.<br />
Enter your four-digit PIN code and press .<br />
Press to highlight GameTimer and press .<br />
Press or to select the length of time until the Input<br />
Lock is activated (30, 60, 90, or 120 minutes) and press<br />
.<br />
To cancel the GameTimer ® :<br />
Select Off in step 4 above.<br />
To deactivate the Input Lock once the GameTimer ®<br />
has activated it:<br />
Set the Input Lock to Off ( “Using the input lock feature”<br />
as described above).<br />
Note:<br />
A message will appear when 10 minutes, 3 minutes, and 1<br />
minute remain on the GameTimer.<br />
If the TV loses power with time remaining on the GameTimer,<br />
when power is restored the TV will enter Input Lock mode (as<br />
if the GameTimer had been activated) and you will have to<br />
deactivate the Input Lock (as described above).<br />
Using the control panel lock feature<br />
You can lock the control panel to prevent your settings from<br />
being changed accidentally (by children, for example). When<br />
the control panel lock is On, none of the controls on the TV<br />
control panel will operate except POWER.<br />
To lock the control panel:<br />
1 Press and highlight the Locks menu icon.<br />
2 Press to display the PIN code entering screen.<br />
3 Enter your four-digit PIN code and press .<br />
4 Press to highlight Control Panel Lock.<br />
5 Press and or to highlight On and press . When<br />
the control panel is locked and any button on the control<br />
panel (except POWER) is pressed, the message “NOT<br />
AVAILABLE” appears.<br />
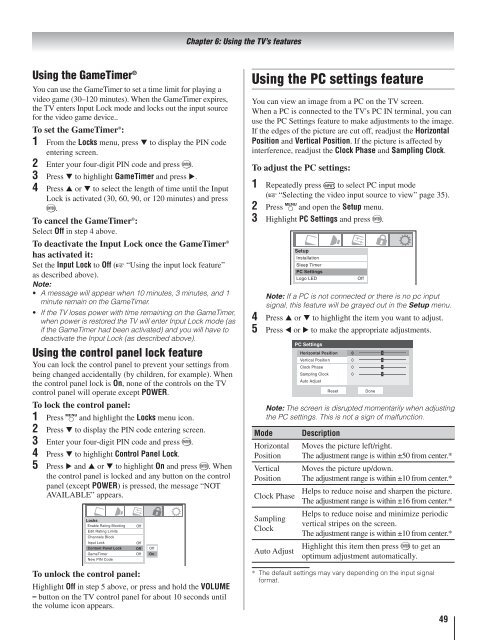
Locks<br />
Enable Rating Blocking Off<br />
Edit Rating Limits<br />
Channels Block<br />
Input Lock<br />
Off<br />
Contont Panel Lock Off<br />
GameTimer Off<br />
New PIN Code<br />
To unlock the control panel:<br />
Highlight Off in step 5 above, or press and hold the VOLUME<br />
– button on the TV control panel for about 10 seconds until<br />
the volume icon appears.<br />
Off<br />
On<br />
Chapter 6: Using the TV’s features<br />
Using the PC settings feature<br />
You can view an image from a PC on the TV screen.<br />
When a PC is connected to the TV's PC IN terminal, you can<br />
use the PC Settings feature to make adjustments to the image.<br />
If the edges of the picture are cut off, readjust the Horizontal<br />
Position and Vertical Position. If the picture is affected by<br />
interference, readjust the Clock Phase and Sampling Clock.<br />
To adjust the PC settings:<br />
1<br />
2<br />
3<br />
4<br />
5<br />
Repeatedly press to select PC input mode<br />
( “Selecting the video input source to view” page 35).<br />
Press and open the Setup menu.<br />
Highlight PC Settings and press .<br />
Note: If a PC is not connected or there is no pc input<br />
signal, this feature will be grayed out in the Setup menu.<br />
Press or to highlight the item you want to adjust.<br />
Press or to make the appropriate adjustments.<br />
PC Settings<br />
Horizontal Position 0<br />
Vertical Position<br />
0<br />
Clock Phase<br />
0<br />
Sampling Clock<br />
Auto Adjust<br />
0<br />
Reset<br />
Done<br />
Note: The screen is disrupted momentarily when adjusting<br />
the PC settings. This is not a sign of malfunction.<br />
Mode Description<br />
Horizontal<br />
Position<br />
Vertical<br />
Position<br />
Clock Phase<br />
Sampling<br />
Clock<br />
*<br />
Auto Adjust<br />
Moves the picture left/right.<br />
The adjustment range is within ±50 from center.*<br />
Moves the picture up/down.<br />
The adjustment range is within ±10 from center.*<br />
Helps to reduce noise and sharpen the picture.<br />
The adjustment range is within ±16 from center.*<br />
Helps to reduce noise and minimize periodic<br />
vertical stripes on the screen.<br />
The adjustment range is within ±10 from center.*<br />
Highlight this item then press to get an<br />
optimum adjustment automatically.<br />
The default settings may vary depending on the input signal<br />
format.<br />
49