Kodak EasyShare CX6445 zoom digital camera User's Guide
Kodak EasyShare CX6445 zoom digital camera User's Guide
Kodak EasyShare CX6445 zoom digital camera User's Guide

You also want an ePaper? Increase the reach of your titles
YUMPU automatically turns print PDFs into web optimized ePapers that Google loves.
18<br />
Chapter 2<br />
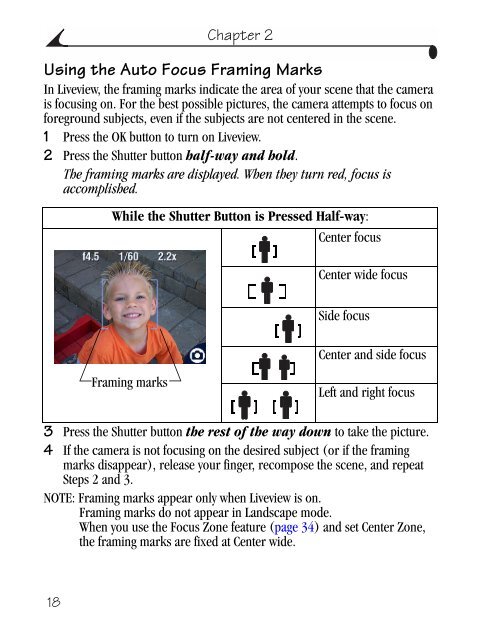
Using the Auto Focus Framing Marks<br />
In Liveview, the framing marks indicate the area of your scene that the <strong>camera</strong><br />
is focusing on. For the best possible pictures, the <strong>camera</strong> attempts to focus on<br />
foreground subjects, even if the subjects are not centered in the scene.<br />
1 Press the OK button to turn on Liveview.<br />
2 Press the Shutter button half-way and hold.<br />
The framing marks are displayed. When they turn red, focus is<br />
accomplished.<br />
While the Shutter Button is Pressed Half-way:<br />
Center focus<br />
Framing marks<br />
Center wide focus<br />
Side focus<br />
Center and side focus<br />
Left and right focus<br />
3 Press the Shutter button the rest of the way down to take the picture.<br />
4 If the <strong>camera</strong> is not focusing on the desired subject (or if the framing<br />
marks disappear), release your finger, recompose the scene, and repeat<br />
Steps 2 and 3.<br />
NOTE: Framing marks appear only when Liveview is on.<br />
Framing marks do not appear in Landscape mode.<br />
When you use the Focus Zone feature (page 34) and set Center Zone,<br />
the framing marks are fixed at Center wide.