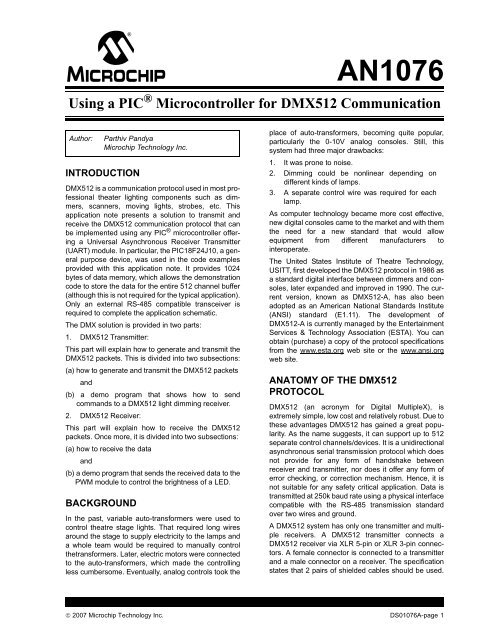
AN1076 - Microchip
AN1076 - Microchip
AN1076 - Microchip

You also want an ePaper? Increase the reach of your titles
YUMPU automatically turns print PDFs into web optimized ePapers that Google loves.
INTRODUCTION<br />
DMX512 is a communication protocol used in most professional<br />
theater lighting components such as dimmers,<br />
scanners, moving lights, strobes, etc. This<br />
application note presents a solution to transmit and<br />
receive the DMX512 communication protocol that can<br />
be implemented using any PIC ® microcontroller offering<br />
a Universal Asynchronous Receiver Transmitter<br />
(UART) module. In particular, the PIC18F24J10, a general<br />
purpose device, was used in the code examples<br />
provided with this application note. It provides 1024<br />
bytes of data memory, which allows the demonstration<br />
code to store the data for the entire 512 channel buffer<br />
(although this is not required for the typical application).<br />
Only an external RS-485 compatible transceiver is<br />
required to complete the application schematic.<br />
The DMX solution is provided in two parts:<br />
1. DMX512 Transmitter:<br />
This part will explain how to generate and transmit the<br />
DMX512 packets. This is divided into two subsections:<br />
(a) how to generate and transmit the DMX512 packets<br />
and<br />
(b) a demo program that shows how to send<br />
commands to a DMX512 light dimming receiver.<br />
2. DMX512 Receiver:<br />
This part will explain how to receive the DMX512<br />
packets. Once more, it is divided into two subsections:<br />
(a) how to receive the data<br />
and<br />
(b) a demo program that sends the received data to the<br />
PWM module to control the brightness of a LED.<br />
BACKGROUND<br />
In the past, variable auto-transformers were used to<br />
control theatre stage lights. That required long wires<br />
around the stage to supply electricity to the lamps and<br />
a whole team would be required to manually control<br />
thetransformers. Later, electric motors were connected<br />
to the auto-transformers, which made the controlling<br />
less cumbersome. Eventually, analog controls took the<br />
<strong>AN1076</strong><br />
Using a PIC ® Microcontroller for DMX512 Communication<br />
Author: Parthiv Pandya<br />
<strong>Microchip</strong> Technology Inc.<br />
place of auto-transformers, becoming quite popular,<br />
particularly the 0-10V analog consoles. Still, this<br />
system had three major drawbacks:<br />
1. It was prone to noise.<br />
2. Dimming could be nonlinear depending on<br />
different kinds of lamps.<br />
3. A separate control wire was required for each<br />
lamp.<br />
As computer technology became more cost effective,<br />
new digital consoles came to the market and with them<br />
the need for a new standard that would allow<br />
equipment from different manufacturers to<br />
interoperate.<br />
The United States Institute of Theatre Technology,<br />
USITT, first developed the DMX512 protocol in 1986 as<br />
a standard digital interface between dimmers and consoles,<br />
later expanded and improved in 1990. The current<br />
version, known as DMX512-A, has also been<br />
adopted as an American National Standards Institute<br />
(ANSI) standard (E1.11). The development of<br />
DMX512-A is currently managed by the Entertainment<br />
Services & Technology Association (ESTA). You can<br />
obtain (purchase) a copy of the protocol specifications<br />
from the www.esta.org web site or the www.ansi.org<br />
web site.<br />
ANATOMY OF THE DMX512<br />
PROTOCOL<br />
DMX512 (an acronym for Digital MultipleX), is<br />
extremely simple, low cost and relatively robust. Due to<br />
these advantages DMX512 has gained a great popularity.<br />
As the name suggests, it can support up to 512<br />
separate control channels/devices. It is a unidirectional<br />
asynchronous serial transmission protocol which does<br />
not provide for any form of handshake between<br />
receiver and transmitter, nor does it offer any form of<br />
error checking, or correction mechanism. Hence, it is<br />
not suitable for any safety critical application. Data is<br />
transmitted at 250k baud rate using a physical interface<br />
compatible with the RS-485 transmission standard<br />
over two wires and ground.<br />
A DMX512 system has only one transmitter and multiple<br />
receivers. A DMX512 transmitter connects a<br />
DMX512 receiver via XLR 5-pin or XLR 3-pin connectors.<br />
A female connector is connected to a transmitter<br />
and a male connector on a receiver. The specification<br />
states that 2 pairs of shielded cables should be used.<br />
© 2007 <strong>Microchip</strong> Technology Inc. DS01076A-page 1
<strong>AN1076</strong><br />
However, the use of a second cable is optional.Table 1<br />
shows the physical pinout when a XLR 5-pin connector<br />
is used.<br />
TABLE 1: XLR 5-PIN CONNECTOR<br />
XLR Pin Number DMX 512 Application Function<br />
1 Common Common Reference<br />
2 DMX Data 1-<br />
3 DMX Data 1+<br />
Each DMX512 transmitter sends 512 8-bit dimming values,<br />
between 0 and 255, where 0 represents the lights<br />
off and 255 represents the maximum intensity.<br />
FIGURE 1: DMX512 TIMING DIAGRAM<br />
TABLE 2: DMX512 TIMING VALUES<br />
Primary Data link<br />
4 DMX Data 2- Secondary (Optional) Data link (Unimplemented<br />
for 3 pin XLR connector)<br />
5 DMX Data 2+<br />
Note: XLR connectors are commonly used in<br />
professional audio, video and lighting<br />
applications. The connector has a rugged<br />
shell and a locking mechanism.<br />
Mark Before<br />
Mark after<br />
Break<br />
Break<br />
Start Code<br />
Each receiver connected to the DMX512 line can<br />
choose one of the 512 channels (address selection) to<br />
control its output lamp (load).<br />
The DMX512 protocol requires the transmitter to continuously<br />
repeat (at least once a second) the transmission<br />
of a frame as shown in the timing diagram in<br />
Figure 1 and Table 2.<br />
2 Stop Bits<br />
LSb MSb<br />
0 7<br />
0 1 1 0 1 0 1<br />
1st Data<br />
Byte<br />
2 Stop Bits<br />
Other 511 Bytes<br />
Description Minimum Maximum Typical Unit<br />
Break 92 — 176 μSec<br />
Mark after Break 12
DMX512 TRANSMITTER<br />
To generate the DMX512 packets, the software solution<br />
employs a simple state machine comprised of four<br />
states:<br />
1. SENDMBB – DMX data line is Idle<br />
2. SENDDATA – Bytes 0 to 511 of the DMX frame<br />
3. SENDMAB – DMX data line is Idle<br />
4. SENDBREAK – DMX data line is driven low<br />
FIGURE 2: TRANSMITTER STATE MACHINE<br />
Wait for<br />
100 μSec<br />
Wait for<br />
100 μSec<br />
State 1<br />
SENDMBB<br />
“DmxTxState = 0”<br />
State 4<br />
SENDBREAK<br />
After 100 μSec<br />
“DmxTxState = 3”<br />
Figure 2 shows the state machine. In this application,<br />
to simplify the code and still remain within the timing<br />
constrains, the SENDBREAK, SENDMAB and SENDMBB<br />
intervals were all set to 100 μSec. These timings can<br />
be easily changed if required. The Timer0 module is<br />
used to control the 100 μSec timing and the spacing<br />
between the transmitted bytes.<br />
After 100 μSec<br />
After 100 μSec<br />
State 2<br />
SENDDATA<br />
“DmxTxState = 1”<br />
512 bytes sent<br />
State 3<br />
SENDMAB<br />
“DmxTxState = 2”<br />
Wait for<br />
60 μSec<br />
between<br />
bytes<br />
Wait for<br />
100 μSec<br />
<strong>AN1076</strong><br />
© 2007 <strong>Microchip</strong> Technology Inc. DS01076A-page 3
<strong>AN1076</strong><br />
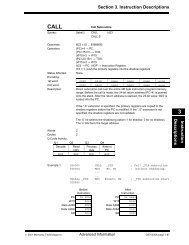
EXAMPLE 1: DMX512 TRANSMITTER<br />
STATE MACHINE CODE<br />
;Jump Table<br />
DMXTransmit:<br />
rlncf DmxTxState,W<br />
andlw 0x0E<br />
addwf PCL<br />
bra SENDMBB<br />
bra SENDDATA<br />
bra SENDMAB<br />
bra SENDBREAK<br />
SENDMBB<br />
.<br />
.<br />
return<br />
SENDDATA<br />
.<br />
.<br />
return<br />
SENDMAB<br />
.<br />
.<br />
return<br />
SENDBREAK<br />
.<br />
.<br />
return<br />
Example 1 shows the outline of the DMXTransmit<br />
subroutine implementing the state machine.<br />
The DMXTransmit subroutine is designed for use in a<br />
cooperative multitasking application. To avoid any timing<br />
issues, the state machine should be called frequently<br />
enough (approximately every 40 μs or less)<br />
from the main program loop. The DmxTxState variable<br />
is used to represent the current state and as an offset<br />
in a jump table to access the corresponding code<br />
segment in the state machine subroutine.<br />
GENERATING THE BREAK SIGNAL<br />
The Break signal allows receivers to synchronize with<br />
the DMX transmitter identifying the beginning of a new<br />
packet of data.The EUSART module available on most<br />
PIC18 microcontrollers has the ability to automatically<br />
generate a 12-bit long Break signal, corresponding to<br />
48 μs at 250k baud. Unfortunately, this is too short for<br />
use in a DMX512 application as the protocol requires a<br />
minimum length of 92 μSec. Figure 3 shows the alternative<br />
hardware method chosen in this application note<br />
to generate the longer Break signal. A 100Ω resistor is<br />
connected in series with the microcontroller’s EUSART<br />
transmit pin and the other end of the resistor to an I/O<br />
pin. In the specific example, pin RC5 was used. With<br />
this solution, the Break time can be varied in software,<br />
from 92 μSec to 176 μSec to meet the DMX protocol<br />
Break time specification, when sending a Break signal,<br />
pin RC5 is driven low. Later Pin RC5 is tri-stated to<br />
allow the transmission from the EUSART to resume.<br />
FIGURE 3: GENERATING A LONG<br />
BREAK SIGNAL<br />
DS01076A-page 4 © 2007 <strong>Microchip</strong> Technology Inc.<br />
PIC ®<br />
Microcontroller<br />
RC6/Tx<br />
RC5<br />
R<br />
100 Ω<br />
To RS-485<br />
Transceiver
SENDING THE DIMMING DATA<br />
The dimming data is 8-bits wide, where ‘0’ represents a<br />
light off and ‘255’ represents full intensity. Figure 4<br />
shows the digital representation of the dimming data.<br />
To generate the two Stop bits required by the DMX512<br />
protocol, the PIC18 EUSART is configured for 9-bit<br />
mode and the 9 th bit is set permanently to ‘1’.<br />
FIGURE 4: DIGITAL REPRESENTATION OF DIMMING DATA<br />
Mark Before Break<br />
Start Code<br />
0<br />
LSb MSb<br />
0<br />
7<br />
0 0 0 0 0 0 0 0<br />
2 Stop Bits<br />
Data = ‘0’ Data = ‘255’<br />
The dimming data is stored in a 512 bytes buffer<br />
(TxBuffer), allocated in the PIC18F24J10 RAM memory.<br />
The data is written to or read from the buffer using<br />
the indirect addressing registers available on PIC18<br />
microcontroller architecture for linear memory access.<br />
A counter keeps track of the number of bytes<br />
transmitted from the buffer.<br />
Note: Although the demonstration code stores<br />
and transmits the dimming data for all 512<br />
channels it can be easily modified to store<br />
and transmit only a subset of channels,<br />
while leaving all remaining channels off<br />
(0). This could reduce considerably the<br />
MCU RAM requirements for a reduced<br />
functionality transmitter.<br />
<strong>AN1076</strong><br />
© 2007 <strong>Microchip</strong> Technology Inc. DS01076A-page 5<br />
Mark Before Break<br />
Start Code<br />
LSb MSb<br />
0 7<br />
1 1 1 1 1 1 1 1<br />
2 Stop Bits
<strong>AN1076</strong><br />
TRANSMITTER APPLICATION DEMO:<br />
DIMMING A LAMP<br />
In the previous section we saw that it is very easy to<br />
generate a DMX512 packet using a PIC18F device. In<br />
this demonstration application, we will use a potentiometer<br />
connected to the DMX512 transmitter to control<br />
remotely a lamp attached to a standard DMX512<br />
receiver.<br />
The PIC18F24J10 has a 10-bit Analog-to-Digital Converter<br />
module with 13 inputs. The potentiometer can be<br />
connected on pin RA0 of the MCU corresponding to the<br />
analog input channel 0.<br />
Since the potentiometer won’t change very rapidly,<br />
sampling it every 10 mSec is sufficient.To generate an<br />
automatic and periodic activation of the Analog-to-<br />
Digital Converter, a convenient feature of the<br />
PIC18F24J10 microcontroller can be used. The ADC<br />
FIGURE 5: DMX512 TRANSMITTER CIRCUIT SCHEMATIC<br />
PIC ®<br />
Microcontroller<br />
RC6/Tx<br />
RC5<br />
100 Ω<br />
0.1 μF<br />
5 V<br />
VCC<br />
RS-485<br />
Transceiver<br />
(-) B<br />
(+) A<br />
Tx<br />
GND<br />
Note: Please see Appendix A: “DMX512<br />
Transmitter Demo” for a complete code<br />
listing of the transmitter demo.<br />
module can, in fact, start periodically a new conversion<br />
triggered by the Capture Compare and PWM module<br />
(CCP). The 16-bit Timer1 module is used in conjunction<br />
with the CCP module configured in 16-bit Compare<br />
mode. When the compare trigger occurs (Timer1 =<br />
CCPR1), the ADC conversion starts on the preselected<br />
input channel and Timer1 is reset.<br />
When the ADC conversion is complete a new result is<br />
loaded into the ADRESH register and the ADIF flag is<br />
set.<br />
When the ADIF bit is detected in the main loop, the<br />
transmitter will retrieve from ADRESH the Most Significant<br />
8 bits encoding the potentiometer position and will<br />
transfer them to the transmission buffer at the position<br />
corresponding to the desired channel. The same channel<br />
will be selected at the dimming receiver for<br />
demonstration.<br />
XLR 3-pin<br />
Connector<br />
To Receiver<br />
DS01076A-page 6 © 2007 <strong>Microchip</strong> Technology Inc.<br />
2<br />
3<br />
1<br />
DMX-<br />
DMX +<br />
COMMON<br />
Shielded cable
A SIMPLE DMX512 RECEIVER<br />
FIGURE 6: RECEIVING A DMX512 PACKET<br />
1 2 3<br />
0 1 1 0 1 0 1 0<br />
MBB BREAK MAB STARTCODE<br />
512 Bytes Data<br />
The problem of receiving a DMX512 packet can be<br />
decomposed in three parts.<br />
1. The first part is the synchronization of the<br />
receiver with the beginning of a new data packet<br />
identified by a prolonged Break condition of the<br />
line. This condition can be conveniently identified<br />
by a Framing error flag reported by the<br />
UART. In fact, when the line is taken to the Break<br />
level, at the beginning of a new DMX512 packet,<br />
the UART initially interprets the condition as the<br />
beginning of a new data byte. But when, after<br />
the duration of the Start bit and 8 more data bits,<br />
instead of the two Stop bits (mark) the line<br />
remains in the Break condition, a frame error is<br />
reported.<br />
Since there is no way to predict at which point of<br />
a transmission sequence the receiver will be<br />
activated, during this phase the UART is polled<br />
continuously in a loop to discard any data<br />
received until a first framing error is detected.<br />
2. Once the Break condition is identified, the<br />
receiver needs to wait for the line to return to the<br />
Idle state (mark) and a first byte of data to arrive.<br />
During this phase the UART is polled continuously<br />
as frame errors continue to be detected.<br />
Eventually the first byte received correctly is<br />
interpreted as the Start code. In this simple<br />
application only frames with a Start code of 0 are<br />
received, frames beginning with a different Start<br />
code (DMX512 extensions) are ignored.<br />
3. The last part consists, once more, of a loop<br />
where the receiver captures up to 512 bytes of<br />
data and stores them sequentially in the receiver<br />
buffer. A 12-bit pointer, available in the PIC18<br />
architecture, is used to provide linear memory<br />
access to the RAM memory space.<br />
<strong>AN1076</strong><br />
Other 511 Bytes<br />
RECEIVER APPLICATION DEMO<br />
In the previous section we saw how to get the DMX512<br />
data for 512 channels and to store them into a receiver<br />
buffer. In this section we will use the received data to<br />
control the PWM module of a PIC microcontroller. Connecting<br />
a LED to the PWM output pin we will observe<br />
the LED brightness change in response to DMX512<br />
dimming commands.<br />
The PIC18F24J10 Capture Compare and PWM (CCP)<br />
module offers 10-bit resolution. When used in PWM<br />
mode, it uses Timer2 as its time base and the PR2 register<br />
determines the PWM period. Since the DMX512<br />
protocol provides only 8-bit of resolution for each channel,<br />
setting the PR2 register to ‘0xFF’ allows us to use<br />
just the 8 Most Significant bits to control the duty cycle<br />
while still providing a PWM output frequency of approximately<br />
16 kHz. This value greatly exceeds the minimum<br />
requirement, of approximately 100 Hz, usually<br />
considered sufficient to eliminate any visible flicker of<br />
the LED.<br />
Since the Most Significant 8 bits of the PWM duty cycle<br />
are controlled by the CCPR2L register, it is sufficient to<br />
periodically update it copying the contents of the location<br />
corresponding to the desired DMX512 address<br />
(defined by the constant CHANNEL) from inside the<br />
receive buffer.<br />
In the demonstration code, the CCPR2L register is<br />
updated every time a complete DMX512 frame has<br />
been received.<br />
© 2007 <strong>Microchip</strong> Technology Inc. DS01076A-page 7<br />
0<br />
7
<strong>AN1076</strong><br />
FIGURE 7: DMX512 RECEIVER CIRCUIT SCHEMATIC<br />
PIC ®<br />
Microcontroller<br />
RC7/Rx<br />
In the schematic, the EUSART receiver pin is connected<br />
to the RS-485 transceiver’s receiver output pin.<br />
A 120Ω, ¼ W resistor should be connected between<br />
DMX- and DMX+ data link as a line terminator. Figure 7<br />
shows the line terminator between pin 2 (DMX- data<br />
link) and pin 3 (DMX+ data link) of an XLR-3 connector.<br />
Proper Termination greatly reduces signal transmission<br />
problems.<br />
TESTING SETUP<br />
To test the DMX512 transmitter and receiver, a separate<br />
pair of PICDEM 2 PLUS demo boards was used.<br />
The PICDEM 2 PLUS can be used to demonstrate the<br />
capabilities of 18, 28 and 40-pin PIC16 and PIC18<br />
devices. The board has a small prototyping area where<br />
the transmitter and receiver transceiver circuits can be<br />
built.<br />
In order to take advantage of the (4) LEDs available on<br />
the board for the receiver demo, the output of the<br />
PIC18F24J10 CCP2 module can been redirected to<br />
PORTB output pin RB3 by modifying the microcontroller<br />
nonvolatile Configuration register CONFIG3H,<br />
‘CCP2 MUX’ bit.<br />
INTERRUPT<br />
0.1 μF<br />
RS-485<br />
Transceiver<br />
(-) B<br />
(+) A<br />
The provided transmitter and receiver demonstration<br />
code uses the polling method to transmit and receive<br />
the DMX512 packets. The CPU is waiting for a timer to<br />
expire to generate the mark and the Break signals or<br />
for the EUSART to transmit or receive the data. To<br />
reduce the CPU polling time, the provided code can be<br />
written using interrupts.<br />
5 V<br />
VCC<br />
Rx<br />
GND<br />
Note: Please see Appendix B: “DMX512<br />
Receiver Demo” for a complete code<br />
listing of the receiver demo.<br />
Terminator<br />
(Resistance 120Ω 1/4w)<br />
XLR 3-pin<br />
Connector<br />
CONCLUSION<br />
This application note presents a very simple software<br />
solution to generate, transmit and receive the DMX512<br />
signals using a low-cost MCU.<br />
REFERENCES<br />
From Transmitter<br />
1. PIC18F24J10 Data sheet (DS39682)<br />
The data sheet provides all the necessary information<br />
regarding the EUSART module, CCP<br />
module, ADC module and electrical<br />
2.<br />
characteristics of the PIC microcontroller.<br />
PICDEM 2 PLUS User’s Guide (DS51275)<br />
This application note has been tested using a<br />
pair of PICDEM 2 PLUS demo boards.<br />
3. American National Standard E1.11 – 2004.<br />
The official DMX512 protocol specifications are<br />
available on www.esta.org.<br />
DS01076A-page 8 © 2007 <strong>Microchip</strong> Technology Inc.<br />
2<br />
1<br />
3<br />
DMX-<br />
DMX +<br />
COMMON<br />
Shielded cable
Software License Agreement<br />
<strong>AN1076</strong><br />
The software supplied herewith by <strong>Microchip</strong> Technology Incorporated (the “Company”) is intended and supplied to you, the<br />
Company’s customer, for use solely and exclusively with products manufactured by the Company.<br />
The software is owned by the Company and/or its supplier, and is protected under applicable copyright laws. All rights are reserved.<br />
Any use in violation of the foregoing restrictions may subject the user to criminal sanctions under applicable laws, as well as to civil<br />
liability for the breach of the terms and conditions of this license.<br />
THIS SOFTWARE IS PROVIDED IN AN “AS IS” CONDITION. NO WARRANTIES, WHETHER EXPRESS, IMPLIED OR STATU-<br />
TORY, INCLUDING, BUT NOT LIMITED TO, IMPLIED WARRANTIES OF MERCHANTABILITY AND FITNESS FOR A PARTICU-<br />
LAR PURPOSE APPLY TO THIS SOFTWARE. THE COMPANY SHALL NOT, IN ANY CIRCUMSTANCES, BE LIABLE FOR<br />
SPECIAL, INCIDENTAL OR CONSEQUENTIAL DAMAGES, FOR ANY REASON WHATSOEVER.<br />
APPENDIX A: DMX512 TRANSMITTER DEMO<br />
; File: DMX512TrmtDemo.asm<br />
; DMX512 Transmitter demo<br />
;<br />
; This source code uses the PIC18F24J10 to transmit a DMX-512 packet via<br />
; the EUSART peripheral. An external 16MHz clock input is used.<br />
; The DMX transmitter code is written as a polled state machine with<br />
; 4 states. The state machine is called periodically from the main<br />
; software loop and a jump table determines the present state.<br />
; Timer0 is used to control the state machine timing, including length<br />
; of the Break signal and the spacing between transmitted bytes.<br />
; The CCP module is configured to start an ADC conversion every 10msec.<br />
; A potentiometer voltage is sampled with the ADC and the result is<br />
; written to the first data slot in the DMX frame to control a remote<br />
; device.<br />
list p=18f24j10 ; define target processor<br />
#include ; include processor specific definitions<br />
; Configuration bits setup<br />
CONFIG CCP2MX = ALTERNATE ; assign CCP2 output to pin RB3<br />
CONFIG WDTEN = OFF ; To use ICD2 as a debugger disable Watch Dog Timer<br />
CONFIG STVERN = ON ; Reset on stack overflow/underflow enabled<br />
CONFIG XINST = OFF ; Instruction set extension and Indexed Addressing<br />
; mode disabled (Legacy mode)<br />
CONFIG CP0 = OFF ; Program memory is not code-protected<br />
CONFIG FOSC = ECPLL ; EC oscillator, PLL enabled and under software<br />
; control, CLKO function on OSC2<br />
CONFIG FOSC2 = ON ; Clock selected by FOSC as system clock is enabled<br />
; when OSCCON = 00<br />
CONFIG FCMEN = OFF ; Fail-Safe Clock Monitor disabled<br />
CONFIG IESO = OFF ; Two-Speed Start-up disabled<br />
CONFIG WDTPS = 32768 ; 1:32768<br />
; Timing constants (assuming 16MHz clock input and assigned prescaler<br />
; values to produce 1us tick)<br />
#define T100US.256-.100 ; preload value for TMR0 to roll over in 100us<br />
#define T60US.256-.60 ; 60us value<br />
; Variables memory allocation<br />
CBLOCK 0x008<br />
DmxTxState ; State Variable<br />
CountH ; 16-bit counter<br />
CountL<br />
TxBuffer: .512 ; allocate 512 bytes for the transmit buffer<br />
ENDC<br />
© 2007 <strong>Microchip</strong> Technology Inc. DS01076A-page 9
<strong>AN1076</strong><br />
;******************************************************************************<br />
ORG 0x0000<br />
Main<br />
rcall InitTX ; initialize the I/O ports and TMR0<br />
rcall SetupSerial ; initialize serial comm<br />
rcall SetupADC ; initialize the ADC for the demo<br />
;******************************************************************************<br />
;Main Application Loop<br />
MainLoop<br />
rcall DMXTransmit ; Execute the state machine<br />
rcall CheckADC ; Check to see if ADC conversion is complete.<br />
goto MainLoop<br />
;************************************************************************************************<br />
;DMX Transmit state machine<br />
DMXTransmit<br />
; The DMX transmit code is driven by the TMR0 roll-over<br />
; events. Just return if a roll-over has not occured.<br />
btfss INTCON,TMR0IF ; wait until TIMER0 roll-over<br />
return<br />
bcf INTCON,TMR0IF ; clear the flag<br />
clrf PCLATH ; (assumes the jump table is located in<br />
; the first page of program memory)<br />
rlncf DmxTxState,W ; state x2 to account for PC byte<br />
; addressing<br />
andlw 0x0E ; reduce offset to valid range (0-14)<br />
addwf PCL ; computed jump<br />
; Jump Table<br />
bra SENDMBB ; 0 IDLE period after each complete frame<br />
bra SENDDATA ; 1 send one byte of data<br />
bra SENDMAB ; 2 IDLE period between BREAK and START slot<br />
bra SENDBREAK ; 3 BREAK synchronization signal<br />
reset ; not used<br />
reset ; not used<br />
reset ; not used<br />
reset ; not used<br />
; DmxTxState = 3. Generates a Break Signal (100uSec)<br />
SENDBREAK<br />
bsf TRISC,5 ; tri-state pin RC5 to end break signal<br />
movlw T100US ; preload TIMER0 for a roll over in 100us<br />
movwf TMR0L<br />
decf DmxTxState,F ; proceed to State2 SENDMAB<br />
return<br />
; DmxTxState = 2. Mark After Break (line IDLE for 100uSec) send a start code<br />
SENDMAB<br />
clrf CountL ; init 16-bit counter<br />
clrf CountH<br />
lfsr 1,TxBuffer ; init pointer to transmit buffer<br />
clrf TXREG ; send NULL START CODE<br />
movlw T60US ; pre-load TMR0 for a short delay (> (12bit x 4us) >48us)<br />
movwf TMR0L<br />
decf DmxTxState,F ; proceed to state1 SENDDATA<br />
return<br />
DS01076A-page 10 © 2007 <strong>Microchip</strong> Technology Inc.
<strong>AN1076</strong><br />
; DmxTxState = 1. wait for UART to complete transmission of current byte and an additional short<br />
; amount of time<br />
SENDDATA<br />
TXDone<br />
btfsc CountH,1 ; check if 512 slot sent already<br />
bra TXDone<br />
btfss PIR1,TXIF ; make sure TX buffer is available<br />
return<br />
movff POSTINC1,TXREG ; send a new byte of data (use IND1 pointer to read data from<br />
; TX buffer)<br />
; automatically advance pointer 1<br />
incf CountL,F ; increment 16-bit counter<br />
btfsc STATUS,C<br />
incf CountH,F<br />
movlw T60US ; pre-load TMR0 for a short delay (> (12bit x 4us) >48us)<br />
movwf TMR0L<br />
return<br />
movlw T100US ; pre-load TMR0 for a 100us delay before the frame repeats<br />
movwf TMR0L<br />
decf DmxTxState,F ; proceed to next state SENDMBB<br />
return<br />
;DmxTxState = 0. sends Mark Before repeating the frame transmission<br />
SENDMBB<br />
movlw T100US ; pre-load the timer for 100us BREAK<br />
movwf TMR0L<br />
bcf INTCON,TMR0IF ; clear the flag<br />
bcf TRISC,5 ; make pin RC5 an output<br />
bcf LATC,5 ; pull pin RC5 low to force a break condition<br />
movlw .3 ; proceed to State3 SENDBREAK<br />
movwf DmxTxState<br />
return<br />
;******************************************************************************<br />
;CheckADC verify a new conversion result is available and copy the value to 6 channels/location in<br />
; the TX buffer<br />
CheckADC<br />
btfss PIR1,ADIF ;check the flag for ADC conversion completed<br />
return<br />
bcf PIR1,ADIF ; clear the ADC flag<br />
bcf PIR2,CCP2IF ; clear the Compare flag<br />
lfsr 0,TxBuffer ; use indirect pointer IND0 to copy the conversion result<br />
movff ADRESH,POSTINC0 ; to the first slot in the transmit buffer (->1)<br />
movff ADRESH,POSTINC0 ; slot 2<br />
movff ADRESH,POSTINC0 ; slot 3<br />
movff ADRESH,POSTINC0 ; slot 4<br />
lfsr 0,TxBuffer + .508<br />
movff ADRESH,POSTINC0 ; slot 509<br />
movff ADRESH,POSTINC0 ; slot 510<br />
movff ADRESH,POSTINC0 ; slot 511<br />
movff ADRESH,POSTINC0 ; slot 512<br />
; Note: This code places the transmit data in the first 4 data slots<br />
; and the last 4 data slots of the DMX data frame. This was done to<br />
; make sure that the code worked properly with a 4-channel dimmer<br />
© 2007 <strong>Microchip</strong> Technology Inc. DS01076A-page 11
<strong>AN1076</strong><br />
; unit that was used during code development. Add code above as<br />
; required to fill other slots with transmit data.<br />
return<br />
;******************************************************************************<br />
;Setup Serial port<br />
SetupSerial<br />
bsf TRISC,7 ; allow the UART RX to control pin RC7<br />
bsf TRISC,6 ; allow the UART TX to control pin RC6<br />
movlw 0x65 ; enable TX, 9-bit mode, high speed mode, 9th bit =1<br />
; (2 stop)<br />
movwf TXSTA<br />
movlw 0x80 ; enable serial port, disable receiver<br />
movwf RCSTA<br />
bsf BAUDCON,BRG16 ; select EUART 16-bit Asynchrnounou mode operation<br />
movlw .15 ; init baud rate generator for 250k baud (assume Fosc=16MHz)<br />
movwf SPBRG<br />
return<br />
;******************************************************************************<br />
;ADC setup<br />
SetupADC<br />
bsf TRISA,0 ; make RA0 an input pin<br />
movlw 0x01 ; enable ADC and select input channel 0<br />
movwf ADCON0<br />
movlw 0x0E ; make only channel 0 an analog input pin<br />
movwf ADCON1<br />
movlw 0x35 ; ADC result left aligned and clock = Fosc/16<br />
movwf ADCON2<br />
;Set the CCP2 module in Compare mode with a 10mSec interval, CCPR2 = 10.000us<br />
movlw 0x27<br />
movwf CCPR2H<br />
movlw 0x10<br />
movwf CCPR2L<br />
;A/D Conversion started by the Special Event Trigger of the CCP2 module<br />
movlw 0x0B<br />
movwf CCP2CON<br />
;init Timer1 as the time base for CCP2<br />
clrf TMR1H<br />
clrf TMR1L<br />
movlw 0x21 ; enable 16-bit Timer1, prescale 1:4 (1us tick@16MHz),<br />
; internal clock<br />
movwf T1CON<br />
return<br />
;******************************************************************************<br />
;InitTX init Timer0, clear TXbuffer, init state machine<br />
InitTX<br />
clrf CountL ; init 16-bit counter<br />
clrf CountH<br />
DS01076A-page 12 © 2007 <strong>Microchip</strong> Technology Inc.
<strong>AN1076</strong><br />
; clear Transmit buffer<br />
lfsr 1,TxBuffer ; use IND1 pointer to address the RAM buffer<br />
CBloop<br />
clrf POSTINC1 ; clear the location pointed to by IND1 then increment pointer<br />
incf CountL,F ; increment 16-bit counter<br />
btfss STATUS,C<br />
bra CBloop<br />
incf CountH,F<br />
btfss CountH,1 ; check if counter >= 512<br />
bra CBloop<br />
; init Timer0<br />
movlw 0xC1 ; enable Timer0, as an 8-bit timer, use prescaler 1:4<br />
;(1us tick@16MHz)<br />
movwf T0CON<br />
movlw T100US ; preload timer for 100us interval to roll over<br />
movwf TMR0L<br />
bcf INTCON,TMR0IF ; clear roll over flag<br />
; init state machine<br />
movlw .03 ; Start with BREAK state<br />
movwf DmxTxState<br />
bcf TRISC,5 ; make pin RC5 an output<br />
bcf LATC,5 ; pull RC5 output low to force a break condition<br />
return<br />
END<br />
© 2007 <strong>Microchip</strong> Technology Inc. DS01076A-page 13
<strong>AN1076</strong><br />
APPENDIX B: DMX512 RECEIVER DEMO<br />
; File: DMX512RecDemo.asm<br />
; DMX512 Receiver<br />
; This file uses a PIC18F24J10 device to receive DMX-512 data and store it<br />
; into a 512 byte receive buffer.<br />
; For demonstration purposes, a selected data slot is written to the<br />
; CCP module. The CCP module is configured in PWM mode and the received<br />
; data adjusts the duty cycle. If a resistor and LED is connected to the<br />
; PWM output, the received DMX data can be visually observed.<br />
list p=18f24j10 ;define target processor<br />
#include ;include processor specific definitions<br />
; Configuration bits setup<br />
CONFIG CCP2MX = ALTERNATE ; assign CCP2 output to pin RB3<br />
CONFIG WDTEN = OFF ; To use ICD2 as a debugger disable Watch Dog Timer<br />
CONFIG STVERN = ON ; Reset on stack overflow/underflow enabled<br />
CONFIG XINST = OFF ; Instruction set extension and Indexed Addressing<br />
; mode disabled (Legacy mode)<br />
CONFIG CP0 = OFF ; Program memory is not code-protected<br />
CONFIG FOSC = ECPLL ; EC oscillator, PLL enabled and under software<br />
; control, CLKO function on OSC2<br />
CONFIG FOSC2 = ON ; Clock selected by FOSC as system clock is enabled<br />
; when OSCCON = 00<br />
CONFIG FCMEN = OFF ; Fail-Safe Clock Monitor disabled<br />
CONFIG IESO = OFF ; Two-Speed Start-up disabled<br />
CONFIG WDTPS = 32768 ; 1:32768<br />
; Constants<br />
#define CHANNEL .510 ;select the receiver slot/channel<br />
; Variables<br />
CBLOCK 0x8<br />
CountH ;16-bit counter<br />
CountL<br />
RxBuffer: .512 ;512 bytes buffer allocation<br />
ENDC<br />
;******************************************************************************<br />
ORG 0x0<br />
Main<br />
MainLoop<br />
call SetupSerial ;Setup Serial port and buffers<br />
; first loop, synchronizing with the transmitter<br />
WaitBreak<br />
btfsc PIR1,RCIF ; if a byte is received correctly<br />
movf RCREG,W ; discard it<br />
btfss RCSTA,FERR ; else<br />
bra WaitBreak ; continue waiting until a frame error is detected<br />
movf RCREG,W ; read the Receive buffer to clear the error condition<br />
; second loop, waiting for the START code<br />
WaitForStart<br />
btfss PIR1,RCIF ; wait until a byte is correctly received<br />
bra WaitForStart<br />
btfsc RCSTA,FERR<br />
bra WaitForStart<br />
movf RCREG,W<br />
DS01076A-page 14 © 2007 <strong>Microchip</strong> Technology Inc.
; check for the START code value, if it is not 0, ignore the rest of the frame<br />
andlw 0xff<br />
bnz MainLoop ; ignore the rest of the frame if not zero<br />
; init receive counter and buffer pointer<br />
clrf CountL<br />
clrf CountH<br />
lfsr 0,RxBuffer<br />
<strong>AN1076</strong><br />
; third loop, receiving 512 bytes of data<br />
WaitForData<br />
btfsc RCSTA,FERR ; if a new framing error is detected (error or short frame)<br />
bra RXend ; the rest of the frame is ignored and a new synchronization is<br />
; attempted<br />
btfss PIR1,RCIF ; wait until a byte is correctly received<br />
bra WaitForData ;<br />
movf RCREG,W ;<br />
MoveData<br />
movwf POSTINC0 ; move the received data to the buffer<br />
; (auto-incrementing pointer)<br />
incf CountL,F ; increment 16-bit counter<br />
btfss STATUS,C<br />
bra WaitForData<br />
incf CountH,F<br />
btfss CountH,1 ; check if 512 bytes of data received<br />
bra WaitForData<br />
;******************************************************************************<br />
; when a complete frame is received<br />
; use the selected CHANNEL data to control the CCP2 module duty cycle<br />
RXend<br />
lfsr<br />
GetData<br />
0,RxBuffer ; use indirect pointer 0 to address the receiver buffer<br />
movlw LOW(CHANNEL) ; add the offset for the select channel<br />
addwf FSR0L,F<br />
movlw HIGH(CHANNEL)<br />
addwfc FSR0H,F<br />
movff INDF0,CCPR2L ; retrieve the data and assign MSB to control PWM2<br />
bra MainLoop ; return to main loop<br />
;******************************************************************************<br />
; Setup Serial port and buffers<br />
SetupSerial<br />
;Clear the receive buffer<br />
lfsr 0,RxBuffer<br />
CBloop<br />
clrf POSTINC0 ; clear INDF register then increment pointer<br />
incf CountL,F<br />
btfss STATUS,C<br />
bra CBloop<br />
incf CountH,F<br />
btfss CountH,1<br />
bra CBloop<br />
© 2007 <strong>Microchip</strong> Technology Inc. DS01076A-page 15
<strong>AN1076</strong><br />
; Setup EUSART<br />
bsf TRISC,7 ; allow the EUSART RX to control pin RC7<br />
bsf TRISC,6 ; allow the EUSART TX to control pin RC6<br />
movlw 0x04 ; Disable transmission<br />
movwf TXSTA ; enable transmission and CLEAR high baud rate<br />
movlw 0x90<br />
movwf RCSTA ; enable serial port and reception<br />
bsf BAUDCON,BRG16 ; Enable UART for 16-bit Asyn operation<br />
clrf SPBRGH<br />
movlw .15 ; Baud rate is 250KHz for 16MHz Osc. freq.<br />
movwf SPBRG<br />
;Setup PWM module<br />
movlw 0x0c ; configure CCP2 for PWM mode<br />
movwf CCP2CON<br />
;Timer2 control<br />
movlw 0x04 ; enable Timer2, select a prescale of 1:1<br />
movwf T2CON<br />
;PWM period<br />
movlw 0xFF ; 256 x .25us = 64us period<br />
movwf PR2<br />
;init I/O<br />
movlw b'11110111' ; make pin RB3 (CCP2) output<br />
movwf TRISB<br />
return<br />
END<br />
DS01076A-page 16 © 2007 <strong>Microchip</strong> Technology Inc.
Note the following details of the code protection feature on <strong>Microchip</strong> devices:<br />
<strong>Microchip</strong> products meet the specification contained in their particular <strong>Microchip</strong> Data Sheet.<br />
<strong>Microchip</strong> believes that its family of products is one of the most secure families of its kind on the market today, when used in the<br />
intended manner and under normal conditions.<br />
There are dishonest and possibly illegal methods used to breach the code protection feature. All of these methods, to our<br />
knowledge, require using the <strong>Microchip</strong> products in a manner outside the operating specifications contained in <strong>Microchip</strong>’s Data<br />
Sheets. Most likely, the person doing so is engaged in theft of intellectual property.<br />
<strong>Microchip</strong> is willing to work with the customer who is concerned about the integrity of their code.<br />
Neither <strong>Microchip</strong> nor any other semiconductor manufacturer can guarantee the security of their code. Code protection does not<br />
mean that we are guaranteeing the product as “unbreakable.”<br />
Code protection is constantly evolving. We at <strong>Microchip</strong> are committed to continuously improving the code protection features of our<br />
products. Attempts to break <strong>Microchip</strong>’s code protection feature may be a violation of the Digital Millennium Copyright Act. If such acts<br />
allow unauthorized access to your software or other copyrighted work, you may have a right to sue for relief under that Act.<br />
Information contained in this publication regarding device<br />
applications and the like is provided only for your convenience<br />
and may be superseded by updates. It is your responsibility to<br />
ensure that your application meets with your specifications.<br />
MICROCHIP MAKES NO REPRESENTATIONS OR<br />
WARRANTIES OF ANY KIND WHETHER EXPRESS OR<br />
IMPLIED, WRITTEN OR ORAL, STATUTORY OR<br />
OTHERWISE, RELATED TO THE INFORMATION,<br />
INCLUDING BUT NOT LIMITED TO ITS CONDITION,<br />
QUALITY, PERFORMANCE, MERCHANTABILITY OR<br />
FITNESS FOR PURPOSE. <strong>Microchip</strong> disclaims all liability<br />
arising from this information and its use. Use of <strong>Microchip</strong><br />
devices in life support and/or safety applications is entirely at<br />
the buyer’s risk, and the buyer agrees to defend, indemnify and<br />
hold harmless <strong>Microchip</strong> from any and all damages, claims,<br />
suits, or expenses resulting from such use. No licenses are<br />
conveyed, implicitly or otherwise, under any <strong>Microchip</strong><br />
intellectual property rights.<br />
Trademarks<br />
The <strong>Microchip</strong> name and logo, the <strong>Microchip</strong> logo, Accuron,<br />
dsPIC, KEELOQ, KEELOQ logo, microID, MPLAB, PIC,<br />
PICmicro, PICSTART, PRO MATE, PowerSmart, rfPIC, and<br />
SmartShunt are registered trademarks of <strong>Microchip</strong><br />
Technology Incorporated in the U.S.A. and other countries.<br />
AmpLab, FilterLab, Linear Active Thermistor, Migratable<br />
Memory, MXDEV, MXLAB, PS logo, SEEVAL, SmartSensor<br />
and The Embedded Control Solutions Company are<br />
registered trademarks of <strong>Microchip</strong> Technology Incorporated<br />
in the U.S.A.<br />
Analog-for-the-Digital Age, Application Maestro, CodeGuard,<br />
dsPICDEM, dsPICDEM.net, dsPICworks, ECAN,<br />
ECONOMONITOR, FanSense, FlexROM, fuzzyLAB,<br />
In-Circuit Serial Programming, ICSP, ICEPIC, Mindi, MiWi,<br />
MPASM, MPLAB Certified logo, MPLIB, MPLINK, PICkit,<br />
PICDEM, PICDEM.net, PICLAB, PICtail, PowerCal,<br />
PowerInfo, PowerMate, PowerTool, REAL ICE, rfLAB,<br />
rfPICDEM, Select Mode, Smart Serial, SmartTel, Total<br />
Endurance, UNI/O, WiperLock and ZENA are trademarks of<br />
<strong>Microchip</strong> Technology Incorporated in the U.S.A. and other<br />
countries.<br />
SQTP is a service mark of <strong>Microchip</strong> Technology Incorporated<br />
in the U.S.A.<br />
All other trademarks mentioned herein are property of their<br />
respective companies.<br />
© 2007, <strong>Microchip</strong> Technology Incorporated, Printed in the<br />
U.S.A., All Rights Reserved.<br />
Printed on recycled paper.<br />
<strong>Microchip</strong> received ISO/TS-16949:2002 certification for its worldwide<br />
headquarters, design and wafer fabrication facilities in Chandler and<br />
Tempe, Arizona, Gresham, Oregon and Mountain View, California. The<br />
Company’s quality system processes and procedures are for its PIC ®<br />
MCUs and dsPIC ® DSCs, KEELOQ ® code hopping devices, Serial<br />
EEPROMs, microperipherals, nonvolatile memory and analog<br />
products. In addition, <strong>Microchip</strong>’s quality system for the design and<br />
manufacture of development systems is ISO 9001:2000 certified.<br />
© 2007 <strong>Microchip</strong> Technology Inc. DS01076A-page 17
AMERICAS<br />
Corporate Office<br />
2355 West Chandler Blvd.<br />
Chandler, AZ 85224-6199<br />
Tel: 480-792-7200<br />
Fax: 480-792-7277<br />
Technical Support:<br />
http://support.microchip.com<br />
Web Address:<br />
www.microchip.com<br />
Atlanta<br />
Duluth, GA<br />
Tel: 678-957-9614<br />
Fax: 678-957-1455<br />
Boston<br />
Westborough, MA<br />
Tel: 774-760-0087<br />
Fax: 774-760-0088<br />
Chicago<br />
Itasca, IL<br />
Tel: 630-285-0071<br />
Fax: 630-285-0075<br />
Dallas<br />
Addison, TX<br />
Tel: 972-818-7423<br />
Fax: 972-818-2924<br />
Detroit<br />
Farmington Hills, MI<br />
Tel: 248-538-2250<br />
Fax: 248-538-2260<br />
Kokomo<br />
Kokomo, IN<br />
Tel: 765-864-8360<br />
Fax: 765-864-8387<br />
Los Angeles<br />
Mission Viejo, CA<br />
Tel: 949-462-9523<br />
Fax: 949-462-9608<br />
Santa Clara<br />
Santa Clara, CA<br />
Tel: 408-961-6444<br />
Fax: 408-961-6445<br />
Toronto<br />
Mississauga, Ontario,<br />
Canada<br />
Tel: 905-673-0699<br />
Fax: 905-673-6509<br />
WORLDWIDE SALES AND SERVICE<br />
ASIA/PACIFIC<br />
Asia Pacific Office<br />
Suites 3707-14, 37th Floor<br />
Tower 6, The Gateway<br />
Habour City, Kowloon<br />
Hong Kong<br />
Tel: 852-2401-1200<br />
Fax: 852-2401-3431<br />
Australia - Sydney<br />
Tel: 61-2-9868-6733<br />
Fax: 61-2-9868-6755<br />
China - Beijing<br />
Tel: 86-10-8528-2100<br />
Fax: 86-10-8528-2104<br />
China - Chengdu<br />
Tel: 86-28-8665-5511<br />
Fax: 86-28-8665-7889<br />
China - Fuzhou<br />
Tel: 86-591-8750-3506<br />
Fax: 86-591-8750-3521<br />
China - Hong Kong SAR<br />
Tel: 852-2401-1200<br />
Fax: 852-2401-3431<br />
China - Qingdao<br />
Tel: 86-532-8502-7355<br />
Fax: 86-532-8502-7205<br />
China - Shanghai<br />
Tel: 86-21-5407-5533<br />
Fax: 86-21-5407-5066<br />
China - Shenyang<br />
Tel: 86-24-2334-2829<br />
Fax: 86-24-2334-2393<br />
China - Shenzhen<br />
Tel: 86-755-8203-2660<br />
Fax: 86-755-8203-1760<br />
China - Shunde<br />
Tel: 86-757-2839-5507<br />
Fax: 86-757-2839-5571<br />
China - Wuhan<br />
Tel: 86-27-5980-5300<br />
Fax: 86-27-5980-5118<br />
China - Xian<br />
Tel: 86-29-8833-7250<br />
Fax: 86-29-8833-7256<br />
ASIA/PACIFIC<br />
India - Bangalore<br />
Tel: 91-80-4182-8400<br />
Fax: 91-80-4182-8422<br />
India - New Delhi<br />
Tel: 91-11-4160-8631<br />
Fax: 91-11-4160-8632<br />
India - Pune<br />
Tel: 91-20-2566-1512<br />
Fax: 91-20-2566-1513<br />
Japan - Yokohama<br />
Tel: 81-45-471- 6166<br />
Fax: 81-45-471-6122<br />
Korea - Gumi<br />
Tel: 82-54-473-4301<br />
Fax: 82-54-473-4302<br />
Korea - Seoul<br />
Tel: 82-2-554-7200<br />
Fax: 82-2-558-5932 or<br />
82-2-558-5934<br />
Malaysia - Penang<br />
Tel: 60-4-646-8870<br />
Fax: 60-4-646-5086<br />
Philippines - Manila<br />
Tel: 63-2-634-9065<br />
Fax: 63-2-634-9069<br />
Singapore<br />
Tel: 65-6334-8870<br />
Fax: 65-6334-8850<br />
Taiwan - Hsin Chu<br />
Tel: 886-3-572-9526<br />
Fax: 886-3-572-6459<br />
Taiwan - Kaohsiung<br />
Tel: 886-7-536-4818<br />
Fax: 886-7-536-4803<br />
Taiwan - Taipei<br />
Tel: 886-2-2500-6610<br />
Fax: 886-2-2508-0102<br />
Thailand - Bangkok<br />
Tel: 66-2-694-1351<br />
Fax: 66-2-694-1350<br />
EUROPE<br />
Austria - Wels<br />
Tel: 43-7242-2244-39<br />
Fax: 43-7242-2244-393<br />
Denmark - Copenhagen<br />
Tel: 45-4450-2828<br />
Fax: 45-4485-2829<br />
France - Paris<br />
Tel: 33-1-69-53-63-20<br />
Fax: 33-1-69-30-90-79<br />
Germany - Munich<br />
Tel: 49-89-627-144-0<br />
Fax: 49-89-627-144-44<br />
Italy - Milan<br />
Tel: 39-0331-742611<br />
Fax: 39-0331-466781<br />
Netherlands - Drunen<br />
Tel: 31-416-690399<br />
Fax: 31-416-690340<br />
Spain - Madrid<br />
Tel: 34-91-708-08-90<br />
Fax: 34-91-708-08-91<br />
UK - Wokingham<br />
Tel: 44-118-921-5869<br />
Fax: 44-118-921-5820<br />
12/08/06<br />
DS01076A-page 18 © 2007 <strong>Microchip</strong> Technology Inc.