MXEditor Programming Manual - One Call
MXEditor Programming Manual - One Call
MXEditor Programming Manual - One Call

You also want an ePaper? Increase the reach of your titles
YUMPU automatically turns print PDFs into web optimized ePapers that Google loves.
8<br />
U<br />
S<br />
I<br />
N<br />
G<br />
M<br />
X<br />
E<br />
D<br />
I<br />
T<br />
O<br />
R<br />
T<br />
O<br />
P<br />
R<br />
O<br />
G<br />
R<br />
A<br />
M<br />
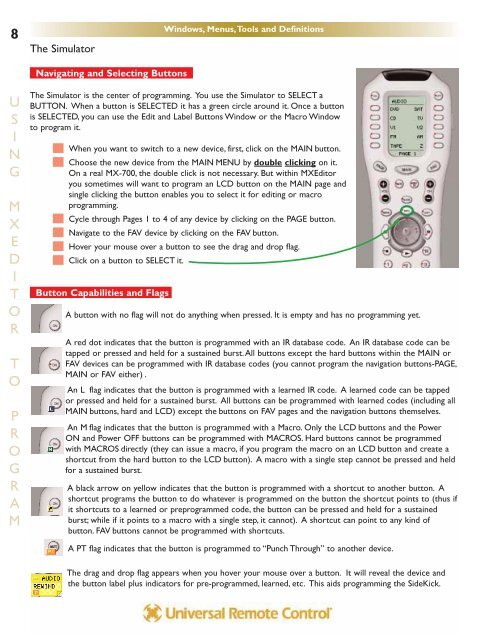
The Simulator<br />
Navigating and Selecting Buttons<br />
The Simulator is the center of programming. You use the Simulator to SELECT a<br />
BUTTON. When a button is SELECTED it has a green circle around it. Once a button<br />
is SELECTED, you can use the Edit and Label Buttons Window or the Macro Window<br />
to program it.<br />
When you want to switch to a new device, first, click on the MAIN button.<br />
Choose the new device from the MAIN MENU by double clicking on it.<br />
On a real MX-700, the double click is not necessary. But within <strong>MXEditor</strong><br />
you sometimes will want to program an LCD button on the MAIN page and<br />
single clicking the button enables you to select it for editing or macro<br />
programming.<br />
Cycle through Pages 1 to 4 of any device by clicking on the PAGE button.<br />
Navigate to the FAV device by clicking on the FAV button.<br />
Hover your mouse over a button to see the drag and drop flag.<br />
Click on a button to SELECT it.<br />
Button Capabilities and Flags<br />
Windows, Menus,Tools and Definitions<br />
A button with no flag will not do anything when pressed. It is empty and has no programming yet.<br />
A red dot indicates that the button is programmed with an IR database code. An IR database code can be<br />
tapped or pressed and held for a sustained burst.All buttons except the hard buttons within the MAIN or<br />
FAV devices can be programmed with IR database codes (you cannot program the navigation buttons-PAGE,<br />
MAIN or FAV either) .<br />
An L flag indicates that the button is programmed with a learned IR code. A learned code can be tapped<br />
or pressed and held for a sustained burst. All buttons can be programmed with learned codes (including all<br />
MAIN buttons, hard and LCD) except the buttons on FAV pages and the navigation buttons themselves.<br />
An M flag indicates that the button is programmed with a Macro. Only the LCD buttons and the Power<br />
ON and Power OFF buttons can be programmed with MACROS. Hard buttons cannot be programmed<br />
with MACROS directly (they can issue a macro, if you program the macro on an LCD button and create a<br />
shortcut from the hard button to the LCD button). A macro with a single step cannot be pressed and held<br />
for a sustained burst.<br />
A black arrow on yellow indicates that the button is programmed with a shortcut to another button. A<br />
shortcut programs the button to do whatever is programmed on the button the shortcut points to (thus if<br />
it shortcuts to a learned or preprogrammed code, the button can be pressed and held for a sustained<br />
burst; while if it points to a macro with a single step, it cannot). A shortcut can point to any kind of<br />
button. FAV buttons cannot be programmed with shortcuts.<br />
A PT flag indicates that the button is programmed to “Punch Through” to another device.<br />
The drag and drop flag appears when you hover your mouse over a button. It will reveal the device and<br />
the button label plus indicators for pre-programmed, learned, etc. This aids programming the SideKick.