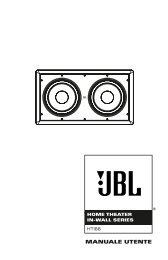
Owners Manual - AVR 760, AVR 660 (English EU - Harman Kardon
Owners Manual - AVR 760, AVR 660 (English EU - Harman Kardon
Owners Manual - AVR 760, AVR 660 (English EU - Harman Kardon

Create successful ePaper yourself
Turn your PDF publications into a flip-book with our unique Google optimized e-Paper software.
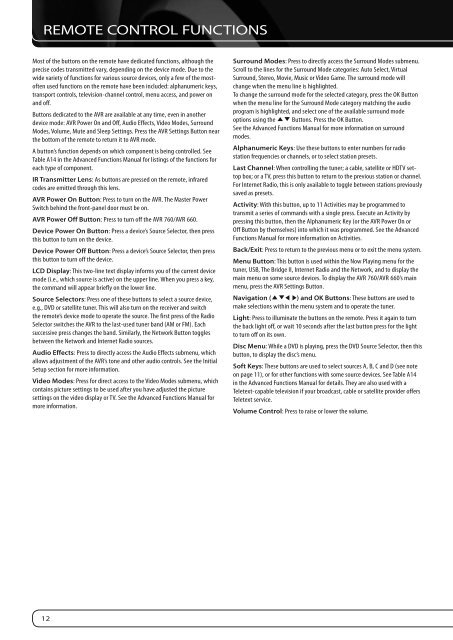
REMOTE CONTROL FUNCTIONS<br />
Most of the buttons on the remote have dedicated functions, although the<br />
precise codes transmitted vary, depending on the device mode. Due to the<br />
wide variety of functions for various source devices, only a few of the mostoften<br />
used functions on the remote have been included: alphanumeric keys,<br />
transport controls, television-channel control, menu access, and power on<br />
and off.<br />
Buttons dedicated to the <strong>AVR</strong> are available at any time, even in another<br />
device mode: <strong>AVR</strong> Power On and Off, Audio Effects, Video Modes, Surround<br />
Modes, Volume, Mute and Sleep Settings. Press the <strong>AVR</strong> Settings Button near<br />
the bottom of the remote to return it to <strong>AVR</strong> mode.<br />
A button’s function depends on which component is being controlled. See<br />
Table A14 in the Advanced Functions <strong>Manual</strong> for listings of the functions for<br />
each type of component.<br />
IR Transmitter Lens: As buttons are pressed on the remote, infrared<br />
codes are emitted through this lens.<br />
<strong>AVR</strong> Power On Button: Press to turn on the <strong>AVR</strong>. The Master Power<br />
Switch behind the front-panel door must be on.<br />
<strong>AVR</strong> Power Off Button: Press to turn off the <strong>AVR</strong> <strong>760</strong>/<strong>AVR</strong> <strong>660</strong>.<br />
Device Power On Button: Press a device’s Source Selector, then press<br />
this button to turn on the device.<br />
Device Power Off Button: Press a device’s Source Selector, then press<br />
this button to turn off the device.<br />
LCD Display: This two-line text display informs you of the current device<br />
mode (i.e., which source is active) on the upper line. When you press a key,<br />
the command will appear briefly on the lower line.<br />
Source Selectors: Press one of these buttons to select a source device,<br />
e.g., DVD or satellite tuner. This will also turn on the receiver and switch<br />
the remote’s device mode to operate the source. The first press of the Radio<br />
Selector switches the <strong>AVR</strong> to the last-used tuner band (AM or FM). Each<br />
successive press changes the band. Similarly, the Network Button toggles<br />
between the Network and Internet Radio sources.<br />
Audio Effects: Press to directly access the Audio Effects submenu, which<br />
allows adjustment of the <strong>AVR</strong>’s tone and other audio controls. See the Initial<br />
Setup section for more information.<br />
Video Modes: Press for direct access to the Video Modes submenu, which<br />
contains picture settings to be used after you have adjusted the picture<br />
settings on the video display or TV. See the Advanced Functions <strong>Manual</strong> for<br />
more information.<br />
12<br />
Surround Modes: Press to directly access the Surround Modes submenu.<br />
Scroll to the lines for the Surround Mode categories: Auto Select, Virtual<br />
Surround, Stereo, Movie, Music or Video Game. The surround mode will<br />
change when the menu line is highlighted.<br />
To change the surround mode for the selected category, press the OK Button<br />
when the menu line for the Surround Mode category matching the audio<br />
program is highlighted, and select one of the available surround mode<br />
options using the KL Buttons. Press the OK Button.<br />
See the Advanced Functions <strong>Manual</strong> for more information on surround<br />
modes.<br />
Alphanumeric Keys: Use these buttons to enter numbers for radio<br />
station frequencies or channels, or to select station presets.<br />
Last Channel: When controlling the tuner; a cable, satellite or HDTV settop<br />
box; or a TV, press this button to return to the previous station or channel.<br />
For Internet Radio, this is only available to toggle between stations previously<br />
saved as presets.<br />
Activity: With this button, up to 11 Activities may be programmed to<br />
transmit a series of commands with a single press. Execute an Activity by<br />
pressing this button, then the Alphanumeric Key (or the <strong>AVR</strong> Power On or<br />
Off Button by themselves) into which it was programmed. See the Advanced<br />
Functions <strong>Manual</strong> for more information on Activities.<br />
Back/Exit: Press to return to the previous menu or to exit the menu system.<br />
Menu Button: This button is used within the Now Playing menu for the<br />
tuner, USB, The Bridge II, Internet Radio and the Network, and to display the<br />
main menu on some source devices. To display the <strong>AVR</strong> <strong>760</strong>/<strong>AVR</strong> <strong>660</strong>’s main<br />
menu, press the <strong>AVR</strong> Settings Button.<br />
Navigation (KLM N) and OK Buttons: These buttons are used to<br />
make selections within the menu system and to operate the tuner.<br />
Light: Press to illuminate the buttons on the remote. Press it again to turn<br />
the back light off, or wait 10 seconds after the last button press for the light<br />
to turn off on its own.<br />
Disc Menu: While a DVD is playing, press the DVD Source Selector, then this<br />
button, to display the disc’s menu.<br />
Soft Keys: These buttons are used to select sources A, B, C and D (see note<br />
on page 11), or for other functions with some source devices. See Table A14<br />
in the Advanced Functions <strong>Manual</strong> for details. They are also used with a<br />
Teletext-capable television if your broadcast, cable or satellite provider offers<br />
Teletext service.<br />
Volume Control: Press to raise or lower the volume.