Owners Manual - AVR 760, AVR 660 (English EU - Harman Kardon
Owners Manual - AVR 760, AVR 660 (English EU - Harman Kardon
Owners Manual - AVR 760, AVR 660 (English EU - Harman Kardon

Create successful ePaper yourself
Turn your PDF publications into a flip-book with our unique Google optimized e-Paper software.
INITIAL SETUP<br />
In this section, you will configure the <strong>AVR</strong> <strong>760</strong>/<strong>AVR</strong> <strong>660</strong> to match your actual<br />
system. A video display must be connected to one of the video monitor<br />
outputs on the receiver.<br />
uSInG tHe on-Screen menu SyStem<br />
Although it’s possible to configure the <strong>AVR</strong> using only the remote and the<br />
front-panel messages, it is easier to use the full-screen menu system.<br />
The menu system is accessed by pressing the <strong>AVR</strong> Settings Button on the<br />
remote or front panel.<br />
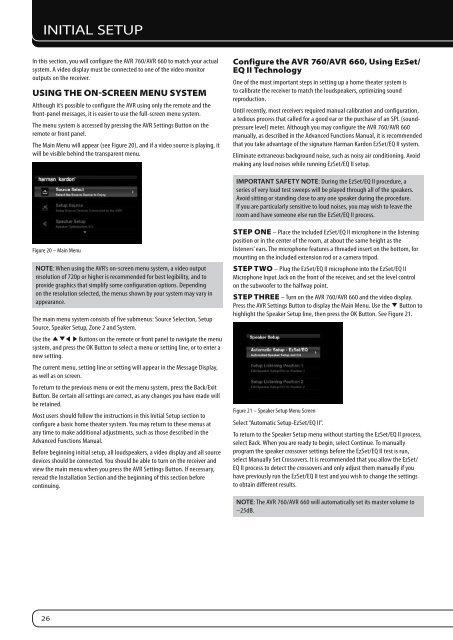
The Main Menu will appear (see Figure 20), and if a video source is playing, it<br />
will be visible behind the transparent menu.<br />
Figure 20 – Main Menu<br />
NOTE: When using the <strong>AVR</strong>’s on-screen menu system, a video output<br />
resolution of 720p or higher is recommended for best legibility, and to<br />
provide graphics that simplify some configuration options. Depending<br />
on the resolution selected, the menus shown by your system may vary in<br />
appearance.<br />
The main menu system consists of five submenus: Source Selection, Setup<br />
Source, Speaker Setup, Zone 2 and System.<br />
Use the KLM N Buttons on the remote or front panel to navigate the menu<br />
system, and press the OK Button to select a menu or setting line, or to enter a<br />
new setting.<br />
The current menu, setting line or setting will appear in the Message Display,<br />
as well as on screen.<br />
To return to the previous menu or exit the menu system, press the Back/Exit<br />
Button. Be certain all settings are correct, as any changes you have made will<br />
be retained.<br />
Most users should follow the instructions in this Initial Setup section to<br />
configure a basic home theater system. You may return to these menus at<br />
any time to make additional adjustments, such as those described in the<br />
Advanced Functions <strong>Manual</strong>.<br />
Before beginning initial setup, all loudspeakers, a video display and all source<br />
devices should be connected. You should be able to turn on the receiver and<br />
view the main menu when you press the <strong>AVR</strong> Settings Button. If necessary,<br />
reread the Installation Section and the beginning of this section before<br />
continuing.<br />
26<br />
configure the aVr <strong>760</strong>/aVr <strong>660</strong>, using ezSet/<br />
eQ II technology<br />
One of the most important steps in setting up a home theater system is<br />
to calibrate the receiver to match the loudspeakers, optimizing sound<br />
reproduction.<br />
Until recently, most receivers required manual calibration and configuration,<br />
a tedious process that called for a good ear or the purchase of an SPL (soundpressure<br />
level) meter. Although you may configure the <strong>AVR</strong> <strong>760</strong>/<strong>AVR</strong> <strong>660</strong><br />
manually, as described in the Advanced Functions <strong>Manual</strong>, it is recommended<br />
that you take advantage of the signature <strong>Harman</strong> <strong>Kardon</strong> EzSet/EQ II system.<br />
Eliminate extraneous background noise, such as noisy air conditioning. Avoid<br />
making any loud noises while running EzSet/EQ II setup.<br />
IMPORTANT SAFETY NOTE: During the EzSet/EQ II procedure, a<br />
series of very loud test sweeps will be played through all of the speakers.<br />
Avoid sitting or standing close to any one speaker during the procedure.<br />
If you are particularly sensitive to loud noises, you may wish to leave the<br />
room and have someone else run the EzSet/EQ II process.<br />
Step one – Place the included EzSet/EQ II microphone in the listening<br />
position or in the center of the room, at about the same height as the<br />
listeners’ ears. The microphone features a threaded insert on the bottom, for<br />
mounting on the included extension rod or a camera tripod.<br />
Step tWo – Plug the EzSet/EQ II microphone into the EzSet/EQ II<br />
Microphone Input Jack on the front of the receiver, and set the level control<br />
on the subwoofer to the halfway point.<br />
Step tHree – Turn on the <strong>AVR</strong> <strong>760</strong>/<strong>AVR</strong> <strong>660</strong> and the video display.<br />
Press the <strong>AVR</strong> Settings Button to display the Main Menu. Use the L Button to<br />
highlight the Speaker Setup line, then press the OK Button. See Figure 21.<br />
Figure 21 – Speaker Setup Menu Screen<br />
Select “Automatic Setup-EzSet/EQ II”.<br />
To return to the Speaker Setup menu without starting the EzSet/EQ II process,<br />
select Back. When you are ready to begin, select Continue. To manually<br />
program the speaker crossover settings before the EzSet/EQ II test is run,<br />
select <strong>Manual</strong>ly Set Crossovers. It is recommended that you allow the EzSet/<br />
EQ II process to detect the crossovers and only adjust them manually if you<br />
have previously run the EzSet/EQ II test and you wish to change the settings<br />
to obtain different results.<br />
NOTE: The <strong>AVR</strong> <strong>760</strong>/<strong>AVR</strong> <strong>660</strong> will automatically set its master volume to<br />
–25dB.