SP-550UZ Advanced manual in PDF - biofos.com
SP-550UZ Advanced manual in PDF - biofos.com
SP-550UZ Advanced manual in PDF - biofos.com

You also want an ePaper? Increase the reach of your titles
YUMPU automatically turns print PDFs into web optimized ePapers that Google loves.
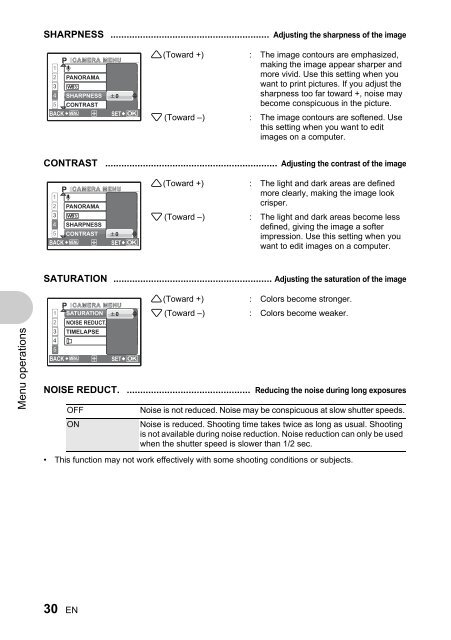
Menu operations<br />
SHARPNESS ........................................................... Adjust<strong>in</strong>g the sharpness of the image<br />
CAMERA MENU<br />
1 R<br />
2 PANORAMA<br />
3 ><br />
4 SHARPNESS 0<br />
5 CONTRAST<br />
BACK MENU<br />
SET OK<br />
• This function may not work effectively with some shoot<strong>in</strong>g conditions or subjects.<br />
30 EN<br />
1 (Toward +) : The image contours are emphasized,<br />
mak<strong>in</strong>g the image appear sharper and<br />
more vivid. Use this sett<strong>in</strong>g when you<br />
want to pr<strong>in</strong>t pictures. If you adjust the<br />
sharpness too far toward +, noise may<br />
be<strong>com</strong>e conspicuous <strong>in</strong> the picture.<br />
2 (Toward –) : The image contours are softened. Use<br />
this sett<strong>in</strong>g when you want to edit<br />
images on a <strong>com</strong>puter.<br />
CONTRAST ................................................................ Adjust<strong>in</strong>g the contrast of the image<br />
CAMERA MENU<br />
1 R<br />
2 PANORAMA<br />
3 ><br />
4 SHARPNESS<br />
5 CONTRAST 0<br />
BACK MENU<br />
SET OK<br />
1 (Toward +) : The light and dark areas are def<strong>in</strong>ed<br />
more clearly, mak<strong>in</strong>g the image look<br />
crisper.<br />
2 (Toward –) : The light and dark areas be<strong>com</strong>e less<br />
def<strong>in</strong>ed, giv<strong>in</strong>g the image a softer<br />
impression. Use this sett<strong>in</strong>g when you<br />
want to edit images on a <strong>com</strong>puter.<br />
SATURATION ........................................................... Adjust<strong>in</strong>g the saturation of the image<br />
CAMERA MENU<br />
1 SATURATION 0<br />
2 NOISE REDUCT.<br />
3<br />
4<br />
5<br />
TIMELAPSE<br />
BACK MENU<br />
SET OK<br />
1 (Toward +) : Colors be<strong>com</strong>e stronger.<br />
2 (Toward –) : Colors be<strong>com</strong>e weaker.<br />
NOISE REDUCT. .............................................. Reduc<strong>in</strong>g the noise dur<strong>in</strong>g long exposures<br />
OFF Noise is not reduced. Noise may be conspicuous at slow shutter speeds.<br />
ON Noise is reduced. Shoot<strong>in</strong>g time takes twice as long as usual. Shoot<strong>in</strong>g<br />
is not available dur<strong>in</strong>g noise reduction. Noise reduction can only be used<br />
when the shutter speed is slower than 1/2 sec.