TECHNOLOGY STORIES BIKE INFO, GEOMETRY ... - Vintage Trek
TECHNOLOGY STORIES BIKE INFO, GEOMETRY ... - Vintage Trek
TECHNOLOGY STORIES BIKE INFO, GEOMETRY ... - Vintage Trek

You also want an ePaper? Increase the reach of your titles
YUMPU automatically turns print PDFs into web optimized ePapers that Google loves.
120<br />
Fuel Pivot Service<br />
Prepare the bike<br />
1. Clamp the frame upright in a workstand by its seatpost<br />
with the head tube vertical.<br />
Removing the rear swingarm<br />
1. Remove the rear wheel and right crankarm.<br />
Disconnect the rear brake and rear derailleur cable.<br />
2. If possible, open<br />
the front derailleur cage<br />
and remove the chain.<br />
Otherwise, remove the<br />
rear derailleur.<br />
3. Identify the seat<br />
stay pivot bolt (Fig. 32).<br />
The bolt has a high<br />
polish, while the axle<br />
is anodized aluminum.<br />
While holding the axle<br />
with a 5mm allen<br />
wrench, use another<br />
5mm allen wrench to<br />
loosen the bolt 4 to 5<br />
turns. Tap the bolt head<br />
to partially drive the axle<br />
out of the assembly. Once<br />
loose, you can probably<br />
pull the axle (Fig. 33) out<br />
with your fingers. As you<br />
remove the axle, be careful not to let<br />
the swingarm swing down and hit<br />
the frame.<br />
4. Remove the main pivot bolt<br />
and axle, using the same technique<br />
as with the seat stay pivot axle.<br />
5. Ease the swingarm out of the<br />
rocker bushings and off the main<br />
pivot bushings. While pulling the<br />
swingarm rearward, it may help to<br />
wiggle the swingarm slightly from side to<br />
side.<br />
Removing the shock<br />
1. If the swingarm is attached,<br />
support the swingarm (especially<br />
if the rear wheel is in the frame)<br />
so that it doesn’t hit the frame<br />
while removing the shock.<br />
2. Hold the upper shock bolt<br />
with a 5mm allen wrench while<br />
loosening the nut with a 10mm<br />
end wrench. Remove the nut, and<br />
slide the bolt out. If the bolt has<br />
Seat stay and rocker<br />
pivot axle and bolts (identical)<br />
Main pivot axle and bolt<br />
Fig. 33<br />
Upper shock mount<br />
bolt (shorter)<br />
Fig. 32<br />
Lower<br />
shock<br />
mount bolt<br />
(longer)<br />
Fig. 34<br />
been loose, its possible that it has cut threads in the aluminum<br />
swingarm shock mount. In this case, you may need to<br />
“unthread” the bolt from the frame.<br />
3. Hold the lower shock bolt with a 5mm allen wrench<br />
while loosening the nut with a 10mm end wrench. Remove<br />
the nut, and slide the bolt out. Be careful not to drop the<br />
shock as you remove the bolt.<br />
2002 <strong>Trek</strong> Technical Manual<br />
Removing the main pivot bushings<br />
1. Remove the main pivot<br />
bushing from the frame. This<br />
part is held in place with<br />
Loktite, so you will probably<br />
need to lightly tap it with a<br />
hammer to drive it out of<br />
the frame (Fig. 35). A socket<br />
on an extension makes a<br />
good drift punch. The socket<br />
should contact the metal portion<br />
of the bushing, barely fitting<br />
inside the swingarm and<br />
pivot lug.<br />
Do not use heat to loosen<br />
the Loktite, as heat may damage<br />
the frame or paint.<br />
2. Remove the main pivot<br />
bushing “top hats” (Fig. 36) from<br />
the swingarm. These are also<br />
installed with Loktite, so again<br />
tap them out with hammer using<br />
a properly sized socket. Avoid<br />
damage to the swingarm by properly<br />
supporting it as you drive out<br />
the bushings.<br />
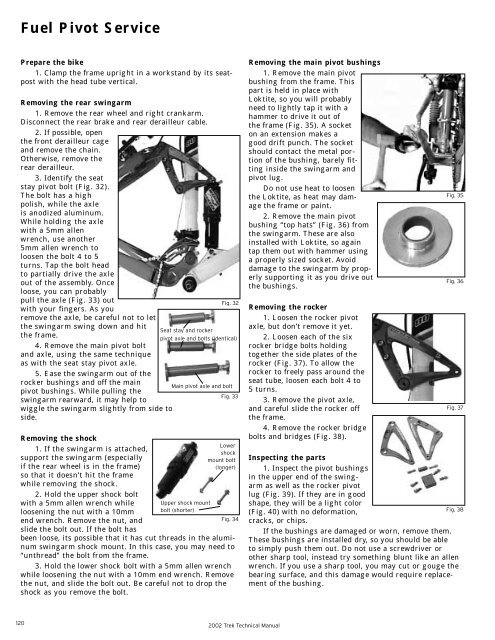
Removing the rocker<br />
1. Loosen the rocker pivot<br />
axle, but don’t remove it yet.<br />
2. Loosen each of the six<br />
rocker bridge bolts holding<br />
together the side plates of the<br />
rocker (Fig. 37). To allow the<br />
rocker to freely pass around the<br />
seat tube, loosen each bolt 4 to<br />
5 turns.<br />
3. Remove the pivot axle,<br />
and careful slide the rocker off<br />
the frame.<br />
4. Remove the rocker bridge<br />
bolts and bridges (Fig. 38).<br />
Rocker<br />
pivot<br />
axle<br />
Fig. 35<br />
Fig. 36<br />
Rocker<br />
clamp<br />
bolts<br />
Fig. 37<br />
Inspecting the parts<br />
1. Inspect the pivot bushings<br />
in the upper end of the swingarm<br />
as well as the rocker pivot<br />
lug (Fig. 39). If they are in good<br />
shape, they will be a light color<br />
(Fig. 40) with no deformation,<br />
Fig. 38<br />
cracks, or chips.<br />
If the bushings are damaged or worn, remove them.<br />
These bushings are installed dry, so you should be able<br />
to simply push them out. Do not use a screwdriver or<br />
other sharp tool, instead try something blunt like an allen<br />
wrench. If you use a sharp tool, you may cut or gouge the<br />
bearing surface, and this damage would require replacement<br />
of the bushing.