ECX-DIO8 - esd electronics, Inc.
ECX-DIO8 - esd electronics, Inc.
ECX-DIO8 - esd electronics, Inc.

Create successful ePaper yourself
Turn your PDF publications into a flip-book with our unique Google optimized e-Paper software.
<strong>ECX</strong>-<strong>DIO8</strong> Hardware Manual • Doc.-No.: E.3010.21 / Rev. 1.0 Page 1 of 33<br />
<strong>esd</strong> electronic system design gmbh<br />
Vahrenwalder Str. 207 • 30165 Hannover • Germany<br />
www.<strong>esd</strong>.eu • Fax: 0511/37 29 8-68<br />
Phone: 0511/37 29 80 • International: +49-5 11-37 29 80<br />
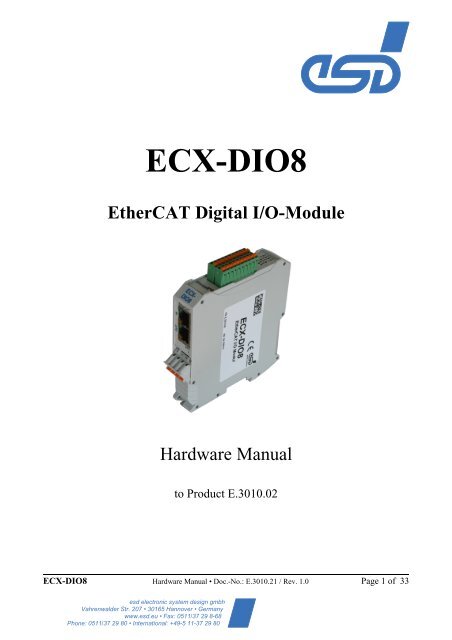
<strong>ECX</strong>-<strong>DIO8</strong><br />
EtherCAT Digital I/O-Module<br />
Hardware Manual<br />
to Product E.3010.02
Page 2 of 33<br />
N O T E<br />
The information in this document has been carefully checked and is believed to be entirely reliable. <strong>esd</strong><br />
makes no warranty of any kind with regard to the material in this document, and assumes no<br />
responsibility for any errors that may appear in this document. <strong>esd</strong> reserves the right to make changes<br />
without notice to this, or any of its products, to improve reliability, performance or design.<br />
<strong>esd</strong> assumes no responsibility for the use of any circuitry other than circuitry which is part of a product<br />
of <strong>esd</strong> gmbh.<br />
<strong>esd</strong> does not convey to the purchaser of the product described herein any license under the patent rights<br />
of <strong>esd</strong> gmbh nor the rights of others.<br />
Trademark Notices<br />
<strong>esd</strong> electronic system design gmbh<br />
Vahrenwalder Str. 207<br />
30165 Hannover<br />
Germany<br />
Phone: +49-511-372 98-0<br />
Fax: +49-511-372 98-68<br />
E-mail: info@<strong>esd</strong>.eu<br />
Internet: www.<strong>esd</strong>.eu<br />
USA / Canada:<br />
<strong>esd</strong> <strong>electronics</strong> <strong>Inc</strong>.<br />
525 Bernardston Road<br />
Suite 1<br />
Greenfield, MA 01301<br />
USA<br />
Phone: +1-800-732-8006<br />
Fax: +1-800-732-8093<br />
E-mail: us-sales@<strong>esd</strong>-<strong>electronics</strong>.com<br />
Internet: www.<strong>esd</strong>-<strong>electronics</strong>.us<br />
EtherCAT® is a registered trademark and patented technology, licensed by Beckhoff Automation GmbH, Germany.<br />
All other trademarks, product names, company names or company logos used in this manual are reserved by their<br />
respective owners.<br />
Hardware Manual • Doc.-No.: E.3010.21 / Rev. 1.0 <strong>ECX</strong>-<strong>DIO8</strong>
Document-<br />
File:<br />
Date of print: 2011-02-24<br />
I:\Texte\Doku\MANUALS\<strong>ECX</strong>\<strong>ECX</strong>-<strong>DIO8</strong>\Englisch\<strong>ECX</strong>-<strong>DIO8</strong>_Hardware_en_10.wpd<br />
PCB version: since <strong>ECX</strong>-<strong>DIO8</strong> Rev. 2.01<br />
Firmware version: since Rev.<br />
Changes in the chapters<br />
The changes in the document listed below affect changes in the hardware and firmware as well as<br />
changes in the description of facts only.<br />
Chapter Changes versus previous version<br />
- First English version<br />
- -<br />
Technical details are subject to change without further notice.<br />
<strong>ECX</strong>-<strong>DIO8</strong> Hardware Manual • Doc.-No.: E.3010.21 / Rev. 1.0 Page 3 of 33
Page 4 of 33<br />
Safety Instructions<br />
! When working with <strong>ECX</strong>-<strong>DIO8</strong> follow the instructions below and read the manual carefully to<br />
protect yourself and the <strong>ECX</strong>-<strong>DIO8</strong> from damage.<br />
! Do not open the housing of the <strong>ECX</strong>-<strong>DIO8</strong><br />
! In order to prevent overvoltage damage due to thunder storm, unplug the <strong>ECX</strong>-<strong>DIO8</strong> from CAN and<br />
the analog I/Os beforehand.<br />
! Never let liquids get inside the <strong>ECX</strong>-<strong>DIO8</strong>. Otherwise, electric shocks or short circuits may result.<br />
! Protect the <strong>ECX</strong>-<strong>DIO8</strong> from dust, moisture and steam.<br />
! Protect the <strong>ECX</strong>-<strong>DIO8</strong> from shocks and vibrations.<br />
! The <strong>ECX</strong>-<strong>DIO8</strong> may become warm during normal use. Always allow adequate ventilation around the<br />
<strong>ECX</strong>-<strong>DIO8</strong> and use care when handling.<br />
! Do not operate the <strong>ECX</strong>-<strong>DIO8</strong> adjacent to heat sources and do not expose it to unnecessary thermal<br />
radiation. Ensure an ambient temperature as specified in the technical data.<br />
! Do not use damaged or defective cables to connect the <strong>ECX</strong>-<strong>DIO8</strong>.<br />
! The <strong>ECX</strong>-<strong>DIO8</strong> may only be driven by power supply current ciruits, that are contact protected.<br />
A power supply, that provides a safety extra-low voltage (SELV or PELV) according to EN 60950-1,<br />
complies with this conditions.<br />
Conformity<br />
The <strong>ECX</strong>-<strong>DIO8</strong> is an industrial product and meets the demands of the EU regulations and EMC standards<br />
for industrial environments printed in the conformity declaration at the end of this manual.<br />
Warning: In a residential, commercial or light industrial environment the <strong>ECX</strong>-<strong>DIO8</strong> may cause radio<br />
interferences in which case the user may be required to take adequate measures.<br />
Qualified Personal<br />
This documentation is directed exclusively towards qualified personal in control and automation<br />
engineering.<br />
The installation and commissioning of the product may only be carried out by qualified personal, which is<br />
authorized to put devices, systems and electric circuits into operation according to the applicable national<br />
standards of safety engineering.<br />
Intended Use<br />
The intended use of the <strong>ECX</strong>-<strong>DIO8</strong> is the operation as EtherCAT digital I/O module.<br />
The <strong>esd</strong> guarantee does not cover damages which result from improper use, usage not in accordance with<br />
regulations or disregard of safety instructions and warnings.<br />
! The <strong>ECX</strong>-<strong>DIO8</strong> is intended for indoor installation only.<br />
! The operation of the <strong>ECX</strong>-<strong>DIO8</strong> in hazardous areas, or areas exposed to potentially explosive<br />
materials is not permitted.<br />
! The operation of the <strong>ECX</strong>-<strong>DIO8</strong> for medical purposes is prohibited.<br />
Service Note<br />
The <strong>ECX</strong>-<strong>DIO8</strong> does not contain any parts that require maintenance by the user. The <strong>ECX</strong>-<strong>DIO8</strong> does not require any<br />
manual configuration of the hardware. Unauthorized intervention in the device voids warranty claims.<br />
Remove all cables before cleaning. Clean the device with a slightly moist, lint-free cloth. Cleaning agents or solvents are<br />
not suitable.<br />
Disposal<br />
Devices which have become defective in the long run have to be disposed in an appropriate way or have to be returned<br />
to the manufacturer for proper disposal. Please, make a contribution to environmental protection.<br />
Hardware Manual • Doc.-No.: E.3010.21 / Rev. 1.0 <strong>ECX</strong>-<strong>DIO8</strong>
Contents<br />
1. Overview . . . . . . . . . . . . . . . . . . . . . . . . . . . . . . . . . . . . . . . . . . . . . . . . . . . . . . . . . . . . . . . . . . . . 7<br />
1.1 Description of the Module . . . . . . . . . . . . . . . . . . . . . . . . . . . . . . . . . . . . . . . . . . . . 7<br />
2. Technical Data . . . . . . . . . . . . . . . . . . . . . . . . . . . . . . . . . . . . . . . . . . . . . . . . . . . . . . . . . . . . . . . 8<br />
2.1 General Technical Data . . . . . . . . . . . . . . . . . . . . . . . . . . . . . . . . . . . . . . . . . . . . . . . 8<br />
2.3 EtherCAT® Slave Controller (ESC) . . . . . . . . . . . . . . . . . . . . . . . . . . . . . . . . . . . . . 9<br />
2.4 Software Support . . . . . . . . . . . . . . . . . . . . . . . . . . . . . . . . . . . . . . . . . . . . . . . . . . . . 9<br />
3. Hardware Installation . . . . . . . . . . . . . . . . . . . . . . . . . . . . . . . . . . . . . . . . . . . . . . . . . . . . . . . . 10<br />
3.1 Connecting Diagram . . . . . . . . . . . . . . . . . . . . . . . . . . . . . . . . . . . . . . . . . . . . . . . . 10<br />
3.2 LEDs . . . . . . . . . . . . . . . . . . . . . . . . . . . . . . . . . . . . . . . . . . . . . . . . . . . . . . . . . . . 11<br />
3.2.1 LEDs in the Front Panel . . . . . . . . . . . . . . . . . . . . . . . . . . . . . . . . . . 11<br />
3.2.1.1 Operation of the Status LEDs L, S, E, C . . . . . . . . . . . 12<br />
3.2.1.2 Status of the LEDs 1-8 . . . . . . . . . . . . . . . . . . . . . . . . 13<br />
3.2.2 EtherCAT LEDs . . . . . . . . . . . . . . . . . . . . . . . . . . . . . . . . . . . . . . . . 14<br />
3.3 Installation of the Module Using InRailBus Connector . . . . . . . . . . . . . . . . . . . . . 15<br />
3.3.1 Connection of the Power Supply Voltage . . . . . . . . . . . . . . . . . . . . . 15<br />
3.3.2 Module Installation Using a Mounting Rail Bus Connector . . . . . 16<br />
3.3.3 Connecting Power Supply to InRailBus . . . . . . . . . . . . . . . . . . . . . . 18<br />
3.4 Remove the <strong>ECX</strong> Module from the InRailBus . . . . . . . . . . . . . . . . . . . . . . . . . . . . 18<br />
4. Connector Assignment . . . . . . . . . . . . . . . . . . . . . . . . . . . . . . . . . . . . . . . . . . . . . . . . . . . . . . . . 19<br />
4.1 Power Supply Voltage 24 V (X101) . . . . . . . . . . . . . . . . . . . . . . . . . . . . . . . . . . . . 19<br />
4.2 Power Supply Voltage via InRailBus Connector (X100) . . . . . . . . . . . . . . . . . . . . 20<br />
4.3 Digital In/Outputs (X500) . . . . . . . . . . . . . . . . . . . . . . . . . . . . . . . . . . . . . . . . . . . . 21<br />
4.4 EtherCAT Ports IN, OUT(X320A/B) . . . . . . . . . . . . . . . . . . . . . . . . . . . . . . . . . . 22<br />
5. Quick Start Guide . . . . . . . . . . . . . . . . . . . . . . . . . . . . . . . . . . . . . . . . . . . . . . . . . . . . . . . . . . . 23<br />
6. Software . . . . . . . . . . . . . . . . . . . . . . . . . . . . . . . . . . . . . . . . . . . . . . . . . . . . . . . . . . . . . . . . . . . 24<br />
7. Declaration of Conformity . . . . . . . . . . . . . . . . . . . . . . . . . . . . . . . . . . . . . . . . . . . . . . . . . . . . 32<br />
8. Order Information . . . . . . . . . . . . . . . . . . . . . . . . . . . . . . . . . . . . . . . . . . . . . . . . . . . . . . . . . . . 33<br />
<strong>ECX</strong>-<strong>DIO8</strong> Hardware Manual • Doc.-No.: E.3010.21 / Rev. 1.0 Page 5 of 33
Page 6 of 33<br />
This page is intentionally left blank.<br />
Hardware Manual • Doc.-No.: E.3010.21 / Rev. 1.0 <strong>ECX</strong>-<strong>DIO8</strong>
1. Overview<br />
1.1 Description of the Module<br />
24V<br />
Power Connector<br />
MSTBO 2,5/4-<br />
G1L-KMGY<br />
24V<br />
Inrail-Bus<br />
Connector<br />
X101<br />
24V<br />
+24 V=<br />
DC/DC<br />
Converter<br />
+3.3 V=<br />
3.3V<br />
ET1100<br />
EtherCAT-Controller<br />
DOUT 8<br />
DIN<br />
8<br />
8x Digital I/O<br />
+<br />
+ - Ref<br />
+ - Ref<br />
+ - Ref<br />
+ - Ref<br />
+ - Ref<br />
+ - Ref<br />
+ - Ref<br />
- Ref<br />
Ethernet<br />
PHY<br />
KSZ8721<br />
Ethernet<br />
PHY<br />
KSZ8721<br />
Fig. 1: Block circuit diagram of the <strong>ECX</strong>-<strong>DIO8</strong> module<br />
Overview<br />
X500<br />
VIO<br />
<strong>ECX</strong>-<strong>DIO8</strong> Hardware Manual • Doc.-No.: E.3010.21 / Rev. 1.0 Page 7 of 33<br />
8<br />
2<br />
10<br />
DIO<br />
Status<br />
LEDs<br />
EtherCAT IN<br />
100BASE-TX<br />
RJ45 with LEDs<br />
EtherCAT OUT<br />
100BASE-TX<br />
RJ45 with LEDs<br />
The <strong>ECX</strong>-<strong>DIO8</strong> is an EtherCAT digital I/O-module. It is equipped with 8 digital I/Os, each available<br />
as input and output. The nominal I/O-voltage value is 24 V. Nominal output current is 0.5 A at 24 V.<br />
The <strong>ECX</strong>-<strong>DIO8</strong> module provides industrial digital in-/outputs with two-wire connection in combination<br />
with service-friendly wiring of supply voltage.<br />
The power supply can be applied via the InRailBus connector (TBUS-connector) integrated in the<br />
mounting rail or separately via the clamp-connection.<br />
The 100BASE-TX EtherCAT® interface is compatible to IEEE 802.3.<br />
Configuration is done by EtherCAT® master (XML file).<br />
The module is designed for hat-rail mounting in a control enclosure. The digital I/O connectors and<br />
status LEDs are mounted in the front panel.
Technical Data<br />
2. Technical Data<br />
2.1 General Technical Data<br />
Supply voltage<br />
Connectors<br />
Page 8 of 33<br />
nominal: 24 VDC / 50 mA<br />
min./max.: 12 VDC/30 VDC<br />
EtherNet<br />
IN (8-pin RJ45 jack, X320A) - EtherCAT data IN (from master)<br />
OUT (8-pin RJ45 jack, X320B) - EtherCAT data OUT (to next slave)<br />
Digital I/O (20-pin Mini COMBICON double-level header, X500)<br />
- digital input/output<br />
24V (4-pin COMBICON connector with spring-cage connection,<br />
X101) - 24V-power supply voltage<br />
InRailBus (5-pin ME-MAX-TBUS-connector, Phoenix Contact, X100)<br />
- power supply voltage for InRailBus<br />
Temperature range -20 ... + 70 /C ambient temperature<br />
Humidity max. 90%, non-condensing<br />
Protection class IP20<br />
Pollution degree<br />
maximum permissible according to DIN EN 61131-2:<br />
Pollution Degree 2<br />
Housing Plastic housing for carrier rail mounting NS35/7,5 DIN EN 60715<br />
Dimensions<br />
Weight 135 g<br />
width: 22.5 mm, length: 99 mm, constructional height: 114.5 mm<br />
(dimensions without mating connectors)<br />
Table 1: General technical data<br />
Hardware Manual • Doc.-No.: E.3010.21 / Rev. 1.0 <strong>ECX</strong>-<strong>DIO8</strong>
2.2 Digital In/Outputs<br />
Technical Data<br />
Number of digital in/outputs 8 channels, each selectable as input and output<br />
Specification of the digital<br />
inputs<br />
Specification of the digital<br />
outputs<br />
input voltage (nominal value): 24 VDC<br />
over voltage protection up to U VIO<br />
Input switching threshold '0'>'1' input voltage$ 8.2 V<br />
Input switching threshold '1'>'0' input voltage # 6.0 V<br />
Input resistance ca. 10 kS<br />
Electrical isolation none<br />
high side power switches,<br />
power supply U VIO : nominal 24 VDC,<br />
min./max.: 12 VDC / 30 VDC,<br />
output current (nom.): 0.5 A (70 /C, 24 V),<br />
protection circuit: short circuit and over temperature protection<br />
with output shutdown and undervoltage shutdown with<br />
auto-restart and hysteresis<br />
LEDs 8 LEDs reflecting the DIO pin status<br />
Table 2: Digital in/outputs<br />
2.3 EtherCAT® Slave Controller (ESC)<br />
Controller Beckhoff ET1100<br />
Typ EtherCAT Slave<br />
ESC interface 2x RJ45, 100BASE-TX according to IEEE 802.3<br />
2.4 Software Support<br />
Table 3: EtherCAT Slave Controller<br />
Configuration is done by EtherCAT® master (XML file).<br />
<strong>ECX</strong>-<strong>DIO8</strong> Hardware Manual • Doc.-No.: E.3010.21 / Rev. 1.0 Page 9 of 33
Hardware-Installation<br />
3. Hardware Installation<br />
3.1 Connecting Diagram<br />
Page 10 of 33<br />
Fig. 2: Connections of the <strong>ECX</strong>-<strong>DIO8</strong> module<br />
The connector pin assignment can be found on page 19 and following.<br />
Hardware Manual • Doc.-No.: E.3010.21 / Rev. 1.0 <strong>ECX</strong>-<strong>DIO8</strong>
3.2 LEDs<br />
3.2.1 LEDs in the Front Panel<br />
Fig. 3: Position of the LEDs in the front panel<br />
Hardware Installation<br />
In the front panel the <strong>ECX</strong>-<strong>DIO8</strong> module is equipped with 4 status LEDs (L, S, E, C) and 8 green<br />
LEDs (1-8) for the digital I/O channels. The indicator states of the front panel LEDs are described in<br />
the following chapters.<br />
<strong>ECX</strong>-<strong>DIO8</strong> Hardware Manual • Doc.-No.: E.3010.21 / Rev. 1.0 Page 11 of 33
Hardware-Installation<br />
3.2.1.1 Operation of the Status LEDs L, S, E, C<br />
Page 12 of 33<br />
LED indication Display function LED-Name<br />
Label Name Colour<br />
L<br />
EEPROM<br />
Error<br />
red<br />
S ETC Run green<br />
E<br />
C<br />
Thermal<br />
Error<br />
ETC<br />
Connect<br />
red<br />
green<br />
Indicator<br />
state<br />
Description<br />
on EEPROM error, EEPROM not loaded<br />
off EEPROM completely loaded<br />
off <strong>ECX</strong>-<strong>DIO8</strong> in INIT state, ETC is not initialised<br />
blinking<br />
(fast)<br />
<strong>ECX</strong>-<strong>DIO8</strong> in PRE-OPERATIONAL state<br />
single flash <strong>ECX</strong>-<strong>DIO8</strong> is in SAFE-OPERATIONAL state<br />
on<br />
<strong>ECX</strong>-<strong>DIO8</strong> is in OPERATIONAL state,<br />
ETC is initialised, registers are set, (Run mode)<br />
flickering <strong>ECX</strong>-<strong>DIO8</strong> is in BOOTSTRAP state<br />
on Error of digital outputs, excess temperature<br />
off digital outputs OK<br />
on data communication, bus sends data<br />
off<br />
data communication terminated, watchdog<br />
expired<br />
Table 4: Indicator states of the Status LEDs<br />
in<br />
Schematics<br />
Diagram<br />
LED200A<br />
LED200B<br />
LED200C<br />
LED200D<br />
Hardware Manual • Doc.-No.: E.3010.21 / Rev. 1.0 <strong>ECX</strong>-<strong>DIO8</strong>
3.2.1.2 Status of the LEDs 1-8<br />
Hardware Installation<br />
The <strong>ECX</strong>-DIO is equipped with 8 green LEDs (1-8) for the indication of the status of the DIO<br />
channels.<br />
LED<br />
Indication function =<br />
DI/O channel status<br />
Name in<br />
Schematics<br />
Diagram<br />
1 DIO1 LED580D<br />
2 DIO2 LED580C<br />
3 DIO3 LED580B<br />
4 DIO4 LED580A<br />
5 DIO5 LED581D<br />
6 DIO6 LED581C<br />
7 DIO7 LED581B<br />
8 <strong>DIO8</strong> LED581A<br />
Table 5: Indication of LEDs 1-8<br />
LED State of channels DIO1...<strong>DIO8</strong><br />
off input voltage level is below the lower switching threshold (input<br />
voltage # 6.0 V) and output status is ‘off’<br />
on input voltage level is higher than the upper switching threshold<br />
(input voltage$ 8.2 V) or output status is ‘on’<br />
Table 6: Status of channels DIO1...<strong>DIO8</strong><br />
<strong>ECX</strong>-<strong>DIO8</strong> Hardware Manual • Doc.-No.: E.3010.21 / Rev. 1.0 Page 13 of 33
Hardware-Installation<br />
3.2.2 EtherCAT LEDs<br />
Page 14 of 33<br />
Fig. 4: Position of the EtherCAT-LEDs<br />
The EtherCAT LEDs are integrated in the RJ45 sockets. The green LEDs indicate the Link/Activity<br />
state of the corresponding port. The yellow LEDs indicate physical layer Rx errors.<br />
LED Display function<br />
Name Colour Indicator state Description<br />
Link/<br />
Activity<br />
green<br />
Error yellow<br />
on EtherCAT link of the port, without activity<br />
blinking<br />
EtherCAT link of the port and<br />
EtherCAT activity (reception of Ethernet data)<br />
off no EtherCAT link of the port<br />
single flash physical layer Rx error occurred on the port<br />
off no physical layer Rx error on the port<br />
Table 7: Indicator states of the Status LEDs<br />
Hardware Manual • Doc.-No.: E.3010.21 / Rev. 1.0 <strong>ECX</strong>-<strong>DIO8</strong>
3.3 Installation of the Module Using InRailBus Connector<br />
3.3.1 Connection of the Power Supply Voltage<br />
!<br />
!<br />
Hardware Installation<br />
The power supply voltage can be connected via the +24V connector for the power supply voltage or<br />
via the InRailBus connector.<br />
Attention!<br />
Please note the safety instructions containing the requirements on power supply<br />
current (see page 4).<br />
Attention:<br />
It is not permissible to feed through the power supply voltage through the <strong>ECX</strong><br />
station from the InRailBus terminal plug to the 24 V power supply connector (and<br />
vice versa) to supply other <strong>ECX</strong> stations! A feed through of the +24 V power supply<br />
voltage can cause damage on the <strong>ECX</strong> modules.<br />
Earthing of the Mounting Rail<br />
Fig. 5: <strong>ECX</strong>-Station<br />
Note: The functional earth contact (FE) has to be connected to the mounting rail.<br />
Please note, that the impedance of the connector cable has to be kept as low as<br />
possible.<br />
The functional earth contact is a current path of low impedance between circuits and earth, that is<br />
not intended as protection measure, but improves the stability. It is not a protection against<br />
accidental contact for persons.<br />
Note: The EG conformity (see page 32) can only be warranted, if the earthing via the<br />
mounting rail is made as described herein.<br />
<strong>ECX</strong>-<strong>DIO8</strong> Hardware Manual • Doc.-No.: E.3010.21 / Rev. 1.0 Page 15 of 33
Hardware-Installation<br />
3.3.2 Module Installation Using a Mounting Rail Bus Connector<br />
If the power supply voltage shall be fed via the InRailBus, please proceed as follows:<br />
Page 16 of 33<br />
Figure 6: Mounting rail with bus connector<br />
1. Position the InRailBus connector on the mounting rail and snap it onto the mounting rail using<br />
slight pressure. Plug the bus connectors together to contact the communication and power signals<br />
(in parallel with one). The bus connectors can be plugged together before or after mounting the<br />
<strong>ECX</strong>..<br />
2. Place the <strong>ECX</strong> module with the DIN rail guideway on the top edge of the mounting rail.<br />
Figure 7 : Mounting <strong>ECX</strong> modules<br />
Hardware Manual • Doc.-No.: E.3010.21 / Rev. 1.0 <strong>ECX</strong>-<strong>DIO8</strong>
Hardware Installation<br />
3. Swivel the <strong>ECX</strong> module onto the mounting rail in pressing the module downwards according to<br />
the arrow as shown in figure 7. The housing is mechanically guided by the DIN rail bus<br />
connector.<br />
4. When mounting the <strong>ECX</strong> module, the metal foot catch snaps on the bottom edge of the mounting<br />
rail. Now the module is mounted on the mounting rail and connected to the InRailBus via the bus<br />
connector. Connect the bus connectors and the InRailBus if not already done.<br />
Figure 8: Mounted <strong>ECX</strong>-module<br />
<strong>ECX</strong>-<strong>DIO8</strong> Hardware Manual • Doc.-No.: E.3010.21 / Rev. 1.0 Page 17 of 33
Hardware-Installation<br />
3.3.3 Connecting Power Supply to InRailBus<br />
To connect the power supply via the InRailBus, a terminal plug (order no.: C.3000.02) is needed.<br />
The terminal plug is not included in delivery and must be ordered separately (see order<br />
information).<br />
Page 18 of 33<br />
Fig. 9: Mounting rail with InRailBus and terminal plug<br />
Plug the terminal plug into the socket on the right of the mounting-rail bus connector of the<br />
InRailBus, as described in Fig. 9. Then connect the power supply voltage via the terminal plug.<br />
3.4 Remove the <strong>ECX</strong> Module from the InRailBus<br />
If the <strong>ECX</strong> module is connected to the InRailBus please proceed as follows:<br />
Release the module from the mounting rail in moving the foot catch (see Fig. 8) downwards (e.g.<br />
with a screwdriver). Now the module is detached from the bottom edge of the mounting rail and can<br />
be removed.<br />
Note: It is possible to remove individual devices from the <strong>ECX</strong> station without<br />
interrupting the InRailBus connection, because the contact chain will not be<br />
interrupted.<br />
Hardware Manual • Doc.-No.: E.3010.21 / Rev. 1.0 <strong>ECX</strong>-<strong>DIO8</strong>
4. Connector Assignment<br />
4.1 Power Supply Voltage 24 V (X101)<br />
!<br />
Connector Pin Assignment<br />
Device connector: Phoenix-Contact MSTBO 2,5/4-G1L-KMGY<br />
Line connector: Phoenix-Contact FKCT 2,5/4-ST, 5.0 mm pitch, spring-cage connection,<br />
Phoenix-Contact order no.: 19 21 90 0 (included in the scope of delivery)<br />
Labelling on<br />
Housing<br />
Labelling on<br />
connector<br />
Pin Position:<br />
Pin Assignment:<br />
24V<br />
- +<br />
- +<br />
Pin No. 1 2 3 4<br />
Signal<br />
P24<br />
(+ 24 V)<br />
M24<br />
(GND)<br />
M24<br />
(GND)<br />
P24<br />
(+ 24 V)<br />
Attention:<br />
If the +24 V power supply voltage is connected to other <strong>ECX</strong> modules via the 24V<br />
power supply connector (X101, pin 3/4 to X101, pin 1/2 ), the current may not<br />
exceed 8 A!<br />
Please refer also to the connecting diagram on page 10.<br />
Signal Description:<br />
P24... power supply voltage +24 V<br />
M24... reference potential<br />
<strong>ECX</strong>-<strong>DIO8</strong> Hardware Manual • Doc.-No.: E.3010.21 / Rev. 1.0 Page 19 of 33
Connector Pin Assignment<br />
4.2 Power Supply Voltage via InRailBus Connector (X100)<br />
Connector type: Mounting rail bus connector CAN-CBX-TBUS<br />
(Phoenix-Contact ME 22,5 TBUS 1,5/5-ST-3,81 KMGY)<br />
Signal Description:<br />
Page 20 of 33<br />
Pin Position:<br />
Pin Assignment:<br />
Pin Signal<br />
5 M24 (GND)<br />
4 P24 (+24 V)<br />
3 -<br />
2 -<br />
1 -<br />
S FE (PE_GND)<br />
P24... power supply voltage +24 V<br />
M24... reference potential<br />
FE... functional earth contact (EMC)(connected to mounting rail potential)<br />
Hardware Manual • Doc.-No.: E.3010.21 / Rev. 1.0 <strong>ECX</strong>-<strong>DIO8</strong>
4.3 Digital In/Outputs (X500)<br />
Pin No. Pin No.<br />
1<br />
2<br />
3<br />
4<br />
5<br />
6<br />
7<br />
8<br />
9<br />
10<br />
P<br />
1<br />
2<br />
3<br />
4<br />
5<br />
6<br />
7<br />
8<br />
M<br />
Labelling of the<br />
Module Case<br />
Connector Pin Assignment<br />
Device connector: Phoenix Contact Combicon MCDN 1,5/10-G1-3,5 RNP26THR<br />
Line connector: Phoenix Contact Combicon 2x FMC 1,5/10-ST-3,5 (spring-cage connections)<br />
(contained in the scope of supply)<br />
!<br />
Connector top view:<br />
Pin Assignment: Pin Assignment:<br />
Signal Pin Pin Position: Pin Signal<br />
L + 24 V 1 11 L + 24 V<br />
M24<br />
2 12 IO1<br />
<strong>ECX</strong>-<strong>DIO8</strong> Hardware Manual • Doc.-No.: E.3010.21 / Rev. 1.0 Page 21 of 33<br />
11<br />
12<br />
13<br />
14<br />
15<br />
16<br />
17<br />
18<br />
19<br />
20<br />
3 13 IO2<br />
4 14 IO3<br />
5 15 IO4<br />
6 16 IO5<br />
7 17 IO6<br />
8 18 IO7<br />
9 19 IO8<br />
10 20 M24<br />
Signal Description:<br />
L +24 V... supply voltage of the digital outputs<br />
M24... reference potential<br />
IO1-8... signals of the digital IOs 1-8<br />
Attention!<br />
The maximum current load of the connector pins is 6A/pin. If all 8 outputs are to be<br />
operated with the maximum admissible load, the supply voltage has to be connected to pins<br />
1 and 11. These pins are connected to each other on the PCB.
Connector Pin Assignment<br />
4.4 EtherCAT Ports IN, OUT(X320A/B)<br />
Connector type: 8-pin RJ45 socket<br />
Page 22 of 33<br />
Pin<br />
Port IN<br />
X320A<br />
Signal<br />
Pin Position:<br />
1 2 3 4 5 6 7 8<br />
Pin Assignment:<br />
Port OUT<br />
X320B<br />
Signal<br />
Meaning<br />
1 Tx0+ (TxD+) Tx1+ (TxD+) Transmit Data +<br />
2 Tx0- (TxD-) Tx1- (TxD-) Transmit Data -<br />
3 Rx0+ (RxD+) Rx1+ (RxD+) Receive Data+<br />
4 - - -<br />
5 - - -<br />
6 Rx0- (RxD-) Rx1- (RxD-) Receive Data-<br />
7 - - -<br />
8 - - -<br />
Tx0+/-, Rx0+/-... EtherCAT data lines of port IN<br />
Tx1+/-, Rx1+/- EtherCAT data lines of port OUT<br />
-... unused<br />
Hardware Manual • Doc.-No.: E.3010.21 / Rev. 1.0 <strong>ECX</strong>-<strong>DIO8</strong>
5. Quick Start Guide<br />
!<br />
Quick Start Guide<br />
For a quick start with a simple configuration for the event-triggered transmission of data the<br />
following steps are necessary:<br />
Step see<br />
page<br />
Read the safety notes at the beginning of the manual carefully before you<br />
start with the installation!<br />
1 Mount the <strong>ECX</strong>-<strong>DIO8</strong> module 15<br />
2 Connect the interfaces (power supply voltage, EtherCAT, digital I/Os) 10<br />
3 End of hardware installation -<br />
4 Continue with the software configuration 24<br />
<strong>ECX</strong>-<strong>DIO8</strong> Hardware Manual • Doc.-No.: E.3010.21 / Rev. 1.0 Page 23 of 33<br />
4
Software<br />
6. Software<br />
!<br />
Page 24 of 33<br />
Attention!<br />
Read the safety notes at the beginning of the manual carefully before you start with the<br />
installation! (See page 4)<br />
1. Mount the <strong>ECX</strong>-<strong>DIO8</strong> module and connect the interfaces (power supply voltage, EtherCAT,<br />
digital I/Os) as described on page10.<br />
2. Save the XML file of the <strong>ECX</strong>-<strong>DIO8</strong> received from <strong>esd</strong> for example as:<br />
C:\Programme\EtherCAT Configurator\EtherCAT\ESD <strong>ECX</strong>-<strong>DIO8</strong>.xml<br />
3. Start your EtherCAT Configurator. In this chapter the configuration is shown using the<br />
example of the Beckhoff’s EtherCAT Configurator.<br />
4. Click I/O Device with the right mouse button and choose Append Device... in the menu.<br />
The dialog window Insert Device is opened.<br />
Hardware Manual • Doc.-No.: E.3010.21 / Rev. 1.0 <strong>ECX</strong>-<strong>DIO8</strong>
5. Select the EtherCAT Device in this dialog window and confirm with OK.<br />
Software<br />
6. The EtherCAT Device 1 is appended. Click Device 1(EtherCAT) with the right mouse button<br />
and choose Scan Boxes... or Append Box... in the menu.<br />
If you choose Scan Boxes... continue with 8.<br />
If you choose Append Box..., the following dialog box Insert EtherCAT Device is opened.<br />
<strong>ECX</strong>-<strong>DIO8</strong> Hardware Manual • Doc.-No.: E.3010.21 / Rev. 1.0 Page 25 of 33
Software<br />
7. Select the <strong>esd</strong> <strong>ECX</strong>-<strong>DIO8</strong> in this dialog window and confirm with OK.<br />
Page 26 of 33<br />
Hardware Manual • Doc.-No.: E.3010.21 / Rev. 1.0 <strong>ECX</strong>-<strong>DIO8</strong>
Software<br />
8. The <strong>ECX</strong>-<strong>DIO8</strong> (Box 1) is now shown in the EtherCAT Configurator.<br />
The input and output variables contained in the XML file of the <strong>ECX</strong>-<strong>DIO8</strong> are displayed as<br />
CANopen Process Data Objects(PDO). The PDOs are listed in the PDO List of the Process<br />
Data tab.<br />
The <strong>ECX</strong>-<strong>DIO8</strong> uses - 8 PDOs (1A00 h-1A07 h) for the inputs of channel 1-8<br />
- 1 PDO (1A08 h) as DiagChannel<br />
- 8 PDOs (1600 h-1607 h) for the outputs of channel 1-8.<br />
<strong>ECX</strong>-<strong>DIO8</strong> Hardware Manual • Doc.-No.: E.3010.21 / Rev. 1.0 Page 27 of 33
Software<br />
Inputs current input state<br />
Inputs (SM = 0, Flag = mandatory, fixed)<br />
Index Size Name PDO Content Size<br />
of PDO<br />
Content<br />
Page 28 of 33<br />
Name<br />
of PDO<br />
Content<br />
Type<br />
of PDO<br />
Content<br />
1A00 h 1 Bit Channel 1 6000 h, 01 1 Bit Input BOOL<br />
1A01 h 1 Bit Channel 2 6010 h, 01 1 Bit Input BOOL<br />
1A02 h 1 Bit Channel 3 6020 h, 01 1 Bit Input BOOL<br />
1A03 h 1 Bit Channel 4 6030 h, 01 1 Bit Input BOOL<br />
1A04 h 1 Bit Channel 5 6040 h, 01 1 Bit Input BOOL<br />
1A05 h 1 Bit Channel 6 6050 h, 01 1 Bit Input BOOL<br />
1A06 h 1 Bit Channel 7 6060 h, 01 1 Bit Input BOOL<br />
1A07 h 1 Bit Channel 8 6070 h, 01 1 Bit Input BOOL<br />
Channel Input IO Pin<br />
Channel 1 IO1<br />
Channel 2 IO2<br />
Channel 3 IO3<br />
Channel 4 IO4<br />
Channel 5 IO5<br />
Channel 6 IO6<br />
Channel 7 IO7<br />
Channel 8 IO8<br />
Hardware Manual • Doc.-No.: E.3010.21 / Rev. 1.0 <strong>ECX</strong>-<strong>DIO8</strong>
Outputs current output state<br />
Outputs (SM = 1, Flag = mandatory, fixed)<br />
Index Size Name PDO Content Size<br />
of PDO<br />
Content<br />
Name<br />
of PDO<br />
Content<br />
Software<br />
Type<br />
of PDO<br />
Content<br />
1600 h 1 Bit Channel 1 7000 h, 01 1 Bit Output BOOL<br />
1601 h 1 Bit Channel 2 7010 h, 01 1 Bit Output BOOL<br />
1602 h 1 Bit Channel 3 7020 h, 01 1 Bit Output BOOL<br />
1603 h 1 Bit Channel 4 7030 h, 01 1 Bit Output BOOL<br />
1604 h 1 Bit Channel 5 7040 h, 01 1 Bit Output BOOL<br />
1605 h 1 Bit Channel 6 7050 h, 01 1 Bit Output BOOL<br />
1606 h 1 Bit Channel 7 7060 h, 01 1 Bit Output BOOL<br />
1607 h 1 Bit Channel 8 7070 h, 01 1 Bit Output BOOL<br />
Channel Output IO Pin<br />
Channel 1 IO1<br />
Channel 2 IO2<br />
Channel 3 IO3<br />
Channel 4 IO4<br />
Channel 5 IO5<br />
Channel 6 IO6<br />
Channel 7 IO7<br />
Channel 8 IO8<br />
<strong>ECX</strong>-<strong>DIO8</strong> Hardware Manual • Doc.-No.: E.3010.21 / Rev. 1.0 Page 29 of 33
Software<br />
DiagChannel This process data object (Index 1A08 h) contains the variables OutputsLoopback,<br />
OutputOverloadError and OutputsErrorRaw.<br />
DiagChannel (SM = 0, Flag = mandatory, fixed)<br />
Index Size Name PDO<br />
Content<br />
Page 30 of 33<br />
Size<br />
of PDO<br />
Content<br />
Name<br />
of PDO Content<br />
Type<br />
of PDO<br />
Content<br />
1A08 h 2 Byte Diag-Channel 6080 h, 00 1 Byte OutputsLoopback BYTE<br />
OutputsLoopback of type byte, contains<br />
6080 h, 01 1 Bit OutputsOverloadError BOOL<br />
6080 h, 02 1 Bit OutputsErrorRaw BOOL<br />
6080 h, 03 1 Bit Dummy1 BOOL<br />
6080 h, 04 1 Bit Dummy2 BOOL<br />
6080 h, 05 1 Bit Dummy3 BOOL<br />
6080 h, 06 1 Bit Dummy4 BOOL<br />
6080 h, 07 1 Bit Dummy5 BOOL<br />
6080 h, 08 1 Bit Dummy6 BOOL<br />
Bit Digital Output<br />
0 Channel 1<br />
1 Channel 2<br />
2 Channel 3<br />
3 Channel 4<br />
4 Channel 5<br />
5 Channel 6<br />
6 Channel 7<br />
7 Channel 8<br />
Hardware Manual • Doc.-No.: E.3010.21 / Rev. 1.0 <strong>ECX</strong>-<strong>DIO8</strong>
Software<br />
OutputsOverloadError indicates for a specified period, that an error of the digital outputs is<br />
active or has occurred<br />
type: bool, contains ‘0' or ‘1'<br />
Value Meaning<br />
0 OK<br />
1 Error of digital output has occurred<br />
OutputsErrorRaw indicates an error of the digital outputs, just for the short time when it is<br />
active<br />
type: bool, contains ‘0' or ‘1'<br />
Value Meaning<br />
0 OK<br />
1 Error of digital output<br />
Dummy1-6 Do not use!<br />
These dummies are only implemented to work around a bug in the<br />
Beckhoff Configurator.<br />
<strong>ECX</strong>-<strong>DIO8</strong> Hardware Manual • Doc.-No.: E.3010.21 / Rev. 1.0 Page 31 of 33
7. Declaration of Conformity
8. Order Information<br />
<strong>ECX</strong>-<strong>DIO8</strong><br />
Manuals<br />
Order Information<br />
Type Features Order No.<br />
EtherCAT I/O module with 8 digital channels,<br />
24 V, nominal output current: 0.5 A (70/C, 24 V),<br />
2-wire, each channel individually selectable as<br />
input or output<br />
E.3010.02<br />
<strong>ECX</strong>-<strong>DIO8</strong>-ME Manual in English E.3010.21<br />
Accessories<br />
CAN-CBX-TBUS<br />
CAN-CBX-TBUS-<br />
Connector<br />
CAN-CBX-TBUS-<br />
Connection adapter<br />
Mounting-rail bus connector of the CBX-InRailBus<br />
for CAN-CBX-modules,<br />
(one bus connector is included in delivery of the<br />
<strong>ECX</strong>-module)<br />
Terminal plug of the CBX-InRailBus for the<br />
connection of the +24 V power supply voltage and<br />
the CAN interface<br />
Female type<br />
Terminal plug of the CBX-InRailBus for the<br />
connection of the +24 V power supply voltage and<br />
the CAN interface<br />
Male type<br />
Table 8: Order information<br />
C.3000.01<br />
C.3000.02<br />
C.3000.03<br />
<strong>ECX</strong>-<strong>DIO8</strong> Hardware Manual • Doc.-No.: E.3010.21 / Rev. 1.0 Page 33 of 33