esd Protocol for CAN Modules - esd electronics, Inc.
esd Protocol for CAN Modules - esd electronics, Inc.
esd Protocol for CAN Modules - esd electronics, Inc.

You also want an ePaper? Increase the reach of your titles
YUMPU automatically turns print PDFs into web optimized ePapers that Google loves.
<strong>esd</strong> <strong>Protocol</strong> <strong>for</strong> <strong>CAN</strong> <strong>Modules</strong> Rev. 3.2<br />
<strong>esd</strong> <strong>Protocol</strong><br />
<strong>for</strong><br />
<strong>CAN</strong> <strong>Modules</strong>
N O T E<br />
The in<strong>for</strong>mation in this document has been carefully checked and is believed to be entirely reliable. <strong>esd</strong><br />
makes no warranty of any kind with regard to the material in this document, and assumes no<br />
responsibility <strong>for</strong> any errors that may appear in this document. <strong>esd</strong> reserves the right to make changes<br />
without notice to this, or any of its products, to improve reliability, per<strong>for</strong>mance or design.<br />
<strong>esd</strong> assumes no responsibility <strong>for</strong> the use of any circuitry other than circuitry which is part of a product<br />
of <strong>esd</strong> gmbh.<br />
<strong>esd</strong> does not convey to the purchaser of the product described herein any license under the patent rights<br />
of <strong>esd</strong> gmbh nor the rights of others.<br />
<strong>esd</strong> electronic system design gmbh<br />
Vahrenwalder Str. 205<br />
D-30165 Hannover<br />
Germany<br />
Phone: +49-511-372-980<br />
FAX: +49-511-633-650<br />
Email: sales@<strong>esd</strong>-<strong>electronics</strong>.com<br />
Internet: http://www.<strong>esd</strong>-<strong>electronics</strong>.com<br />
This document shall not be duplicated, nor its contents used <strong>for</strong> any purpose,<br />
unless express permission has been granted.<br />
Copyright by <strong>esd</strong><br />
<strong>esd</strong> <strong>Protocol</strong> <strong>for</strong> <strong>CAN</strong> <strong>Modules</strong> Rev. 3.2
Manual File: I:\TEXTE\DOKU\MANUALS\<strong>CAN</strong>\SOFT-MOD\<strong>CAN</strong>PRT32.EN6<br />
Date of Print: 06.11.97<br />
<strong>esd</strong> <strong>Protocol</strong> <strong>for</strong> <strong>CAN</strong> <strong>Modules</strong> Rev. 3.2<br />
Described Software Revision:<br />
<strong>CAN</strong> kernel : from revision '1.b' (HEX)<br />
<strong>esd</strong> protocol : from revision '7' (HEX)<br />
Module specific implementation: refer to manual of the module specific software
Changes in the chapters<br />
The changes in the user's manual listed below affect changes in the firmware, as well as changes the<br />
description of the facts only.<br />
Chapter Changes versus revision<br />
Further technical changes are subject to change without notice.<br />
<strong>esd</strong> <strong>Protocol</strong> <strong>for</strong> <strong>CAN</strong> <strong>Modules</strong> Rev. 3.2
Content Page<br />
1. Introduction .............................................................. 1 - 1<br />
1.1 Notes to this Manual ................................................. 1 - 1<br />
1.2 Specification of the <strong>esd</strong> <strong>Protocol</strong> ........................................ 1 - 1<br />
1.3 General Notes on Data Transmission ..................................... 1 - 1<br />
1.4 General Hardware Functions .......................................... 1 - 2<br />
1.5 Parameters after a RESET ............................................. 1 - 2<br />
1.6 Calling the Commands and Setting the Parameters ......................... 1 - 6<br />
2. Overview of the Implemented Commands and Parameters ....................... 2 - 1<br />
2.1 Overview of the Commands ........................................... 2 - 1<br />
2.2 Overview of the Returned Parameter Values ............................... 2 - 5<br />
3. Description of the Individual Commands and Parameters ........................ 3 - 1<br />
3.1 Configuration Reply .................................................. 3 - 1<br />
3.2 System Parameters ................................................... 3 - 7<br />
3.3 Process TxIds ...................................................... 3 - 20<br />
3.4 Process RxIds ...................................................... 3 - 23<br />
3.5 Cyclic Tx Transfers (Tx Activate Time) ................................. 3 - 26<br />
3.6 Process Module Memory ............................................. 3 - 29<br />
3.6.1 Internal RAM and XRAM, EEPROM ........................... 3 - 29<br />
3.6.2 External Memory ........................................... 3 - 33<br />
3.6.3 Extended Memory ........................................... 3 - 35<br />
3.6.4 Program Code .............................................. 3 - 38<br />
3.7 Process User Parameters ............................................. 3 - 40<br />
3.8 Process Rx Mode ................................................... 3 - 42<br />
3.9 Allocation of Pin Names ............................................. 3 - 46<br />
3.10 Service Request ................................................... 3 - 49<br />
3.11 Setting the Absolute Module-Time and Synchronisation of the <strong>Modules</strong> ....... 3 - 51<br />
3.12 Supervisor Commands .............................................. 3 - 53<br />
4. Examples <strong>for</strong> Parameterization .............................................. 4 - 1<br />
4.1 Setting the Tx Identifier TxId1 ......................................... 4 - 1<br />
4.2 Restoring the Default Parameters ....................................... 4 - 3<br />
4.2.1 ...if the actual module no. is unknown ............................ 4 - 3<br />
4.2.2 ...if the module no. is known .................................... 4 - 4<br />
<strong>esd</strong> <strong>Protocol</strong> <strong>for</strong> <strong>CAN</strong> <strong>Modules</strong> Rev. 3.2 i - 1
i - 2<br />
<strong>esd</strong> <strong>Protocol</strong> <strong>for</strong> <strong>CAN</strong> <strong>Modules</strong> Rev. 3.2
1. Introduction<br />
1.1 Notes to this Manual<br />
Overview<br />
This manual describes the '<strong>esd</strong>-<strong>CAN</strong> protocol' <strong>for</strong> <strong>esd</strong>-<strong>CAN</strong> modules. By this protocol it is possible to<br />
set the <strong>CAN</strong> parameters of the modules, as <strong>for</strong> example, the Rx and Tx identifiers or the baudrate.<br />
Apart from the <strong>CAN</strong> parameters it is also possible to set and play back module-specific parameters<br />
(user parameters) with the help of the protocol.<br />
In the chapter 'Overview of the implemented commands and parameters' all commands supported at the<br />
moment are shown in a tabular summary.<br />
Depending on the respective module type restrictions of the functions might possibly occur. Notes on<br />
this can be found in the description of the module-specific software. There the individual user<br />
parameters of the used module are described in detail, too.<br />
1.2 Specification of the <strong>esd</strong> <strong>Protocol</strong><br />
On the basis of its problem-oriented structure the <strong>esd</strong> protocol cannot be categorized clearly into a layer<br />
of the ISO layer model: It offers services which range from fundamental functions, as e.g., the inquiry<br />
of the status of the <strong>CAN</strong> hardware controller up to application-specific adjustments, as, e.g., the setting<br />
of so-called 'user parameters'.<br />
The <strong>esd</strong> protocol offers functions which are comparable, e.g., with the LMT (layer management) in the<br />
CAL (<strong>CAN</strong> application layer). Because the identifier allocation occurs by the <strong>esd</strong> protocol, too, its<br />
functionalities are partly similar to those of the DBT (identifier distributor) in the CAL, as well.<br />
But the <strong>esd</strong> protocol is operated totally independently and has got no interface to the CAL!<br />
1.3 General Notes on Data Transmission<br />
In the following descriptions the transmission direction of data is looked at, if not other wisely stated,<br />
from the module. The module receives data on the 'Rx identifier' and transmits data on the 'Tx<br />
identifier'.<br />
The data bytes are counted from 1 to 8 and are always transmitted in the order byte 1...byte 8. The<br />
number of transmitted bytes can vary from 0 to 8. The data transmission has to start with byte 1 and<br />
progress in continuous order (e.g., byte 1, byte 2, byte 3 - not possible, e.g., byte 1, byte 7, byte 8).<br />
Generally only those bytes are overwritten which are received by the module. The data of not recorded<br />
bytes remain unchanged.<br />
<strong>esd</strong> <strong>Protocol</strong> <strong>for</strong> <strong>CAN</strong> <strong>Modules</strong> Rev. 3.2 1 - 1
Overview<br />
1.4 General Hardware Functions<br />
To use the <strong>esd</strong> <strong>CAN</strong> protocol at the <strong>CAN</strong> modules at each module the following hardware circuits are<br />
necessary:<br />
<strong>CAN</strong> controller 8xC592 (or compatible)<br />
The controller has a internal RAM, that is used as a working memory. In this RAM the<br />
dynamical parameters are stored. The RAM ist deleted with each RESET.<br />
I²C EEPROM<br />
The I²C EEPROM is used <strong>for</strong> storing the configuration parameters. The data will remain stored<br />
in power off condition or after a RESET.<br />
Coding switch<br />
Via the coding switch, e.g. the default value of the module no. is set.<br />
Further descriptions can be read in the hardware manual of the module.<br />
1.5 Parameters after a RESET<br />
The module offers various possibilities to trigger a RESET:<br />
A power-on RESET, a RESET by the EMERGENCY-STOP inputs and a RESET by the general<br />
command 'RESET module' reset the local components.<br />
Furthermore the module is able to trigger a RESET independently when the hardware watchdog has<br />
expired. This RESET also resets the local components without changing the stored parameters.<br />
The listed RESETs only change the parameters of the module filed in the I²C EEPROM, if the<br />
conditions apply which are listed in the table below.<br />
The module also supports the command 'default RESET'. By this command a local RESET is triggered<br />
and the parameters of the module are always overwritten with the default parameters.<br />
The used parameters with which the module operates after a power-on RESET, a RESET by the<br />
EMERGENCY STOP inputs or a RESET by the general command 'RESET module', depend mainly<br />
on three factors:<br />
The switch position of the coding switches, the availability of the I²C EEPROM data and the module<br />
number (parameter 'module no.') stored in the I²C EEPROM.<br />
The following table should give an overview of the resulting parameters. It does not contain the 'default<br />
RESET', because this does always lead to the activation of the default parameters.<br />
1 - 2<br />
<strong>esd</strong> <strong>Protocol</strong> <strong>for</strong> <strong>CAN</strong> <strong>Modules</strong> Rev. 3.2
Actual position of the I²C I²C<br />
coding switches after EEPROM EEPROM<br />
RESET status module no.<br />
Overview<br />
<strong>CAN</strong> identifier<br />
(<strong>CAN</strong> Id.), parameter, module no.<br />
<strong>CAN</strong> Id. = f6Coding switches><br />
Parameter = default<br />
1 $00 x x I²C EEPROM mod no. =<br />
mod no.<br />
previous<br />
active mod no. = $00<br />
2 $00 ERROR x<br />
3 $00 OK $00<br />
4 (*) $00 OK $00<br />
<strong>CAN</strong> Id. = f6Coding switches><br />
Parameter = default<br />
I²C EEPROM mod no. =$00<br />
active mod no. = Coding switch no.<br />
<strong>CAN</strong> Id. = f6Coding switches><br />
Parameter = default<br />
I²C EEPROM mod no. = $00<br />
active mod no. = Coding switch no.<br />
<strong>CAN</strong> Id. = f6I²C EEPROM><br />
Parameter = f6I²C EEPROM><br />
active mod no. =<br />
I²C EEPROM mod no.<br />
(x) This value or status is of no importance in this case.<br />
(*) If a <strong>CAN</strong> error is found after a RESET, the local software sets the bitrate to the default value (=adjustment<br />
at configuration jumper).<br />
Table 1.5.1: Parameter after a RESET<br />
<strong>esd</strong> <strong>Protocol</strong> <strong>for</strong> <strong>CAN</strong> <strong>Modules</strong> Rev. 3.2 1 - 3
Overview<br />
Explanations to Table 1.5.1:<br />
Some of the terms from the table above will be described in detail in following sections of this manual.<br />
For a general understanding of the table, a short explanation of the terms:<br />
Module no. ... Serial number (1...255) which can be allocated to the module by the user<br />
independently from the module type.<br />
active mod no. ... The module no. with which the module is selected by the initialisation identifier<br />
(INIT Id) during the parameter interchange.<br />
I²C EEPROM<br />
mod no. ... The module no. which was stored in the local I²C EEPROM of the module. If no<br />
change in this number had been made after the storing, the actual mod no. is<br />
identical with the I²C EEPROM module no..<br />
Below the combinations of factors, shown in table 1.4.1, which are decisive <strong>for</strong> the selection of the<br />
default parameters will be explained:<br />
Combination 1<br />
If the positions of the coding switches are $00 when the module starts after a RESET, the I²C<br />
EEPROM data, previously stored, will be overwritten at the moment in which the adjustment is<br />
changed from $00 to any other value. The firmware needs about five seconds <strong>for</strong> this. Afterwards a<br />
local RESET is triggered by the firmware. During the RESET the message outputs are activated.<br />
The <strong>CAN</strong> identifier corresponds to the value adjusted at the coding switches.<br />
The module operates with the default parameters.<br />
Combination 2<br />
The second listed combination occurs if no I²C EEPROM is available or the I²C EEPROM data are<br />
faulty. If this is the case, the local software would use the default parameters.<br />
The <strong>CAN</strong> identifier corresponds to the value adjusted at the coding switches. The actual module no.<br />
corresponds to the value which is adjusted on the coding switches.<br />
1 - 4<br />
<strong>esd</strong> <strong>Protocol</strong> <strong>for</strong> <strong>CAN</strong> <strong>Modules</strong> Rev. 3.2
Combination 3<br />
Overview<br />
The third combination describes the condition of the module which occurs, e.g., if the position of the<br />
coding switches is changed from $00 to any other value.<br />
The I²C EEPROM module no. had been set by the local software (see combination 1) to $00. (The I²C<br />
EEPROM module no. can also be set to $00 by interchanging the parameter 'module no.')<br />
If the status of the I²C EEPROM data are correct, the module operates with the identifier on the <strong>CAN</strong>,<br />
in this combination, which is adjusted by the coding switches.<br />
The actual module no. corresponds to the value adjusted on the coding switches.<br />
Combination 4<br />
In this combination of the factors listed above, the module operates after a RESET with the previously<br />
changed and in the I²C EEPROM stored parameters.<br />
Requirements <strong>for</strong> this are a faultless CRC check of the I²C EEPROM data (I²C EEPROM status=OK),<br />
a coding switch position unequal $00 and a module no., stored in the I²C EEPROM, which has got a<br />
value unequal $00.<br />
The <strong>CAN</strong> identifier with which the module operates and all used parameters are taken from the I²C<br />
EEPROM.<br />
The actual module no. with which the module is selected in the initialisation phase corresponds to the<br />
module no. stored in the I²C EEPROM.<br />
<strong>esd</strong> <strong>Protocol</strong> <strong>for</strong> <strong>CAN</strong> <strong>Modules</strong> Rev. 3.2 1 - 5
Overview<br />
1.6 Calling the Commands and Setting the Parameters<br />
If an <strong>esd</strong>-<strong>CAN</strong> module is in original condition (default condition at delivery), it operates only by the<br />
<strong>CAN</strong> identifiers on the <strong>CAN</strong> (see hardware manual) adjusted by hardware.<br />
To report the initialisation parameters to the module nevertheless, a special <strong>CAN</strong> identifier (INIT Id)<br />
has been reserved which is the same <strong>for</strong> all <strong>esd</strong>-<strong>CAN</strong> modules.<br />
In spite of the identifier adjusted by the coding switches, the module receives and processes every <strong>CAN</strong><br />
frame transmitted on the INIT Id.<br />
The INIT Id determined by <strong>esd</strong> has got the value:<br />
1 - 6<br />
$700<br />
(valid since software version V0.8, subject to alterations)<br />
The identifier $700 is reserved <strong>for</strong> the initialisation, i.e., if this identifier should wrongly be allocated<br />
to other functions, the transmitted data will be interpreted as initialisation parameter, nevertheless!<br />
Generally not all modules should be initialized with the same parameters. To distinguish the modules<br />
the fourth byte of the six INIT Id bytes has to have the 'actual Module no.' of the wanted module at the<br />
initialisation.<br />
The module no. is a characteristic number in the area of $00...$FF which can be freely defined by the<br />
user. It is possible, e.g., to number all existing modules (max. 255 modules), independent from the<br />
type, continuously.<br />
In a <strong>CAN</strong> net the same module no. should only be used once. The module no. $00 should not be used,<br />
because it is used during the initialisation sequence with global commands, which are valid <strong>for</strong> all<br />
modules.<br />
The actual module no. is identical with the number adjusted at the coding switches, when the module<br />
is operated with the default parameters.<br />
But it is also possible to program the module no. freely during the initialisation.<br />
<strong>esd</strong> <strong>Protocol</strong> <strong>for</strong> <strong>CAN</strong> <strong>Modules</strong> Rev. 3.2
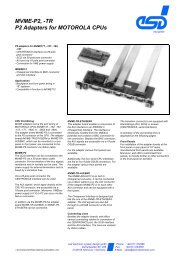
<strong>CAN</strong> Net<br />
CDO16 CDO16 CDIO16/8<br />
Default<br />
Parameters<br />
RxId:<br />
$210<br />
INIT Id:<br />
$700<br />
Module No.:<br />
$10<br />
Changed<br />
Parameters<br />
RxId:<br />
$1AA<br />
TxId:<br />
$258<br />
INIT Id:<br />
$700<br />
Module No.:<br />
$11<br />
Default<br />
Parameters<br />
RxId1:<br />
$090<br />
RxId2:<br />
$091<br />
....<br />
INIT Id:<br />
$700<br />
Module No.:<br />
$12<br />
CDI16<br />
Default<br />
Parameters<br />
TxId:<br />
$313<br />
INIT Id:<br />
$700<br />
Module No.:<br />
$13<br />
Fig. 1.6.1: Examples <strong>for</strong> the module no. and the <strong>CAN</strong> identifier<br />
Overview<br />
CAI812<br />
Default<br />
Parameters<br />
TxId1:<br />
$126<br />
TxId2:<br />
$127<br />
INIT Id:<br />
$700<br />
Module No.:<br />
$26<br />
6 bytes are necessary <strong>for</strong> the initialisation of a module. The transmitted structure has to have the correct<br />
length and the functions corresponding to the module type of board. If this is not the case, the module<br />
would not react to the initialisation.<br />
The table below shows the construction of the INIT Id. In the command byte and the sub command<br />
bytes the function of the respective initialisation level is determined. The module no. selects the wanted<br />
module. In the cells parameter 1 and 2 the wanted parameters are transmitted.<br />
Byte no. Function Value range<br />
1 Command $00...$FF<br />
2 Sub command 1 $00...$FF<br />
3 Sub command 2 1*) $00...$FF 1*)<br />
4 Module no. $00, $01...$FF<br />
5 Parameter 1 $00...$FF<br />
6 Parameter 2 $00...$FF<br />
7<br />
8<br />
Not used -<br />
(*) Byte 3 (sub command 2) is not needed <strong>for</strong> the majority of commands and parameters. In this case it should<br />
always be allocated with $00.<br />
Table 1.6.1: Data bytes of the INIT Id ($700)<br />
<strong>esd</strong> <strong>Protocol</strong> <strong>for</strong> <strong>CAN</strong> <strong>Modules</strong> Rev. 3.2 1 - 7
Overview<br />
The parameter interchange can lead to the setting of parameters, to the reply of already adjusted<br />
parameters or to the execution of a command. At the command interchange and the setting of<br />
parameters the highest bit of the command byte is always '1', at the request of parameters it is always<br />
'0'.<br />
The requested reply of the module is only sent once by the module. The identifier (CTxId) which had<br />
been allocated to the module <strong>for</strong> this transmission is not stored on the module. If another transmission<br />
is desired an INIT Id with the corresponding parameters has to be transmitted to the module again.<br />
If the module processes faultlessly and the <strong>CAN</strong> is free, it transmits the reply within 10msec.<br />
Normally, at the reply of the actual parameter condition of the modules, in the first byte the contents<br />
of the received command byte and in the second byte the contents of the sub command byte is given.<br />
This is not the case if the second byte is used <strong>for</strong> the display of other parameters or an unknown<br />
command or sub command byte had been sent to the module. In the second case a message containing<br />
only one byte with the contents $FF is given back to the <strong>CAN</strong>.<br />
The given value ranges of the parameters have to be kept, because otherwise the faultless<br />
execution of commands is not guaranteed! No error message occurs after wrong entry of the<br />
parameter values.<br />
Below the parameters and commands will be specified. The instructions are kept general, so that they<br />
apply to all <strong>esd</strong>-<strong>CAN</strong> modules which have the software versions from V1.4c. The examples added<br />
subsequently to the specification should clarify the function course further.<br />
The description of the bytes of the INIT Id restricts to those which are relevant <strong>for</strong> the corresponding<br />
mode.<br />
Byte 3 (sub command 2) should, if it is not needed, always be recorded with $00. In byte 4 the actual<br />
module no. has to be entered, as already mentioned above.<br />
1 - 8<br />
<strong>esd</strong> <strong>Protocol</strong> <strong>for</strong> <strong>CAN</strong> <strong>Modules</strong> Rev. 3.2
2. Overview of the Implemented Commands and Parameters<br />
Overview<br />
The two following tables give a complete summary of all bytes implemented until now and the parameters<br />
given back by the module. The individual designations of the commands and parameters will not be<br />
explained in detail in the tables in favour of the clarity. The descriptions of the used expressions can be taken<br />
from the following chapters in which the individual commands will be described.<br />
The value ranges of the parameters cover all possible entries which are evaluated correctly by the software.<br />
Here it has to be noted that partly special functions (e.g. 'function switched off') have been allocated to<br />
individual values of the parameters (e.g. $00). The allocation of values which are outside of the given limits<br />
is not permissible, because otherwise the perfect function of the addressed module will not be guaranteed<br />
anymore.<br />
2.1 Overview of the Commands<br />
Byte 1 Byte 2 Byte 3 Byte 4 Byte 5 Byte 6 Byte 7 Byte 8<br />
Command Sub-Command don't care Module No. Parameter 1 Parameter 2 not used not used<br />
Request<br />
Configuration<br />
$00<br />
$00 - Module Type<br />
$01 - Active Switch<br />
$02 - ASCII Id Please write selected Module No. CTxId These Bytes are not<br />
$03 - Software Rev. always $00. $01...$FF $0000...$07FF used.<br />
$04 - Module Time<br />
$05 - Serial No.<br />
Byte 1 Byte 2 Byte 3 Byte 4 Byte 5 Byte 6 Byte 7 Byte 8<br />
Command Sub-Command 1 Sub-Command 2 Module No. Parameter 1 Parameter 2 not used not used<br />
System selected Module No.<br />
$00 - Save Parameter -<br />
Parameter: $81 (= Byte 4)<br />
new Module No.<br />
$81 - set -<br />
$00...$FF<br />
$01 - Module No<br />
CTxId<br />
$01 - request<br />
$0000...$07FF<br />
> > ><br />
$81 - set cstat $00 -<br />
$01 - request<br />
$81 - set<br />
$01 - request<br />
$81 - set<br />
$01 - request<br />
$81 - set<br />
$01 - request<br />
$02 - <strong>CAN</strong>-Status- Please write selected Module No.<br />
Byte always $00. $01...$FF<br />
$03 - Bitrate<br />
$04 - Watchdog<br />
Tx Identifier<br />
$05 - Watchdog WDLife<br />
Time TimeFactor<br />
CTxId<br />
$0000...$07FF<br />
These Bytes are not<br />
used.<br />
bust 0 (=BTR0) (see bust 1 (=BTR1) (see<br />
? ? Controller-Manual) Controller-Manual) ?<br />
CTxId<br />
$0000...$07FF<br />
WTxId<br />
$0000...$07FF<br />
CTxId<br />
$0000...$07FF<br />
WDtime<br />
$0000...$FFFF [ms]<br />
CTxId<br />
$0000...$07FF<br />
<strong>esd</strong> <strong>Protocol</strong> <strong>for</strong> <strong>CAN</strong> <strong>Modules</strong> Rev. 3.2 2 - 1
2 - 2<br />
Overview<br />
Byte 1 Byte 2 Byte 3 Byte 4 Byte 5 Byte 6 Byte 7 Byte 8<br />
Command Sub-Command don't care Module No. Parameter 1 Parameter 2 not used not used<br />
TxIds $00 - TxId1<br />
TxId<br />
$82 - set $01 - TxId2<br />
Please write selected Module No. $0000...$07FF<br />
These Bytes are not<br />
$02 - TxId3<br />
always $00. $01...$FF<br />
:<br />
CTxId<br />
used.<br />
$02 - request<br />
n - TxId(n+1)<br />
$0000...$07FF<br />
Byte 1 Byte 2 Byte 3 Byte 4 Byte 5 Byte 6 Byte 7 Byte 8<br />
Command Sub-Command don't care Module No. Parameter 1 Parameter 2 not used not used<br />
RxIds $00 - RxId1<br />
RxId<br />
$83 - set $01 - RxId2<br />
Please write selected Module No.<br />
$0000...$07FF<br />
$02 - RxId3<br />
always $00. $01...$FF<br />
:<br />
CTxId<br />
$03 - request<br />
n - RxId(n+1)<br />
$0000...$07FF<br />
These Bytes are not<br />
used.<br />
Byte 1 Byte 2 Byte 3 Byte 4 Byte 5 Byte 6 Byte 7 Byte 8<br />
Command Sub-Command don't care Module No. Parameter 1 Parameter 2 not used not used<br />
Tx-Activate-<br />
Time<br />
$84 - set<br />
$04 - request<br />
$00 - act.-T. TxId1<br />
$01 - act.-T. TxId2<br />
$02 - act.-T. TxId3<br />
:<br />
n - act.-T. TxId(n+1)<br />
Please write selected Module No.<br />
tx_act<br />
$0000...$FFFF [ms]<br />
These Bytes are not<br />
always $00. $01...$FF<br />
CTxId<br />
$0000...$07FF<br />
used.<br />
Byte 1 Byte 2 Byte 3 Byte 4 Byte 5 Byte 6 Byte 7 Byte 8<br />
Command Sub-Command 1 Sub-Command 2 Module No. Parameter 1 Parameter 2 not used not used<br />
Module Memory/<br />
$00- RAM<br />
Controller Ports $01- XRAM<br />
data<br />
Memory Address<br />
-<br />
$85 - set<br />
$02...$09-<br />
$00...$FF<br />
or Port Select selected Module No. These Bytes are not<br />
EEPROM<br />
$01...$FF used.<br />
$7F - µC-Ports<br />
$00...$FF<br />
CTxId<br />
$05 - request<br />
$8F...$FF-<br />
$0000...$07FF<br />
reserved<br />
Byte 1 Byte 2 Byte 3 Byte 4 Byte 5 Byte 6 Byte 7 Byte 8<br />
Command Sub-Command don't care Module No. Parameter 1 Parameter 2 not used not used<br />
User Parameter Para<br />
$86 - set User Parameter No. Please write selected Module No. $0000...$FFFF<br />
These Bytes are not<br />
$06 - request<br />
$00...$7F always $00. $01...$FF CTxId<br />
$0000...$07FF<br />
used.<br />
Byte 1 Byte 2 Byte 3 Byte 4 Byte 5 Byte 6 Byte 7 Byte 8<br />
Command Sub-Command don't care Module No. Parameter 1 Parameter 2 not used not used<br />
rxmode<br />
Rx Block Mode<br />
$87 - set<br />
$07 - request<br />
$00 - Block 1<br />
$01 - Block 2<br />
$02 - Block 3<br />
:<br />
n - Block (n+1)<br />
Please write<br />
always $00.<br />
selected Module No.<br />
$01...$FF<br />
$00 - normal Rx<br />
-<br />
$01 - Rx Block<br />
Mode active<br />
CTxId<br />
$0000...$07FF<br />
These Bytes are not<br />
used.<br />
<strong>esd</strong> <strong>Protocol</strong> <strong>for</strong> <strong>CAN</strong> <strong>Modules</strong> Rev. 3.2
Overview<br />
Byte 1 Byte 2 Byte 3 Byte 4 Byte 5 Byte 6 Byte 7 Byte 8<br />
Command Sub-Command 1 Sub-Command 2 Module No. Parameter 1 Parameter 2 not used not used<br />
Pin Name<br />
$88 - set $00 - Pin 1 $00-Byte 0<br />
Byte Name<br />
-<br />
(don't use!) $01 - Pin 2 $01-Byte 1 selected Module No. $00...$FF<br />
These Bytes are not<br />
... ... $01...$FF used.<br />
$08 - request $FF - Pin 256 $17-Byte 23<br />
CTxId<br />
(don't use!) $0000...$07FF<br />
Byte 1 Byte 2 Byte 3 Byte 4 Byte 5 Byte 6 Byte 7 Byte 8<br />
Command Sub-Command 1 Sub-Command 2 Module No. Parameter 1 Parameter 2 not used not used<br />
External Memory<br />
Memory Data<br />
$89 - set Memory Address Memory Address<br />
-<br />
(don't use!)<br />
selected Module No. $00...$FF<br />
These Bytes are not<br />
Low High<br />
$01...$FF used.<br />
$00...$FF $00...$FF<br />
CTxId<br />
$09 - request<br />
$0000...$07FF<br />
Byte 1 Byte 2 Byte 3 Byte 4 Byte 5 Byte 6 Byte 7 Byte 8<br />
Command Sub-Command 1 Sub-Command 2 Module No. Parameter 1 Parameter 2 Parameter 3 Parameter 4<br />
Extended<br />
Memory<br />
$8A - set<br />
(don't use!)<br />
$0A - request<br />
Memory Address<br />
Low<br />
$00...$FF<br />
Memory Address<br />
High<br />
$00...$FF<br />
selected Module No.<br />
$01...$FF<br />
data(addr) data(addr+1)<br />
$00...$FF $00...$FF<br />
CTxId<br />
$0000...$07FF<br />
data(addr+2) data(addr+3)<br />
$00...$FF $00...$FF<br />
These Bytes are not used.<br />
Byte 1 Byte 2 Byte 3 Byte 4 Byte 5 Byte 6 Byte 7 Byte 8<br />
Command Sub-Command 1 Sub-Command 2 Module No. Parameter 1 Parameter 2 Parameter 3 Parameter 4<br />
Memory Address Memory Address<br />
Programm Code Low High<br />
$0B - request $00...$FF $00...$FF<br />
selected Module No. CTxId<br />
$01...$FF $0000...$07FF These Bytes are not used.<br />
Byte 1 Byte 2 Byte 3 Byte 4 Byte 5 Byte 6 Byte 7 Byte 8<br />
Command Sub-Command 1 Sub-Command 2 Module No. Parameter 1 Parameter 2 not used not used<br />
Service Request Module No_LOW Module No_HIGH Please write always CTxId These Bytes are not<br />
$7F $00...$FF $00...$FF $00. $0000...$07FF used.<br />
Byte 1 Byte 2 Byte 3 Byte 4 Byte 5 Byte 6 Byte 7 Byte 8<br />
Command Sub-Command not used Module No. Parameter 1 Parameter 2 Parameter 3 Parameter 4<br />
Set Module Time Please write<br />
absolute always $00.<br />
$FD<br />
Please write selected Module No. absolute_time<br />
always $00. $00...$FF $00000000...$05265BFF [ms]<br />
<strong>esd</strong> <strong>Protocol</strong> <strong>for</strong> <strong>CAN</strong> <strong>Modules</strong> Rev. 3.2 2 - 3
2 - 4<br />
Overview<br />
Byte 1 Byte 2 Byte 3 Byte 4 Byte 5 Byte 6 Byte 7 Byte 8<br />
Command Sub-Command not used Module No. Parameter 1 Parameter 2 Parameter 3 Parameter 4<br />
Sync. Module Please write Please write selected Module No. sync_time_master<br />
$FE always $00. always $00. $00...$FF $000000000...$FFFFFFFF<br />
Byte 1 Byte 2 Byte 3 Byte 4 Byte 5 Byte 6 Byte 7 Byte 8<br />
Command Sub-Command don't care Module No. Parameter 1 Parameter 2 not used not used<br />
Supervisor<br />
Commands<br />
$FF<br />
$00 - RESET<br />
Module<br />
$AAAA - RESET<br />
$01 - reserved -<br />
$02 - Supervisor<br />
Watchdog<br />
$03 - Default<br />
RESET<br />
$04 - Suspend/<br />
Continue<br />
Module<br />
$05 - RESET<br />
<strong>CAN</strong>-Status<br />
$00 - all <strong>Modules</strong><br />
-<br />
Please write These Bytes are not<br />
always $00. $01...$FF - selected<br />
Module<br />
$AAAA - Default-Reset<br />
used.<br />
$5A5A - suspend<br />
$A5A5 - continue<br />
-<br />
<strong>esd</strong> <strong>Protocol</strong> <strong>for</strong> <strong>CAN</strong> <strong>Modules</strong> Rev. 3.2
2.2 Overview of the Returned Parameter Values<br />
Command: Sub-<br />
Request... Command<br />
Configuration<br />
$00<br />
$00-Module<br />
Type<br />
$01-Active<br />
Switch<br />
Overview<br />
Byte 1 Byte 2 Byte 3 Byte 4 Byte 5 Byte 6 Byte 7 Byte 8<br />
$00 $00 type iomode - - - -<br />
$00 $01 switch - - - - -<br />
$02- ASCII Module No.- Module No.-<br />
$00 a (ASCII) b (ASCII) c (ASCII) d (ASCII) e (ASCII)<br />
Id H (ASCII) L (ASCII)<br />
$03-<br />
Software $00 'V' in ASCII level H '.' in ASCII level L revision <strong>esd</strong>/cms<br />
Revision<br />
$04- Module<br />
Time<br />
$05- Serial<br />
No.<br />
Command: Sub-<br />
Request... Command<br />
System<br />
Parameter:<br />
$01<br />
$00 $04 ˛time module_time<br />
protocolrevision<br />
$00 $05 u (ASCII) v (ASCII) w (ASCII) x (ASCII) y (ASCII) z (ASCII)<br />
Byte 1 Byte 2 Byte 3 Byte 4 Byte 5 Byte 6 Byte 7 Byte 8<br />
$00-Saved saved<br />
$01 $00 - - - - -<br />
Module No. Module No.<br />
$01-Active active<br />
$01 $01 - - - - -<br />
Module No. Module No.<br />
$02 - <strong>CAN</strong>-<br />
Status Byte<br />
$03 - Saved<br />
Bitrate<br />
$04 -<br />
WD-Tx-Id<br />
$01 $02 cstat constat - - - -<br />
$01 $03 bust 0 bust 1 - - - -<br />
$01 $04 WTxId - - - -<br />
$05 - WDLifeTime<br />
$01 $05 WDtime [ms] - - -<br />
WD-Time Factor<br />
Command: Sub-<br />
Request... Command<br />
TxIds<br />
$02<br />
Command: Sub-<br />
Request... Command<br />
RxIds<br />
$03<br />
Byte 1 Byte 2 Byte 3 Byte 4 Byte 5 Byte 6 Byte 7 Byte 8<br />
$00-TxId1 $02 $00 TxId1 - - - -<br />
$01-TxId2 $02 $01 TxId2 - - - -<br />
$02-TxId3 $02 $02 TxId3 - - - -<br />
: $02 : : - - - -<br />
n -TxId(n+1) $02 n TxId(n+1) - - - -<br />
Byte 1 Byte 2 Byte 3 Byte 4 Byte 5 Byte 6 Byte 7 Byte 8<br />
$00-RxId1 $03 $00 RxId1S RxId1E - -<br />
$01-RxId2 $03 $01 RxId2S RxId2E - -<br />
$02-RxId3 $03 $02 RxId3S RxId3E - -<br />
: $03 : : : - -<br />
n -RxId(n+1) $03 n RxId(n+1)S RxId(n+1)E - -<br />
<strong>esd</strong> <strong>Protocol</strong> <strong>for</strong> <strong>CAN</strong> <strong>Modules</strong> Rev. 3.2 2 - 5
2 - 6<br />
Overview<br />
Command: Sub-<br />
Request... Command<br />
Byte 1 Byte 2 Byte 3 Byte 4 Byte 5 Byte 6 Byte 7 Byte 8<br />
$00- Time TxId1 $04 $00 tx-act1 [ms] - - - -<br />
Tx Activate<br />
$01- Time TxId2 $04 $01 tx-act2 [ms] - - - -<br />
Time $02- Time TxId3 $04 $02 tx-act3 [ms] - - - -<br />
$04<br />
: $04 : : - - - -<br />
Command: Sub-<br />
Request... Command<br />
Module<br />
Memory/<br />
Controller-<br />
Ports<br />
$05<br />
Command: Sub-<br />
Request... Command<br />
User<br />
Parameter<br />
$06<br />
n-Time TxId(n+1) $04 n tx-act(n+1) - - - -<br />
Byte 1 Byte 2 Byte 3 Byte 4 Byte 5 Byte 6 Byte 7 Byte 8<br />
$00data<br />
00/<br />
Addr. 00/ $05 $00 - - - - -<br />
Port P0.0...P0.7<br />
Port P0.x<br />
$01data<br />
01/<br />
Addr. 01/ $05 $01 - - - - -<br />
Port P1.0...P1.7<br />
Port P1.x<br />
Command: Sub-<br />
Request... Command<br />
... $05 ... ... - - - - -<br />
$FF-Addr.FF $05 $FF data FF - - - - -<br />
Byte 1 Byte 2 Byte 3 Byte 4 Byte 5 Byte 6 Byte 7 Byte 8<br />
$00-Para 0 $06 $00 Para0 - - - -<br />
$01-Para 1 $06 $01 Para1 - - - -<br />
... $06 ... ... - - - -<br />
$7F-Para127 $06 $7F Para7F - - - -<br />
Byte 1 Byte 2 Byte 3 Byte 4 Byte 5 Byte 6 Byte 7 Byte 8<br />
$00-Block 1 $07 $00 rxmode 1 - - - - -<br />
Rx Block<br />
$01-Block 2 $07 $01 rxmode 2 - - - - -<br />
Mode $02-Block 3 $07 $02 rxmode 3 - - - - -<br />
$07<br />
: $07 : : - - - - -<br />
Command: Sub-<br />
Request... Command<br />
Pin Name<br />
$08<br />
(don't use!)<br />
n-Block (n+1) $07 n rxmode(n+1) - - - - -<br />
Byte 1 Byte 2 Byte 3 Byte 4 Byte 5 Byte 6 Byte 7 Byte 8<br />
selected Byte<br />
$00-Pin 1 $08 $00 - - - - -<br />
of Pin 1<br />
selected Byte<br />
$01-Pin 2 $08 $01 - - - - -<br />
of Pin 2<br />
... $08 ... ... - - - - -<br />
$FF-Pin 256 $08 $FF - - - - -<br />
selected Byte<br />
of Pin 256<br />
<strong>esd</strong> <strong>Protocol</strong> <strong>for</strong> <strong>CAN</strong> <strong>Modules</strong> Rev. 3.2
Command: Sub-<br />
Request... Command<br />
External<br />
Memory<br />
$09<br />
$00-<br />
Addr. 00<br />
$01-<br />
Addr. 01<br />
Overview<br />
Byte 1 Byte 2 Byte 3 Byte 4 Byte 5 Byte 6 Byte 7 Byte 8<br />
$09 $00 data 00 - - - - -<br />
$09 $01 data 01 - - - - -<br />
... $09 ... ... - - - - -<br />
$FF-<br />
Addr. FF<br />
Command: Sub-<br />
Request... Command<br />
Extended<br />
Memory<br />
$0A<br />
$00-<br />
Addr. 00<br />
$04-<br />
Addr. 04<br />
$09 $FF data FF - - - - -<br />
Byte 1 Byte 2 Byte 3 Byte 4 Byte 5 Byte 6 Byte 7 Byte 8<br />
$0A $00 data 00 data 01 data 02 data 03 - -<br />
$0A $01 data 04 data 05 data 06 data 07 - -<br />
... $0A ... ... ... ... ... - -<br />
$FC-<br />
Addr. FC<br />
Command: Sub-<br />
Request... Command<br />
Programm<br />
Code<br />
$0B<br />
$00-<br />
Addr. 00<br />
$04-<br />
Addr. 04<br />
$0A $FC data FC data FD data FE data FF - -<br />
Byte 1 Byte 2 Byte 3 Byte 4 Byte 5 Byte 6 Byte 7 Byte 8<br />
$0B $00 code 00 code 01 code 02 code 03 - -<br />
$0B $01 code 04 code 05 code 06 code 07 - -<br />
... $0B ... ... ... ... ... - -<br />
$FC-<br />
Addr. FC<br />
$0B $FC code FC code FD code FE code FF - -<br />
(-) This Byte is not transmitted.<br />
<strong>esd</strong> <strong>Protocol</strong> <strong>for</strong> <strong>CAN</strong> <strong>Modules</strong> Rev. 3.2 2 - 7
2 - 8<br />
<strong>esd</strong> <strong>Protocol</strong> <strong>for</strong> <strong>CAN</strong> <strong>Modules</strong> Rev. 3.2
Commands and Parameters<br />
3. Description of the Individual Commands and Parameters<br />
3.1 Configuration Reply<br />
The transmission is called by transmitting a 'request configuration' command. The identifier on<br />
which the module should transmit the in<strong>for</strong>mation on the <strong>CAN</strong> is reported to it by byte 5 and 6.<br />
Contrary to the other commands only parameters are called with this command.<br />
Byte 1 Byte 2 Byte 3 Byte 4 Byte 5 Byte 6<br />
Function Command Sub command Not used Module no. Parameter 1 Parameter 2<br />
Always Selected<br />
Value $00 $00...$05 write module no.<br />
$00 $01...$FF<br />
Table 3.1.1: Bytes of the command 'request configuration'<br />
Explanation of the Bytes Transmitted to the Module:<br />
CTxId<br />
$0000...$07FF<br />
Command... The command 'request configuration' requests the transmission of the actual<br />
parameters of the module.<br />
Sub command... The sub command determines the configuration bytes which should reply:<br />
Sub<br />
command<br />
Reply of the parameters<br />
$00 Module type<br />
$01 Active switch<br />
$02 ASCII Id<br />
$03 Software rev.<br />
$04 local module time<br />
$05 serial number<br />
Table 3.1.2: Selection of the configuration reply by sub command<br />
Parameter 1 and 2... With these parameters it is reported to the module to which <strong>CAN</strong> Id. it should<br />
transmit the requested reply.<br />
The module does only transmit once on this identifier. The identifier is not<br />
stored on the module.<br />
If another transmission is desired another INIT Id with the corresponding<br />
parameters has to be transmitted to the module.<br />
<strong>esd</strong> <strong>Protocol</strong> <strong>for</strong> <strong>CAN</strong> <strong>Modules</strong> Rev. 3.2 3 - 1
Commands and Parameters<br />
Transmission of the adjusted configuration by the module:<br />
Decisive <strong>for</strong> the selection of the message to be transmitted is the value of the sub command received<br />
by the module. The following table shows the in<strong>for</strong>mation which is transmitted to the <strong>CAN</strong> by the<br />
module.<br />
Sub Reply of the<br />
command parameter<br />
3 - 2<br />
Byte 1 Byte 2 Byte 3 Byte 4 Byte 5 Byte 6 Byte 7 Byte 8<br />
$00 Module type $00 $00 type iomode - - - -<br />
$01 Active switch $00 $01 switch - - - - -<br />
$02 ASCII Id $00 a b c d e<br />
Mod No Mod No<br />
ASCIIH ASCIIL<br />
'V' '.'<br />
$03 Software rev. $00 level H level L rev. <strong>esd</strong>/cms prot-rev<br />
ASCII ASCII<br />
Local module<br />
$04 $00 $04 ˛time module_time<br />
time<br />
Serial number<br />
$05 $00 $05 u v w x y z<br />
(*)<br />
(-) Byte is not transmitted.<br />
(*) No support at the moment.<br />
Table 3.1.3: Transmitting the adjusted configuration<br />
Explanation of the bytes transmitted by the module:<br />
Sub command $00 --< module type<br />
Byte 1... The first byte replies the contents of the received command byte (here always<br />
$00).<br />
Byte 2... The second byte replies the contents of the received sub command (here<br />
always $00).<br />
Byte 3:<br />
type... In this cell the type of the <strong>esd</strong>-<strong>CAN</strong> module is coded. The following table shows<br />
examples of the existing type designations:<br />
<strong>esd</strong> <strong>Protocol</strong> <strong>for</strong> <strong>CAN</strong> <strong>Modules</strong> Rev. 3.2
type<br />
<strong>Modules</strong><br />
(examples)<br />
$00 reserved<br />
$01 CDO16<br />
$02 CDI16<br />
$03 CAI810<br />
$04 CAO812<br />
$05 CDIO16/16<br />
$06 CAI812<br />
$07 reserved<br />
$08 CREL8<br />
$09 CSC595<br />
$0A CPIO16/8<br />
$0B CCOM4<br />
$0C CCOM1<br />
$0D PTIDAC<br />
$0E SPS16<br />
$0F CMIO<br />
$10 reserved<br />
$11 CTERM<br />
$12 CBIP<br />
$13 <strong>CAN</strong>SAT<br />
$14 AIS16<br />
$15 CI488<br />
$16 <strong>CAN</strong>-PT100/DMS4<br />
$17 CDMS4I<br />
$18 <strong>CAN</strong>-PCC<br />
$19 CCOM1<br />
$1A XMIO4<br />
$1B reserved<br />
: :<br />
$1F reserved<br />
$20 LasCon I/O<br />
: :<br />
$FE reserved<br />
$FF reserved<br />
Table 3.1.4 Examples <strong>for</strong> module type designations<br />
Commands and Parameters<br />
<strong>esd</strong> <strong>Protocol</strong> <strong>for</strong> <strong>CAN</strong> <strong>Modules</strong> Rev. 3.2 3 - 3
Commands and Parameters<br />
Byte 4:<br />
iomode... The byte 'iomode' contains, broken down into 6 bits, in<strong>for</strong>mation about the<br />
operating mode of the addressed module. A '1' of the respective bit signalizes<br />
the operating mode possible <strong>for</strong> this module:<br />
3 - 4<br />
Bit Function Example: CMIO<br />
0 Output 1<br />
1 Input 1<br />
2 Digital 1<br />
3 Analog 1<br />
4 Controller 0<br />
5 Serial 0<br />
6 Reserved 1*) 0<br />
7 Reserved 1*) 0<br />
1*) These bits are read as '0'.<br />
Sub command $01 --< active switch<br />
Table 3.1.5: Bits in parameter 'iomode'<br />
Example: At a CMIO module the value $0F would be replied <strong>for</strong><br />
'iomode'.<br />
Byte1,<br />
Byte2... See sub command $00.<br />
Byte 3:<br />
switch... The byte 'switch' replies the number adjusted on the coding switches.<br />
If the module no. filed in the EEPROM has got the value $00 or if the<br />
EEPROM data are not OK, the actual module no. by which the module is<br />
addressed during the initialisation corresponds to this coding switch number.<br />
<strong>esd</strong> <strong>Protocol</strong> <strong>for</strong> <strong>CAN</strong> <strong>Modules</strong> Rev. 3.2
Sub command $02 --< ASCII Id<br />
Byte 1... See sub command $00.<br />
Byte 2 - Byte 6<br />
a, b, c, d, e... These bytes describe the module type in ASCII code.<br />
Commands and Parameters<br />
Byte 7, Byte 8:<br />
mod no. ASCII... These two bytes describe the module name and the active module number in<br />
ASCII code. The following table gives an example <strong>for</strong> the display of these<br />
bytes in ASCII code. It is a CMIO module with the module no. $99.<br />
Byte 2 3 4 5 6 7 8<br />
Parameter a b c d e Module no. H Module no. L<br />
ASCII Id<br />
CMIO<br />
Sub command $03 --< software revision<br />
M I O 4 2 9 9<br />
Table 3.1.6: Example <strong>for</strong> an ASCII Id<br />
(CMIO module with module no. $99)<br />
Byte 1... See sub command $00.<br />
Byte 2 - Byte 5<br />
'V', level,<br />
'.', rev.... In ASCII code these bytes describe the revision number of the firmware of<br />
the <strong>CAN</strong> core used on the module.<br />
Byte 2 and byte 4 are permanently allocated with the ASCII symbols 'V'($56)<br />
or '.'($2E).<br />
In byte 3 and byte 5 the actual revision number is described.<br />
Byte 6 contains a letter which stands <strong>for</strong> the revision of the module-specific<br />
firmware.<br />
In byte 7 is returned, which protocol is implemented (<strong>esd</strong> <strong>CAN</strong> protocol or<br />
CMS protocol). An 'e' means, that the <strong>esd</strong> <strong>CAN</strong> protocol is implemented and<br />
a 'c' means, that the CMS protocol is implemented.<br />
Byte 8 returns the actual revision number of the used protocol (e.g. of the <strong>esd</strong><br />
<strong>CAN</strong> protocol).<br />
<strong>esd</strong> <strong>Protocol</strong> <strong>for</strong> <strong>CAN</strong> <strong>Modules</strong> Rev. 3.2 3 - 5
3 - 6<br />
Commands and Parameters<br />
Byte 2 3 4 5 6 7 8<br />
Parameter 'V' level H '.' level L rev. <strong>esd</strong>/cms prot-rev<br />
ASCII<br />
display<br />
Sub command $04 --< local module time<br />
V 1 . 7 e e 7<br />
Table 3.1.7: Example <strong>for</strong> the ASCII software rev no. 'V1.7ee7'<br />
At the <strong>esd</strong> <strong>CAN</strong> modules a 32-bits counter is working, that runs with microsecond steps. The<br />
counter is reset to ‘0’ with every power-on. If the absolute module time will not be triggered with<br />
the command ‘Set absolute module time’ ($FD), the counter counts up to $FFFFFFFF. The setting<br />
of the absolute module time sets the local clock and sets additionally the overflow value of the<br />
counter to 24 h, e.g. $05265BFF.<br />
A synchronisation with the time of the <strong>CAN</strong> master is possible using the supervisor command $FE.<br />
The supervisor commands are described in a following chapter in detail.<br />
With the request configuration command $00 with the sub command $04, that is described here the<br />
time difference between the master time and the module time can be requested:<br />
Byte 1, Byte 2 ... refer to sub command $00.<br />
Byte 3, Byte 4 -<br />
'˛time'... Time difference between <strong>CAN</strong> master and <strong>CAN</strong> module as 16-bits value in<br />
milliseconds. If no synchronisation happens, always '0000' is returned.<br />
Byte 5...8<br />
'module_time'... Absolute module time as a 32-bits value in milliseconds<br />
Value range (after clock setting by command $FD):<br />
0 ... 86 400 000 ms (24 h)<br />
(0 ... $ 05 26 5B FF)<br />
Sub-Command $05 --< serial-number<br />
Byte 1, Byte 2 ... refer to sub command $00.<br />
Byte 3...8 ... serial number of the <strong>CAN</strong> module.<br />
This function is not supported at the moment.<br />
<strong>esd</strong> <strong>Protocol</strong> <strong>for</strong> <strong>CAN</strong> <strong>Modules</strong> Rev. 3.2
3.2 System Parameters<br />
Commands and Parameters<br />
With the command $81 the parameters described below are set. By command $01 and the according<br />
sub command the module is lead to reply the actual parameters.<br />
If the command 'store parameter' (sub command $00) is transmitted to the module, all previously<br />
interchanged parameters are stored in the local I²C EEPROM.<br />
If the module is reset (RESET) or the supply voltage is switched off, the entered parameters are lost<br />
if this command has not been entered be<strong>for</strong>e.<br />
After a RESET command or a power-on RESET the module operates with the stored parameters<br />
(identifiers etc.). If the programming has been unsuccessful (e.g. no I²C EEPROM or defect) the<br />
module uses the standard parameters (e.g. identifier =< coding switches).<br />
The module no. with which the module is selected at the parameter interchange corresponds to the<br />
adjustment of the coding switches (provided no modification had been made so far). By the sub<br />
command $01 it is possible to allocate another module no. to the module. The new number is active<br />
immediately after the setting and the number adjusted by the coding switches is ignored.<br />
The <strong>CAN</strong>-status byte offers various in<strong>for</strong>mation about the condition of the module: It is shown if<br />
the module had previously not been connected to the <strong>CAN</strong>, if the default parameters had been<br />
activated after a RESET, if the last RESET had been caused by a power-on cycle, etc.<br />
By the sub command $03 it is possible to change the <strong>CAN</strong> bitrate of the module which was adjusted<br />
by the configuration jumper of the module. The new bitrate is only activated after the parameters<br />
have been stored by sub command $00Command and a RESET has been triggered.<br />
Between the modules and a supervisor (master) a mutual function control by a watchdog protocol<br />
similar to the CMS specification can occur. By the sub commands $04 and $05 it is possible to<br />
interchange a watchdog identifier and a watchdog time.<br />
<strong>esd</strong> <strong>Protocol</strong> <strong>for</strong> <strong>CAN</strong> <strong>Modules</strong> Rev. 3.2 3 - 7
3 - 8<br />
Commands and Parameters<br />
Byte 1 Byte 2 Byte 3 Byte 4 Byte 5 Byte 6<br />
Function Command Sub command Not used Module no. Parameter 1 Parameter 2<br />
Request: $01 $00...$03<br />
$01 module no. Always<br />
allocate $00<br />
Selected<br />
module no.<br />
new mod no. -<br />
Value $02 status $01..$FF cstat -<br />
Set: $81<br />
= active<br />
module no.<br />
CTxId<br />
$0000...$07FF<br />
active mod<br />
$00 store parameter -<br />
no.<br />
$03 bitrate bust 0 bust 1<br />
$04 watchdog Id<br />
WDLife<br />
$05 watchdog time TimeFactor<br />
$00...$FF<br />
WTxId<br />
$0000...$07FF<br />
WDtime<br />
$0000...$FFFF<br />
Table 3.2.1: Bytes of the commands 'store parameter, module no., bitrate and watchdog'<br />
Setting the Commands and Parameters (Command $81):<br />
Command... The command $81 leads to the setting of parameters or to the activation of<br />
the commands.<br />
The command $01 leads to the reply of the actual parameters.<br />
Sub command... The sub command selects the desired parameter interchange or the command<br />
to be executed.<br />
Parameter1,<br />
Parameter2 Following sub commands are implemented:<br />
Sub command Function<br />
$00 Storing the actual parameter<br />
$01 Setting a new module no.<br />
$02 Setting the <strong>CAN</strong>-status byte<br />
$03 Setting a new bitrate<br />
$04 Setting the watchdog Tx identifier<br />
$05 Setting the watchdog time<br />
Table 3.2.2: Function of the sub commands<br />
<strong>esd</strong> <strong>Protocol</strong> <strong>for</strong> <strong>CAN</strong> <strong>Modules</strong> Rev. 3.2
Sub command $00 --< store parameter<br />
Commands and Parameters<br />
The kind of the parameters interchanged to the module depends on the<br />
selected sub command:<br />
active<br />
mod. no... To store all interchanged parameters (also those of other commands) the<br />
actual module no. has to be entered into byte 5 when calling this sub<br />
command.<br />
The actual module no. is either the number adjusted by the coding switches<br />
(default parameter active) or the number changed by sub command 'set<br />
module no.'.<br />
Sub command $01 --< set module no.<br />
new. mod. no.. Here the desired new module no. is entered. The module is addressed<br />
immediately after this command by the new module no. The module no.<br />
adjusted by the coding switches is ignored.<br />
If the new module no. should remain active after a RESET, the parameters<br />
have to be stored by the sub command 'store parameters' be<strong>for</strong>e a power down<br />
or a RESET.<br />
Sub command $02 --< set <strong>CAN</strong>-status byte<br />
cstat... A 'set' access onto the <strong>CAN</strong>-status byte sets the bits 2 and 7 of the byte to '0'.<br />
All other bits of the status byte remain unchanged, because they serve as read<br />
only in<strong>for</strong>mation (see also 'requesting the actual parameters').<br />
Bit 2 shows that a <strong>CAN</strong> error has been detected by the module. The bit serves<br />
the documentation of errors which do not cause a 'standstill' <strong>for</strong> the <strong>CAN</strong>, but<br />
remain only <strong>for</strong> a short period. Error arising <strong>for</strong> a short time can easily be<br />
overlooked, because they make themselves visible only by a temporal limited<br />
flashing of the status LED.<br />
The bit is set to '1' when an error has been detected. A 'set' access with any<br />
data (recommended: byte 5 = $00) onto the status byte or each RESET reset<br />
the bit back to '0'.<br />
The <strong>CAN</strong>-error bit can also be reset by the supervisor command 'reset <strong>CAN</strong><br />
error' (sub command $05). The other bits remain unchanged by this<br />
command.<br />
<strong>esd</strong> <strong>Protocol</strong> <strong>for</strong> <strong>CAN</strong> <strong>Modules</strong> Rev. 3.2 3 - 9
Commands and Parameters<br />
Sub command $03 --< set bitrate<br />
3 - 10<br />
Notes on the internal management of the <strong>CAN</strong>-error bit:<br />
The <strong>CAN</strong>-error bit is set by the local software if the status bit of the<br />
<strong>CAN</strong> controller 'error status' is activated. (see constat).<br />
After the first recognition of a <strong>CAN</strong> error the controller at first tries to<br />
transmit or receive data repeatedly. If it recognizes after several<br />
attempts that the error does not occur anymore, it does not take back<br />
its error bit at once. First further successful transmissions have to take<br />
place to count back the internal error counter again. Supervised Tx<br />
transfers which are addressed to other modules are also counted as<br />
successful transmissions. But if only one module and one <strong>CAN</strong><br />
master are installed on the bus, the master possibly has to transmit<br />
some messages first to reset the error counter and there<strong>for</strong>e reset the<br />
controller status bit.<br />
There<strong>for</strong>e it is possible that the <strong>CAN</strong>-error bit of the <strong>CAN</strong>-status byte<br />
is still active after only one reset, because the error bit of the<br />
controller is still active.<br />
Bit 7 of the byte has got the designation 'new on bus' and shows if the module<br />
processes <strong>for</strong> the first time on the <strong>CAN</strong>:<br />
A <strong>CAN</strong> master is able to evaluate and set the bit to zero to document on the<br />
module that it noted the presence of the module on the <strong>CAN</strong>. If the bit has got<br />
the value '1' at the reading, in this application of the bit the module had not<br />
been found by a master so far after the last RESET.<br />
A 'set' access with any data (recommended: byte 5 = $00) onto the status byte<br />
sets the bit onto '0'.<br />
bust0, bust1.. These two bytes set the contents of the registers BTR0 and BTR1 of the <strong>CAN</strong><br />
controller 8xC592/82C200 which determine the bitrate of the <strong>CAN</strong> interface.<br />
An allocation of the register contents to the bit rates can be taken from the<br />
table below.<br />
Contrary to the other commands this parameters only become active after the<br />
actual parameter set was stored in the EEPROM (store parameters) and a<br />
RESET was triggered on the module.<br />
<strong>esd</strong> <strong>Protocol</strong> <strong>for</strong> <strong>CAN</strong> <strong>Modules</strong> Rev. 3.2
Commands and Parameters<br />
If no communication is possible with the module, this is often due to a wrong<br />
adjustment of the bitrate.<br />
If the local software discovers a malfunction on the <strong>CAN</strong>, the bitrate is<br />
adjusted again to the default value (adjustment at the configuration jumper of<br />
the module), but without changing the other parameters.<br />
The specified typical line lengths base on experimental values from<br />
experience. The minimum reachable line lengths result from the 'worst case'<br />
delay times of the used components.<br />
<strong>CAN</strong> controller<br />
register Bit rate<br />
BTR0 BTR1<br />
[HEX] [HEX]<br />
[kBit/s]<br />
Typical values of Minimum values<br />
the reachable line of the reachable<br />
length l [m] line length l [m]<br />
max min<br />
00 14 1000 37 20<br />
00 16 800 59 42<br />
00 18 666.6 80 65<br />
00 1C 500 130 110<br />
01 18 333.3 180 160<br />
01 1C 250 270 250<br />
02 1C 166 420 400<br />
03 1C 125 570 550<br />
04 1C 100 710 700<br />
45 2F 66.6 1000 980<br />
09 1C 50 1400 1400<br />
4B 2F 33.3 2000 2000<br />
18 1C 20 3600 3600<br />
5F 2F 12.5 5400 5400<br />
31 1C 10 7300 7300<br />
The specifications in the table base on the limit values of the bit timing of the<br />
<strong>CAN</strong> protocol, the runtime of the local <strong>CAN</strong> interface and the runtime of the<br />
cable. The runtime of the cable is assumed with about 5.5 ns/m. Further<br />
influences, e.g., by the terminal resistances, the specific resistance, the geometry<br />
of the cable of outer interference effects at the transmission have not been<br />
included in the specifications!<br />
Table 3.2.3: Allocation of the bitrate to the registers of the controller<br />
8xC592 or 82C200<br />
<strong>esd</strong> <strong>Protocol</strong> <strong>for</strong> <strong>CAN</strong> <strong>Modules</strong> Rev. 3.2 3 - 11
Commands and Parameters<br />
Sub command $04 --< set watchdog Tx identifier<br />
Sub command $05 --< set watchdog time (guard time)<br />
The watchdog protocol functions with following scheme:<br />
1. After a RESET, the watchdog is inactive. The 'master' interchanges with these sub<br />
commands a Tx identifier, a watchdog time (Guard Time) and a life time factor to the<br />
module. Setting the watchdog time to values > '0' and setting the life time factor to values ><br />
'0' enables the local watchdog on the module. The watchdog is not activated at that moment!<br />
2. First a remote request has to be received <strong>for</strong> this Tx identifier or the command 'Supervisor<br />
Watchdog' ($FF) has to be received, be<strong>for</strong>e the watchdog time is counted down <strong>for</strong> the first<br />
time. After this the master has to send a RTR or a supervisor command at the given Tx<br />
identifier within the time (WDtime x WDLifeTimeFactor), otherwise a RESET is triggered<br />
at the module.<br />
Receiving the RTR or the command shows the module that the master is still active.<br />
3. If the remote request or the supervisor command arrives within the given time, the module<br />
transmits a one byte containing message back on the Tx identifier. The byte is constructed as<br />
follows:<br />
3 - 12<br />
Bit 7 6 5 4 3 2 1 0<br />
Contents Toggle bit 1 1 1 1 CMS State<br />
Table 3.2.4: Watchdog reply of the modules<br />
The toggle bit changes its condition with each transmission. In normal position, i.e. be<strong>for</strong>e<br />
the first transmission, it has got the value '0'. The bits 6 to 3 are always transmitted as '1'.<br />
The bits 2 to 0 contain a CMS status message which is permanently programmed on '111'<br />
with all modules. Possible replies there<strong>for</strong>e are: $7F and $FF.<br />
4. The master can recognize from the reply that the module is still active. After a RESET that<br />
is generated by the watchdog the module will not answer to receiving RTR frames of the<br />
master (first the watchdog time and the life time factor has to be set).<br />
The interchanged parameters of the sub command $04 and $05 have the following meaning:<br />
WTxId ... In this word the Tx identifier is interchanged on which the master transmits<br />
the remote request and on which the module transmits the response.<br />
<strong>esd</strong> <strong>Protocol</strong> <strong>for</strong> <strong>CAN</strong> <strong>Modules</strong> Rev. 3.2
Commands and Parameters<br />
WDtime... The watchdog time after that a local RESET is generated results from the<br />
time set in WDtime multiplied by the life time factor, that is set in<br />
WDLifeTimeFactor. The product has to be greater than ‘0’ to enable the<br />
watchdog!<br />
WDtime Watchdog time<br />
[HEX] in [ms]<br />
0000<br />
Watchdog disable<br />
(default adjustment)<br />
0001 1<br />
0002 2<br />
0003 3<br />
.. ...<br />
FFFF 65.535<br />
Table 3.2.5: Allocation of the parameters to the watchdog time<br />
WDLifeTime<br />
Factor... Multiplier <strong>for</strong> the watchdog time (function is described at WDtime).<br />
value: $00...$FF<br />
Requesting the actual parameters by the module (command $01):<br />
Command... The command $01 leads to the reply of the actual parameters.<br />
Sub command... The sub command determines the configuration bytes which should be<br />
returned:<br />
Sub<br />
command<br />
Reply of the parameter<br />
$00 Saved module no.<br />
$01 Active module no.<br />
$02 <strong>CAN</strong>-status byte<br />
$03 Saved bitrate<br />
$04 Watchdog Tx identifier<br />
$05 Watchdog time<br />
Table 3.2.6: Definition of the reply by sub command<br />
<strong>esd</strong> <strong>Protocol</strong> <strong>for</strong> <strong>CAN</strong> <strong>Modules</strong> Rev. 3.2 3 - 13
Commands and Parameters<br />
Parameter 1 and 2... With these parameters it is reported to the module onto which <strong>CAN</strong> Id it<br />
should transmit the requested reply.<br />
Decisive <strong>for</strong> the selection of the requested message is the sub command value received by the<br />
module.<br />
The following table shows the in<strong>for</strong>mation which the module transmits onto the <strong>CAN</strong> if a request<br />
command has been received.<br />
Sub Reply of the<br />
command parameter<br />
3 - 14<br />
Byte 1 Byte 2 Byte 3 Byte 4 Byte 5 Byte 6 Byte 7 Byte 8<br />
$00 Saved mod. no. $01 $00 saved mod no - - - - -<br />
Active<br />
$01 $01 $01 active mod no - - - - -<br />
mod. no.<br />
$02 cstat and constat $01 $02 cstat constat - - - -<br />
$03 Saved bitrate $01 $03 bust0 bust1 - - - -<br />
$04 Watchdog TxId $01 $04 WTxId - - - -<br />
WDLife<br />
$05 Watchdog time $01 $05 WDtime - - -<br />
TimeFactor<br />
(-) Byte is not transmitted<br />
Table 3.2.7: Transmitting the actual parameters module no. and bitrate<br />
Explanation of the bytes transmitted by the module:<br />
Sub command $00 --< stored module no.<br />
Byte 1... The first byte returns the contents of the received command byte<br />
(here always $01).<br />
Byte 2... The second byte returns the contents of the received sub command byte<br />
(here always $00).<br />
Byte 3:<br />
saved<br />
mod no... In this cell the module no. is returned which is actually stored in the EEPROM. After<br />
a power-on RESET or a RESET command this module no. is the number with which<br />
the module is selected if no other module no. had been stored after a RESET.<br />
If the module operates with the default parameters, then the value $00 is returned<br />
here always.<br />
<strong>esd</strong> <strong>Protocol</strong> <strong>for</strong> <strong>CAN</strong> <strong>Modules</strong> Rev. 3.2
Sub command $01 --< actual module no.<br />
Byte1,<br />
Byte2... See sub command $00.<br />
Commands and Parameters<br />
Byte 3:<br />
active<br />
mod no... Here the module no. is returned which is active at the moment. This number is<br />
identical with the number of this INIT Id entered into byte 4.<br />
Sub command $02 --< <strong>CAN</strong>-status byte<br />
Byte1,<br />
Byte2... See sub command $00.<br />
cstat... Byte 3 describes status in<strong>for</strong>mation about the condition of the <strong>CAN</strong> components of<br />
the selected module (see the following table).<br />
Bit Designation<br />
0 Power-down RESET<br />
1 Suspend bit<br />
2 Error on <strong>CAN</strong><br />
3 I²C error<br />
4 EEPROM size<br />
5 I²C busy<br />
6 Default wake up<br />
7 New on bus<br />
Table 3.2.8: Bits of the parameter 'cstat'<br />
Explanation of the bits of parameter 'cstat':<br />
Power-down RESET (bit 0)<br />
Bit 0 shows if the last RESET on the module had been triggered by a power-down<br />
RESET. If the bit has got the value '1', the last RESET had been triggered by<br />
removing the supply voltage. For all other RESET causes (RESET by supervisor<br />
command, RESET by EMERGENCY STOP) the bit is '0'.<br />
<strong>esd</strong> <strong>Protocol</strong> <strong>for</strong> <strong>CAN</strong> <strong>Modules</strong> Rev. 3.2 3 - 15
3 - 16<br />
Commands and Parameters<br />
Suspend bit (bit 1)<br />
In bit 1 is described if the module is in condition 'suspended' or in active condition:<br />
By the supervisor command 'suspend module' it is possible to put individual or all<br />
modules of the <strong>CAN</strong> into a delay condition. In this operating mode the actual<br />
condition of the outputs of the selected module remains unchanged (if available) and<br />
cannot be changed anymore until the module is enabled again. Parameters and<br />
commands are received and filed by the module but not evaluated: It is possible, e.g.,<br />
to set raw data on the module without changing the normal conditions at once.<br />
In condition 'suspended' the module does not transmit data onto the <strong>CAN</strong>. This is<br />
valid <strong>for</strong> each kind of Tx transfer with the exception of this configuration reply.<br />
If the module is activated again by the command 'continue', possibly existing outputs<br />
are set at once corresponding to the last received data and the module operates with<br />
the last received parameters.<br />
If bit 1 has got the value '1', the module is in condition 'suspended'. In normal<br />
operating mode (continue) bit 1 has got the value '0'.<br />
Error on <strong>CAN</strong> (bit 2)<br />
With this bit the module shows that it recognized a <strong>CAN</strong> error (bit = '1'). The bit<br />
serves the documentation of errors which do not lead to a 'standstill' of the complete<br />
<strong>CAN</strong> net, but only occur <strong>for</strong> a short time and then disappear again. By the command<br />
'set <strong>CAN</strong>-status byte' (sub command $02) or a RESET it is possible to reset the bit.<br />
I²C error (bit 3)<br />
If the micro controller recognizes an error while reading or writing onto the I²C<br />
EEPROM (e.g. CRC error or write error), this bit is set to '1'.<br />
EEPROM size (bit 4)<br />
If bit 4 has got the value '1', the module has got an EEPROM whose memory<br />
capacity is bigger than 128 bytes. An EEPROM of this size is prerequisite <strong>for</strong> the<br />
allocation of pin names <strong>for</strong> each individual connection pin, because the names are<br />
filed in the EEPROM (see also chapter 'Allocation of Pin Names').<br />
<strong>esd</strong> <strong>Protocol</strong> <strong>for</strong> <strong>CAN</strong> <strong>Modules</strong> Rev. 3.2
Commands and Parameters<br />
I²C busy (bit 5)<br />
The bit 'I²C busy' signalizes with the value '1' that the local software accesses the I²C<br />
EEPROM. The operating speed of the local firmware reduces itself at frequent access<br />
onto the EEPROM. This can occur if many different pins are given pin names<br />
subsequently. The EEPROM access 'store parameter' or the reading of the EEPROM<br />
is processed so quickly that the user normally reads this bit always as '0' (store<br />
duration is approx. 50 ms).<br />
Default wake up (bit 6)<br />
If the bit 'default start' has the value '1', the module 'awoke' with the default<br />
parameters after the last RESET.<br />
New on bus (bit 7)<br />
The bit 'new on bus' can be evaluated by the <strong>CAN</strong> master to recognize if it already<br />
found this module after the last RESET or if the module is new on the bus. The bit is<br />
set to the value '1' after each RESET which corresponds to condition 'new on bus'.<br />
The master can reset the bit to show that it found the module. Apart from 'error on<br />
<strong>CAN</strong>' it is the only bit of this byte which can be reset.<br />
<strong>esd</strong> <strong>Protocol</strong> <strong>for</strong> <strong>CAN</strong> <strong>Modules</strong> Rev. 3.2 3 - 17
Commands and Parameters<br />
constat... In the fourth byte the status register of the <strong>CAN</strong> controller is returned. The bits<br />
correspond exactly to the status bits described in the controller manual. The<br />
following table shows a short overview of the status bits. Further in<strong>for</strong>mation can be<br />
taken from the controller manual.<br />
3 - 18<br />
Bit 'Standard’-<br />
Function Value Status<br />
(assembler) value<br />
0<br />
Receive Buffer<br />
Status<br />
1 Data Overrun<br />
2<br />
3<br />
Transmit Buffer<br />
Access<br />
Transmission<br />
Complete Status<br />
4 Receive Status<br />
5 Transmit Status<br />
6 Error Status<br />
7 Bus Status<br />
Table 3.2.9: Bits of the controller status<br />
1 full<br />
0 empty 0<br />
1 overrun<br />
0 absent 0<br />
1 released 1<br />
0 locked<br />
1 complete 1<br />
0 incomplete<br />
1 receive<br />
0 idle 0<br />
1 transmit<br />
0 idle 0<br />
1 error<br />
0 ok 0<br />
1 Bus-Off<br />
0 Bus-On 0<br />
= $0C<br />
(higher language<br />
counting)<br />
At some of the status bits level changes are hardly perceptible, because the changes<br />
are only <strong>for</strong> a short period.<br />
<strong>esd</strong> <strong>Protocol</strong> <strong>for</strong> <strong>CAN</strong> <strong>Modules</strong> Rev. 3.2
Sub command $03 --< stored bitrate<br />
Byte1,<br />
Byte2... See sub command $00.<br />
Commands and Parameters<br />
Byte 3, 4:<br />
bust 0,<br />
bust1 ... These two bytes describe the contents of the registers BTR0 and BTR1 of the <strong>CAN</strong><br />
controller 8xC592/82C200 which determine the bitrate of the <strong>CAN</strong> interface. The<br />
allocation of the register contents to the bit rates has already been explained in the<br />
description of setting these registers.<br />
Sub command $04 --< watchdog Tx identifier<br />
Byte1,<br />
Byte2... See sub command $00.<br />
Byte 3, 4:<br />
WTxId-H,<br />
WTxId-L ... These two bytes return Tx identifiers on which the module transmits the watchdog<br />
reply.<br />
Sub command $05 --< watchdog time<br />
Byte1,<br />
Byte2... See sub command $00.<br />
Byte 3, 4:<br />
WDtime... Here the watchdog time is returned (value range see 'Setting the watchdog time').<br />
Byte 5:<br />
WDLifeTime<br />
Factor... Return of the Life Time Factor ($00...$FF).<br />
<strong>esd</strong> <strong>Protocol</strong> <strong>for</strong> <strong>CAN</strong> <strong>Modules</strong> Rev. 3.2 3 - 19
3.3 Process TxIds<br />
3 - 20<br />
Commands and Parameters<br />
By this command one or more Tx identifiers are allocated to the module, depending on the module<br />
type, by which it is able to transmit the data onto the <strong>CAN</strong> (set TxIds).<br />
The new Tx identifier replaces immediately after he had been received by the module the default<br />
identifier adjusted by the coding switches. If the new Tx identifier should remain after a RESET or a<br />
power-down, it has to be filed into the local EEPROM by command 'store parameter'.<br />
Apart from that the module can be <strong>for</strong>ced to transmit a reply about the Tx identifiers actually used<br />
by it onto the <strong>CAN</strong> by the Tx identifier CTxId (request TxIds).<br />
Byte 1 Byte 2 Byte 3 Byte 4 Byte 5 Byte 6<br />
Function Command Sub command Not used Module no. Parameter 1 Parameter 2<br />
Always<br />
Request: $02<br />
Selected<br />
allocate with<br />
Value $00...n module no.<br />
$00<br />
Set: $82<br />
$01...$FF<br />
Table 3.3.1: Bytes of the command set/request TxIds<br />
CTxId<br />
$0000...$07FF<br />
TxId<br />
$0000...$07FF<br />
Command... By the command $02 the actual Tx identifiers are requested by the module.<br />
After this request the module transmits the in<strong>for</strong>mation on the identifier<br />
'CTxId', entered into byte 5 and 6.<br />
By the command $82 new Tx identifiers (TxId) to transmit I/O data are<br />
allocated to the module corresponding to the sub command. The new Tx<br />
identifiers are interchanged by byte 5 and 6.<br />
Sub command... By the sub command it is selected which Tx identifier should be<br />
interchanged. Depending on the module type a different number of Tx<br />
identifiers can be set.<br />
<strong>esd</strong> <strong>Protocol</strong> <strong>for</strong> <strong>CAN</strong> <strong>Modules</strong> Rev. 3.2
Commands and Parameters<br />
Parameter 1 and 2... With these parameters it is reported to the module at a request command onto<br />
which <strong>CAN</strong> Id (CTxId) it should transmit the requested reply.<br />
The module only transmits once on this identifier. The identifier is not stored<br />
on the module. If another transmission is wanted, another INIT Id with the<br />
corresponding parameters has to be transmitted to the module again.<br />
At a set command the 11 bit wide Tx identifier on which it should transmit<br />
the data is interchanged to the module by the parameters.<br />
By the sub command it is selected which one of the possible Tx identifiers<br />
should be set or reset:<br />
Sub Tx identifiers on<br />
command parameters 1 and 2<br />
$00 TxId1<br />
$01 TxId2<br />
$02 TxId3<br />
: :<br />
n TxId(n+1)<br />
Table 3.3.2: Selection of the identifiers by the sub command<br />
The following table shows how the bits of Tx identifiers have to be allocated<br />
to the bytes 5 and 6:<br />
Byte 5 Byte 6<br />
Parameter 1 Parameter 2<br />
Bits in<br />
byte 7 6 5 4 3 2 1 0 7 6 5 4 3 2 1 0<br />
5 and 6<br />
Bits of<br />
the TxId<br />
TxId-H TxId-L<br />
- - - - - id11 id10 id9 id8 id7 id6 id5 id4 id3 id2 id1<br />
(-) These bits are not evaluated.<br />
Table 3.3.3: Bits of the Tx identifiers in byte 5 and byte 6<br />
<strong>esd</strong> <strong>Protocol</strong> <strong>for</strong> <strong>CAN</strong> <strong>Modules</strong> Rev. 3.2 3 - 21
Commands and Parameters<br />
Reply of the modules to the command 'request TxIds':<br />
The reply of a Tx identifier depends on the value of the received sub command.<br />
The following table shows the in<strong>for</strong>mation which the module transmits onto the <strong>CAN</strong>.<br />
Sub Reply of the<br />
command parameter<br />
3 - 22<br />
Byte 1 Byte 2 Byte 3 Byte 4 Byte 5 Byte 6 Byte 7 Byte 8<br />
$00 TxId 1 $02 $00 TxId1 - - - -<br />
$01 TxId 2 $02 $01 TxId2 - - - -<br />
$02 TxId 3 $02 $02 TxId3 - - - -<br />
: : $02 : : - - - -<br />
n TxId (n+1) $02 n TxId(n+1) - - - -<br />
(-) Byte is not transmitted<br />
Table 3.3.4: Transmitting the actual Tx identifiers<br />
Explanation of the bytes transmitted by the module:<br />
Byte 1... The first byte returns the contents of the received command byte<br />
(here always $02).<br />
Byte 2... The second byte returns the contents of the received sub command byte. The sub<br />
command designates the selected identifier.<br />
Byte 3,<br />
Byte 4... In these two cells the actual Tx identifier is returned. The bits of the identifier are<br />
described in byte 3 and 4 and returned in that <strong>for</strong>m as they have to be entered at<br />
setting in byte 5 and 6. (See also table 'Bits of the Tx identifier in byte 5 and 6'.)<br />
<strong>esd</strong> <strong>Protocol</strong> <strong>for</strong> <strong>CAN</strong> <strong>Modules</strong> Rev. 3.2
3.4 Process RxIds<br />
Commands and Parameters<br />
Depending on the module type one or more Rx identifiers are allocated to the module on which it is<br />
able to receive data to the <strong>CAN</strong> (set RxIds).<br />
The new Rx identifier replaces the default identifier adjusted by the coding switches immediately<br />
after it had been received by the module. If the new Rx identifier should remain after a RESET or a<br />
power-down, it has to be filed into the local EEPROM by the command 'store parameter'.<br />
Apart from this it is possible to make the module transmit a reply onto the <strong>CAN</strong> by the Tx identifier<br />
CTxId (request RxIds) about the Rx identifiers actually used by the module.<br />
Byte 1 Byte 2 Byte 3 Byte 4 Byte 5 Byte 6<br />
Function Command Sub command Not used Module no. Parameter 1 Parameter 2<br />
Value<br />
Request: $03<br />
$00...n<br />
Always<br />
allocate with<br />
Selected<br />
module no.<br />
Set: $83<br />
$00<br />
$01...$FF<br />
Table 3.4.1: Bytes of the command set/request RxIds<br />
CTxId<br />
$0000...$07FF<br />
RxId<br />
$0000...$07FF<br />
Command... By the command $03 the actual Rx identifiers are requested by the module.<br />
The module transmits the in<strong>for</strong>mation on the identifier 'CTxId' entered in byte<br />
5 and byte 6 after this request.<br />
By the command $83 new Rx identifiers <strong>for</strong> the transmission of I/O data are<br />
allocated to the module. The new Rx identifier are interchanged by byte 5 and<br />
byte 6.<br />
Sub command... By the sub command it is selected which Rx identifier should be<br />
interchanged. Depending on the module type a different number of Rx<br />
identifiers can be set.<br />
<strong>esd</strong> <strong>Protocol</strong> <strong>for</strong> <strong>CAN</strong> <strong>Modules</strong> Rev. 3.2 3 - 23
Commands and Parameters<br />
Parameter 1 and 2... With these parameters it is reported to the module at a request command onto<br />
which <strong>CAN</strong> Id (CTxId) it should transmit the requested reply.<br />
The module only transmits once on this identifier. The identifier is not stored<br />
on the module. If another transmission is wanted, another INIT Id with the<br />
corresponding parameters has to be transmitted to the module again.<br />
3 - 24<br />
At a set command the Rx identifier is interchanged to the module by these<br />
parameters on which it should transmit the data.<br />
By the sub command it is selected which one of the possible Rx identifiers<br />
should be set or reset:<br />
Sub Rx identifiers on<br />
command parameter 1 and 2<br />
$00 RxId1<br />
$01 RxId2<br />
: :<br />
n RxId(n+1)<br />
Table 3.4.2: Selection of the Rx identifiers by the sub command<br />
The following table shows how the bits of Rx identifiers have to be allocated<br />
to the bytes 5 and 6:<br />
Byte 5 Byte 6<br />
Parameter 1 Parameter 2<br />
Bits in<br />
byte 7 6 5 4 3 2 1 0 7 6 5 4 3 2 1 0<br />
5 and 6<br />
Bits of<br />
the RxId<br />
RxId-H RxId-L<br />
- - - - - id11 id10 id9 id8 id7 id6 id5 id4 id3 id2 id1<br />
(-) These bits are not evaluated.<br />
Table 3.4.3: Bits of the Rx identifier in byte 5 and byte 6<br />
<strong>esd</strong> <strong>Protocol</strong> <strong>for</strong> <strong>CAN</strong> <strong>Modules</strong> Rev. 3.2
Reply of the modules to the command 'request RxIds':<br />
Commands and Parameters<br />
The reply of the Rx identifiers depends on the value of the received sub command.<br />
The following table shows the in<strong>for</strong>mation which the module transmits to the <strong>CAN</strong>.<br />
Sub Reply of the<br />
command parameter<br />
Byte 1 Byte 2 Byte 3 Byte 4 Byte 5 Byte 6 Byte 7 Byte 8<br />
$00 RxId 1 $03 $00 Rx1S Rx1E - -<br />
$01 RxId 2 $03 $01 Rx2S Rx2E - -<br />
$02 RxId 3 $03 $02 Rx3S Rx3E - -<br />
: : $03 : : : - -<br />
n RxId (n+1) $03 n Rx(n+1)S Rx(n+1)E - -<br />
(-) Byte is not transmitted<br />
Table 3.4.4: Transmitting the actual Rx identifiers<br />
Explanation of the bytes transmitted by the module:<br />
Byte 1... The first byte returns the contents of the received command byte<br />
(here always $03).<br />
Byte 2... The second byte returns the contents of the received sub command byte. The sub<br />
command designates the selected identifier.<br />
Byte 3-<br />
Byte 6... In these cells the actual Rx identifier is returned. The bits of the identifier are<br />
described in byte 3 and 4 (or byte 5 and 6) and returned in that <strong>for</strong>m as they have to<br />
be entered at setting in byte 5 and 6. (See also table 'Bits of the Rx identifier in byte 5<br />
and 6'.)<br />
Apart from the allocation of Rx identifiers described above there is the possibility to<br />
allocate, depending on the module type, an own identifier to each output bit, byte or<br />
word (see chapter 'Rx Block Mode'). If this block mode is activated, the first<br />
(Rxm_S) and the last (Rxm_E) identifier of the block are returned at an RxId request<br />
command (m=1,2,3,4...).<br />
If the module is not in Rx block mode, the returned identifier in byte 3 and byte 4 is<br />
identical with the one in byte 5 and byte 6.<br />
<strong>esd</strong> <strong>Protocol</strong> <strong>for</strong> <strong>CAN</strong> <strong>Modules</strong> Rev. 3.2 3 - 25
3 - 26<br />
Commands and Parameters<br />
3.5 Cyclic Tx Transfers (Tx Activate Time)<br />
The interchange of the parameter 'Tx activate time' makes the module transmit I/O data onto the<br />
<strong>CAN</strong> in regular periods of time.<br />
The data are transmitted on the actual Tx identifier (see also chapter 'Setting/Reading TxIds', and<br />
'Parameters after RESET').<br />
Apart from that the module can be <strong>for</strong>ced to transmit a reply by the Tx identifier CTxId onto the<br />
<strong>CAN</strong> about the 'activate times' it uses at the moment.<br />
Byte 1 Byte 2 Byte 3 Byte 4 Byte 5 Byte 6<br />
Function Command Sub command Not used Module no. Parameter 1 Parameter 2<br />
Request: $04<br />
Always<br />
Value $00...n allocate with<br />
Set: $84<br />
$00<br />
Selected<br />
module no.<br />
$01...$FF<br />
Table 3.5.1: Bytes of the command set/request TxIds<br />
CTxId<br />
$0000...$07FF<br />
tx_act<br />
$0000...$FFFF<br />
Command... By the command $04 the actual Tx activate times are requested by the<br />
module. After this request the module transmits the in<strong>for</strong>mation on the<br />
identifier 'CTxId' of byte 5 and 6.<br />
By the command $84 new Tx activate times to transmit I/O data are allocated<br />
to the module. The new period time is interchanged by byte 5 and byte 6.<br />
Sub command... By the parameter sub command it is selected <strong>for</strong> which Tx identifier the new<br />
Tx activate time should be interchanged. Depending on the module type it is<br />
possible to allocate an activate time <strong>for</strong> a different number of Tx identifiers.<br />
<strong>esd</strong> <strong>Protocol</strong> <strong>for</strong> <strong>CAN</strong> <strong>Modules</strong> Rev. 3.2
Commands and Parameters<br />
Parameter 1 and 2... By these parameters it is reported to the module at a request command onto<br />
which <strong>CAN</strong> Id (CTxId) it should transmit the requested reply.<br />
The module transmits only once on this identifier. The identifier is not stored<br />
on the module. If another transmission is wanted, another INIT Id with the<br />
corresponding parameters has to be transmitted to the module again.<br />
At a set command the activate time is interchanged to the module by these<br />
parameters.<br />
By the sub command it is selected to which one of the four possible Tx<br />
identifiers the transmitted activate time should be allocated.<br />
Sub Tx activate time<br />
command (parameters 1 and 2)<br />
$00 tx_act 1<br />
$01 tx_act 2<br />
$02 tx_act 3<br />
: :<br />
n tx_act (n+1)<br />
Table 3.5.2: Selection of the Tx activate time by the sub command<br />
The parameters of the activate time show the period of time from the last data<br />
transmission, after which the module automatically starts a new transmission.<br />
The last data transmission could have been the previous Tx transfer of this<br />
cycle, but also every other Tx transfer transmitted by the module (e.g. a<br />
transmission initiated by a 'remote request').<br />
tx_act Activate time<br />
[HEX] in [ms]<br />
0000 Function switched off<br />
0001 1<br />
0002 2<br />
0003 3<br />
.. ...<br />
FFFF 65.535<br />
Table 3.5.3: Allocation of the parameters to the Tx activate time<br />
<strong>esd</strong> <strong>Protocol</strong> <strong>for</strong> <strong>CAN</strong> <strong>Modules</strong> Rev. 3.2 3 - 27
Commands and Parameters<br />
Reply of the modules to the command 'request Tx activate time':<br />
The reply of the activate time depends on the value of the received sub command.<br />
The following table shows the in<strong>for</strong>mation which the module transmits onto the <strong>CAN</strong>.<br />
Sub Activate time<br />
command <strong>for</strong> TxId<br />
3 - 28<br />
Byte 1 Byte 2 Byte 3 Byte 4 Byte 5 Byte 6 Byte 7 Byte 8<br />
$00 TxId 1 $04 $00 tx_act1 - - - -<br />
$01 TxId 2 $04 $01 tx_act2 - - - -<br />
$02 TxId 3 $04 $02 tx_act3 - - - -<br />
: : $04 : : - - - -<br />
n TxId (n+1) $04 n tx_act(n+1) - - - -<br />
(-) Byte is not transmitted<br />
Table 3.5.4: Transmitting the actual Tx activate times<br />
Explanation of the bytes transmitted by the module:<br />
Byte 1... The first byte always returns the contents of the received command byte<br />
(here always $04).<br />
Byte 2... The second byte returns the contents of the received sub command. The sub<br />
command designates the selected identifier.<br />
Byte 3,<br />
Byte 4... In these two cells the actual Tx activate time is returned (see also 'parameter 1 and<br />
2').<br />
<strong>esd</strong> <strong>Protocol</strong> <strong>for</strong> <strong>CAN</strong> <strong>Modules</strong> Rev. 3.2
3.6 Process Module Memory<br />
3.6.1 Internal RAM and XRAM, EEPROM<br />
Commands and Parameters<br />
By this command it is possible to display or change the contents of the local memories and to set or<br />
read the microcontroller’s ports. The memories contain the parameters which have already been<br />
described and are still to come. The contents of the memory should only be changed by the<br />
described parameter set commands and not by the command 'process module memory'.<br />
If the command 'store parameter' is called after the modification of a memory cell of the internal<br />
RAM or XRAM of the <strong>CAN</strong> controller, the new data are filed in the local EEPROM. At direct<br />
accesses onto the EEPROM the transferred data are filed in the EEPROM at once.<br />
The user should not change the cells of the local memories by this command, because the<br />
functioning of the modules cannot be guaranteed at improper programming of the memories!<br />
At write accesses onto the memory the address is interchanged by the sub command 1, the desired<br />
memory components by sub command 2 and the data by parameter 1.<br />
The user should only read the controller ports, because most of the ports are used <strong>for</strong> controlling<br />
the local circuits and are set by the firmware!<br />
The request of the port status is permitted. The assignment of the ports depends of the module type.<br />
The assignament of the ports is shown in the circuit diagrams.<br />
The request of data from the memory occurs like the setting of the data with the difference that in<br />
the parameters 1 and 2 the Tx identifier is interchanged on which the module should transmit the<br />
data.<br />
Byte 1 Byte 2 Byte 3 Byte 4 Byte 5 Byte 6<br />
Function Command Sub command 1 Sub command 2 Module no.<br />
$00 - int. RAM<br />
Request: $05 $00...$FF Selected<br />
$01 - int.XRAM<br />
Value module no.<br />
$02...$09 - I²C<br />
Memory address<br />
Set: $85<br />
EEPROM<br />
or port select. $01...$FF<br />
do not use<br />
$7F - µC ports<br />
Table 3.6.1: Bytes of the command set/request memory data<br />
Parameter Parameter<br />
1 2<br />
data<br />
$00...$FF<br />
CTxId<br />
$0000...$07FF<br />
Not used.<br />
<strong>esd</strong> <strong>Protocol</strong> <strong>for</strong> <strong>CAN</strong> <strong>Modules</strong> Rev. 3.2 3 - 29
Commands and Parameters<br />
Command... By the command $05 the memory data are requested by the module. After<br />
this request the module transmits the in<strong>for</strong>mation on the identifier 'CTxId' of<br />
byte 5 and 6.<br />
By the command $85 the available data of the memory cell selected by the<br />
sub commands is overwritten or the controller ports are set.<br />
Sub command 1 By the parameter sub command 1 the port group is selected.<br />
3 - 30<br />
Byte 2 Port group<br />
$00 P0.0 ... P0.7<br />
$01 P1.0 ... P1.7<br />
$02 P2.0 ... P2.7<br />
$03 P3.0 ... P3.7<br />
$04 P4.0 ... P4.7<br />
$05 P5.0 ... P5.7<br />
$06...$FF Reserved<br />
Table 3.6.2: Selection of the port group by sub command 1 (byte 2)<br />
Sub command 2 By byte 3 the desired memory type which should be accessed or the port<br />
group is selected:<br />
Byte 3 Memory type<br />
$00 Internal RAM of the 8xC592<br />
$01 Internal XRAM of the 8xC592<br />
$02...$09 I²C EEPROM<br />
$0A...$6F Reserved<br />
$7E Internal I/O register $80...$FF (refer tocontroller data sheet)<br />
$7F Access to <strong>CAN</strong> controller ports<br />
$80...$FF Reserved<br />
Table 3.6.3: Selection of the memory type by sub command 2 (byte 3)<br />
Parameter 1 and 2... By these parameters it is reported to the module at a request command on<br />
which <strong>CAN</strong> Id (CTxId) it should transmit the requested reply.<br />
The module transmits only once on this identifier. The identifier is not stored<br />
on the module. If another transmission is wanted, another INIT Id with the<br />
corresponding parameters has to be transmitted to the module.<br />
<strong>esd</strong> <strong>Protocol</strong> <strong>for</strong> <strong>CAN</strong> <strong>Modules</strong> Rev. 3.2
Commands and Parameters<br />
At a set command the date is interchanged to the module by parameter 1 with<br />
which the corresponding memory cell should be overwritten.<br />
If ports shall be set or read, the level of the ports has to be transferred in<br />
parameter 1 as follows:<br />
Bits of<br />
parameter 1-><br />
D7 D6 D5 D4 D3 D2 D1 D0<br />
Port bits Px.7 Px.6 Px.5 Px.4 Px.3 Px.2 Px.1 Px.0<br />
(x = 0, 1, 2, ... ,5)<br />
Table 3.6.4: Assignment of the parameter bits to the controller ports<br />
Reply of the modules to the command 'request memory data':<br />
The return of the memory data depends on the value of the received sub commands which contain<br />
in<strong>for</strong>mation about the memory type and the address of the desired memory cell or the port group.<br />
The following table shows the in<strong>for</strong>mation which the module transmits onto the <strong>CAN</strong>.<br />
The reply does not contain in<strong>for</strong>mation about the selected memory type.<br />
Memory<br />
Sub command 1 Byte 1 Byte 2 Byte 3 Byte 4 Byte 5 Byte 6 Byte 7 Byte 8<br />
address<br />
$00 $00 $05 $00 Mem data 00 - - - - -<br />
$01 $01 $05 $01 Mem data 01 - - - - -<br />
... ... ... ... ... - - - - -<br />
$FF $FF $05 $FF Mem data 255 - - - - -<br />
(-) Byte is not transmitted<br />
Table 3.6.5: Module transmits memory data<br />
<strong>esd</strong> <strong>Protocol</strong> <strong>for</strong> <strong>CAN</strong> <strong>Modules</strong> Rev. 3.2 3 - 31
Commands and Parameters<br />
Port<br />
Sub command 1 Byte 1 Byte 2 Byte 3 Byte 4 Byte 5 Byte 6 Byte 7 Byte 8<br />
group<br />
3 - 32<br />
$00 P0.x $05 $00 Ports P0.0 ... P0.7 - - - - -<br />
$01 P1.x $05 $01 Ports P1.0 ... P1.7 - - - - -<br />
... ... ... ... ... - - - - -<br />
$FF P5.x $05 $FF Ports P5.0 ... P1.7 - - - - -<br />
(-) Byte is not transmitted<br />
x = 0, 1, 2, ... ,5<br />
Table 3.6.6: Module transmits controller ports status<br />
Explanation of the bytes transmitted by the module:<br />
Byte 1... The first byte returns the contents of the received command byte<br />
(here always $05).<br />
Byte 2... The second byte returns the contents of the received sub command byte (sub<br />
command 1). The sub command designates the memory address.<br />
Byte 3:<br />
Mem data... In case of memory cell request this cell contains the actual date of the selected<br />
memory.<br />
Byte 3:<br />
Ports... In case of controller port request this cell contains the actual state of the port bits.<br />
The assignment of the ports to the parameter bits is shown at the previous page.<br />
<strong>esd</strong> <strong>Protocol</strong> <strong>for</strong> <strong>CAN</strong> <strong>Modules</strong> Rev. 3.2
3.6.2 External Memory<br />
Commands and Parameters<br />
By this command it is possible to access possibly available memory components of the module. The<br />
command is designed <strong>for</strong> programmers.<br />
The user should there<strong>for</strong>e only access these memory cells reading!<br />
At writing accesses to the memory the lower address bits are interchanged by the sub command 1,<br />
the upper address bits by sub command 2 and the data by parameter 1.<br />
The request of data from the memory occurs like the setting of the data with the difference that the<br />
Tx identifier on which the module should transmit is interchanged in the parameters 1 and 2.<br />
Byte 1 Byte 2 Byte 3 Byte 4 Byte 5 Byte 6<br />
Sub Sub<br />
Function Command Module no. Parameter 1 Parameter 2<br />
command 1 command 2<br />
Request: $09<br />
$00...$FF $00...$FF<br />
Selected<br />
Value memory memory module no.<br />
Set:<br />
do not use<br />
$89<br />
address<br />
'LOW'<br />
address<br />
'HIGH'<br />
$01...$FF<br />
data<br />
$00...$FF<br />
Table 3.6.7: Bytes of the command set/request external memory<br />
CTxId<br />
$0000...$07FF<br />
Not used<br />
Command... By the command $09 the memory data are requested by the module. After<br />
this request the module transmits the in<strong>for</strong>mation on the identifier 'CTxId' of<br />
byte 5 and 6.<br />
By the command $89 the available data of the memory cell selected by the<br />
sub commands are overwritten.<br />
Sub command 1 By the parameter sub command 1 the lower address bits of the desired<br />
memory cell are selected. (A0...A7)<br />
Sub command 2 By the parameter sub command 2 the upper address bits of the desired<br />
memory cell are selected. (A8...A15)<br />
<strong>esd</strong> <strong>Protocol</strong> <strong>for</strong> <strong>CAN</strong> <strong>Modules</strong> Rev. 3.2 3 - 33
Commands and Parameters<br />
Parameter 1 and 2... By these parameters it is reported to the module at a request command on<br />
which <strong>CAN</strong> Id (CTxId) it should transmit the requested reply.<br />
The module transmits only once on this identifier. The identifier is not stored<br />
on the module. If another transmission is desired, another INIT Id with the<br />
corresponding parameters has to be transmitted to the module again.<br />
3 - 34<br />
At a set command the date is interchanged to the module by parameter 1 with<br />
which the corresponding memory cell should be overwritten.<br />
Reply of the modules to the command 'request external memory':<br />
The return of the memory data depends on the value of the received sub commands which contain<br />
in<strong>for</strong>mation about the address of the desired memory cell. The following table shows the<br />
in<strong>for</strong>mation which is transmitted to the <strong>CAN</strong> by the module.<br />
Sub Sub Memory<br />
command 1 command 2 address<br />
Byte 1 Byte 2 Byte 3 Byte 4 Byte 5 Byte 6 Byte 7 Byte 8<br />
$00 $00 $0000 $09 $00 Mem data 00 - - - - -<br />
$01 $00 $0001 $09 $01 Mem data 01 - - - - -<br />
... ... ... ... ... ... - - - - -<br />
Mem data<br />
$FF $FF $FFFF $09 $FF - - - - -<br />
65535<br />
(-) Byte is not transmitted<br />
Table 3.6.8: Module transmits memory data of the 'external memory'<br />
Explanation of the bytes transmitted by the module:<br />
Byte 1... The first byte returns the contents of the received command byte<br />
(here always $09).<br />
Byte 2... The second byte returns the contents of the received sub command byte (sub<br />
command 1). The sub command designates the lower bits of the memory address.<br />
Byte 3:<br />
Mem data... In this cell the actual date of the memory is returned.<br />
<strong>esd</strong> <strong>Protocol</strong> <strong>for</strong> <strong>CAN</strong> <strong>Modules</strong> Rev. 3.2
3.6.3 Extended Memory<br />
Commands and Parameters<br />
By this command it is possible to access further memory circuits (if available) at the module.<br />
Compared to command $89 this command will transmit up to four data bytes in one frame. The<br />
command is designed <strong>for</strong> programmers only.<br />
The user shall only read from these memory cells, to avoid malfunction of the module!<br />
If write accesses shall be executed to the memory, the lower address bits are set by sub command 1,<br />
the upper address bits are set by sub command 2 and the data bytes are set by parameter 1 ...4 (bytes<br />
5...8).<br />
The request of data from the memory is done like writing data with the difference, that in parameter<br />
1 and 2 the returning Tx identifier is set.<br />
Byte 1 Byte 2 Byte 3 Byte 4 Byte 5 Byte 6 Byte 5 Byte 6<br />
Sub Sub Parameter Parameter Parameter Parameter<br />
Function Command Module no.<br />
Command 1 Command 2 1 2 3 4<br />
request: $0A<br />
$00...$FF $00...$FF<br />
Selected<br />
CTxId<br />
$0000...$07FF<br />
not used<br />
Value memory memory module no.<br />
set: $8A<br />
do not use !<br />
address<br />
'LOW'<br />
address<br />
'HIGH'<br />
$01...$FF<br />
data<br />
(addr)<br />
$00...$FF<br />
data<br />
(addr+1)<br />
$00...$FF<br />
data<br />
(addr+2)<br />
$00...$FF<br />
data<br />
(addr+3)<br />
$00...$FF<br />
Table 3.6.9: Byte of the command set/request extended memory<br />
Command... By the command $0A the memory data are requested by the module. Always<br />
4 data bytes will be returned. The module transmits the data on the identifier<br />
'CTxId' of byte 5 and 6.<br />
By the command $8A the available data of the memory cells selected by the<br />
sub commands are overwritten.<br />
Sub command 1... By the parameter sub command 1 the lower address bits of the desired<br />
memory cells are selected. (A0...A7)<br />
Sub command 2... By the parameter sub command 2 the upper address bits of the desired<br />
memory cell are selected. (A8...A15)<br />
Parameter 1..2... By these parameters it is reported to the module at a request command on<br />
which <strong>CAN</strong> Id (CTxId) it should transmit the requested reply.<br />
The module transmits only once on this identifier. The identifier is not stored<br />
on the module. If another transmission is desired, another INIT Id with the<br />
corresponding parameters has to be transmitted to the module again.<br />
At a set command the date is interchanged to the module by parameter 1 to 4<br />
with which the corresponding memory cell should be overwritten.<br />
<strong>esd</strong> <strong>Protocol</strong> <strong>for</strong> <strong>CAN</strong> <strong>Modules</strong> Rev. 3.2 3 - 35
3 - 36<br />
Commands and Parameters<br />
The number of data bytes that shall be transmitted is coded by the length of<br />
the telegram.<br />
Length of<br />
telegram<br />
the following bytes will be send:<br />
5 parameter 1<br />
6 parameter 1, parameter 2<br />
7 parameter 1, parameter 2, parameter 3<br />
8 parameter 1, parameter 2, parameter 3, parameter 4<br />
Table 3.6.10: Definition of the number of transmitted data bytes<br />
The data will be stored in the memory as follows:<br />
Address<br />
(Sub command 1 and 2)<br />
Data bytes of<br />
memory address +0 parameter 1<br />
memory address +1 parameter 2<br />
memory address +2 parameter 3<br />
memory address +3 parameter 4<br />
Table 3.6.11: Storing the data bytes in the memory<br />
<strong>esd</strong> <strong>Protocol</strong> <strong>for</strong> <strong>CAN</strong> <strong>Modules</strong> Rev. 3.2
Reply of the modules to the command 'request external memory':<br />
Commands and Parameters<br />
The return of the memory data depends on the value of the received sub commands which contain<br />
in<strong>for</strong>mation about the address of the desired memory cell. The module returns always 4 data bytes.<br />
The following table shows the in<strong>for</strong>mation which is transmitted to the <strong>CAN</strong> by the module.<br />
Sub Sub Memory<br />
command 1 command 2 address<br />
Byte 1 Byte 2 Byte 3 Byte 4 Byte 5 Byte 6 Byte 7 Byte 8<br />
$00 $00 $0000 $0A $00 data 00 data 01 data 02 data 03 - -<br />
$04 $00 $0004 $0A $01 data 04 data 05 data 06 data 07 - -<br />
... ... ... ... ... ... ... ... ... - -<br />
data data data data<br />
$FC $FF $FFFC $0A $FC - -<br />
65532 65533 65534 65535<br />
(-) Byte is not transmitted.<br />
Table 3.6.12: Module sends memory data of extended memory<br />
(Example: Addresses incremented by '4'.)<br />
Explanation of the bytes transmitted by the module:<br />
Byte 1... The first byte returns the contents of the received command byte<br />
(here always $0A).<br />
Byte 2... The second byte returns the contents of the received sub command byte (sub<br />
command 1). The sub command designates the lower bits of the memory address.<br />
Byte 3:<br />
data n... In this cell the actual date of the memory is returned.<br />
<strong>esd</strong> <strong>Protocol</strong> <strong>for</strong> <strong>CAN</strong> <strong>Modules</strong> Rev. 3.2 3 - 37
3.6.4 Program Code<br />
3 - 38<br />
Commands and Parameters<br />
By this command program code can be requested from the module.<br />
When requesting data from the memory, the lower address bits has to be set by sub command 1 and<br />
the upper address bits has to be set by sub command 2. In parameter 1 and 2 the returning Tx<br />
identifier has to be set.<br />
Byte 1 Byte 2 Byte 3 Byte 4 Byte 5 Byte 6 Byte 5 Byte 6<br />
Sub Sub Parameter Parameter Parameter Parameter<br />
Function Command Module no.<br />
command 1 command 2 1 2 3 4<br />
$00...$FF $00...$FF<br />
Value<br />
request: $0B<br />
memory<br />
address<br />
memory<br />
address<br />
Selected<br />
module no.<br />
$01...$FF<br />
CTxId<br />
$0000...$07FF<br />
not used<br />
'LOW' 'HIGH'<br />
Table 3.6.13: Bytes of the command set/request program code<br />
Command... By the command $0B the program code is requested from the module.<br />
Always 4 code bytes will be returned. The module transmits the data on the<br />
identifier 'CTxId' of byte 5 and 6.<br />
Sub command 1... By the parameter sub command 1 the lower address bits of the desired<br />
memory cells of the program code are selected. (A0...A7)<br />
Sub command 2... By the parameter sub command 2 the upper address bits of the desired<br />
memory cells of the program code are selected. (A8...A15)<br />
Parameter 1 and 2... By these parameters it is reported to the module at a request command on<br />
which <strong>CAN</strong> Id (CTxId) it should transmit the requested reply.<br />
The module transmits only once on this identifier. The identifier is not stored<br />
on the module. If another transmission is desired, another INIT Id with the<br />
corresponding parameters has to be transmitted to the module again.<br />
<strong>esd</strong> <strong>Protocol</strong> <strong>for</strong> <strong>CAN</strong> <strong>Modules</strong> Rev. 3.2
Reply of the modules to the command 'request external memory':<br />
Commands and Parameters<br />
The return of the memory data depends on the value of the received sub commands which contain<br />
in<strong>for</strong>mation about the address of the desired memory cell. The module returns always 4 code bytes.<br />
The following table shows the in<strong>for</strong>mation which is transmitted to the <strong>CAN</strong> by the module.<br />
Sub Sub Memory<br />
command 1 command 2 address<br />
Byte 1 Byte 2 Byte 3 Byte 4 Byte 5 Byte 6 Byte 7 Byte 8<br />
$00 $00 $0000 $0B $00 code 00 code 01 code 02 code 03 - -<br />
$04 $00 $0004 $0B $04 code 04 code 05 code 06 code 07 - -<br />
... ... ... ... ... ... ... ... ... - -<br />
code code code code<br />
$FC $FF $FFFC $0B $FC - -<br />
65532 65533 65534 65535<br />
(-) Byte is not transmitted.<br />
Table 3.6.14: Module returns program code<br />
(Example: Addresses incremented by '4'.)<br />
Explanation of the bytes transmitted by the module:<br />
Byte 1... The first byte retunes the contents of the received command byte<br />
(here always $0B).<br />
Byte 2... The second byte returns the contents of the received sub command byte (sub<br />
command 1). The sub command designates the lower bits of the memory address.<br />
Byte 3:<br />
code n... In this cell the actual program code of the module is returned.<br />
<strong>esd</strong> <strong>Protocol</strong> <strong>for</strong> <strong>CAN</strong> <strong>Modules</strong> Rev. 3.2 3 - 39
3 - 40<br />
Commands and Parameters<br />
3.7 Process User Parameters<br />
The user parameters are designed <strong>for</strong> module-specific applications. By this sub command it is<br />
possible to process up to 127 parameters with 16 bit width.<br />
The assignment of the user parameters can be taken from the module-specific software.<br />
By the command 'set user parameters' the parameters on the module are set. The command 'request<br />
user parameters' makes the module return the parameter contents on the Tx identifier CTxId which<br />
had been interchanged in the request.<br />
Byte 1 Byte 2 Byte 3 Byte 4 Byte 5 Byte 6<br />
Function Command Sub command Not used Module no. Parameter 1 Parameter 2<br />
Request: $06 Always Selected<br />
Value $00...$7F allocate with<br />
$00<br />
module no.<br />
Set: $86<br />
$01...$FF<br />
Table 3.7.1: Bytes of the command set/request user parameters<br />
CTxId<br />
$0000...$07FF<br />
Para<br />
$0000...$FFFF<br />
Command... By the command $06 the parameter data are requested by the module. After<br />
this request the module transmits the in<strong>for</strong>mation on the identifier 'CTxId' of<br />
byte 5 and 6.<br />
By the command $86 the parameters are set.<br />
Sub command... By the sub command the desired parameter is selected.<br />
Parameter 1 and 2... By these parameters it is reported to the module at a request command onto<br />
which <strong>CAN</strong> Id (CTxId) it should transmit the requested reply.<br />
The module transmits only once on this identifier. The identifier is not stored<br />
on the module. If another transmission is desired, another INIT Id with the<br />
corresponding parameters has to be transmitted to the module again.<br />
At a set command these two bytes contain the 16 bits of the parameter which<br />
should be interchanged. The possible parameters have got numbers which<br />
correspond to the value of the corresponding sub command. A maximum of<br />
127 ($7F) parameters is possible.<br />
<strong>esd</strong> <strong>Protocol</strong> <strong>for</strong> <strong>CAN</strong> <strong>Modules</strong> Rev. 3.2
Reply of the modules to the command 'request user parameters':<br />
Commands and Parameters<br />
The parameter returned by the module is selected by the corresponding sub command.<br />
The following table shows the in<strong>for</strong>mation which is transmitted to the <strong>CAN</strong> by the module.<br />
Sub command Parameter Byte 1 Byte 2 Byte 3 Byte 4 Byte 5 Byte 6 Byte 7 Byte 8<br />
$00 1 $06 $00 Para0 - - - -<br />
$01 2 $06 $01 Para1 - - - -<br />
... ... ... ... ... - - - - -<br />
$7F 127 $06 $7F Para7F - - - -<br />
(-) Byte is not transmitted<br />
Table 3.7.2: Module transmits parameter contents<br />
Explanation of the bytes transmitted by the module:<br />
Byte 1... The first byte returns the contents of the received command byte<br />
(here always $06).<br />
Byte 2... The second byte returns the contents of the received sub command byte.<br />
Byte 3,4:<br />
Para... In these cells the actual parameter contents are returned:<br />
Output 16 15 14 13 12 11 10 9 8 7 6 5 4 3 2 1<br />
Bits of the parameter 15 14 13 12 11 10 9 8 7 6 5 4 3 2 1 0<br />
Allocation of the parameter<br />
to the bytes 5 and 6<br />
7 6 5 4 3 2 1 0 7 6 5 4 3 2 1 0<br />
Byte 5 Byte 6<br />
Table 3.7.3: Allocation of the parameter bits to the outputs<br />
<strong>esd</strong> <strong>Protocol</strong> <strong>for</strong> <strong>CAN</strong> <strong>Modules</strong> Rev. 3.2 3 - 41
3.8 Process Rx Mode<br />
3 - 42<br />
Commands and Parameters<br />
By the command 'Rx block mode' an own Rx identifier is allocated to each output bit, byte or word<br />
of the selected module (depending on the module type).<br />
If an output should be set in 'normal' Rx mode, because only successive complete bytes can be<br />
transmitted, the bytes (or bits) which should keep their value have always to be set again, too.<br />
If, e.g., only the level of a bit should be changed, the other seven bits have to be overwritten with<br />
their previous value. This requires the knowledge of the condition of all bits at the time of<br />
transmission.<br />
In a multi tasking or a multi master system this might lead to problems, because a second program<br />
or a second master could have changed the output bits independently and unrecognized by the first.<br />
To prevent that wrong values can be allocated to the output bits in this way, it is possible to set<br />
individual bits in a frame specifically by the Rx block mode.<br />
By the command 'set Rx block mode' the blocks are defined by successive Rx identifiers on which<br />
the module is able to receive data.<br />
The command 'request Rx block mode' makes the module return a message on the Tx identifier<br />
(CTxId), interchanged in the request, in which it says if the Rx mode has been activated or not.<br />
Byte 1 Byte 2 Byte 3 Byte 4 Byte 5 Byte 6<br />
Function Command Sub command Not used Module no. Parameter 1 Parameter 2<br />
Value<br />
Request: $07<br />
$00...$03<br />
Always<br />
allocate with<br />
Selected<br />
module no.<br />
CTxId<br />
$0000...$07FF<br />
Set: $87<br />
$00<br />
$01...$FF<br />
rxmode<br />
$00...$01<br />
Not used<br />
Table 3.8.1: Bytes of the command set/request Rx block mode<br />
Command... By the command $07 it is requested if the module is in block mode. After this<br />
request the module transmits the in<strong>for</strong>mation on the identifier 'CTxId' of byte<br />
5 and 6.<br />
By the command $86 the Rx block mode is activated <strong>for</strong> the Rx identifier<br />
selected by the sub command.<br />
<strong>esd</strong> <strong>Protocol</strong> <strong>for</strong> <strong>CAN</strong> <strong>Modules</strong> Rev. 3.2
Commands and Parameters<br />
Sub command... By the sub command the Rx identifier is selected <strong>for</strong> which an Rx block<br />
should be created.<br />
If a module has got various identifiers those Rx identifiers to which Rx<br />
blocks should be allocated have to be selected with a sufficient offset to<br />
each other and to other identifiers (also to TxIds!), so that the developing<br />
identifier areas do not intersect each other!<br />
This is especially important if the module is still operated by the default<br />
parameters, because here the identifiers normally succeed very close.<br />
The reprogramming of identifiers is often unavoidable here!<br />
A maximum of so many blocks is possible as Rx identifiers are available <strong>for</strong><br />
setting the outputs of the selected module (in 'normal' Rx mode). The length<br />
of the blocks depends on the module type. A module can contain blocks with<br />
different lengths.<br />
The Rx identifiers of the blocks are created in ascending series by the local<br />
software. The first identifier of an Rx block does not have to be identical with<br />
the actual Rx identifier <strong>for</strong> which the Rx block should be used, because<br />
depending on the block length (which depends again on the module type), the<br />
lower bits of the first Rx block identifier are set to '0'.<br />
Block length<br />
(= number of<br />
Rx identifiers)<br />
Number of low<br />
value bits set to '0'<br />
2 1<br />
4 2<br />
8 3<br />
16 4<br />
32 5<br />
Table 3.8.2: Number of identifier bits set to '0' i the Rx block mode<br />
Example: Two blocks with each 8 Rx identifiers can be allocated to a<br />
module. The two 'standard' identifiers RxId1 and RxId2 are<br />
adjusted to $403 and $419.<br />
At the setting of the block mode the identifiers of the two<br />
blocks are determined by the local software as follows:<br />
<strong>esd</strong> <strong>Protocol</strong> <strong>for</strong> <strong>CAN</strong> <strong>Modules</strong> Rev. 3.2 3 - 43
3 - 44<br />
Commands and Parameters<br />
Block 1: RxId-B11 = $400<br />
RxId-B12 = $401<br />
....<br />
RxId-B18 = $407<br />
Block 2: RxId-B21 = $418<br />
RxId-B22 = $419<br />
....<br />
RxId-B28 = $41F<br />
If the block mode has been selected, after an RxId request command the first<br />
Rx identifier and the last Rx identifier of the block are returned.<br />
After resetting the Rx block mode the Rx identifier originally entered, <strong>for</strong><br />
which this block stood, is taken over again. Related to the example above<br />
these would be the Ids $403 or $419.<br />
Parameter 1 and 2... By these two parameters it is reported to the module at a request command to<br />
which <strong>CAN</strong> Id (CTxId) it should transmit the requested reply.<br />
The module transmits only once on this identifier. The identifier is not stored<br />
on the module. If another transmission is desired, another INIT Id with the<br />
corresponding parameters has to be transmitted to the module again.<br />
By a set command the Rx block mode is activated or deactivated by<br />
parameter 1 (rxmode).<br />
Parameter<br />
(rxmode)<br />
Function<br />
$00 Normal Rx mode<br />
$01 Rx block mode activated<br />
$02<br />
... No function<br />
$FF<br />
Table 3.8.3: Setting the block mode by parameter 1<br />
<strong>esd</strong> <strong>Protocol</strong> <strong>for</strong> <strong>CAN</strong> <strong>Modules</strong> Rev. 3.2
Reply of the modules to the command 'request Rx block mode':<br />
Commands and Parameters<br />
The parameter returned by the module is selected by the corresponding sub command.<br />
The following table shows the in<strong>for</strong>mation which the module transmits to the <strong>CAN</strong>.<br />
Sub Rx block <strong>for</strong><br />
command RxId<br />
Byte 1 Byte 2 Byte 3 Byte 4 Byte 5 Byte 6 Byte 7 Byte 8<br />
$00 RxId 1 $07 $00 rxmode1 - - - - -<br />
$01 RxId 2 $07 $01 rxmode2 - - - - -<br />
$02 RxId 3 $07 $02 rxmode3 - - - - -<br />
$03 RxId 4 $07 $03 rxmode4 - - - - -<br />
(-) Byte is not transmitted<br />
Table 3.8.4: Module transmits Rx block mode status<br />
Explanation of the bytes transmitted by the module:<br />
Byte 1... The first byte returns the contents of the received command byte<br />
(here always $07).<br />
Byte 2... The second byte returns the contents of the received sub command.<br />
Byte 3:<br />
rxmode... In these cells the module returns if the block mode has been selected <strong>for</strong> the<br />
corresponding Rx identifier and which length the block has got. The parameter can<br />
take over following values:<br />
rxmode<br />
(Byte 3)<br />
Block length<br />
$00 Block mode switched off<br />
$02 Block length = 2 RxIds<br />
$04 " = 4 RxIds<br />
$08 " = 8 RxIds<br />
$0F " = 16 RxIds<br />
$20 " = 32 RxIds<br />
Table 3.8.5: Block length in parameter 'rxmode'<br />
<strong>esd</strong> <strong>Protocol</strong> <strong>for</strong> <strong>CAN</strong> <strong>Modules</strong> Rev. 3.2 3 - 45
3 - 46<br />
Commands and Parameters<br />
3.9 Allocation of Pin Names<br />
The allocation of names to the individual I/O pins or channels has been developed as a user specific<br />
function which should give the <strong>CAN</strong> master another opportunity to identify the modules. The<br />
reading of the pin names of a module and their check by the previously entered 'set names' should<br />
secure that the module is addressed correctly.<br />
This function is only implemented if the module has got an EEPROM which has got a memory<br />
capacity of more than 128 bytes, because the pin names have been filed in the EEPROM.<br />
The user can find out if the function is implemented by inquiring the fourth bit ('EEPROM size') of<br />
the <strong>CAN</strong>-status byte 'cstat'. The description of the inquiry can be found in the previous chapter<br />
'system parameters'.<br />
The <strong>CAN</strong> master can allocate a name in ASCII code of up to 24 bytes long to each I/O pin of a<br />
module. The pins and the bytes of the pin names are selected by the sub commands.<br />
The return of the Pin names also occurs byte by byte.<br />
Byte 1 Byte 2 Byte 3 Byte 4 Byte 5 Byte 6<br />
Module<br />
Function Command Sub command 1 Sub command 2 Parameter 1 Parameter 2<br />
no.<br />
Request: $08<br />
Pin number<br />
Number of the Selected<br />
CTxId<br />
$0000...$07FF<br />
Value $00...$FF interchanged module no.<br />
Set: $88<br />
(module<br />
dependent)<br />
byte<br />
$00...$17 $01...$FF<br />
Byte name<br />
$00...$FF<br />
(ASCII)<br />
Not used<br />
Table 3.9.1: Bytes of the command set/request pin name<br />
Command... By the command $88 the individual bytes of the pin names are requested. The<br />
module transmits the in<strong>for</strong>mation of this inquiry on the identifier 'CTxId' of<br />
byte 5 and 6.<br />
By the command $89 the pin names are set.<br />
Sub command 1 By the sub command the pin is selected whose name should be processed.<br />
The number of pins depends on the module type (e.g.: CDO16 - 16 pins).<br />
The new pin name is only saved in the EEPROM by the firmware if the 24 th<br />
byte (byte no. 23) of the name had been processed! There<strong>for</strong>e it is only<br />
possible to process the bytes of one pin until the last byte (no.23) is<br />
processed!<br />
<strong>esd</strong> <strong>Protocol</strong> <strong>for</strong> <strong>CAN</strong> <strong>Modules</strong> Rev. 3.2
Commands and Parameters<br />
Sub command 2 In byte 3 of the INIT Id the number of the byte is entered which should be<br />
changed in the pin name. A pin name is 24 bytes long (byte 0..byte 23).<br />
The transmitted bytes of a pin name are only filed in the EEPROM, if the<br />
byte no. 23 of a pin name had been transmitted.<br />
The bytes are not filed like other parameters by the command 'save<br />
parameters' in the EEPROM, but only by setting the byte no. 23!<br />
Parameter 1 and 2... By these parameters it is reported to the module at a request command to<br />
which <strong>CAN</strong> Id (CTxId) it should transmit the requested reply.<br />
The module transmits only once on this identifier. The identifier is not stored<br />
by the module. If another transmission is desired, another INIT Id with the<br />
corresponding parameters has to be transmitted to the module.<br />
At a set command parameter 1 contains the 8 bits of the byte of a pin name<br />
which should be interchanged.<br />
<strong>esd</strong> <strong>Protocol</strong> <strong>for</strong> <strong>CAN</strong> <strong>Modules</strong> Rev. 3.2 3 - 47
Commands and Parameters<br />
Reply of the modules to the command 'request pin name':<br />
The parameter returned by the module is selected by the corresponding sub commands.<br />
The following table shows the in<strong>for</strong>mation which is transmitted to the <strong>CAN</strong> by the module. The<br />
reply does not contain in<strong>for</strong>mation about the requested byte number (sub command 2).<br />
Sub<br />
command 1<br />
3 - 48<br />
Pin/Channel Byte 1 Byte 2 Byte 3 Byte 4 Byte 5 Byte 6 Byte 7 Byte 8<br />
$00 Pin 1 $08 $00 byte name - - - - -<br />
$01 Pin 2 $08 $01 byte name - - - - -<br />
... ... $08 ... ... - - - - -<br />
$FF Pin 256 $08 $FF byte name - - - - -<br />
(-) Byte is not transmitted<br />
Table 3.9.2: Module transmits Rx block mode status<br />
Explanation of the bytes transmitted by the module:<br />
Byte 1... The first byte returns the contents of the received command byte<br />
(here always $08).<br />
Byte 2... The second byte returns the contents of the received sub command byte (sub<br />
command 1 =< pin number).<br />
Byte 3... In byte 3 the contents of the byte which has been selected in the request is returned.<br />
<strong>esd</strong> <strong>Protocol</strong> <strong>for</strong> <strong>CAN</strong> <strong>Modules</strong> Rev. 3.2
3.10 Service Request<br />
Commands and Parameters<br />
By this command it is possible to inquire the error condition of the <strong>esd</strong>-<strong>CAN</strong> modules. It is possible<br />
to make various or individual modules return a transmission if they show the error status 'error on<br />
<strong>CAN</strong>' or the status bit 'new on bus' is active.<br />
The message consists of a Tx frame which has got no data.<br />
The parameters of the modules remain unchanged when this command is requested.<br />
The command can be used to find out which modules operate faultless on the bus and which<br />
modules have got transmission problems.<br />
Byte 1 Byte 2 Byte 3 Byte 4 Byte 5 Byte 6<br />
Function Command Sub command 1 Sub command 2 Not used Parameter 1 Parameter 2<br />
Always<br />
Module no_LOW Module no_HIGH CTxId<br />
Value $7F allocate with<br />
$00...$FF $00...$FF $0000...$07FF<br />
$00<br />
Table 3.10.1: Bytes of the command service request<br />
Explanation of the bytes transmitted to the module:<br />
Command... This command has got the value $7F.<br />
Sub command1,<br />
Sub command2... By the sub commands the modules are selected which should be checked.<br />
The modules are addressed by their module numbers.<br />
To select an area with various modules, in sub command 1 the lowest and in<br />
sub command 2 the highest module no. of the desired area has to be entered.<br />
The limit values are included. If only one module should transmit a status<br />
message, the same module no. has to be entered <strong>for</strong> both sub commands.<br />
Byte 4... In contrast to most of the other commands, here byte 4 and not byte 3 should<br />
be allocated with '$00'.<br />
Parameter 1,<br />
Parameter 2... In byte 5 and byte 6 the Tx identifier is interchanged on which the module<br />
should transmit a reply.<br />
<strong>esd</strong> <strong>Protocol</strong> <strong>for</strong> <strong>CAN</strong> <strong>Modules</strong> Rev. 3.2 3 - 49
Commands and Parameters<br />
Reply of the module to the command 'service request':<br />
If a module receives this command, and if a short term <strong>CAN</strong> error existed (bit 'error on <strong>CAN</strong>' = 1)<br />
or/and if the bit 'new on bus' is active, the module transmits a message with the length 0 on the<br />
received Tx identifier. No bytes are transmitted.<br />
3 - 50<br />
TxId Byte 1 Byte 2 Byte 3 Byte 4 Byte 5 Byte 6 Byte 7 Byte 8<br />
CTxId - - - - - - - -<br />
(-) Byte is not transmitted<br />
Table 3.10.2: Reply by CTxId<br />
<strong>esd</strong> <strong>Protocol</strong> <strong>for</strong> <strong>CAN</strong> <strong>Modules</strong> Rev. 3.2
<strong>CAN</strong> master<br />
<strong>CAN</strong> module<br />
save<br />
master time<br />
tm1<br />
ts1<br />
save<br />
module time<br />
DTX<br />
command received<br />
save<br />
master time<br />
tm2<br />
sync. command, tm0 sync. command, tm1 sync. command, tm2<br />
command received<br />
+<br />
'synccontroller'<br />
-<br />
ts2<br />
save module time,<br />
determine difference<br />
between ts1and tm1,<br />
compensate difference<br />
Commands and Parameters<br />
3.11 Setting the Absolute Module-Time and Synchronisation of the <strong>Modules</strong><br />
As described in the chapter 'Request Configuration' (refer sub command $04), each module (from<br />
software rev. 17.7) is equipped with an own 32-bits counter that works as a 24-hours clock with a<br />
resolution of 1 ms.<br />
With the command $FD the absolute module time is set. The command can be called after a system<br />
start to synchro the module time with the <strong>CAN</strong> master time. Additionally the command sets the<br />
counter overflow value from $FFFFFFFF to $05265BFF (24 hours).<br />
The command can be called <strong>for</strong> separate modules (module no. P 0), but should be used with the<br />
address 'module no. = 0' to access all connected <strong>esd</strong> <strong>CAN</strong> modules with one call.<br />
Normally the call is only necessary <strong>for</strong> one time. The new module time is adapted by all modules<br />
that never have adapt the absolute time be<strong>for</strong>e ('New_on_ Bus').<br />
After the new time value is received, the ‘sync controller’ of the module is started and waits <strong>for</strong><br />
‘sync’ messages in (if possible) periodical time stamps (T SYNC_PER.<br />
10 s...100 s). The command $FE<br />
is used <strong>for</strong> the synchronisation of the module clock. The ‘sync’ controller of the module need the<br />
time difference between the master time and the time of the local synch call as an input value.<br />
The following figure shall show the functionality:<br />
DTX<br />
command received<br />
save<br />
master time<br />
tm3<br />
+<br />
-<br />
'synccontroller'<br />
ts3<br />
save module time,<br />
determine difference<br />
between ts2 and tm2,<br />
compensate difference<br />
Fig. 3.11.1: Time synchronisation<br />
Time<br />
tm1, ts1: The <strong>CAN</strong> master has send the command $FE and stores his actual time (tm1). The<br />
module receives the command and stores his actual time (ts1) too. -<<br />
<strong>esd</strong> <strong>Protocol</strong> <strong>for</strong> <strong>CAN</strong> <strong>Modules</strong> Rev. 3.2 3 - 51
3 - 52<br />
Commands and Parameters<br />
tm2, ts2: When transmitting the next synchronisation command the master sends tm1 and stores<br />
the actual time as tm2. The slave receives tm1 and determines his difference value from<br />
ts1 and tm1.<br />
tm3, ts3: The sequence of tm2/ts2 is repeated with every command call.<br />
The transfer of the synchronisation command should be executed in intervals between 10 s and<br />
2 min. Is the difference between nominal value and real value (˛time) high, a transfer between<br />
5...10 s is useful. The time difference ˛time can be requested by the command 'Request<br />
Configuration’.<br />
The accuracy of the synchronisation depends on the time the <strong>CAN</strong> master needs <strong>for</strong> storing his<br />
actual master time after the synchro command is send. The shorter this time is, the more precise is<br />
the synchronisation. Additionally it is important that the master time is always stored after a<br />
constant delay time after the transfer of the command. The higher the ’jitter', the higher is the error<br />
of the synchronisation.<br />
Byte 1 Byte 2 Byte 3 Byte 4 Byte 5 Byte 6 Byte 7 Byte 8<br />
Sub not Parameter Parameter<br />
Function Command Module no. Parameter 2 Parameter 4<br />
command used 1 3<br />
$FD- absolute_time Selected<br />
absolute_time<br />
module no.<br />
Value $00 $00<br />
$00,<br />
$FE- sync_time $01...$FF<br />
sync_time_master<br />
Table 3.11.1: Bytes of the commands 'setting the absolute module time' and 'synchronisation of<br />
the modules'<br />
Explanation of the bytes transmitted to the module:<br />
Command... These commands have got the values $7F (setting of the absolute module<br />
time) and $FE (synchronisation of the module time). With these commands<br />
no parameters can be requested. But the actual module time can be requested<br />
by the command ‘Request Configuration'.<br />
Sub command ... Has always be set to '0'.<br />
Parameter 1 to<br />
Parameter 4 ... With the command $FD in byte 5 to byte 8 the absolute module time is set.<br />
(absolute_time...).<br />
Value range: 0 ... 86 400 000 ms (24 h)<br />
(0 ... $ 05 26 5B FF)<br />
With the command $FE the synchronisation time of the master (sync_<br />
time_master) is set (refer to description at the previous page).<br />
<strong>esd</strong> <strong>Protocol</strong> <strong>for</strong> <strong>CAN</strong> <strong>Modules</strong> Rev. 3.2
3.12 Supervisor Commands<br />
Commands and Parameters<br />
In contrast to the other commands, supervisor commands are able to address individual or all<br />
modules in the <strong>CAN</strong> net.<br />
By the module no. $00 all modules are selected. There<strong>for</strong>e it is not recommendable to adjust the<br />
module no. $00 on a module.<br />
The supervisor commands are not able to request parameters from the module.<br />
The command RESET has got the same consequences as a 'power-on RESET'. It resets all<br />
parameters which are not stored in the EEPROM. After the RESET the parameters filed in the<br />
EEPROM are active, or, if the EEPROM data are defective or the EEPROM is not available, the<br />
default parameters.<br />
If individual or all modules should be reset in a way that they operate with the default parameters<br />
after the RESET, this can be achieved by the command default RESET.<br />
During a local RESET the message outputs are activated.<br />
The command Supervisor Watchdog can be called by the Supervisor, to activate the watchdog<br />
functionality (precondition is that the watchdog time and the life time factor are greater than ‘0’).<br />
After the first activation the command has to be repeated within the time 'WDtime x<br />
WDLifeTimeFactor' otherwise a local RESET is generated at the module (refer to chapter 'System<br />
Parameter').<br />
The command suspend module causes one or all modules on the <strong>CAN</strong> to 'freeze' the actual<br />
condition of their outputs (if available) and not transmit any messages (Tx transfers) to the <strong>CAN</strong><br />
(exception: configuration reply).<br />
Parameters and commands are received and filed by the module, but not evaluated: It is possible<br />
there<strong>for</strong>e, e.g., to set output data on the module without changing the output conditions at once.<br />
If the module is activated again by the command 'continue', possibly available outputs are set<br />
immediately according to the last received data and the module operates with the last received<br />
parameters.<br />
<strong>esd</strong> <strong>Protocol</strong> <strong>for</strong> <strong>CAN</strong> <strong>Modules</strong> Rev. 3.2 3 - 53
3 - 54<br />
Commands and Parameters<br />
Byte 1 Byte 2 Byte 3 Byte 4 Byte 5 Byte 6<br />
selected<br />
Function Command Sub command Not used Parameter 1 Parameter 2<br />
module no.<br />
$00 Trigger RESET $AAAA - RESET<br />
$01 Reserved -<br />
$02 Supervisor<br />
Watchdog<br />
Always<br />
$00 All<br />
modules<br />
selected<br />
-<br />
Value $FF<br />
$03 Default RESET<br />
allocate<br />
with $00 $01..$FF<br />
$AAAA - Default RESET<br />
$04 Suspend/continue<br />
module<br />
One module<br />
selected<br />
$5A5A - Suspend<br />
$A5A5 - Continue<br />
$05 -<br />
Reset <strong>CAN</strong>-error bit<br />
Table 3.12.1: Bytes of the supervisor commands<br />
Explanation of the bytes transmitted to the module:<br />
Command... The supervisor commands all have got the value $FF.<br />
Sub command... The sub command selects the corresponding supervisor command:<br />
Sub<br />
command<br />
Function<br />
$00 Reset module<br />
$01 Reserved<br />
$02 Supervisor Watchdog<br />
$03 Reset module and activate the default parameters<br />
$04 Suspend module<br />
$05 Reset <strong>CAN</strong> error bit<br />
Table 3.12.2: Selection of the supervisor commands by the sub command<br />
<strong>esd</strong> <strong>Protocol</strong> <strong>for</strong> <strong>CAN</strong> <strong>Modules</strong> Rev. 3.2
Commands and Parameters<br />
Module no. ... Here the desired actual module no. is entered. The setting of individual<br />
modules occurs by the module no. $01 to $FF.<br />
At this command all <strong>esd</strong> modules connected to this <strong>CAN</strong> net are accessed at<br />
the same time by the module no. $00!<br />
Parameter 1,.. Depending on the sub command here are parameters interchanged, which are<br />
specific <strong>for</strong> the function:<br />
The commands RESET, default RESET, suspend/continue modules and<br />
resetting the <strong>CAN</strong> error bits are only carried out, if exactly the specified<br />
parameters are interchanged.<br />
<strong>esd</strong> <strong>Protocol</strong> <strong>for</strong> <strong>CAN</strong> <strong>Modules</strong> Rev. 3.2 3 - 55
3 - 56<br />
<strong>esd</strong> <strong>Protocol</strong> <strong>for</strong> <strong>CAN</strong> <strong>Modules</strong> Rev. 3.2
4. Examples <strong>for</strong> Parameterization<br />
Examples<br />
L<br />
In this chapter the operation and the initialisation of a module should be clarified with some<br />
examples.<br />
4.1 Setting the Tx Identifier TxId1<br />
In this example it will be shown how the Tx identifier TxId1 is programmed on a module. The Tx<br />
identifier should get the value $1AA. The Tx identifier had not been programmed at this module so<br />
far.<br />
Be<strong>for</strong>e the new identifier is set, the module should transmit a reply by the actual Tx identifier on the<br />
Tx identifier $567. The reply is requested by command $02.<br />
As actual module no. the value $12 will be presumed here.<br />
<strong>CAN</strong> Id<br />
$700<br />
=INIT Id<br />
Byte 1 Byte 2 Byte 3 Byte 4 Byte 5 Byte 6<br />
(command) (sub command) (always $00) (module no.) (CTxId-H) (CTxId-L)<br />
$02 $00 $00 $12 $05 $67<br />
Byte 7 and 8 are not needed <strong>for</strong> this command.<br />
Table 4.1.1: Request of the Tx identifier<br />
After this INIT Id had been transmitted to the module, the module responds on the Tx identifier<br />
$567:<br />
<strong>CAN</strong> Id<br />
Byte 1 Byte 2 Byte 3 Byte 4<br />
(returns command) (returns sub command) (returns TxId1-H) (returns TxId1-L)<br />
$567 $02 $00 $00 $92<br />
Byte 5 to 8 are not transmitted.<br />
Table 4.1.2: Reply of the Tx identifier<br />
As can be seen from byte 3 and 4 the module has actually got the Tx identifier TxId1 $092.<br />
<strong>esd</strong> <strong>Protocol</strong> <strong>for</strong> <strong>CAN</strong> <strong>Modules</strong> Rev. 3.2 4 - 1
L Examples<br />
Now the Tx identifier TxId1 (=$1AA) is allocated to the module:<br />
<strong>CAN</strong> Id<br />
$700<br />
=INIT Id<br />
4 - 2<br />
Byte 1 Byte 2 Byte 3 Byte 4 Byte 5 Byte 6<br />
(command) (sub command) (always $00) (module no.) (TxId-H) (TxId-L)<br />
$82 $00 $00 $12 $01 $AA<br />
Byte 7 and 8 are not needed <strong>for</strong> this command.<br />
Table 4.1.3: Setting the Tx identifier TxId1<br />
The Tx identifier TxId1 of the module is now assigned with the value $1AA. The new identifier is<br />
active immediately after it has been received by the module.<br />
<strong>esd</strong> <strong>Protocol</strong> <strong>for</strong> <strong>CAN</strong> <strong>Modules</strong> Rev. 3.2
4.2 Restoring the Default Parameters<br />
Examples<br />
L<br />
This example should show how a module whose default parameters have been changed during an<br />
initialisation is put back into the original condition.<br />
There are various ways to reactivate the default parameters.<br />
4.2.1 ...if the actual module no. is unknown:<br />
If only on this <strong>esd</strong>-<strong>CAN</strong> module the default parameters should be restored, you have to proceed as<br />
follows:<br />
The coding switches of the module have to be set to $00 and a RESET has to be triggered.<br />
Because the module no. is unknown, the RESET is triggered by interrupting the supply voltage of<br />
the module or the voltage at the EMERGENCY-STOP outputs or by triggering a global module<br />
RESET on the <strong>CAN</strong> (RESET all modules).<br />
This global RESET resets all modules. But the default parameters are only restored on those<br />
modules whose coding switches are adjusted to $00.<br />
<strong>CAN</strong> Id<br />
$700<br />
=INIT Id<br />
Byte 1 Byte 2 Byte 3 Byte 4<br />
(command) (sub command) (always $00) (RESET type)<br />
Byte 5 Byte 6<br />
$00<br />
$FF $00 $00 $AA $AA<br />
(global)<br />
Table 4.2.1: RESET of all <strong>esd</strong> modules of the <strong>CAN</strong><br />
The bytes 7 and 8 are not needed <strong>for</strong> this command.<br />
If on all <strong>esd</strong>-<strong>CAN</strong> modules on the <strong>CAN</strong> the default parameters should be reactivated, the global<br />
command 'default RESET' is given to the bus:<br />
<strong>CAN</strong> Id<br />
$700<br />
=INIT Id<br />
Byte 1 Byte 2 Byte 3 Byte 4<br />
(command) (sub command) (always $00) (RESET type)<br />
Byte 5 Byte 6<br />
$00<br />
$FF $03 $00 $AA $AA<br />
(global)<br />
Table 4.2.2: Default RESET of all <strong>esd</strong> modules of the <strong>CAN</strong><br />
The bytes 7 and 8 are not needed <strong>for</strong> this command.<br />
After this RESET the module starts again with the default parameters. By coding switches the<br />
desired identifier can be determined again.<br />
<strong>esd</strong> <strong>Protocol</strong> <strong>for</strong> <strong>CAN</strong> <strong>Modules</strong> Rev. 3.2 4 - 3
L Examples<br />
4.2.2 ...if the module no. is known:<br />
If the module no. is known it is possible to restore the default parameters by the command 'default<br />
RESET' at the desired module. The module no. of the module is presumed with $12 here, again:<br />
<strong>CAN</strong> Id<br />
$700<br />
=INIT Id<br />
4 - 4<br />
Byte 1 Byte 2 Byte 3 Byte 4<br />
(command) (sub command) (always $00) (RESET type)<br />
Byte 5 Byte 6<br />
$12<br />
$FF $03 $00 $AA $AA<br />
(selective)<br />
Table 4.2.3: Default RESET of an <strong>esd</strong> module on the <strong>CAN</strong><br />
The bytes 7 and 8 are not needed <strong>for</strong> this command.<br />
<strong>esd</strong> <strong>Protocol</strong> <strong>for</strong> <strong>CAN</strong> <strong>Modules</strong> Rev. 3.2