Installatie instructie horizo... - Climarad
Installatie instructie horizo... - Climarad
Installatie instructie horizo... - Climarad

Create successful ePaper yourself
Turn your PDF publications into a flip-book with our unique Google optimized e-Paper software.
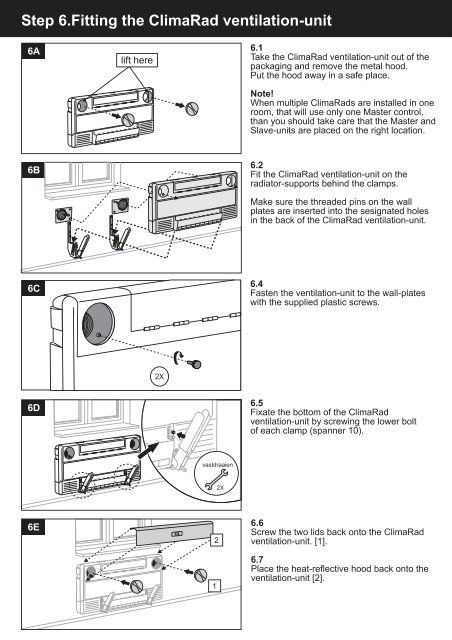
Step 6.Fitting the ClimaRad ventilation-unit<br />
6A<br />
6B<br />
6C<br />
6D<br />
6E<br />
lift here<br />
2X<br />
vastdraaien<br />
2<br />
1<br />
2X<br />
6.1<br />
Take the ClimaRad ventilation-unit out of the<br />
packaging and remove the metal hood.<br />
Put the hood away in a safe place.<br />
Note!<br />
When multiple ClimaRads are installed in one<br />
room, that will use only one Master control,<br />
than you should take care that the Master and<br />
Slave-units are placed on the right location.<br />
6.2<br />
Fit the ClimaRad ventilation-unit on the<br />
radiator-supports behind the clamps.<br />
Make sure the threaded pins on the wall<br />
plates are inserted into the sesignated holes<br />
in the back of the ClimaRad ventilation-unit.<br />
6.4<br />
Fasten the ventilation-unit to the wall-plates<br />
with the supplied plastic screws.<br />
6.5<br />
Fixate the bottom of the ClimaRad<br />
ventilation-unit by screwing the lower bolt<br />
of each clamp (spanner 10).<br />
6.6<br />
Screw the two lids back onto the ClimaRad<br />
ventilation-unit. [1].<br />
6.7<br />
Place the heat-reflective hood back onto the<br />
ventilation-unit [2].