Installatie instructie horizo... - Climarad
Installatie instructie horizo... - Climarad
Installatie instructie horizo... - Climarad

You also want an ePaper? Increase the reach of your titles
YUMPU automatically turns print PDFs into web optimized ePapers that Google loves.
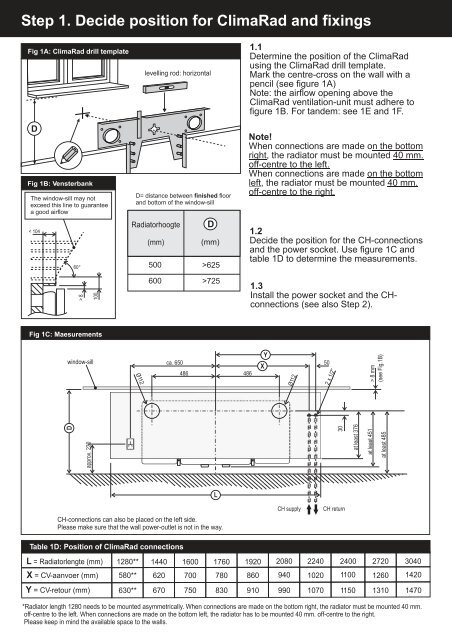
Step 1. Decide position for ClimaRad and fixings<br />
Fig 1A: ClimaRad drill template<br />
D<br />
Fig 1B: Vensterbank<br />
The window-sill may not<br />
exceed this line to guarantee<br />
a good airflow<br />
< 104<br />
D<br />
60°<br />
>8<br />
approx. 230<br />
100<br />
Fig 1C: Maesurements<br />
window-sill<br />
Ø112<br />
levelling rod: <strong>horizo</strong>ntal<br />
ca. 650<br />
486<br />
Table 1D: Position of ClimaRad connections<br />
L = Radiatorlengte (mm)<br />
X = CV-aanvoer (mm)<br />
Y = CV-retour (mm)<br />
1280**<br />
580**<br />
630**<br />
D= distance between finished floor<br />
and bottom of the window-sill<br />
Radiatorhoogte<br />
CH-connections can also be placed on the left side.<br />
Please make sure that the wall power-outlet is not in the way.<br />
1440<br />
620<br />
670<br />
1600<br />
700<br />
750<br />
D<br />
(mm) (mm)<br />
500 >625<br />
600 >725<br />
1760<br />
780<br />
830<br />
486<br />
1.1<br />
Determine the position of the ClimaRad<br />
using the ClimaRad drill template.<br />
Mark the centre-cross on the wall with a<br />
pencil (see figure 1A)<br />
Note: the airflow opening above the<br />
ClimaRad ventilation-unit must adhere to<br />
figure 1B. For tandem: see 1E and 1F.<br />
Note!<br />
When connections are made on<br />
the bottom<br />
right, the radiator must be mounted 40 mm.<br />
off-centre to the left.<br />
When connections are made on the bottom<br />
left, the radiator must be mounted 40 mm.<br />
off-centre to the right.<br />
1.2<br />
Decide the position for the CH-connections<br />
and the power socket. Use figure 1C and<br />
table 1D to determine the measurements.<br />
1.3<br />
Install the power socket and the CHconnections<br />
(see also Step 2).<br />
1920<br />
860<br />
910<br />
Y<br />
Ø112<br />
CH supply<br />
2080<br />
940<br />
990<br />
2240<br />
1020<br />
1070<br />
50<br />
2 x 1/2”<br />
30<br />
CH return<br />
*Radiator length 1280 needs to be mounted asymmetrically. When connections are made on the bottom right, the radiator must be mounted 40 mm.<br />
off-centre to the left. When connections are made on the bottom left, the radiator has to be mounted 40 mm. off-centre to the right.<br />
Please keep in mind the available space to the walls.<br />
at least 376<br />
2400<br />
1100<br />
1150<br />
>8mm<br />
(see Fig.1B)<br />
at least 451<br />
at least 485<br />
2720<br />
1260<br />
1310<br />
3040<br />
1420<br />
1470