Installatie instructie horizo... - Climarad
Installatie instructie horizo... - Climarad
Installatie instructie horizo... - Climarad
Create successful ePaper yourself
Turn your PDF publications into a flip-book with our unique Google optimized e-Paper software.
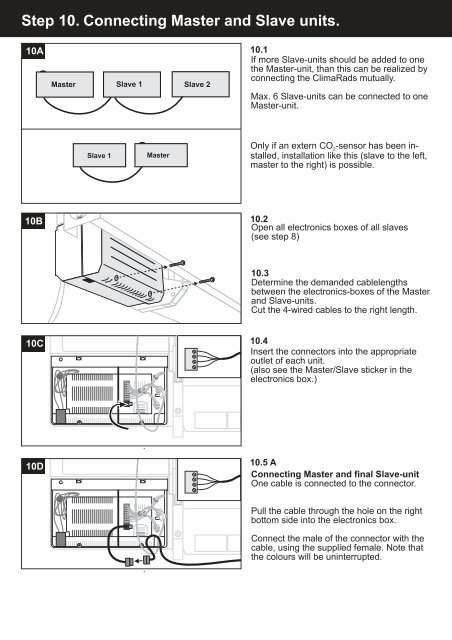
Step 10. Connecting Master and Slave units.<br />
10A<br />
10B<br />
10C<br />
10D<br />
Master Slave 1 Slave 2<br />
Slave 1<br />
Master<br />
10.1<br />
If more Slave-units should be added to one<br />
the Master-unit, than this can be realized by<br />
connecting the ClimaRads mutually.<br />
Max. 6 Slave-units can be connected to one<br />
Master-unit.<br />
Only if an extern CO2-sensor has been installed,<br />
installation like this (slave to the left,<br />
master to the right) is possible.<br />
10.2<br />
Open all electronics boxes of all slaves<br />
(see step 8)<br />
10.3<br />
Determine the demanded cablelengths<br />
between the electronics-boxes of the Master<br />
and Slave-units.<br />
Cut the 4-wired cables to the right length.<br />
10.4<br />
Insert the connectors into the appropriate<br />
outlet of each unit.<br />
(also see the Master/Slave sticker in the<br />
electronics box.)<br />
10.5 A<br />
Connecting Master and final Slave-unit<br />
One cable is connected to the connector.<br />
Pull the cable through the hole on the right<br />
bottom side into the electronics box.<br />
Connect the male of the connector with the<br />
cable, using the supplied female. Note that<br />
the colours will be uninterrupted.


