Installatie instructie horizo... - Climarad
Installatie instructie horizo... - Climarad
Installatie instructie horizo... - Climarad

You also want an ePaper? Increase the reach of your titles
YUMPU automatically turns print PDFs into web optimized ePapers that Google loves.
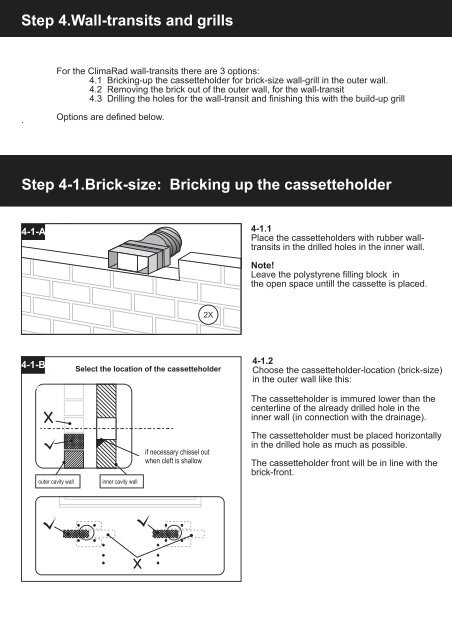
Step 4.Wall-transits and grills<br />
.<br />
Step 4-1.Brick-size: Bricking up the cassetteholder<br />
4-1-A<br />
4-1-B<br />
WA<br />
For the ClimaRad wall-transits there are 3 options:<br />
4.1 Bricking-up the cassetteholder for brick-size wall-grill in the outer wall.<br />
4.2 Removing the brick out of the outer wall, for the wall-transit<br />
4.3 Drilling the holes for the wall-transit and finishing this with the build-up grill<br />
Options are defined below.<br />
Select the location of the cassetteholder<br />
outer cavity wall inner cavity wall<br />
2X<br />
if necessary chissel out<br />
when cleft is shallow<br />
4-1.1<br />
Place the cassetteholders with rubber walltransits<br />
in the drilled holes in the inner wall.<br />
Note!<br />
Leave the polystyrene filling block in<br />
the open space untill the cassette is placed.<br />
4-1.2<br />
Choose the cassetteholder-location (brick-size)<br />
in the outer wall like this:<br />
The cassetteholder is immured lower than the<br />
centerline of the already drilled hole in the<br />
inner wall (in connection with the drainage).<br />
The cassetteholder must be placed <strong>horizo</strong>ntally<br />
in the drilled hole as much as possible.<br />
The cassetteholder front will be in line with the<br />
brick-front.