Installatie instructie horizo... - Climarad
Installatie instructie horizo... - Climarad
Installatie instructie horizo... - Climarad

Create successful ePaper yourself
Turn your PDF publications into a flip-book with our unique Google optimized e-Paper software.
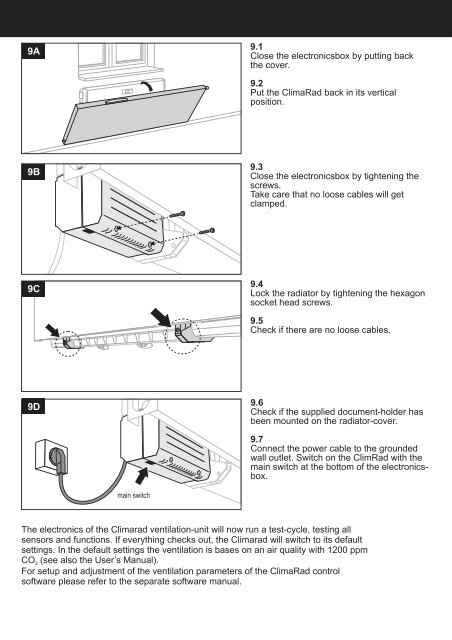
9A<br />
9B<br />
9C<br />
9D<br />
main switch<br />
9.1<br />
Close the electronicsbox by putting back<br />
the cover.<br />
9.2<br />
Put the ClimaRad back in its vertical<br />
position.<br />
9.3<br />
Close the electronicsbox by tightening the<br />
screws.<br />
Take care that no loose cables will get<br />
clamped.<br />
9.4<br />
Lock the radiator by tightening the hexagon<br />
socket head screws.<br />
9.5<br />
Check if there are no loose cables.<br />
9.6<br />
Check if the supplied document-holder has<br />
been mounted on the radiator-cover.<br />
9.7<br />
Connect the power cable to the grounded<br />
wall outlet. Switch on the ClimRad with the<br />
main switch at the bottom of the electronicsbox.<br />
The electronics of the <strong>Climarad</strong> ventilation-unit will now run a test-cycle, testing all<br />
sensors and functions. If everything checks out, the <strong>Climarad</strong> will switch to its default<br />
settings. In the default settings the ventilation is bases on an air quality with 1200 ppm<br />
CO (see also the User’s Manual).<br />
2<br />
For setup and adjustment of the ventilation parameters of the ClimaRad control<br />
software please refer to the separate software manual.