MAX S92+ HDMI_EN_v1.0.indd - FTE Maximal
MAX S92+ HDMI_EN_v1.0.indd - FTE Maximal
MAX S92+ HDMI_EN_v1.0.indd - FTE Maximal

You also want an ePaper? Increase the reach of your titles
YUMPU automatically turns print PDFs into web optimized ePapers that Google loves.
<strong>MAX</strong> <strong>S92+</strong> <strong>HDMI</strong>
<strong>EN</strong>GLISH<br />
The lightning fl ash with<br />
arrowhead symbol, within<br />
an equilateral triangle, is<br />
intended to alert the user<br />
to “dangerous voltage”<br />
and to prevent from a<br />
risk of electric shock.<br />
SAFETY PRECAUTION<br />
Warning:<br />
To reduce the risk of electric shock,<br />
don’t open the cabinet. Refer servicing<br />
to qualifi ed personnel only.<br />
PAG. 2<br />
The exclamation point<br />
within an equilateral<br />
triangle is intended<br />
to alert the user to<br />
important operating and<br />
maintenance (servicing).<br />
Please read the manual carefully before installing the receiver.<br />
Caution: Never open the device by yourself. Dangerously high voltages are present inside the unit. Refer<br />
servicing to qualifi ed staff only.<br />
When installing the receiver, always unplug the receiver from the mains voltage.<br />
Unplug the receiver from the mains in case of long periods without operating the receiver (for example,<br />
during holidays!).<br />
To prevent shock hazard, do not touch the power plug with wet hands.<br />
Always unplug the receiver before cleaning it or working on the connections.<br />
Do not install the receiver close to strong heat sources, and ensure a good aeration if you plan to install<br />
the receiver in a small cabinet.<br />
Before you start operating the receiver, make sure that the satellite antenna is properly built up, optimally<br />
connected and aligned.<br />
The correct place to install the receiver is, of course, near your TV set and any other A/V signal sources<br />
(DVD, VCR, CD, game console, etc.).<br />
Choose a stable support, in which you can easily lay the necessary connecting cables without stumblingdanger.<br />
The receiver should be installed near an easily accessible outlet.<br />
Do not install the receiver in a place where it can be reached by liquid spills.<br />
Do not put any heavy objects as, for example, a TV-device over the receiver; the receiver could be<br />
damaged.<br />
DO NOT INSTALL THE RECEIVER:<br />
- On an unstable surface<br />
- Subject to direct sunlight<br />
- In high humidity environment<br />
- Outside the receiver’s temperature range (+5°...+40°C)<br />
If the receiver is subject to severe temperature changes, it can suffer from water condensation inside.<br />
Switch off the receiver in these cases for at least 2 hours before resuming operation.<br />
rev 1.0
ev 1.0<br />
QUICK INSTALLATION GUIDE<br />
QUICK INSTALLATION GUIDE<br />
FOLLOW NEXT STEPS FOR THE CORRECT INSTALLATION OF THIS RECEIVER.<br />
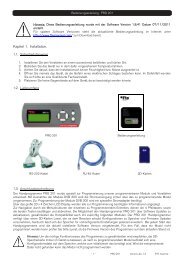
STEP 1: CONNECTIONS<br />
The coaxial cable, with satellite signal, must be connected to the “IF IN” connector. The “<strong>HDMI</strong>” or “TV<br />
SCART” connector must be connected to the TV set.<br />
Depending on the type of installation, the receiver should be connected and confi gured following next<br />
examples.<br />
Example 1 – Basic System<br />
Example 3 – Combined with terrestrial Example 4 – Motorized system<br />
PAG. 3<br />
Example 2 – DISEqC switches<br />
<strong>EN</strong>GLISH
<strong>EN</strong>GLISH<br />
IMAGE 1<br />
QUICK INSTALLATION GUIDE<br />
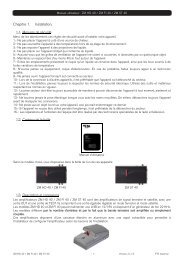
STEP 2: BASIC CONFIGURATION OF THE<br />
RECEIVER<br />
The receiver includes an installation assistant (Quick Setup)<br />
that will help you to setup the different parameters.<br />
When the receiver is turned on at fi rst time (using the button at<br />
the rear panel of the receiver), the next menu is shown on the<br />
TV (Image 1):<br />
The receiver is programmed with all the channels of Astra (at<br />
position 1 of the DISEqC), Hotbird (at position 2 of the DISEqC),<br />
Hispasat (at position 3 of the DISEqC) and Turksat (at position<br />
4 of the DISEqC). If your installation is different to this case,<br />
please follow installation steps to search the channels.<br />
In order to move through the different options of this menu,<br />
please use the keys [ ] of your remote control. If a “Short<br />
circuit on the LNB” message is shown on the TV, please check<br />
the connections before continuing the installation.<br />
Language: press [ ] to select languages. The selection<br />
of languages include: English, German, French, Spanish,<br />
Italian, Portuguese, Turkish, Polish, Russian, Danish, Greek,<br />
Hungarian, Arabic, Farsi, Dutch.<br />
First Audio: Some channels offer more than one audio language.<br />
This function allows you to set the preferred audio language for<br />
those channels using [ ]. If a channel offers the same<br />
audio language as the “First Audio” you set the system will play<br />
this audio language as default. If the channel does not offer<br />
this audio language then the system will compare the offered<br />
languages with the second audio language. The selections of<br />
audio languages include: English, German, French, Spanish,<br />
Italian, Portuguese, Turkish, Polish, Russian, Danish, Greek,<br />
Hungarian, Arabic, Farsi, Dutch.<br />
Second Audio: If the channel has no audio language that<br />
corresponds with “First Audio” but with “Second Audio” the<br />
system will play the second audio language as default. If no<br />
audio language corresponds with the “Second Audio” then the<br />
default language of the current channel will be played instead.<br />
The selections of audio languages include: English, German,<br />
French, Spanish, Italian, Portuguese, Turkish, Polish, Russian,<br />
Danish, Greek, Hungarian, Arabic, Farsi, Dutch.<br />
LNB Power: Here you can set the power output to the LNB. If<br />
your receiver is connected to the LNB directly then you need to<br />
set the LNB Power to “On”. If your receiver is connected to a<br />
multi switch (SMATV signal distribution system) then it may be<br />
that you don’t need to provide the power to the LNB. But since<br />
this is depending on the kind of installed distribution system we<br />
PAG. 4<br />
rev 1.0
ev 1.0<br />
IMAGE 2<br />
IMAGE 3<br />
QUICK INSTALLATION GUIDE<br />
recommend you to contact your installer or to refer to the user<br />
manual of this system to get the correct information.<br />
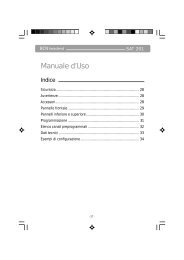
Single search: You can edit the following items (Image 2):<br />
1. Satellite: Press [ ] to switch Satellites or press [OK] to<br />
enter satellite list to select directly.<br />
2. LNB Confi guration: Selecting this option and pressing [OK],<br />
the LNB Confi guration menu will be displayed. In this menu,<br />
next options can be modifi ed (Image 3):<br />
- LNB Type: Press [ ] to switch among “Standard”, “User”<br />
and “Universal” mode. If you select “Standard” or “User”, the<br />
frequency of the LNB can be changed. Pressing [OK] the<br />
frequencies will appear to be edited. Select the frequency<br />
you want to edit and change the value with [ ]<br />
- 22K: Use [ ] to switch “ON” and “Off”. The 22 kHz signal<br />
is used in KU Universal LNBs to change between low<br />
band and high band. After choosing LNB type “Universal”<br />
you cannot modify 22K.<br />
- DiSEqC1.0: Use [ ] to switch the options of DiSEqC<br />
switches.<br />
- DiSEqC1.1: Use [ ] to switch the options of DiSEqC1.1<br />
switches.<br />
- Positioner: Press [ ] to select between “None /<br />
DiSEqC1.2 / USALS”.<br />
- Polarity: Press [ ] to switch between “Auto / H / V”.<br />
Once the LNB is confi gured, press [Exit] to save the changes<br />
and go to the previous window to continue confi guring<br />
the antenna.<br />
- Toneburst: Press [ ] to switch this function “On” or<br />
“Off”.<br />
3. DiSEqC1.0: Use [ ] to switch the options of DiSEqC<br />
switches.<br />
4. On “TP Index” item use [ ] to select the desired<br />
transponder.<br />
5. In the “FTA Only” item, press [ to select to scan only<br />
free channels or even scrambled channels. If you select “Yes” it<br />
will scan free channels only.<br />
6. In “Scan Channel” item, press [ ] to select to scan TV<br />
+ Radio Channels, or just TV channels or just Radio channels.<br />
7. In “Scan Mode” item you can select “Auto Scan” to blind<br />
scan or “Preset Scan” to scan all preset transponders.<br />
8. Move the highlight to “Search” and press [OK] button to<br />
start scanning. Bars are showing the progress of the channel<br />
scanning in the lower part of the window and the found channels<br />
are listed.<br />
You can stop the scan with [Exit] and save the so far found<br />
channels.<br />
9. Press [Exit] to exit this menu. A window to confi rm the<br />
changes will appear.<br />
PAG. 5<br />
<strong>EN</strong>GLISH
<strong>EN</strong>GLISH<br />
IMAGE 4<br />
QUICK INSTALLATION GUIDE<br />
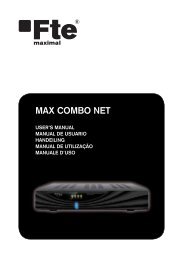
Multi search: You can edit the following items (Image 4):<br />
1. On “Satellite” item press [OK] to open the satellite list.<br />
Then press [ ] to move the highlight and press [OK]<br />
to mark/unmark and [EXIT] to fi nish the selection. You can<br />
select several satellites in this menu. At the bottom of the<br />
screen you can see the selected satellites. The system will use<br />
DiSEqC1.0/1.1, DiSEqC1.2 and USALS functions to search<br />
the marked satellites and scan channels.<br />
2. On “FTA Only” item, press [ ] to select scanning of all<br />
channels or just scanning of free channels. If you select “Yes” it<br />
will scan free channels only.<br />
3. On “Scan Channel” item, press [ ] to select the<br />
scanning range from TV + Radio Channels, only TV channels or<br />
only Radio channels.<br />
4. On “Scan Mode” item, you can select “Auto Scan” to make<br />
a blind scan or “Preset Scan” to scan all preset transponders of<br />
the selected satellites.<br />
5. Select “Search” and press [OK] to start scanning. In the<br />
lower part of the window the progress of scanning and the<br />
found channels are displayed.<br />
6. Press [Exit] to cancel or fi nish the scanning and saving the<br />
found channels.<br />
Main Menu: Selecting this option, the main menu will appear<br />
on the TV.<br />
PAG. 6<br />
rev 1.0
ev 1.0<br />
IMAGE 5<br />
QUICK INSTALLATION GUIDE<br />
STEP 3: TIME CONFIGURATION<br />
It is recommended to setup the clock before starting to enjoy<br />
the receiver, because correct time maybe is required by some<br />
applications. Please complete following options:<br />
Press the [Menu] key of the remote control for appearing the<br />
main menu. Select the “System Setup” option and confi rm<br />
pressing [OK].<br />
Once in the “System Setup” option, please select “Local Time<br />
setting” option and press [OK]. Select “Time” option and press<br />
[OK]. Image 5 is watched on the TV. For setting up the time,<br />
please complete:<br />
1. GMT Usage: this option will allow you to select if the date<br />
and time will be introduced manually (GMT Usage: Off) or if<br />
you wish to introduce the offset respect GMT manually (GMT<br />
Usage: On).<br />
2. GMT Offset: If GMT Usage is On, the offset respect GMT<br />
has to be confi gured depending on your region or country. Use<br />
the [ ] keys to choose the offset. Remember that the<br />
offset values are between -12:00 and +12:00<br />
3. Summer: this option is only available when “USE GMT” is<br />
enabled. Use [ ] to switch on/off the summer timetable.<br />
4. Date / Time: In order to introduce manually the time and<br />
date. Before these values can be modifi ed, the automatic<br />
control of GMT has to be turned off.<br />
NOTE: If the current channel provides the correct time<br />
information, you will see the current time after you entered<br />
“Time” menu. If the channel doesn’t provide time information,<br />
you have to input the date and time information manually. The<br />
most channels support the time signal.<br />
5. Show time: Use [ ] to switch on/off this option. When<br />
the option is enabled, the time will be displayed at the TV in a<br />
frame in the top right margin.<br />
6. Press [Exit] to exit the menu.<br />
PAG. 7<br />
<strong>EN</strong>GLISH
<strong>EN</strong>GLISH<br />
QUICK INSTALLATION GUIDE<br />
TV Channel List: This option shows the list of TV stored channels.<br />
Radio Channel List: This option shows the list of Radio stored channels.<br />
Channel Setup: This option allows setting the receiver to start in a predefi ned channel.<br />
Favourite Channel List Name: It allows changing the name of the favourite groups.<br />
Delete All: This option deletes all TV and Radio stored channels.<br />
Restore channel list and settings: This option loads the user TV and Radio channel list,<br />
saved previously.<br />
Save channel list and settings: This option makes a backup of the channel list and it will<br />
allow restoring the channel list even thought after a factory default.<br />
Single Search: Once the antenna is confi gured, this option allows search for the channels<br />
of one satellite.<br />
Multi Search: Once the antenna is confi gured, this option allows search for the channels<br />
of various satellites.<br />
TP Search: Once the antenna is confi gured, this option allows search for the channels<br />
of one TP.<br />
Satellite List: This option shows all the stored satellites. This list can be modifi ed.<br />
TP List: This option shows all the stored TP. This list can be modifi ed.<br />
Satellite Guide: After introducing some data, this application allows to know which<br />
orientation and elevation should be the antenna.<br />
PAG. 8<br />
rev 1.0
ev 1.0<br />
QUICK INSTALLATION GUIDE<br />
Language: This option allows choosing the language of the menus.<br />
TV System: This option allows choosing the video Standard and other parameters of<br />
the screen.<br />
Time & Timer Setting: Timer setting menu.<br />
OSD Setting: This option allows confi guring the subtitles of the channel information.<br />
Parental Lock: In this option, user can lock the access to the menu and change the<br />
password of the receiver.<br />
LNB Power: Turns on or off the LNB power.<br />
RCU position Switch: To chose the RCU position of the remote control.<br />
Information: Shows all the technical information for the selected channel.<br />
Quick Setup: The installation assistant will be loaded.<br />
Game: Some games like Tetris, Snake and Othello.<br />
Factory Default: This option resets the receiver and loads the factory default values.<br />
Software Upgrade: To update the receiver with other receiver or by satellite.<br />
SatcoDX Auto programming: To load SatcoDX channel lists.<br />
PAG. 9<br />
<strong>EN</strong>GLISH
<strong>EN</strong>GLISH<br />
INDEX<br />
1. Panel & Remote Control Description<br />
1.1. Front Panel Description…….......................................…………………………12<br />
1.2. Rear Panel Description……................................………….…………………..12<br />
1.3. Remote Control Description…...............................................…………………………..13<br />
2. Basic Operations<br />
2.0. Switch on STB……………………….....................................………………………………...14<br />
2.1. Standby ……………………..............................................…………………………………...14<br />
2.2. TTX …………..................................................……………………………………..14<br />
2.3. Mute……………............................................………………………………………..14<br />
2.4. Channel Number…………...........................……………………………………………………15<br />
2.5. Multi-Pictures……............................……………………………………………………………15<br />
2.6. CH + / CH -…...............................................…………………….…………………………..15<br />
2.7. TV/RADIO…………........................…………………………………………………….15<br />
2.8. Vol+/Vol-…......................................……………………………………………………….15<br />
2.9. Exit….................................……………………………………………………..15<br />
2.10. Menu……………………...................................…………………………………..15<br />
2.11. Recall…..............................................………………………………………...15<br />
2.12. Channel List…………………….........................…………………………………...15<br />
2.13. EPG…………………...............................…………………………………………...16<br />
2.14. List………………................................…………………………………………………17<br />
2.15. Favourites………....................................………………………………………………...17<br />
2.16. Audio Track / Mode…...........................……………………………………………….17<br />
2.17. Information……..................................…………………………………………...17<br />
2.18. FAV +/-…..................................……………………………………………….17<br />
2.19. ZOOM……………………………………………………………………...17<br />
2.20. Subtitles……………………………………………………………………...18<br />
2.21. LNB Short……………………………………………………………………...18<br />
3. Channel<br />
3.1. TV Channel List…………....................……………………………………………..19<br />
3.1.1. Favourite………...............................………………………………….……………19<br />
3.1.2. Move.……………..............................………… …………………………….…………20<br />
3.1.3. Sort......................................………………………… …………………….………..20<br />
3.1.4. Edit….......................................…………………………………………….20<br />
3.1.4.1 Delete…........................................…………….…...20<br />
3.1.4.2 Skip….......................…………………………………..…………..20<br />
3.1.4.3 Lock..….................................………………………… …….……….21<br />
3.1.4.4 Edit..........................…………………...………………………...21<br />
3.1.5. Find…………….........................……………………..……..………………..…….21<br />
3.2. Radio Channel List……..................................……………………………………......22<br />
3.3 Channel Setup…………..................................………………………………......22<br />
3.3.1. Start-up Channel……………................................……………………………......22<br />
3.3.2. Channel Play Type………........................…………………………………......22<br />
PAG. 10<br />
rev 1.0
ev 1.0<br />
PAG. 11<br />
INDEX<br />
3.4. Favourite Channel List Name……..........……………………………………......22<br />
3.5. Delete All……...............……………………………………………….22<br />
3.6. Restore channel list and settings………………..........…………………………………….23<br />
3.7. Save channel list and settings………………..........…………………………………….23<br />
4. Installation<br />
4.1. Single Search…………......................……………………..…………………..24<br />
4.2. Multi Search………...........................…………...………..…………………….25<br />
4.3. TP Scan………..………………................………………………..…………………...26<br />
4.4. Satellite List………….............................………………………...………………...27<br />
4.5. TP List……………..........................………………………..………………...27<br />
4.6. Satellite Guide…………..................…………………………..………………...28<br />
5. System Setup<br />
5.1. Language………………….............………………………...…………………...29<br />
5.2. TV System……………..............…………………………..…………………...30<br />
5.3. Time & Timer Setting ………....................………………………...………………30<br />
5.3.1. Timer.......................................................................................30<br />
5.3.2. Local Time setting.................................................................................31<br />
5.3.3. Sleep Timer.................................................................32<br />
5.4. OSD Setting…………………………………......................…………………...32<br />
5.5. Parental Lock…………………………............................…………………………….32<br />
5.6. LNB Power…………………………………..............................……………………………..33<br />
5.7. RCU Position Switch………………………………….....................……………………..33<br />
6. Tools<br />
6.1. Information…………………………...................................………………………….34<br />
6.2. Quick Setup………………………………......................……………………...34<br />
6.3. Game…………………………………………….......................……………………….35<br />
6.3.1. Tetris..........................................................................................35<br />
6.3.2. Snake...................................................................................35<br />
6.3.3. Othello.........................................................................................35<br />
6.4. Factory Default………………………………………..………………..............................35<br />
6.5. Software Update………………………….………………………............................36<br />
6.5.1. RS232 Upgrade...................................................................36<br />
6.5.2. Upgrade by Satellite...................................................................36<br />
6.6. SatcoDX Auto Programming………………………...................................36<br />
7. Technical Specification……………………………………........................................38<br />
8. Conformity declaration……………………………………........................................39<br />
<strong>EN</strong>GLISH
<strong>EN</strong>GLISH<br />
PANEL & REMOTE CONTROL DESCRIPTION<br />
1. PANEL & REMOTE CONTROL DESCRIPTION<br />
1.1. FRONT PANEL DESCRIPTION<br />
1 2 3 4 5<br />
1. POWER: Switches the receiver on, or enters standby mode.<br />
2. LOCK LED: Indicates a suffi cient signal level at the IF IN input.<br />
3. DISPLAY: 4 Digits to display the program numbers.<br />
4. IR-S<strong>EN</strong>SOR: Reception sensor for the IR remote control signals.<br />
5. BUTTONS: These buttons allow controlling the main functions of the receiver, and<br />
provide the same functionality as the remote control ones.<br />
1.2. REAR PANEL DESCRIPTION<br />
1 2 3 4<br />
5<br />
7 8 9<br />
1. RS-232: Serial Port allowing software upgrades.<br />
2. IF IN: Satellite input.<br />
3. S/PDIF: Coaxial output for digital audio (AC3).<br />
4. RCA Audio L/R<br />
5. AC IN: Mains input cable.<br />
6. POWER ON/OFF: Allows to completely switching off the receiver.<br />
7. <strong>HDMI</strong>: <strong>HDMI</strong> Output<br />
Note: If you have the <strong>HDMI</strong> output connected and you select the progressive mode, the SCART<br />
output is automatically disabled.<br />
8. IF OUT: Satellite output for cascading to other devices.<br />
Note: The operation of another receiver at the same time is only possible with limited channel<br />
selection.<br />
9. TV SCART: Output SCART for the connection to a TV set.<br />
PAG. 12<br />
6<br />
rev 1.0
ev 1.0<br />
1<br />
2 3<br />
5<br />
8<br />
15<br />
19<br />
21<br />
16<br />
6<br />
9<br />
11<br />
12<br />
17<br />
PANEL & REMOTE CONTROL DESCRIPTION<br />
18<br />
20 23 24<br />
22<br />
4<br />
7<br />
10<br />
13<br />
14<br />
1. POWER: Switches receiver ON or in stand-by-mode.<br />
2. TEXT: Opens and closes teletext.<br />
3. MUTE: Switches audio on and off.<br />
4. NUMERIC KEYS: For direct typing values and names.<br />
5. CH+ / CH-: Changes channel up and down.<br />
6. TV/R: Switches between TV and Radio channels.<br />
7. VOL+ / VOL-: Adjusts audio volume up and down.<br />
8. EXIT: Exit menus or stop operations.<br />
9. M<strong>EN</strong>U: Opens the main menu.<br />
10. Back: Watch the last viewed channel.<br />
11. OK: Confi rms selections or opens channel list.<br />
12. : Changes channels volume or controls the cursor<br />
in menus.<br />
13. : Adjusts audio volume or controls the cursor in<br />
menus.<br />
14. Color Keys: Controls menu options.<br />
15. SAT: It shows the satellite list<br />
16. EPG: Shows the EPG information.<br />
17. List: Opens channel list.<br />
18. Fav: Opens favourite channel list.<br />
19. Audio: Opens audio menu.<br />
20. Sub: Switches subtitle on and off.<br />
21. Info: Shows channel information with signal bar.<br />
22. Zoom: Zoom function.<br />
23. Pup / Pdw: Moves cursor in block steps<br />
24. Fav+ / Fav-: Moves favourite channel up and down.<br />
PAG. 13<br />
<strong>EN</strong>GLISH
<strong>EN</strong>GLISH<br />
OSD 1<br />
OSD 2<br />
BASIC OPERATIONS<br />
2. BASIC OPERATIONS<br />
2.0. SWITCH ON STB<br />
Switch the [Device’s Main Power] switch on.<br />
When the STB is fi rst used it will display the quick setup page<br />
where the receiver can be confi gured quickly.<br />
For further use the STB will play the same channel as last time<br />
when it was switched off.<br />
? FREQU<strong>EN</strong>TLY ASKED QUESTION<br />
Q: The power of my STB is on and it is running in TV mode but<br />
the TV screen shows nothing:<br />
A: Make sure the TV set has been set to the correct video input<br />
(not the TV channels). For example, if you have connected the<br />
STB to the Video1 input of the TV set, then you need to select<br />
the corresponding Input on the TV. Mostly it is done with the AV<br />
button of the TVs remote control unit.<br />
Q: My STB is running in TV mode but the TV screen shows<br />
nothing except one ball and “No Signal”.<br />
A: That means the channel you selected has no signal. This can<br />
be caused by several reasons:<br />
1. The channel you selected is not from the satellite to which<br />
your dish is pointing. Select another channel.<br />
2. The signal of current TV channel is too weak. You can<br />
try to change to other channels with a stronger signal. If the<br />
problems still exist, please consult your local dealer or installer<br />
for technical service.<br />
3. You selected the wrong LNB type in the installation menu or<br />
your DiSEqC switch confi guration is not correct.<br />
2.1. STANDBY<br />
1. Press [Power] button to switch from TV mode to Standby<br />
mode.<br />
2. In Standby mode press [Power] button again to switch back<br />
to TV mode. The last active channel will be showed.<br />
3. To switch off the STB complete press the main power button<br />
(placed at the rear panel of the receiver).<br />
2.2. TTX<br />
1. Press [TXT] button in TV mode to open the teletext page<br />
(OSD 1). This service is depending on the support of the<br />
channel provider.<br />
2. If the channel does not support teletext information, it will<br />
show “No Teletext Data” on the screen.<br />
2.3. MUTE<br />
1. Press the [Mute] button to mute the sound. On the screen an<br />
icon will be displayed to indicate the muted sound (OSD 2).<br />
PAG. 14<br />
rev 1.0
ev 1.0<br />
OSD 3<br />
OSD 4<br />
OSD 5<br />
BASIC OPERATIONS<br />
2. Press the [Mute] button again to restore the sound.<br />
2.4. CHANNEL NUMBER<br />
In TV mode you can enter the channel number directly with your<br />
remote control unit and confi rm the number with the OK button<br />
to change to the desired channel.<br />
2.5. MULTI-PICTURES<br />
In TV mode, press [0] button to enter the Multi-Picture mode<br />
(OSD 3).<br />
1. In Multi-Picture mode the screen will display 9 channels’<br />
preview window (static), starting from the current channel. Only<br />
the marked preview program is continuously playing.<br />
2. Press [ ] to change the marked channel among<br />
the preview programs.<br />
3. With the number buttons [1] ~ [9] you can directly move the<br />
highlight to the related channel.<br />
4. With [OK] you return to full screen mode in the marked<br />
channel.<br />
2.6. CH +/ CH -<br />
In TV mode press [CH+/CH-] to change channel.<br />
2.7. TV/RADIO<br />
In TV mode, press [TV/R] to switch to Radio mode. In Radio<br />
mode press [TV/R] again to switch back to TV mode.<br />
2.8. VOL+/VOL-<br />
In TV mode, press [Vol+/Vol-] to adjust volume.<br />
2.9. EXIT<br />
Press [Exit] button to exit the current menu.<br />
2.10. M<strong>EN</strong>U<br />
Press [Menu] button to enter or exit the current menu.<br />
2.11. RECALL<br />
Pressing the [Back] button allows you to toggle between the<br />
actual and the last selected channel.<br />
2.12. CHANNEL LIST<br />
In TV mode press [OK] button to open the Channel List<br />
window.<br />
Reduced Channel List (OSD 4):<br />
PAG. 15<br />
<strong>EN</strong>GLISH
<strong>EN</strong>GLISH<br />
OSD 6<br />
OSD 7<br />
OSD 8<br />
OSD 9<br />
BASIC OPERATIONS<br />
You can use [ ] keys to navigate this list.<br />
1. Press [Yellow] button to open the SAT list. After selecting a<br />
satellite the channel list will be reduced to the channels of this<br />
satellite.<br />
2. Press [Blue] button to open the “Find” window. You can use<br />
this feature to fi nd channel by their names.<br />
3. Press [Red] button to open the expanded channel list.<br />
4. Once the desired channel is selected, press [OK[ to change<br />
and display the marked channel.<br />
Expanded Channel List (OSD 5):<br />
You can use [ ] keys to navigate this list.<br />
In this view, you can get more information about the frequency,<br />
polarity, symbol rate and PID of the selected channel.<br />
1. Press [Green] button to sort the channels by free and<br />
scrambled channels. Free channel are listed fi rst and scrambled<br />
channels last.<br />
2. Press [Yellow] button to open the SAT list. After selecting a<br />
satellite the channel list will be reduced to the channels of this<br />
satellite.<br />
3. Press [FAV] button to open FAV list. After selecting a<br />
Favourite Group the channel list will be reduced to the channels<br />
of this group.<br />
4. Press [Blue] button to open the “Find” window (OSD 6). You<br />
can use this feature to fi nd channel by their names.<br />
5. Press [Red] button to open the reduced channel list.<br />
6. Once the desired channel is selected, press [OK[ to change<br />
and display the marked channel.<br />
2.13. EPG<br />
1. The STB supports Electronic Program Guides (EPG) to give<br />
you information about the actual programs of certain channels<br />
like event name, subtitle, description, start and fi nish time. This<br />
feature is depending on the service of the channel provider.<br />
Press [EPG] to open the EPG window (OSD 7).<br />
2. The [Red] button opens the detailed schedule of the marked<br />
channel (OSD 8). You can select an event with [ ] and<br />
display the event’s detailed description with [OK]. With the<br />
[Yellow] button you can program a timer with the start and fi nish<br />
time and date of this event.<br />
3. Press the [Green] button in the EPG menu to display the<br />
detailed information of the actual event in the selected channel<br />
(OSD 9). With the [Red] button you can get more information<br />
about the events of the channel. With the [Yellow] button you<br />
can program a timer with the start and fi nish time and date of<br />
this event.<br />
4. To close the EPG menu press [Exit].<br />
PAG. 16<br />
rev 1.0
ev 1.0<br />
OSD 10<br />
OSD 11<br />
OSD 12<br />
OSD 13<br />
BASIC OPERATIONS<br />
2.14. LIST<br />
In TV mode, press [List] button to access directly to the “TV<br />
Channel List” menu or in Radio mode, press [List] button to<br />
access directly to to the “Radio Channel List” menu.<br />
2.15. FAVOURITES<br />
1. In TV mode press the [Favourite] button to display the<br />
Favourite Group window on the screen as the picture beside<br />
shows (OSD 10).<br />
2. In the Favourite Group window you can select the desired<br />
favourite channel with [ ] and confi rm it with [OK] to switch<br />
to it. In bigger groups you can navigate with [Pup/Pdw].<br />
3. With [ ] you can select different Favourite Group.<br />
4. Press [Exit] to close the Favourite Group window.<br />
? FREQU<strong>EN</strong>TLY ASKED QUESTION<br />
Q: Why the screen displays “No Favourite Channel” after<br />
pressing the [Favourite] button?<br />
A: No channels have been assigned to a Favourite Group yet.<br />
You can do this in the channel menu.<br />
2.16. AUDIO TRACK / MODE<br />
1. In TV mode, press the [Audio] button to open the Audio<br />
Mode window (OSD 11).<br />
2. Select the item you want to adjust with [ ] and change<br />
the value with [ ].<br />
3. Press [Exit] to leave this window.<br />
2.17. INFORMATION<br />
In TV mode, press [INFO] button can open information screen<br />
(OSD 12), in the window shows the parameters of current<br />
channel.<br />
2.18. FAV +/-<br />
1. In TV mode press the [FAV+/FAV-] buttons to switch<br />
between the favourites channels in the current Favourite Group<br />
directly.<br />
2. The sequence of the favourite channels is following the<br />
sequence in the related Favourite Group list.<br />
2.19. ZOOM<br />
1. Press [Zoom] button in TV mode to zoom the image. Image<br />
can be augmented x16 times (OSD 13).<br />
2. Press [Exit] to exit this function.<br />
PAG. 17<br />
<strong>EN</strong>GLISH
<strong>EN</strong>GLISH<br />
OSD 14<br />
BASIC OPERATIONS<br />
2.20. SUBTITLES<br />
In TV mode, press [Sub] button for activating / deactivating the<br />
channel subtitles, depending on the provider information.<br />
2.21. LNB SHORT<br />
When LNB is short, it will notify user on screen “LNB Short!”<br />
(OSD 14). Please check your cables and connections for<br />
shorts. When the short is removed the warning message will<br />
disappear.<br />
PAG. 18<br />
rev 1.0
ev 1.0<br />
OSD 15<br />
OSD 16<br />
OSD 17<br />
OSD 18<br />
CHANNEL<br />
PAG. 19<br />
3. CHANNEL<br />
Press [Menu] in the TV mode to enter the main menu (OSD<br />
15).<br />
1. Press [ ] to select the Channel item.<br />
2. Press [OK] to enter the selected item.<br />
In the Channel menu (OSD 16):<br />
3. Press [ ] to select the wanted menu item.<br />
4. Press [OK] to enter the selected item among.<br />
- TV Channel List<br />
- Radio Channel List<br />
- Channel setup<br />
- Favourite channel list name<br />
- Delete All<br />
- Restore channel list and settings<br />
- Save channel list and settings<br />
3.1. TV CHANNEL LIST<br />
If you enter the Channel List menu a window like the one<br />
besides will open (OSD 17).<br />
1. You can move the highlighted channel with [ ] and<br />
press [OK] to preview the highlighted program in the preview<br />
window.<br />
2. You can enter directly the number of the desired channel with<br />
the remote control. The selection will select that channel, but it<br />
will not be previewed until you confi rm with [OK] button.<br />
3. Press [Pup/Pdw] on the RCU to jump between the channels<br />
by pages.<br />
4. Press [ ] to switch the Program Group.<br />
5. Press [Menu], [Exit] or [Ok] buttons to enter TV mode<br />
playing mode.<br />
6. The colour buttons offer further functions to manage the<br />
channel list.<br />
3.1.1. FAVOURITE<br />
1. Press [FAV] to open the Favourite window (OSD 18).<br />
2. You can select between 8 favourites groups with [ ].<br />
Press [OK] to assign the channel to a Favourite group.<br />
3. Press [OK] again to remove the channel from the marked<br />
Favourite group.<br />
4. Press [Exit] button to return to the TV Channel List. The<br />
channels of Favourites Groups are indicated with a favourite<br />
icon behind the name.<br />
<strong>EN</strong>GLISH
<strong>EN</strong>GLISH<br />
OSD 19<br />
OSD 20<br />
OSD 21<br />
OSD 22A<br />
OSD 22<br />
OSD 23<br />
3.1.2. MOVE<br />
1. To move/change channels: Pushing the [Red] button, you<br />
will see a picture like OSD 19. You will be able to move or<br />
change the position of the channels:<br />
- Push again the [Red] button to move the channel.<br />
- Push the [Green] button to change the position of the<br />
channel.<br />
2. Move the channel to the desired position with [ ].<br />
Press [OK] to confi rm the position.<br />
3.1.3. SORT<br />
1. Press [Green] to open the Sort window (OSD 20). Press [<br />
] to select and [OK] to confi rm your choice.<br />
2. The ways of sorting are:<br />
- Name (A-Z): Sorting in Alphabetical Order, ignoring “$” symbol.<br />
- Name (Z-A): Sorting in Alphabetical Order, ignoring “$” symbol.<br />
- FTA: Sort channel by free and scrambled sequence. Free<br />
channels will be listed fi rst and scrambled channels behind<br />
in the channel list.<br />
- Lock: Unlocked channels are listed fi rst end locked channels<br />
at the end.<br />
- Default: Load the default sort of channels.<br />
3.1.4. EDIT<br />
1. After pressing the [Yellow] button a window for entering the<br />
password will open. The default password is “0000”.<br />
2. You can Delete, Skip, Lock and Edit the channel (OSD 21).<br />
3. Press [Exit] to leave the Channel Editing. The system will ask<br />
you to confi rm the saving of the changes you made.<br />
3.1.4.1 DELETE<br />
In Channel Edit menu press [Red] button to mark a channel<br />
for deleting.<br />
A confi rmation of deleting one or all channels from the list is<br />
displayed (OSD 22a):<br />
- Please, confi rm pushing the [Red] button to select the channels<br />
one by one. Only the selected channels will be deleted.<br />
- Confi rm pushing the [green] button to select all the channels<br />
from the list.<br />
Marked channels (OSD 22) will be deleted after you confi rm to<br />
save the changes when you leave this menu.<br />
3.1.4.2 SKIP<br />
In Channel Edit menu, press [Green] button to place a Skip icon<br />
behind the name of the highlighted channel. Marked channels<br />
(OSD 23) will be skipped when you change channels in TV<br />
PAG. 20<br />
CHANNEL<br />
rev 1.0
ev 1.0<br />
OSD 24<br />
OSD 25<br />
OSD 26<br />
OSD 27<br />
OSD 28<br />
CHANNEL<br />
mode after you confi rm to save the changes when you leave<br />
this menu.<br />
3.1.4.3 LOCK<br />
In Channel Edit menu, press [Yellow] button to place a Lock icon<br />
behind the name of the highlighted channel. Marked channels<br />
(OSD 24) will be locked and displayed only after password has<br />
been entered if you confi rm to save the changes when you<br />
leave this menu.<br />
3.1.4.4 EDIT<br />
Pressing the [Blue] button in the TV Channel List Edit menu will<br />
open another window where you can choose between Edit the<br />
actual channel or create a new channel (OSD 25).<br />
1. Edit current channel: To edit the channel press the [Red]<br />
button (OSD 26).<br />
- Name: You can edit the name of the current channel using the<br />
keys on the remote control.<br />
- On the “Video PID”, “Audio PID” and “PCR PID” items you can<br />
input numbers to modify the item’s value.<br />
- After modifi cation select “Save” and press [OK] button to save<br />
the modifi ed values and exit “Edit” mode. Or select “Exit” and<br />
press [OK] to leave Edit mode without saving the modifi cations.<br />
2. Create: Press [Green] button to open the Create window<br />
(OSD 27).<br />
- Press [OK] button on the “Satellite” item to display the satellite<br />
list. You can select the satellite for which you want to create<br />
a new channel.<br />
- With marked “TP Index” item press [ ] to select the TP<br />
number where the channel can be found. The next three items<br />
will show the related parameters.<br />
- Highlight the “Name” item and edit the name of the current<br />
channel using the keys on the remote control.<br />
- In “Video PID”, “Audio PID” and “PCR PID” items you can<br />
enter the numbers directly to set these parameters of the<br />
new channel.<br />
- After modifi cation select “Save” and press [OK] to save the<br />
new channel and leave the Edit mode. Select “Exit” and press<br />
[OK] to exit the Edit mode without saving the new channel.<br />
3.1.5. FIND<br />
1. Press [Blue] button to open the “Find” window like showed<br />
besides (OSD 28). Press [ ] to select the leading<br />
character of the channel name and press [OK] to confi rm it.<br />
2. After entering the character(s) highlight “OK” in the window<br />
and press [OK] on the RCU.<br />
3. Press [Exit] button to close the Find window and brings you<br />
back to the channel list.<br />
PAG. 21<br />
<strong>EN</strong>GLISH
<strong>EN</strong>GLISH<br />
OSD 29<br />
OSD 30<br />
OSD 31<br />
OSD 32<br />
OSD 33<br />
3.2. RADIO CHANNEL LIST<br />
Basically the operation of “Radio Channel List” is same as “TV<br />
Channel List”, except that in the small channel window the Fte<br />
Logo will be displayed (OSD 29).<br />
3.3. CHANNEL SETUP<br />
When you enter the “Channel Setup” menu you will see a<br />
screen like beside (OSD 30):<br />
3.3.1. START-UP CHANNEL<br />
Press [OK] to enter “Start-up Channel” menu to see the screen<br />
like showed beside (OSD 31):<br />
1. If you set of “Boot on Channel” to “On” you can edit the<br />
following two items. If the setting is “Off” the box always starts<br />
with the channel that was running when the box has been<br />
switched off.<br />
2. On the “Mode” item you can select either “TV channel” or<br />
“Radio channel”.<br />
3. On “Start-up Channel” item you can open the channel list by<br />
pressing [OK]. Then you can select the channel of you choice.<br />
Press [OK] again to confi rm.<br />
3.3.2. CHANNEL PLAY TYPE<br />
Press [OK] to enter “Channel Play Type” menu (OSD 32).<br />
1. Here you can select the “playing channels” as “Free”,<br />
“Scrambled” or “All”.<br />
2. If you select “Free” then all scrambled channels will be<br />
skipped when you change channels with [CH+/-].<br />
3. Press [Exit] to leave the “Channel Setup” menu.<br />
3.4. FAVOURITE CHANNEL LIST NAME<br />
In this menu, user is able to change the name of the Favourite<br />
Groups. Press [OK] to enter this menu and you will see a<br />
screen like beside (OSD 33).<br />
To change the name of the Favourites Groups:<br />
1. Press [ ] and select a Favorite Group.<br />
2. Press [Ok] button to edit the name of the Group.<br />
3. Once the name is correct, select “Ok” option and confi rm<br />
pressing [OK] (OSD 34 next page).<br />
4. If the name is used by other group, an alert message will<br />
appear on the TV.<br />
5. Select “Exit” and press [OK] to leave this menu.<br />
3.5. DELETE ALL<br />
To delete all channels:<br />
1. Enter the password. The default password is “0000”.<br />
PAG. 22<br />
CHANNEL<br />
rev 1.0
ev 1.0<br />
OSD 34<br />
OSD 35<br />
OSD 36<br />
OSD 37<br />
CHANNEL<br />
2. After entering the password correct a safety question will<br />
show up where you have to confi rm fi rst (OSD 35 next page).<br />
3. Select “Yes” to delete all channels or “No” to cancel and<br />
confi rm with [OK].<br />
4. In step 2 and step 3, pressing [Exit] will exit the function<br />
directly without saving.<br />
? FREQU<strong>EN</strong>TLY ASKED QUESTION<br />
Q: IF I incautiously delete all channels, what should I do?<br />
A: There are three ways to restore:<br />
- To re-search all channels at the “Installation” menu.<br />
- Use “Factory Default” function to restore all channels in the<br />
“Tools” menu. The receiver will load the factory channels.<br />
- Use the “Restore channel list and settings” option as next<br />
point shows.<br />
3.6. RESTORE CHANNEL LIST AND SETTINGS<br />
Using this option, the receiver will load the channels saved as<br />
previously as a backup of the user channels list (see point 3.7.).<br />
For restoring the default channels, please:<br />
1. Enter the password. The default password is “0000”.<br />
2. After entering the password correct a safety question will<br />
show up where you have to confi rm fi rst (OSD 36).<br />
3. Select “Yes” to delete all channels or “No” to cancel and<br />
confi rm with [OK].<br />
4. In step 2 and step 3, pressing [Exit] will exit the function<br />
directly without saving.<br />
3.7 SAVE CHANNEL LIST AND SETTINGS<br />
This option is very important, because here is where the security<br />
of your data lies. This option makes a backup of the channel<br />
list and it will allow restoring the channel list even thought after<br />
a factory default.<br />
Once you have customized your receiver and everything<br />
operates properly, you have the possibility, with this option, to<br />
save the programs’ data.<br />
1. Enter the password. The default password is “0000”.<br />
2. After entering the password correct a safety question will<br />
show up where you have to confi rm fi rst (OSD 37).<br />
3. Select “Yes” to delete all channels or “No” to cancel and<br />
confi rm with [OK].<br />
4. In step 2 and step 3, pressing [Exit] will exit the function<br />
directly without saving.<br />
PAG. 23<br />
<strong>EN</strong>GLISH
<strong>EN</strong>GLISH<br />
OSD 38<br />
OSD 39<br />
OSD 40<br />
OSD 41<br />
INSTALLATION<br />
PAG. 24<br />
4. INSTALLATION<br />
Press [Menu] in the TV mode to enter the main menu (OSD<br />
38).<br />
1. Press [ ] to select the Installation item.<br />
2. Press [OK] to enter the selected item.<br />
In the Installation menu (OSD 39):<br />
3. Press [ ] to select the wanted menu item.<br />
4. Press [OK] to enter the selected item among.<br />
- Single Search<br />
- Multi Search<br />
- TP Scan<br />
- Satellite List<br />
- TP List<br />
- Satellite Guide<br />
4.1. SINGLE SEARCH<br />
After selecting Antenna Setup another window will be opened<br />
(OSD 40).<br />
You can edit the following items:<br />
1. Satellite: Press [ ] to switch Satellites or press [OK] to<br />
enter satellite list to select directly.<br />
2. LNB Confi guration: Selecting this option and pressing [OK],<br />
the LNB Confi guration menu will be displayed (OSD 41). In this<br />
menu, next options can be modifi ed:<br />
- LNB Type: Press [ ] to switch among “Standard”, “User”<br />
and “Universal” mode. If you select “Standard” or “User”, the<br />
frequency of the LNB can be changed. Pressing [OK] the<br />
frequencies will appear to be edited. Select the frequency<br />
you want to edit and change the value with [ ]<br />
- 22K: Use [ ] to switch “ON” and “Off”. The 22 kHz signal<br />
is used in KU Universal LNBs to change between low<br />
band and high band. After choosing LNB type “Universal”<br />
you cannot modify 22K.<br />
- DiSEqC1.0: Use [ ] to switch the options of DiSEqC<br />
switches.<br />
- DiSEqC1.1: Use [ to switch the options of DiSEqC1.1<br />
switches.<br />
- Positioner: Press [ to select between “None /<br />
DiSEqC1.2 / USALS”.<br />
- Polarity: Press [ ] to switch between “Auto / H / V”.<br />
Once the LNB is confi gured, press [Exit] to save the changes<br />
and go to the previous window to continue confi guring the<br />
antenna.<br />
- Toneburst: Press [ ] to switch this function “On” or<br />
“Off”.<br />
rev 1.0
ev 1.0<br />
OSD 42<br />
OSD 43<br />
OSD 44<br />
OSD 45<br />
INSTALLATION<br />
3. DiSEqC1.0: Use [ ] to switch the options of DiSEqC<br />
switches.<br />
4. On “TP Index” item use [ ] to select the desired<br />
transponder.<br />
5. In the “FTA Only” item, press [ ] to select to scan only<br />
free channels or even scrambled channels. If you select “Yes” it<br />
will scan free channels only.<br />
6. In “Scan Channel” item, press [ ] to select to scan TV +<br />
Radio Channels, or just TV channels or just Radio channels.<br />
7. In “Scan Mode” item you can select “Auto Scan” to blind scan<br />
or “Preset Scan” to scan all preset transponders.<br />
8. Move the highlight to “Search” and press [OK] button to<br />
start scanning. Bars are showing the progress of the channel<br />
scanning in the lower part of the window and the found channels<br />
are listed (OSD 42).<br />
You can stop the scan with [Exit] and save the so far found<br />
channels.<br />
9. Press [Exit] to exit this menu. A window to confi rm the<br />
changes will appear.<br />
4.2. MULTI SEARCH<br />
When you enter the “Multi Search” menu a window like the one<br />
beside will open (OSD 43).<br />
1. On “Satellite” item press [OK] to open the satellite list (OSD<br />
44). Then press [ ] to move the highlight and press [OK] to<br />
mark/unmark and [EXIT] to fi nish the selection. You can select<br />
several satellites in this menu. At the bottom of the screen you<br />
can see the selected satellites (OSD 45). The system will use<br />
DiSEqC1.0/1.1, DiSEqC1.2 and USALS functions to search<br />
the marked satellites and scan channels.<br />
2. On “FTA Only” item, press [ ] to select scanning of all<br />
channels or just scanning of free channels. If you select “Yes” it<br />
will scan free channels only.<br />
3. On “Scan Channel” item, press [ ] to select the<br />
scanning range from TV + Radio Channels, only TV channels or<br />
only Radio channels.<br />
4. On “Scan Mode” item, you can select “Auto Scan” to make<br />
a blind scan or “Preset Scan” to scan all preset transponders of<br />
the selected satellites.<br />
5. Select “Search” and press [OK] to start scanning. In the<br />
lower part of the window the progress of scanning and the<br />
found channels are displayed.<br />
6. Press [Exit] to cancel or fi nish the scanning and saving the<br />
found channels.<br />
PAG. 25<br />
<strong>EN</strong>GLISH
<strong>EN</strong>GLISH<br />
OSD 46<br />
OSD 47<br />
OSD 48<br />
OSD 49<br />
INSTALLATION<br />
4.3. TP SCAN<br />
When you enter “TP Scan” menu a window like the one beside<br />
will be displayed (OSD 46):<br />
1. On “Satellite” item, press [ ] to select the satellite<br />
you want to scan or press [OK] to open the satellite list for<br />
selection.<br />
2. On “TP Index” item use [ ] to select the desired<br />
transponder.<br />
If any of the TP of the list have tuned and stored channels into<br />
the receiver, the following two options “Frequency” and “Symbol<br />
Rate” will not be able to be edited.<br />
It means that the parameters cannot be modifi ed by error<br />
neither loosing the stored channels when any value of the data<br />
base is changed.<br />
In case of any value, for example the Symbol Rate of a TP,<br />
has been modifi ed by the provider and the receiver has these<br />
channels tuned, the TP must be deleted (it will delete all the<br />
channels of this TP), create it again with the correct data, and<br />
to carry out a new search of the TP.<br />
In this item you can also add, delete or delete all TP.<br />
- Press [Red] button to add a new TP (OSD 47). You have to<br />
set the parameters of “TP Frequency” and “Symbol Rate” for<br />
this new transponder. Therefore use the number buttons of<br />
the RCU. The available range are “3000~13450 MHz” and<br />
“1000~45000KS/s”.<br />
- Press [Green] button to delete the current TP. A safety question<br />
will be displayed for confi rmation to delete the current<br />
transponder or not (OSD 48). If you select “Yes”, the current<br />
transponder will be deleted and the total number of transponders<br />
will be reduced.<br />
- Press [Yellow] button to delete all TP. A safety question will be<br />
displayed for confi rmation to delete all transponders or not. If<br />
you select “Yes”, all transponders will be deleted.<br />
3. For transponders you also can use number buttons to modify<br />
the parameters of “TP Frequency” and “Symbol Rate” or [<br />
] to change the value directly. “Polarity” and “Scan Mode”<br />
are used for setting scans conditions. Press [ ] to select<br />
a different mode.<br />
4. Polarity: Press [ ] to switch between “Auto / H / V”.<br />
5. Search channels of the TP: Selecting this option, a new<br />
window appears, where you can confi gure the following<br />
parameters (OSD 49):<br />
- On “FTA Only” item, press [ ] to select scanning of all<br />
channels or just scanning of free channels. If you select “Yes” it<br />
will scan free channels only.<br />
- On “Scan Channel” item, press [ ] to select the scanning<br />
range from TV + Radio Channels, only TV channels or only<br />
Radio channels.<br />
- Search NIT: If you select this option as “Off”, the receiver<br />
PAG. 26<br />
rev 1.0
ev 1.0<br />
OSD 50<br />
OSD 51<br />
OSD 52<br />
OSD 53<br />
OSD 54<br />
INSTALLATION<br />
will search the selected TP. In case you select “On”, the NIT<br />
(Network Identifi cation) will be identifi ed and the receiver will<br />
automatically search all the TP of this network.<br />
6. Press [OK] to start scanning.<br />
7. On the “TP Scan” item, press [Exit] to cancel the scanning<br />
and saving the found channels.<br />
4.4. SATELLITE LIST<br />
When you enter the “Satellite List” menu you can see a window<br />
like the one beside (OSD 50):<br />
1. Move through the satellite list using [ ] and mark/<br />
unmark the satellites that you want pressing [OK]<br />
2. Press [Red] button to enter edit satellite menu (OSD 51).<br />
You can edit the satellite’s name and its longitude. Once you<br />
have edited the satellite, select “Save” option and confi rm with<br />
[OK]. If you prefer to exit without saving the changes select<br />
“Exit” and press [OK].<br />
3. Press [Green] button to open the “Add satellite” window. You<br />
can edit the satellite’s name and its longitude. Once you have<br />
edited the satellite, select “Save” option and confi rm with [OK].<br />
If you prefer to exit without saving the changes select “Exit” and<br />
press [OK].<br />
4. After pressing [Yellow] button you will be asked “Are you<br />
sure to delete?” (OSD 52). Select “Yes” to delete the marked<br />
satellite. Select “No” to cancel the operation.<br />
4.5. TP LIST<br />
When you open the “TP List” menu you will see a window like<br />
the one beside (OSD 53).<br />
1. Press [ ] to change the marked satellite. Press [<br />
] to change the marked TP.<br />
2. Press [Red] button to open the “Edit TP” menu (OSD 54). Here<br />
you can edit the Transponder’s data like frequency, polarity and<br />
Symbol Rate. In this window, the search of the channels of the TP<br />
can be done selecting the “Search” option and pressing [OK].<br />
3. Press [Green] button to open the “Add TP” menu (OSD<br />
55 next page). Here you can add a new TP and setup its<br />
parameters like frequency, polarity and Symbol Rate. In this<br />
window, the search of the channels of the TP can be done<br />
selecting the “Search” option and pressing [OK].<br />
4. Press [Yellow] button will open a dialog box asking you to<br />
confi rm the deletion of the current TP (OSD 56 next page). If<br />
you select “Yes” all the related channels will be deleted. If you<br />
select “No” the operation will be cancelled.<br />
5. Pressing the [Blue] button will open a dialog box asking you<br />
to confi rm the deletion of all Transponders. If you select “Yes”,<br />
all channels of the current satellite will be deleted. If you select<br />
“No” the operation will be cancelled.<br />
PAG. 27<br />
<strong>EN</strong>GLISH
<strong>EN</strong>GLISH<br />
OSD 55<br />
OSD 56<br />
OSD 57<br />
OSD 58<br />
INSTALLATION<br />
4.6. SATELLITE GUIDE<br />
When you enter “Satellite Guide” menu, you will see the screen<br />
like beside (OSD 57).<br />
Here you can enter your local longitude and latitude and the<br />
satellite’s longitude. The receiver calculates the antenna’s<br />
azimuth and elevation to point your antenna to the selected<br />
satellite.<br />
1. Use the [Number] buttons to input the values of “Local<br />
Longitude”, “Local Latitude” and “Satellite Longitude”.<br />
2. Press [ ]buttons to select east or west in “Local<br />
Longitude” and “Satellite Longitude” or to select north or south<br />
in “Local Latitude”.<br />
3. Highlight the “Start” item and press [OK]. In the lower part<br />
of the window the corresponding values for the antenna setting<br />
are displayed (OSD 58).<br />
4. Orientation means the angle between south and satellite.<br />
5. Press [Exit] to leave this feature<br />
PAG. 28<br />
rev 1.0
ev 1.0<br />
OSD 59<br />
OSD 60<br />
OSD 61<br />
SYSTEM SETUP<br />
PAG. 29<br />
5. SYSTEM SETUP<br />
Press [Menu] in the TV mode to enter the main menu (OSD<br />
59).<br />
1. Press [ ] to select the System Setup item.<br />
2. Press [OK] to enter the selected item.<br />
In the System Setup menu (OSD 60):<br />
3. Press [ ] to select the wanted menu item.<br />
4. Press [OK] to enter the selected item among.<br />
- Language<br />
- TV System<br />
- Time & Timer Setting<br />
- OSD Setting<br />
- Parental Lock<br />
- LNB Power<br />
- RCU Position Switch<br />
5.1. LANGUAGE<br />
After selecting the “Language” menu you will see a window like<br />
beside (OSD 61):<br />
1. Language: press [ ] to select languages. The selection<br />
of languages include: English, German, French, Spanish,<br />
Italian, Portuguese, Turkish, Polish, Russian, Danish, Greek,<br />
Hungarian, Arabic, Farsi, Dutch.<br />
2. First Audio: Some channels offer more than one audio<br />
language. This function allows you to set the preferred audio<br />
language for those channels using [ ]. If a channel offers<br />
the same audio language as the “First Audio” you set the<br />
system will play this audio language as default. If the channel<br />
does not offer this audio language then the system will compare<br />
the offered languages with the second audio language. The<br />
selections of audio languages include: English, German,<br />
French, Spanish, Italian, Portuguese, Turkish, Polish, Russian,<br />
Danish, Greek, Hungarian, Arabic, Farsi, Dutch.<br />
3. Second Audio: If the channel has no audio language that<br />
corresponds with “First Audio” but with “Second Audio” the<br />
system will play the second audio language as default. If no<br />
audio language corresponds with the “Second Audio” then the<br />
default language of the current channel will be played instead.<br />
The selections of audio languages include: English, German,<br />
French, Spanish, Italian, Portuguese, Turkish, Polish, Russian,<br />
Danish, Greek, Hungarian, Arabic, Farsi, Dutch.<br />
4. Subtitles language: You can choose the predetermined<br />
subtitles language by using [ ] keys. The selection of the<br />
subtitles language includes: English, German, French, Spanish,<br />
Italian, Portuguese, Turkish, Polish, Russian, Danish, Greek,<br />
Hungarian, Arabic, Farsi, Dutch.<br />
5. Press [Exit] to return back from “Language” menu.<br />
<strong>EN</strong>GLISH
<strong>EN</strong>GLISH<br />
OSD 62<br />
OSD 63<br />
OSD 64<br />
OSD 65<br />
SYSTEM SETUP<br />
5.2. TV SYSTEM<br />
When you enter the “TV System” menu you will see the screen<br />
like below (OSD 62):<br />
1. Display Mode is used to switch the display mode. You can<br />
select from Auto / PAL / PAL-M / NTSC 3.58. Press [<br />
] to select the desired mode.<br />
2. Aspect Mode is used to switch the screen aspect ratio mode.<br />
You can select from Auto / 4:3 PS / 4:3 LB / 16:9. Press [<br />
] to select the needed mode.<br />
3. Video Output is use for switching the screen aspect ratio<br />
mode. Now we provide below options: RGB / CVBS. You can<br />
press [ ] key to select each mode circularly.<br />
4. In <strong>HDMI</strong> Mode, you can choose the number of lines and the<br />
scan mode of the video signal you are sending by the <strong>HDMI</strong><br />
connector. Through the arrows [ ], select among: 576P /<br />
480P / 576 I / 480 I. (P: Progressive, I: Interleaved)<br />
Note: If you have the <strong>HDMI</strong> output connected and you select<br />
the progressive mode, the SCART output is automatically disabled.<br />
6. Press [Exit] to close the “TV System” menu.<br />
* With this model, 4:3 / 16:9 switching is not allowed.<br />
* With this model, RGB output is not allowed.<br />
5.3. TIME & TIMER SETTING<br />
When you enter “Time” “Local Time Setting” or “Sleep Timer” a<br />
menu with three items will be opened (OSD 63). Use [ ]<br />
to select between the three options and confi rm with [OK].<br />
5.3.1. TIMER<br />
Select “Timer” item and press [OK] to enter the “Timer list”<br />
menu (OSD 64).<br />
The current time will be displayed in the fi rst column. If the<br />
current time is incorrect, please modify it with the [Number]<br />
buttons at the “Time” menu.<br />
1. Timer Number: You can press [ ] to set the Timer<br />
number. There are totally 8 timers.<br />
2. Timer Mode: Select how often the timer is running: Once,<br />
Daily, Weekly, Monthly and Yearly. Or switch the timer off.<br />
3. Timer Service: Select between Channel (timer setting for<br />
channel change and Wakeup/Sleep) and Message (reminding<br />
message).<br />
4. When you select “Channel” (timer setting for channel change<br />
and Wakeup/Sleep) then you have further options you need to<br />
set (OSD 65):<br />
- Wakeup Channel: press [OK] to enter the channel list and<br />
select the channel you want to see.<br />
PAG. 30<br />
rev 1.0
ev 1.0<br />
OSD 66<br />
OSD 67<br />
OSD 68<br />
SYSTEM SETUP<br />
- Wakeup Date: use number buttons to input your wakeup<br />
date.<br />
- On Time: use number buttons to input your wakeup time. If<br />
date and time are reached then no matter if the system is in<br />
standby mode or in playing mode, it will automatically switch<br />
to the channel you set and start to play.<br />
- Duration: Here you can set the time you want to see or play<br />
this channel. After the time set the system will automatically<br />
switch to standby mode. If you don’t want the box to be switched<br />
to standby mode then set the duration to 00:00.<br />
5. When you select “Message” (reminding message) option in<br />
“Timer Service” then you can enter additional data (OSD 66):<br />
- Wakeup Message: press [ ] to select the category of the<br />
reminding message from Birthday, Anniversary and General.<br />
- Wakeup Date: Use the [Number] buttons to input your wakeup<br />
date.<br />
- On Time: Use the [Number] buttons to input your wakeup<br />
time. If date and time are reached, no matter if the system is in<br />
standby mode or in playing mode, it will automatically show a<br />
reminding message.<br />
- The message will be displayed on the screen until you press<br />
[Exit] to close it.<br />
6. Press [Exit] to leave the “Timer” menu.<br />
5.3.2. LOCAL TIME SETTING<br />
When you select “Local Time Setting” and press [OK] then you<br />
will see a window like the one beside (OSD 67):<br />
1. GMT Usage: This item is used to set the time by using the time<br />
signal from the satellite. Press [ ] to change the setting.<br />
2. The “GMT Offset” item is only available when “GMT Usage”<br />
is set to “On”. Press [ ] to set the “GMT Offset” value.<br />
With every time you press the button the time offset will be<br />
increased / decreased by half an hour.<br />
3. Summer: this option is only available when “USE GMT” is<br />
enabled. Use [ ] to switch on/off the summer timetable.<br />
4. “Date” and “Time” items are only available when the “GMT<br />
Usage” is set to “Off”. Press [ ] to select one item and<br />
use number buttons to input time and date directly.<br />
NOTE: If the current channel provides the correct time<br />
information, you will see the current time after you entered<br />
“Time” menu. If the channel doesn’t provide time information,<br />
you have to input the date and time information manually. The<br />
most channels support the time signal.<br />
5. Show time: Use [ ] to switch on/off this option. When<br />
the option is enabled, the time will be displayed at the TV in a<br />
frame in the top right margin.(OSD 68)<br />
6. Press [Exit] to exit the menu.<br />
PAG. 31<br />
<strong>EN</strong>GLISH
<strong>EN</strong>GLISH<br />
OSD 69<br />
OSD 70<br />
OSD 71<br />
SYSTEM SETUP<br />
5.3.3. SLEEP TIMER<br />
Press [OK] button in this option to set the sleep timer. You will<br />
see “SLEEP TIME OFF / SLEEP TIME 10 / SLEEP TIME 30<br />
/ SLEEP TIME 60 / SLEEP TIME 90 / SLEEP TIME 120”.<br />
(OSD 69)<br />
If you set a sleep time, the system will change to Standby mode<br />
after the chosen time period.<br />
5.4. OSD SETTING<br />
When you select “OSD Setting” you will see a screen like<br />
beside (OSD 70):<br />
1. Subtitle Display: Press [ ] to select “On” or “Off”. If the<br />
current channel has subtitle information, it will be displayed if<br />
this function is “On”. If this function is “Off” subtitles won’t be<br />
displayed.<br />
2. OSD Timeout: This setting determines the duration the info<br />
window is displayed on the screen when you change channels.<br />
Press [ ] to set the time between 1 to 10 seconds.<br />
3. Position: To defi ne the position of the information’s bar<br />
(top/bottom).<br />
4. OSD Transparency: With this parameter you can set the<br />
transparency of the menus. Press [ ] select the value<br />
between 10%, 20%, 30%, and 40% and “NO” (means no<br />
transparency function).<br />
5. Load OSD Setting Default: If you want to reset your OSD<br />
settings to the default settings then select this item and press<br />
[OK].<br />
6. Press [Exit] button to leave the “OSD Setting” menu.<br />
5.5. PAR<strong>EN</strong>TAL LOCK<br />
You can set a password for anyone who wishes to operate<br />
the “Installation” menu. You can also set the password to<br />
lock channels. Below you fi nd how to set and change the<br />
password.<br />
1. On “Parental Lock”, press [OK] to open a dialogue box and<br />
input the password. After you entered the correct password,<br />
you will see a screen like beside (OSD 71):<br />
2. Menu Lock: If Menu Lock is set to “Yes” then you need to<br />
enter the password every time you want to open then menu. If<br />
it is set to “No” then you can open the menu without entering<br />
the password fi rst.<br />
3. Channel Lock: If set to “Yes” then you need to enter the<br />
password before you can see those channels which have been<br />
marked as locked channels in the Channel menu. If it is set to<br />
“No” then even those channels can be selected without entering<br />
the password fi rst.<br />
4. New Password: Here you can change the existing password.<br />
You should do this after you set up the receiver the fi rst time<br />
PAG. 32<br />
rev 1.0
ev 1.0<br />
OSD 72<br />
OSD 73<br />
OSD 74<br />
SYSTEM SETUP<br />
and every time when you think that your password is known<br />
by unauthorized persons. To change the password, enter the<br />
new password in the “New Password” item and repeat the<br />
same one in the “Confi rm Password” item. If the passwords<br />
are not identically then you will see a warning message. If you<br />
entered the same new password in both fi elds then you will see<br />
the message “Saving Data, Please Wait…”. From now on you<br />
need to use the new password to open locked menus or locked<br />
channels.<br />
NOTE: The default password is 0000<br />
5. Press [Exit] to leave the “Parental Lock” menu.<br />
5.6. LNB POWER<br />
Here you can set the power output to the LNB (OSD 72). If<br />
your receiver is connected to the LNB directly then you need to<br />
set the LNB Power to “On”. If your receiver is connected to a<br />
multi switch (SMATV signal distribution system) then it may be<br />
that you don’t need to provide the power to the LNB. But since<br />
this is depending on the kind of installed distribution system we<br />
recommend you to contact your installer or to refer to the user<br />
manual of this system to get the correct information.<br />
You also just can change this setting and check if you still can<br />
receive the channels. If the LNB Power is off and you still can<br />
see all channels then we recommend this setting.<br />
5.7. RCU POSITION SWITCH<br />
In order to avoid interferences between remote controls, you<br />
have the possibility to change the code of it, to do that you have<br />
to change the position of a switch in the remote control.<br />
But fi rst of all you have to change this code in the receiver. You<br />
can do this in the menu “RCU Position” (OSD 73).<br />
You have to select the same position in the receiver than in the<br />
remote control (OSD 74).<br />
PAG. 33<br />
<strong>EN</strong>GLISH
<strong>EN</strong>GLISH<br />
OSD 75<br />
OSD 76<br />
OSD 77<br />
OSD 78<br />
PAG. 34<br />
TOOLS<br />
6. TOOLS<br />
Press [Menu] in the TV mode to enter the main menu (OSD<br />
75).<br />
1. Press [ ] to select the Tools item.<br />
2. Press [OK] to enter the selected item.<br />
In the Tools menu (OSD 76):<br />
3. Press [ ] to select the wanted menu item.<br />
4. Press [OK] to enter the selected item among.<br />
- Information<br />
- Quick Setup<br />
- Game<br />
- Factory Default<br />
- Software Upgrade<br />
- SatcoDX Auto Programing<br />
6.1. INFORMATION<br />
1. When you select the “Information” menu you will see a<br />
screen like beside (OSD 77). The screen displays data about<br />
the current channel. This function is the same as the function<br />
[Info] in the full screen TV mode.<br />
2. Press [Exit] button to leave the information display.<br />
6.2. QUICK SETUP<br />
The receiver includes an installation assistant that will help you<br />
to setup the different parameters as you can see at OSD 78.<br />
1. Language: press [ ] to select the language that will<br />
appear on the menus (see point 5.1.)<br />
2. First Audio: Some channels offer more than one audio<br />
language. This function allows you to set the preferred audio<br />
language for those channels using[ ]. (See point 5.1.)<br />
3. Second Audio: Some channels offer more than one audio<br />
language. This function allows you to set the second audio<br />
language for those channels using[ ]. (See point 5.1.)<br />
4. LNB Power: If your receiver is connected to the LNB directly<br />
then you need to set the LNB Power to “On”. If your receiver is<br />
connected to a multi switch (SMATV signal distribution system)<br />
then it may be that you don’t need to provide the power to the<br />
LNB. (See point 5.6.)<br />
5. Single Search: Selecting this option and pressing [OK], you<br />
will access to the Antenna Setup menu (see point 4.1.).<br />
6. Multi search: Selecting this option and pressing [OK], you<br />
will access to “Multi search” menu (see point 4.3.).<br />
rev 1.0
ev 1.0<br />
OSD 79<br />
OSD 80<br />
PAG. 35<br />
TOOLS<br />
6.3. GAME<br />
When you enter “Game” menu, you will see three Games<br />
include Tetris, Snake and Othello (OSD 79).<br />
6.3.1. TETRIS<br />
1. Mark “Setup” and press [ ] to select the level (speed).<br />
2. Mark “Start” and press [OK] to start the game.<br />
3. Mark “Cancel” and press [OK] to leave the game.<br />
4. Play the game:<br />
- Press [ ] to move the block left or right<br />
- Press [ ] to rotate the block clockwise<br />
- Press [ ] to drop the block faster<br />
- Press [OK] to Pause/Play the game<br />
- Press [Exit] to leave the game and return to the Game<br />
menu.<br />
6.3.2. SNAKE<br />
1. Mark “Setup” and press [ ] to select the level (speed).<br />
2. Mark “Start” and press [OK] to start the game.<br />
3. Mark “Cancel” and press [OK] to leave the game.<br />
4. Play the game:<br />
- Press [ ] to guide the snake to the red blocks.<br />
Every block you ate increases the length of the snake. If the<br />
snake runs against a wall or against itself then it dies.<br />
- Press [OK] to Pause/Play the game<br />
- Press [Exit] to quit the game and return to the Game menu.<br />
6.3.3. OTHELLO<br />
1. Mark “Setup” and press [ ] to select the game level<br />
(degree of diffi culty).<br />
2. Mark “Start” and press [OK] to start the game.<br />
3. Mark “Cancel” and press [OK] to leave the game.<br />
4. Play the game:<br />
- Press [ ] to position the round mark.<br />
- Press [OK] to set your stone.<br />
- Press [Exit] to quit the game and return to the Game menu.<br />
6.4. FACTORY DEFAULT<br />
When you press [OK] on the “Default Value” item:<br />
1. A dialogue box will occur where you need to enter the<br />
password.<br />
2. After you input the correct password a warning message will<br />
be displayed like the one beside (OSD 80).<br />
3. If you select “Yes” then all changes you made will be reset to<br />
default values. Make sure you really want to do this!<br />
4. Press [Exit] in both steps will close the window without<br />
resetting the receiver.<br />
<strong>EN</strong>GLISH
<strong>EN</strong>GLISH<br />
OSD 81<br />
OSD 82<br />
OSD 83<br />
TOOLS<br />
6.5. SOFTWARE UPGRADE<br />
There are two ways of upgrading the software of the receiver as<br />
you can see at OSD 81.<br />
6.5.1. RS232 UPGRADE<br />
1. This function allows you to upgrade the software of the<br />
receiver. This can be done from PC to receiver or from a master<br />
receiver to a slave receiver.<br />
2. Connect master receiver or PC to the slave receiver via serial<br />
interface (0-Modem cable). Enter the “Software Upgrade”<br />
menu of the master receiver and press [ ] to change the<br />
upgrade mode. Upgrade modes include: allcode / maincode /<br />
radioback / defaultdb / userdb (OSD 82).<br />
3. Switch on the slave receiver.<br />
4. Mark “Start” on the master reeciver and press [OK] to<br />
start upgrade. Wait until the display on the front panel shows<br />
“<strong>EN</strong>D”. Then switch off the receiver and on again. Now the new<br />
software is used.<br />
7. Press [Exit] to save the setting without upgrade.<br />
For more information about software upgrade, please visit<br />
http://www.ftemaximal.com.<br />
6.5.2. UPGRADE BY SATELLITE<br />
This function can upgrade the software of your receiver through<br />
data sent by a satellite. At the moment we offer satellite updates<br />
only through ASTRA1 satellite.<br />
1. Select the satellite and TP or input the TP value and<br />
download PID.<br />
2. Then mark “Start” and press [Enter] to begin the download<br />
of the upgrade (OSD 83). This may need up to 60 Minutes.<br />
Therefore we suggest using of this function only if you don’t<br />
intent to watch TV during this time.<br />
At the moment of writing this manual, the data for the software<br />
upgrade by Satellite is:<br />
•Satellite: Astra<br />
•TP Frequency: 12604 MHz.<br />
•Symbol Rate: 22000<br />
•Polarity: Horizontal<br />
•Download PID: 1277<br />
For changes in the data of the satellite please visit http://www.<br />
ftemaximal.com .<br />
6.6. SATCODX AUTO PROGRAMMING<br />
This function is using the tables of the SatcoDX websites to<br />
update your channel and satellite lists.<br />
1. Start the SatcoDX application on your PC.<br />
2. Select “SatcoDX Auto Programming” item from the “Tools”<br />
PAG. 36<br />
rev 1.0
ev 1.0<br />
OSD 84<br />
OSD 85<br />
menu and press [OK]. The screen will show the message “OK<br />
to Proceed” (OSD 84).<br />
3. Press [OK] again and you will see the message “Ready to<br />
Download” (OSD 85).<br />
4. In the PC application set the Baud Rate to 115200 and start<br />
the download procedure.<br />
! Caution: The new download channels will delete the original<br />
channels list. Please be careful before using it.<br />
PAG. 37<br />
TOOLS<br />
<strong>EN</strong>GLISH
<strong>EN</strong>GLISH<br />
VIDEO<br />
Decoding<br />
Bit rate<br />
Output<br />
Active pixel<br />
Output connector<br />
AUDIO<br />
Decoding<br />
Mode<br />
Bit rate<br />
Output connector<br />
DEMODULATOR<br />
Demodulation<br />
Symbol rate<br />
Outer code<br />
Inner code<br />
Energy dispersion<br />
INPUT SIGNAL<br />
Frequency<br />
Input level<br />
Channel bandwidth<br />
Input socked<br />
LNB CONTROL<br />
Power supply<br />
Polarized control<br />
DiSEqC control<br />
MISCELLANEOUS<br />
Supply voltage<br />
Power consumption<br />
Operation temperature<br />
Storage temperature<br />
Dimension (W x D x H)<br />
Weight<br />
TECHNICAL SPECIFICATION<br />
7. TECHNICAL SPECIFICATION<br />
MPEG-2 & MEPG-1 compatible<br />
Max 15Mbps<br />
PAL/NTSC<br />
720x480 @ 30fps; 720x576 @25fps<br />
Scart / <strong>HDMI</strong><br />
MPEG-2/MPEG-1 layer I & II<br />
Mono, Dual, Stereo, Joint stereo<br />
Max 384Kbps<br />
Scart / <strong>HDMI</strong> / SPDIF / RCA L-R<br />
QPSK<br />
SCPC/MCPC<br />
RS (204, 188, 8)<br />
ALL DVB rates<br />
DVB-S recommendation<br />
950MHz ~ 2150MHz<br />
-65dBm ~ -25dBm<br />
36MHz<br />
F-type connector<br />
13/18V (500mA max) with short circuit protection<br />
13/18V polarization (vertical/horizontal)<br />
DiSEqC1.0 DiSEqC1.1 and DiSEqC 1.2<br />
100~240VAC 50~60 Hz<br />
Max. 25 watts<br />
+5° a +40°<br />
-20° a +70°<br />
240x190x45 mm<br />
1,1 Kg<br />
PAG. 38<br />
rev 1.0
ev 1.0<br />
CONFORMITY DECLARATION<br />
“WE , <strong>FTE</strong> <strong>MAX</strong>IMAL, DECLARE THAT THE PRODUCTS<br />
<strong>MAX</strong> <strong>S92+</strong> <strong>HDMI</strong><br />
IS IN CONFORMITY WITH FOLLOWING DIRECTIVES<br />
LOW VOLTAGE DIRECTIVE 2006/95/EC<br />
EMC DIRECTIVE 2004/108/EC”<br />
PAG. 39<br />
<strong>EN</strong>GLISH