MAX S93+ - FTE Maximal
MAX S93+ - FTE Maximal
MAX S93+ - FTE Maximal

You also want an ePaper? Increase the reach of your titles
YUMPU automatically turns print PDFs into web optimized ePapers that Google loves.
ev 1.2<br />
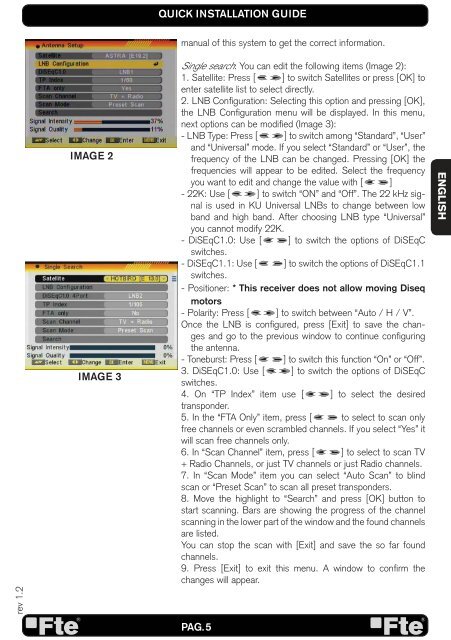
IMAGE 2<br />
IMAGE 3<br />
QUICK INSTALLATION GUIDE<br />
manual of this system to get the correct information.<br />
Single search: You can edit the following items (Image 2):<br />
1. Satellite: Press [ ] to switch Satellites or press [OK] to<br />
enter satellite list to select directly.<br />
2. LNB Confi guration: Selecting this option and pressing [OK],<br />
the LNB Confi guration menu will be displayed. In this menu,<br />
next options can be modifi ed (Image 3):<br />
- LNB Type: Press [ ] to switch among “Standard”, “User”<br />
and “Universal” mode. If you select “Standard” or “User”, the<br />
frequency of the LNB can be changed. Pressing [OK] the<br />
frequencies will appear to be edited. Select the frequency<br />
you want to edit and change the value with [ ]<br />
- 22K: Use [ ] to switch “ON” and “Off”. The 22 kHz signal<br />
is used in KU Universal LNBs to change between low<br />
band and high band. After choosing LNB type “Universal”<br />
you cannot modify 22K.<br />
- DiSEqC1.0: Use [ ] to switch the options of DiSEqC<br />
switches.<br />
- DiSEqC1.1: Use [ ] to switch the options of DiSEqC1.1<br />
switches.<br />
- Positioner: * This receiver does not allow moving Diseq<br />
motors<br />
- Polarity: Press [ ] to switch between “Auto / H / V”.<br />
Once the LNB is confi gured, press [Exit] to save the changes<br />
and go to the previous window to continue confi guring<br />
the antenna.<br />
- Toneburst: Press [ ] to switch this function “On” or “Off”.<br />
3. DiSEqC1.0: Use [ ] to switch the options of DiSEqC<br />
switches.<br />
4. On “TP Index” item use [ ] to select the desired<br />
transponder.<br />
5. In the “FTA Only” item, press [ to select to scan only<br />
free channels or even scrambled channels. If you select “Yes” it<br />
will scan free channels only.<br />
6. In “Scan Channel” item, press [ ] to select to scan TV<br />
+ Radio Channels, or just TV channels or just Radio channels.<br />
7. In “Scan Mode” item you can select “Auto Scan” to blind<br />
scan or “Preset Scan” to scan all preset transponders.<br />
8. Move the highlight to “Search” and press [OK] button to<br />
start scanning. Bars are showing the progress of the channel<br />
scanning in the lower part of the window and the found channels<br />
are listed.<br />
You can stop the scan with [Exit] and save the so far found<br />
channels.<br />
9. Press [Exit] to exit this menu. A window to confi rm the<br />
changes will appear.<br />
PAG. 5<br />
ENGLISH