DCC20 Instructions.pub - Gaugemaster.com
DCC20 Instructions.pub - Gaugemaster.com
DCC20 Instructions.pub - Gaugemaster.com

Create successful ePaper yourself
Turn your PDF publications into a flip-book with our unique Google optimized e-Paper software.
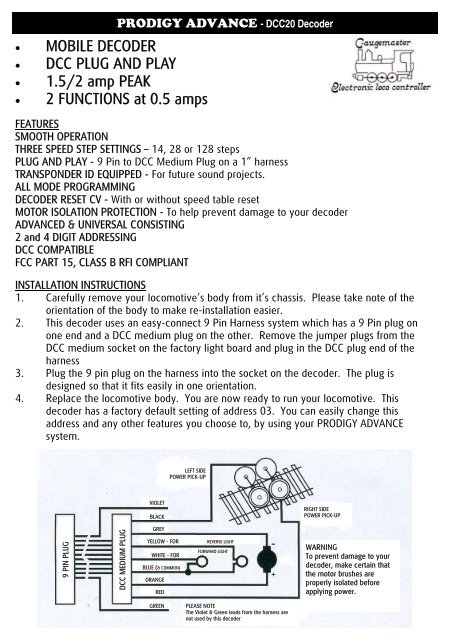
• MOBILE DECODER<br />
• DCC PLUG AND PLAY<br />
• 1.5/2 amp PEAK<br />
• 2 FUNCTIONS at 0.5 amps<br />
PRODIGY ADVANCE - <strong>DCC20</strong> Decoder<br />
FEATURES<br />
SMOOTH OPERATION<br />
THREE SPEED STEP SETTINGS – 14, 28 or 128 steps<br />
PLUG AND PLAY - 9 Pin to DCC Medium Plug on a 1” harness<br />
TRANSPONDER ID EQUIPPED - For future sound projects.<br />
ALL MODE PROGRAMMING<br />
DECODER RESET CV - With or without speed table reset<br />
MOTOR ISOLATION PROTECTION - To help prevent damage to your decoder<br />
ADVANCED & UNIVERSAL CONSISTING<br />
2 and 4 DIGIT ADDRESSING<br />
DCC COMPATIBLE<br />
FCC PART 15, CLASS B RFI COMPLIANT<br />
INSTALLATION INSTRUCTIONS<br />
1. Carefully remove your lo<strong>com</strong>otive’s body from it’s chassis. Please take note of the<br />
orientation of the body to make re-installation easier.<br />
2. This decoder uses an easy-connect 9 Pin Harness system which has a 9 Pin plug on<br />
one end and a DCC medium plug on the other. Remove the jumper plugs from the<br />
DCC medium socket on the factory light board and plug in the DCC plug end of the<br />
harness<br />
3. Plug the 9 pin plug on the harness into the socket on the decoder. The plug is<br />
designed so that it fits easily in one orientation.<br />
4. Replace the lo<strong>com</strong>otive body. You are now ready to run your lo<strong>com</strong>otive. This<br />
decoder has a factory default setting of address 03. You can easily change this<br />
address and any other features you choose to, by using your PRODIGY ADVANCE<br />
system.<br />
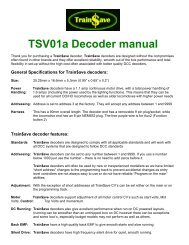
9 PIN PLUG<br />
DCC MEDIUM PLUG<br />
VIOLET<br />
BLACK<br />
GREY<br />
YELLOW - FOR REVERSE LIGHT<br />
FORWARD LIGHT<br />
WHITE - FOR<br />
BLUE (& COMMON)<br />
ORANGE<br />
RED<br />
GREEN<br />
LEFT SIDE<br />
POWER PICK-UP<br />
PLEASE NOTE<br />
The Violet & Green leads from the harness are<br />
not used by this decoder<br />
RIGHT SIDE<br />
POWER PICK-UP<br />
WARNING<br />
To prevent damage to your<br />
decoder, make certain that<br />
the motor brushes are<br />
properly isolated before<br />
applying power.
CV# REGISTER # FUNCTION<br />
1 1 Short Address<br />
2 2 Start Voltage<br />
3 3 Acceleration Rate (momentum)<br />
4 4 Deceleration Rate (momentum)<br />
5 - Top Voltage<br />
6 - Mid Voltage<br />
7 - Manufacturer Version #<br />
8 - Manufacturer ID #<br />
17 - Extended Address - Upper & Lower Bytes, 4 Digit Address<br />
18 - Extended Address - Upper & Lower Bytes, 4 Digit Address<br />
19 - Advance Consist<br />
29 5 Configuration Data #1<br />
CONFIGURATION VARIABLES<br />
select the lo<strong>com</strong>otive by pressing LOCO, then enter the lo<strong>com</strong>otive address and press<br />
ENTER. Now you can run your lo<strong>com</strong>otive. If you would like to do more then read<br />
on!<br />
4. Next “SV” will flash, prompting you to enter the Start Voltage. Input the data then<br />
press ENTER.<br />
5. Next “Acc” will flash, prompting you to program the acceleration rate. Input the data<br />
then press ENTER.<br />
6. Next “dEc” will flash, prompting you to program the deceleration rate. Input the data<br />
then press ENTER.<br />
7. Next “TV” will flash, prompting you to program the top voltage. Input the data then<br />
press ENTER.<br />
8. Finally, “CV#” will flash, prompting you to program a CV (Configuration Variable). At<br />
this point you have already finished most of the decoder programming. You can stop<br />
programming here by pressing ENTER. PRODIGY ADVANCE allows you to enjoy operating<br />
your model railway without having to fully understand CV’s and how they work<br />
as we like to keep things as simple as possible.<br />
9. However, if you want to program a CV, enter a CV number and press ENTER. Input<br />
your CV data and press ENTER again. “CV#” will flash again, prompting you to program<br />
another CV. To skip this, press ENTER.<br />
Please note that programming a CV with incorrect data can cause your decoder to<br />
malfunction. Read the manual that <strong>com</strong>es with your decoder carefully before programming<br />
a CV. Also, be certain to read the Configuration Variables section on the next page before<br />
attempting to program a CV. This will enable you to have a better understanding of<br />
Configuration Variables.
1. Make sure your WALKAROUND is allowed to program on the Program Track.<br />
2. Place the lo<strong>com</strong>otive on the Program Track. Press PROG to select “Prog Prog Track”<br />
and press ENTER.<br />
3. First, “Adr” will flash, prompting you to program the lo<strong>com</strong>otive address. Using 0-9,<br />
enter the lo<strong>com</strong>otive address followed by ENTER, or press ENTER to skip. Please note<br />
that if you are a beginner or only want to program the lo<strong>com</strong>otive address, you can<br />
stop now as this is now <strong>com</strong>plete. Put your lo<strong>com</strong>otive back on the Main Track and<br />
PROGRAMMING LOCOMOTIVES ON THE PROGRAM TRACK<br />
The PRODIGY ADVANCE allows you to easily program most NMRA <strong>com</strong>patible decoders. It<br />
guides you step-by-step through the programming process. PRODIGY ADVANCE prides itself<br />
on simplicity of use - you do not need an engineering degree to program decoders with this<br />
system. PRODIGY ADVANCE allows you to program decoders on a separate Program Track or<br />
on the Main Track layout, all without affecting any other lo<strong>com</strong>otives operating on the Main<br />
Track.<br />
A list of <strong>com</strong>mon decoder terminology can be found on the next page. It is re<strong>com</strong>mended<br />
that you familiarise yourself with this terminology, to further your DCC knowledge.<br />
LOCO ADDRESS<br />
The address is the number assigned to a decoder to identify the decoder.<br />
START VOLTAGE<br />
This is the voltage required to start the lo<strong>com</strong>otive’s motor and over<strong>com</strong>e its weight and friction<br />
to begin to make it move. You can program your lo<strong>com</strong>otive with a start voltage so that<br />
it will begin to move as soon as the control knob is turned.<br />
TOP VOLTAGE<br />
The top voltage (top speed) is the voltage (speed) at full throttle. The PRODIGY ADVANCE top<br />
end voltage is set for maximum output. If you are operating a shunter, you may want the top<br />
end voltage to be less than full output for a more realistic performance when at full throttle.<br />
ACCELERATION RATE<br />
This rate simulates the drag of a heavy load as the lo<strong>com</strong>otive speeds up, so when you increase<br />
the speed setting, the lo<strong>com</strong>otive will gradually increase its speed.<br />
DECELERATION RATE<br />
This rate simulates the momentum of a heavy load as the lo<strong>com</strong>otive slows down, so when<br />
you decrease the speed setting, the lo<strong>com</strong>otive will gradually decrease its speed.<br />
PROGRAMMING DECODERS<br />
INSTALLATION NOTES<br />
1. Do not exceed the decoder’s 500mA total function output rating.<br />
2. If you are planning on using a function output with an inductive (coil) type load, lamps<br />
or LED’s - please contact us for further information on how to achieve this.<br />
CUSTOMISING YOUR DECODER<br />
This decoder is ready to run and will operate using it’s default address of 03 with no additional<br />
programming. For a more prototypical approach to the operation of your model railway,<br />
this decoder can be customised to suit the needs of any lo<strong>com</strong>otive you fit it to by programming<br />
some of the Configuration Variables (CV’s) that are available.
Configuration Variables, also known as CVs, receive and hold entered data that allow the<br />
decoder to be tailored to a specific loco or accessory. Some CVs are also called registers.<br />
The Prodigy Advance DCC system allows you to perform most basic programming without<br />
having to concern yourself with CVs or registers. Of course, if you want to program CVs to<br />
custom tailor your decoders or select certain functions, PRODIGY ADVANCE has this capability.<br />
MOST COMMONLY USED CV’s<br />
The CVs listed on the chart below are contained in almost all decoders, with additional CVs for<br />
extra functions – sound or light – in more specialized decoders. See the decoder<br />
manufacturer’s instruction manual for a list of CVs contained in that specific decoder and what<br />
values to enter for those CVs.<br />
CV #29<br />
CV29 is the most important CV of the decoder. Improperly programming the CV29 may<br />
cause your decoder to malfunction. We do not re<strong>com</strong>mend you program CV29 yourself as<br />
the unit will take care of it for you under most circumstances. When you program your<br />
decoder’s address with PRODIGY ADVANCE, it will automatically program CV29. If you want<br />
to reverse the lo<strong>com</strong>otive’s polarity or set 14 speed steps, you have to reprogram CV29 after<br />
programming the lo<strong>com</strong>otive’s address. Please use the following table to reprogram CV29.<br />
The value of CV29 depends on the lo<strong>com</strong>otive’s address. If you would like further<br />
information on CV29, do not hesitate to contact us.<br />
CHANGES DECODER ADDRESS<br />
1-127<br />
CV #08<br />
To reset all CV values to the initial factory settings. To reset all CV values, program CV08 to a<br />
value of 008/x08. You also have the option of resetting all values except the 28 speed step<br />
tables. To do this, program CV08 to a value of 009/x09<br />
WARRANTY AND REPAIR<br />
If you believe your decoder is faulty, please telephone us in the first instance. We will advise<br />
you of your best course of action. If it involves sending anything back, please send it to the<br />
address below via insured post and packed securely.<br />
POSTAL ADDRESS OTHER USEFUL CONTACT NUMBERS<br />
Technical Department Telephone - 01903 884321<br />
GAUGEMASTER Controls Plc Shop Sales - 01903 884488<br />
<strong>Gaugemaster</strong> House Fax - 01903 884377<br />
Ford Road, Arundel E Mail - technical@gaugemaster.co.uk<br />
West Sussex<br />
BN18 0BN<br />
GAUGEMASTER - The UK Home of Prodigy Advance<br />
DECODER ADDRESS<br />
128-9999<br />
PRODIGY ADVANCE’s Default Setting CV29 = 2 CV29 = 34<br />
Change Polarity Only CV29 = 3 CV29 = 35<br />
Change to 14 Speed Steps Only CV29 = 0 CV29 = 32<br />
Change Polarity & 14 Speed Steps CV29 = 1 CV29 = 33