

Owners Manual - HKTS 20, HKTS 30 (English EU
Owners Manual - HKTS 20, HKTS 30 (English EU
Owners Manual - HKTS 20, HKTS 30 (English EU

You also want an ePaper? Increase the reach of your titles
YUMPU automatically turns print PDFs into web optimized ePapers that Google loves.
PL0004-01001<br />
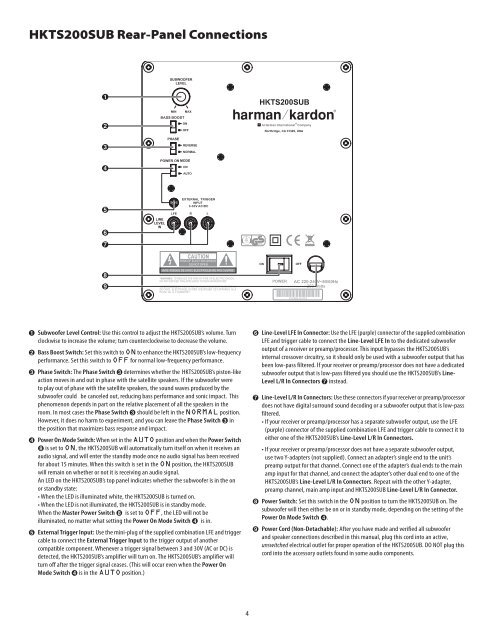
<strong>HKTS</strong><strong>20</strong>0SUB Rear-Panel Connections<br />
1<br />
2<br />
3<br />
4<br />
5<br />
6<br />
7<br />
8<br />
9<br />
0. Subwoofer Level Control: Use this control to adjust the <strong>HKTS</strong><strong>20</strong>0SUB’s volume. Turn<br />
clockwise to increase the volume; turn counterclockwise to decrease the volume.<br />
1. Bass Boost Switch: Set this switch to ON to enhance the <strong>HKTS</strong><strong>20</strong>0SUB’s low-frequency<br />
performance. Set this switch to OFF for normal low-frequency performance.<br />
2. Phase Switch: The Phase Switch 2 determines whether the <strong>HKTS</strong><strong>20</strong>0SUB’s piston-like<br />
action moves in and out in phase with the satellite speakers. If the subwoofer were<br />
to play out of phase with the satellite speakers, the sound waves produced by the<br />
subwoofer could be canceled out, reducing bass performance and sonic impact. This<br />
phenomenon depends in part on the relative placement of all the speakers in the<br />
room. In most cases the Phase Switch 2 should be left in the NORMAL position.<br />
However, it does no harm to experiment, and you can leave the Phase Switch 2 in<br />
the position that maximizes bass response and impact.<br />
3. Power On Mode Switch: When set in the AUTO position and when the Power Switch<br />
7 is set to ON, the <strong>HKTS</strong><strong>20</strong>0SUB will automatically turn itself on when it receives an<br />
audio signal, and will enter the standby mode once no audio signal has been received<br />
for about 15 minutes. When this switch is set in the ON position, the <strong>HKTS</strong><strong>20</strong>0SUB<br />
will remain on whether or not it is receiving an audio signal.<br />
An LED on the <strong>HKTS</strong><strong>20</strong>0SUB’s top panel indicates whether the subwoofer is in the on<br />
or standby state:<br />
• When the LED is illuminated white, the <strong>HKTS</strong><strong>20</strong>0SUB is turned on.<br />
• When the LED is not illuminated, the <strong>HKTS</strong><strong>20</strong>0SUB is in standby mode.<br />
When the Master Power Switch 7 is set to OFF, the LED will not be<br />
illuminated, no matter what setting the Power On Mode Switch 3 is in.<br />
4. External Trigger Input: Use the mini-plug of the supplied combination LFE and trigger<br />
cable to connect the External Trigger Input to the trigger output of another<br />
compatible component. Whenever a trigger signal between 3 and <strong>30</strong>V (AC or DC) is<br />
detected, the <strong>HKTS</strong><strong>20</strong>0SUB’s amplifier will turn on. The <strong>HKTS</strong><strong>20</strong>0SUB’s amplifier will<br />
turn off after the trigger signal ceases. (This will occur even when the Power On<br />
Mode Switch 3 is in the AUTO position.)<br />
5. Line-Level LFE In Connector: Use the LFE (purple) connector of the supplied combination<br />
LFE and trigger cable to connect the Line-Level LFE In to the dedicated subwoofer<br />
output of a receiver or preamp/processor. This input bypasses the <strong>HKTS</strong><strong>20</strong>0SUB’s<br />
internal crossover circuitry, so it should only be used with a subwoofer output that has<br />
been low-pass filtered. If your receiver or preamp/processor does not have a dedicated<br />
subwoofer output that is low-pass filtered you should use the <strong>HKTS</strong><strong>20</strong>0SUB’s Line-<br />
Level L/R In Connectors 6 instead.<br />
6. Line-Level L/R In Connectors: Use these connectors if your receiver or preamp/processor<br />
does not have digital surround sound decoding or a subwoofer output that is low-pass<br />
filtered.<br />
• If your receiver or preamp/processor has a separate subwoofer output, use the LFE<br />
(purple) connector of the supplied combination LFE and trigger cable to connect it to<br />
either one of the <strong>HKTS</strong><strong>20</strong>0SUB’s Line-Level L/R In Connectors.<br />
• If your receiver or preamp/processor does not have a separate subwoofer output,<br />
use two Y-adapters (not supplied). Connect an adapter’s single end to the unit’s<br />
preamp output for that channel. Connect one of the adapter’s dual ends to the main<br />
amp input for that channel, and connect the adapter’s other dual end to one of the<br />
<strong>HKTS</strong><strong>20</strong>0SUB’s Line-Level L/R In Connectors. Repeat with the other Y-adapter,<br />
preamp channel, main amp input and <strong>HKTS</strong><strong>20</strong>0SUB Line-Level L/R In Connector.<br />
7. Power Switch: Set this switch in the ON position to turn the <strong>HKTS</strong><strong>20</strong>0SUB on. The<br />
subwoofer will then either be on or in standby mode, depending on the setting of the<br />
Power On Mode Switch 3.<br />
8. Power Cord (Non-Detachable): After you have made and verified all subwoofer<br />
and speaker connections described in this manual, plug this cord into an active,<br />
unswitched electrical outlet for proper operation of the <strong>HKTS</strong><strong>20</strong>0SUB. DO NOT plug this<br />
cord into the accessory outlets found in some audio components.<br />
4


