

Owners Manual - HKTS 20, HKTS 30 (English EU
Owners Manual - HKTS 20, HKTS 30 (English EU
Owners Manual - HKTS 20, HKTS 30 (English EU

Create successful ePaper yourself
Turn your PDF publications into a flip-book with our unique Google optimized e-Paper software.
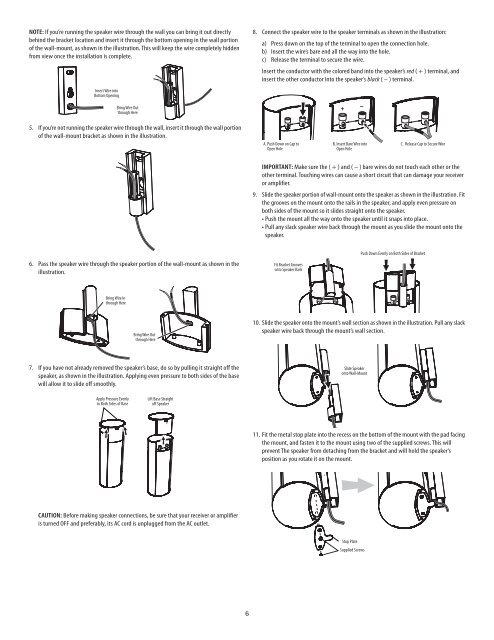
NOTE: If you’re running the speaker wire through the wall you can bring it out directly<br />
behind the bracket location and insert it through the bottom opening in the wall portion<br />
of the wall-mount, as shown in the illustration. This will keep the wire completely hidden<br />
from view once the installation is complete.<br />
8. Connect the speaker wire to the speaker terminals as shown in the illustration:<br />
a) Press down on the top of the terminal to open the connection hole.<br />
b) Insert the wire’s bare end all the way into the hole.<br />
c) Release the terminal to secure the wire.<br />
Insert the conductor with the colored band into the speaker’s red ( + ) terminal, and<br />
insert the other conductor into the speaker’s black ( – ) terminal.<br />
Insert Wire into<br />
Bottom Opening<br />
Bring Wire Out<br />
through Here<br />
+ –<br />
5.<br />
If you’re not running the speaker wire through the wall, insert it through the wall portion<br />
of the wall-mount bracket as shown in the illustration.<br />
A. Push Down on Cap to<br />
Open Hole<br />
B. Insert Bare Wire into<br />
Open Hole<br />
C. Release Cap to Secure Wire<br />
9.<br />
IMPORTANT: Make sure the ( + ) and ( – ) bare wires do not touch each other or the<br />
other terminal. Touching wires can cause a short circuit that can damage your receiver<br />
or amplifier.<br />
Slide the speaker portion of wall-mount onto the speaker as shown in the illustration. Fit<br />
the grooves on the mount onto the rails in the speaker, and apply even pressure on<br />
both sides of the mount so it slides straight onto the speaker.<br />
• Push the mount all the way onto the speaker until it snaps into place.<br />
• Pull any slack speaker wire back through the mount as you slide the mount onto the<br />
speaker.<br />
Push Down Evenly on Both Sides of Bracket<br />
6.<br />
Pass the speaker wire through the speaker portion of the wall-mount as shown in the<br />
illustration.<br />
Fit Bracket Grooves<br />
onto Speaker Rails<br />
Bring Wire In<br />
through Here<br />
Bring Wire Out<br />
through Here<br />
10. Slide the speaker onto the mount’s wall section as shown in the illustration. Pull any slack<br />
speaker wire back through the mount’s wall section.<br />
7. If you have not already removed the speaker’s base, do so by pulling it straight off the<br />
speaker, as shown in the illustration. Applying even pressure to both sides of the base<br />
will allow it to slide off smoothly.<br />
Slide Speaker<br />
onto Wall-Mount<br />
Apply Pressure Evenly<br />
to Both Sides of Base<br />
Lift Base Straight<br />
off Speaker<br />
11. Fit the metal stop plate into the recess on the bottom of the mount with the pad facing<br />
the mount, and fasten it to the mount using two of the supplied screws. This will<br />
prevent The speaker from detaching from the bracket and will hold the speaker’s<br />
position as you rotate it on the mount.<br />
CAUTION: Before making speaker connections, be sure that your receiver or amplifier<br />
is turned OFF and preferably, its AC cord is unplugged from the AC outlet.<br />
Stop Plate<br />
Supplied Screws<br />
6


