

Owners Manual - HKTS 20, HKTS 30 (English EU
Owners Manual - HKTS 20, HKTS 30 (English EU
Owners Manual - HKTS 20, HKTS 30 (English EU

Create successful ePaper yourself
Turn your PDF publications into a flip-book with our unique Google optimized e-Paper software.
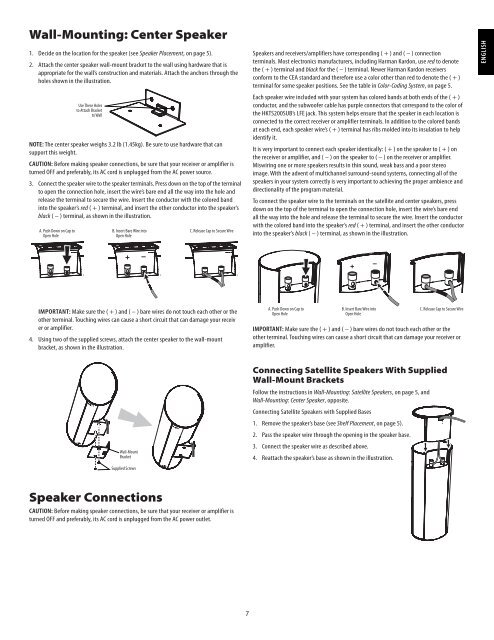
Wall-Mounting: Center Speaker<br />
1. Decide on the location for the speaker (see Speaker Placement, on page 5).<br />
2. Attach the center speaker wall-mount bracket to the wall using hardware that is<br />
appropriate for the wall’s construction and materials. Attach the anchors through the<br />
holes shown in the illustration.<br />
Use These Holes<br />
to Attach Bracket<br />
to Wall<br />
NOTE: The center speaker weighs 3.2 lb (1.45kg). Be sure to use hardware that can<br />
support this weight.<br />
CAUTION: Before making speaker connections, be sure that your receiver or amplifier is<br />
turned OFF and preferably, its AC cord is unplugged from the AC power source.<br />
3. Connect the speaker wire to the speaker terminals. Press down on the top of the terminal<br />
to open the connection hole, insert the wire’s bare end all the way into the hole and<br />
release the terminal to secure the wire. Insert the conductor with the colored band<br />
into the speaker’s red ( + ) terminal, and insert the other conductor into the speaker’s<br />
black ( – ) terminal, as shown in the illustration.<br />
A. Push Down on Cap to<br />
Open Hole<br />
B. Insert Bare Wire into<br />
Open Hole<br />
C. Release Cap to Secure Wire<br />
Speakers and receivers/amplifiers have corresponding ( + ) and ( – ) connection<br />
terminals. Most electronics manufacturers, including Harman Kardon, use red to denote<br />
the ( + ) terminal and black for the ( – ) terminal. Newer Harman Kardon receivers<br />
conform to the CEA standard and therefore use a color other than red to denote the ( + )<br />
terminal for some speaker positions. See the table in Color-Coding System, on page 5.<br />
Each speaker wire included with your system has colored bands at both ends of the ( + )<br />
conductor, and the subwoofer cable has purple connectors that correspond to the color of<br />
the <strong>HKTS</strong><strong>20</strong>0SUB’s LFE jack. This system helps ensure that the speaker in each location is<br />
connected to the correct receiver or amplifier terminals. In addition to the colored bands<br />
at each end, each speaker wire’s ( + ) terminal has ribs molded into its insulation to help<br />
identify it.<br />
It is very important to connect each speaker identically: ( + ) on the speaker to ( + ) on<br />
the receiver or amplifier, and ( – ) on the speaker to ( – ) on the receiver or amplifier.<br />
Miswiring one or more speakers results in thin sound, weak bass and a poor stereo<br />
image. With the advent of multichannel surround-sound systems, connecting all of the<br />
speakers in your system correctly is very important to achieving the proper ambience and<br />
directionality of the program material.<br />
To connect the speaker wire to the terminals on the satellite and center speakers, press<br />
down on the top of the terminal to open the connection hole, insert the wire’s bare end<br />
all the way into the hole and release the terminal to secure the wire. Insert the conductor<br />
with the colored band into the speaker’s red ( + ) terminal, and insert the other conductor<br />
into the speaker’s black ( – ) terminal, as shown in the illustration.<br />
ENGLISH<br />
+ –<br />
+ –<br />
4.<br />
Important: Make sure the ( + ) and ( – ) bare wires do not touch each other or the<br />
other terminal. Touching wires can cause a short circuit that can damage your receiv<br />
er or amplifier.<br />
Using two of the supplied screws, attach the center speaker to the wall-mount<br />
bracket, as shown in the illustration.<br />
A. Push Down on Cap to<br />
Open Hole<br />
B. Insert Bare Wire into<br />
Open Hole<br />
C. Release Cap to Secure Wire<br />
IMPORTANT: Make sure the ( + ) and ( – ) bare wires do not touch each other or the<br />
other terminal. Touching wires can cause a short circuit that can damage your receiver or<br />
amplifier.<br />
Wall-Mount<br />
Bracket<br />
Supplied Screws<br />
Connecting Satellite Speakers With Supplied<br />
Wall-Mount Brackets<br />
Follow the instructions in Wall-Mounting: Satellite Speakers, on page 5, and<br />
Wall-Mounting: Center Speaker, opposite.<br />
Connecting Satellite Speakers with Supplied Bases<br />
1. Remove the speaker’s base (see Shelf Placement, on page 5).<br />
2. Pass the speaker wire through the opening in the speaker base.<br />
3. Connect the speaker wire as described above.<br />
4. Reattach the speaker’s base as shown in the illustration.<br />
Speaker Connections<br />
CAUTION: Before making speaker connections, be sure that your receiver or amplifier is<br />
turned OFF and preferably, its AC cord is unplugged from the AC power outlet.<br />
7


