More Skills 11 Split Windows and Arrange Windows - Pearson
More Skills 11 Split Windows and Arrange Windows - Pearson
More Skills 11 Split Windows and Arrange Windows - Pearson

Create successful ePaper yourself
Turn your PDF publications into a flip-book with our unique Google optimized e-Paper software.
CHAPTER 1<br />
Word<br />
<strong>More</strong> <strong>Skills</strong> <strong>11</strong> <strong>Split</strong> <strong>Windows</strong> <strong>and</strong> <strong>Arrange</strong> <strong>Windows</strong><br />
Word enables you to split the screen, which lets you look at two different parts of the same<br />
document at the same time. This is useful in a long document, for example, when you are<br />
writing a summary.<br />
You can also view two different documents side by side to make comparisons between the<br />
two, use one as a source of information, or even copy text from one document to the other.<br />
To complete this document, you will need the following files:<br />
w01_Staffing_Memo<br />
w01_Shareholders<br />
You will save your document as:<br />
w01_Staffing_Your_Name<br />
w01_<strong>Split</strong>_Snip_Your_Name<br />
w01_Two_<strong>Windows</strong>_Snip_Your_Name<br />
1. Start Word. Locate <strong>and</strong> open the file w01_Staffing_Memo. Save the file in your Word<br />
Chapter 1 folder as w01_Staffing_Your_Name <strong>and</strong> then add the file name to the footer.<br />
If necessary, turn the formatting marks off.<br />
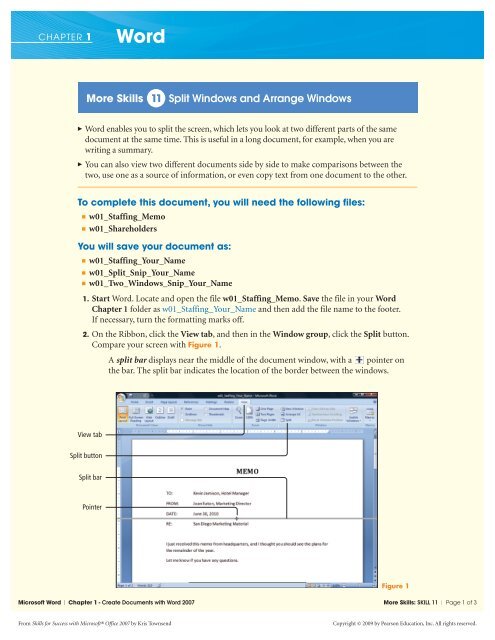
2. On the Ribbon, click the View tab, <strong>and</strong> then in the Window group, click the <strong>Split</strong> button.<br />
Compare your screen with Figure 1.<br />
A split bar displays near the middle of the document window, with a pointer on<br />
the bar. The split bar indicates the location of the border between the windows.<br />
View tab<br />
<strong>Split</strong> button<br />
<strong>Split</strong> bar<br />
Pointer<br />
Figure 1<br />
Microsoft Word | Chapter 1 - Create Documents with Word 2007 <strong>More</strong> <strong>Skills</strong>: SKILL <strong>11</strong> | Page 1 of 3<br />
From <strong>Skills</strong> for Success with Microsoft® Office 2007 by Kris Townsend<br />
Copyright © 2009 by <strong>Pearson</strong> Education, Inc. All rights reserved.
3. Move the split bar below the paragraph that begins DATE, <strong>and</strong> then click one time. Notice<br />
that the document window is divided into two sections, <strong>and</strong> each section has its own ruler.<br />
4. Click anywhere in the lower half of the window, <strong>and</strong> then use the lower vertical scroll bar to<br />
display the bottom of Page 1, as shown in Figure 2.<br />
One document,<br />
two windows<br />
Page 1 footer<br />
Figure 2<br />
5. Display the Start menu ,point to All Programs, click the Accessories folder, <strong>and</strong><br />
then click Snipping Tool. On the Snipping Tool program, click the New button<br />
arrow, <strong>and</strong> then click Full-screen Snip. In the Snipping Tool mark-up window, click<br />
the Save Snip button . In the displayed Save As dialog box, navigate to your<br />
Word Chapter 1 folder. Click in the File name box, <strong>and</strong> then using your own name,<br />
type w01_<strong>Split</strong>_Snip_Your_Name <strong>and</strong> press J. Close the Snipping Tool<br />
mark-up window.<br />
If you do not have the Snipping Tool, which is available in <strong>Windows</strong> Vista Home<br />
Premium edition, press ap, <strong>and</strong> then paste the screen into a Word document.<br />
6. On the View tab, in the Window group, click the Remove <strong>Split</strong> button.<br />
7. From the Office menu , locate <strong>and</strong> open the file w01_Shareholders.<br />
8. On the View tab, in the Window group, click the <strong>Arrange</strong> All button. Notice that both<br />
documents display in their own window, <strong>and</strong> each window has a Ribbon, rulers, <strong>and</strong> scroll<br />
bars, as shown in Figure 3.<br />
Microsoft Word | Chapter 1 - Create Documents with Word 2007 <strong>More</strong> <strong>Skills</strong>: SKILL <strong>11</strong> | Page 2 of 3<br />
From <strong>Skills</strong> for Success with Microsoft® Office 2007 by Kris Townsend<br />
Copyright © 2009 by <strong>Pearson</strong> Education, Inc. All rights reserved.
Ribbons in each window<br />
Two documents open<br />
Figure 3<br />
9. In the w01_Staffing_Your_Name window, scroll to display the file name in the Page 1<br />
footer.<br />
10. Using the technique you used in Step 5, create a Snip called w01_Two_<strong>Windows</strong>_<br />
Snip_Your_Name<br />
<strong>11</strong>. In the w01_Shareholders window, click the Close button . In the w01_Staffing_<br />
Your_Name window, click the Maximize button .<br />
12. Submit the two Snip files as directed, Save your document, <strong>and</strong> then Exit Word.<br />
You have completed <strong>More</strong> <strong>Skills</strong> <strong>11</strong><br />
Microsoft Word | Chapter 1 - Create Documents with Word 2007 <strong>More</strong> <strong>Skills</strong>: SKILL <strong>11</strong> | Page 3 of 3<br />
From <strong>Skills</strong> for Success with Microsoft® Office 2007 by Kris Townsend<br />
Copyright © 2009 by <strong>Pearson</strong> Education, Inc. All rights reserved.