Manual_M50LTAT-52 - Auto Service Praxis
Manual_M50LTAT-52 - Auto Service Praxis
Manual_M50LTAT-52 - Auto Service Praxis

Create successful ePaper yourself
Turn your PDF publications into a flip-book with our unique Google optimized e-Paper software.
• leveling limit switches for proper operation (both the platforms should lower<br />
simultaneously)<br />
• the horn /signaling light for proper operation during the final travel;<br />
7.10.2 CHECK WITH LOAD<br />
Repeat checks in section 7.10.1 with the vehicle loaded;<br />
7.10.3 BOLTS AND NUTS CHECK<br />
After carrying out the checks with a load, make a visual inspection of the equipment and check<br />
bolts and nuts for proper tightening<br />
7.11 LIMIT SWITCHES ADJUSTMENTS<br />
ONLY SKILLED PERSONNEL MUST BE ALLOWED TO CARRY OUT THIS OPERATION.<br />
AN IMPROPER ADJUSTMENT OF THE LIMIT SWITCHES COULD CAUSE DAMAGE TO<br />
THE LIFT, OBJECTS AND PEOPLE<br />
• Check the bolts for proper tightening that assures the limit switches;<br />
• Check the wheat that assure the cams to the arms,<br />
• Check the correct position of each limit switches.<br />
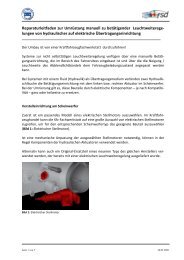
7.11.1 ADJUSTMENT OF MAXIMUM WORKING HEIGHT LIMIT SWITCH<br />
Fig. 27<br />
Press UP button (7) and verify that platforms<br />
reach the height of 1850 mm<br />
If this has not happened, adjust the limit switch<br />
as follows:<br />
• By pressing Up button (7), raise the lift<br />
to a height of 1850 mm; if the limit<br />
switch acts before such height , push the<br />
Up button (7), and the exclusion button<br />
(15) simultaneously.<br />
• Loosen dowels (1) which lock the cam<br />
(2) between the arms of platform P2<br />
• Turn the cam (2) until the limit switch<br />
detects it<br />
• Tighten the dowels (1) properly<br />
In case the limit switch does not detect the cam ,<br />
adjust it as follow:<br />
• Loosen nuts (3) and move the sensor (4)<br />
towards the cam (2) at a distance of 1 to<br />
3 mm.<br />
Tighten nuts (3)