CMG-DCM / AM - Güralp Systems Limited
CMG-DCM / AM - Güralp Systems Limited
CMG-DCM / AM - Güralp Systems Limited

You also want an ePaper? Increase the reach of your titles
YUMPU automatically turns print PDFs into web optimized ePapers that Google loves.
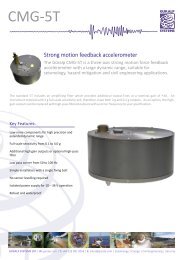
<strong>CMG</strong>-<strong>DCM</strong> Data Communications Module<br />
3.4 The <strong>DCM</strong> as a network data hub<br />
The most flexible way to operate the <strong>DCM</strong> is as a fully independent<br />
machine on your local area network. To do this:<br />
1. Connect <strong>Güralp</strong> digitizers to PORT A and PORT B as necessary,<br />
using the serial data cable provided.<br />
2. If you are using the <strong>DCM</strong>'s USB capabilities, connect your<br />
external hardware or computer to the USB socket.<br />
Note: In the USB standard, a device is either a host (a computer)<br />
or a client (a peripheral.) The <strong>DCM</strong>'s USB port can act as either,<br />
depending on the options specified at manufacture. It cannot do<br />
both at the same time.<br />
If your <strong>DCM</strong> is a host, you can attach additional USB<br />
peripherals such as hard disks to the USB socket. If it is a client,<br />
you can attach the USB socket to a computer, and it will appear<br />
as a network interface.<br />
3. Connect a <strong>Güralp</strong> combined serial/power cable to the DATA<br />
OUT port. Make up a connector if necessary, and attach the<br />
power lines to a 12 V DC power supply.<br />
4. Connect the 9-pin serial socket to a computer for configuration.<br />
5. Connect an Ethernet cable to the NETWORK socket, and set up<br />
the network as described in Section 2.4, page 15.<br />
6. You should now be able to connect to the <strong>DCM</strong>'s Web setup<br />
32 Issue F