Installation and operating instructions - Haas + Sohn
Installation and operating instructions - Haas + Sohn
Installation and operating instructions - Haas + Sohn

Create successful ePaper yourself
Turn your PDF publications into a flip-book with our unique Google optimized e-Paper software.
Index of contents<br />
1. Description 3<br />
2. General <strong>instructions</strong>, safety <strong>instructions</strong> 3<br />
3. <strong>Installation</strong> of the pellet stove <strong>and</strong> connection to<br />
the chimney 4<br />
4. The pellet stove’s functional characteristics 6<br />
5. The pellet stove’s <strong>operating</strong> statuses: 6<br />
5.1. Ignition phase 6<br />
5.2. Heating mode 6<br />
5.3. Burner test 7<br />
5.4. Cooling down 7<br />
5.5. St<strong>and</strong>by 7<br />
5.6. Safety shutdown (shutdown) 7<br />
5.7. Faults 7<br />
5.8. Switching off – <strong>operating</strong> status OFF 8<br />
5.9. Power cut 8<br />
5.10. Overheating 8<br />
5.11. Low temperature shutdown 8<br />
6. Description of operator console keys 8<br />
6.1. Operator console 8<br />
6.2. Information screens 9<br />
6.2..1 Info screen 1 (St<strong>and</strong>ard screen) 9<br />
6.2..2 Main menu 9<br />
6.2..3 Setting the <strong>operating</strong> mode 9<br />
6.2..4 Setting the time <strong>and</strong> date 9<br />
6.2..5 Setting the times <strong>and</strong> target room temperatures<br />
in automatic mode 9<br />
6.2..6 Setting target room temperature in Heating<br />
mode 9<br />
6.2..7 Fault screen 10<br />
6.3. Setting the language 10<br />
6.4. Description – Heating profile 10<br />
6.5. Description – Key lock (child-safe) 10<br />
6.6. Description – Display brightness - contrast setting10<br />
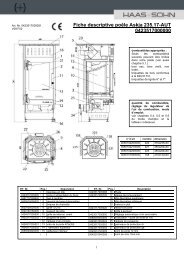
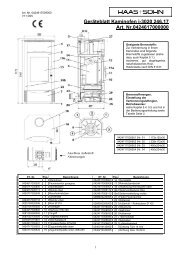
9. Description of the components 18<br />
9.1. Storage container (pellet tank) 18<br />
9.2. Screw conveyor motor / screw conveyor 18<br />
9.3. Combustion pot with tray: 18<br />
9.4. Electric ignition 18<br />
9.5. Control unit 19<br />
9.6. Operator console 19<br />
9.6..1 Backlighting 20<br />
9.6..2 Activating the backlighting 20<br />
9.7. Induced draught fan with rotation speed feedback<br />
20<br />
9.8. Flame or combustion chamber temperature sensor<br />
(combustion chamber thermosensor) 20<br />
9.9. Flue gas thermosensor 20<br />
9.10. Room temperature sensor 20<br />
9.11. OC – Overheat cutout 21<br />
9.12. Combustion chamber cladding 21<br />
9.13. Flue tube connection 21<br />
9.14. Mains cable <strong>and</strong> master switch 21<br />
10. Technical data 22<br />
11. Faults, causes, correction 24<br />
11.1. Error messages on the display 24<br />
11.2. General faults 28<br />
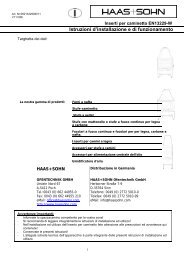
12. Type plate: Symbol 29<br />
13. Replacement parts list 32<br />
14. Circuit diagram 33<br />
15. Guarantee 35<br />
7. Operating the pellet stove 10<br />
7.1. Fuel 10<br />
7.2. Commissioning your pellet stove 11<br />
7.3. Selecting the <strong>operating</strong> mode 11<br />
7.3..1 “Heating” <strong>operating</strong> mode 12<br />
7.3..2 Setting the target room temperature in<br />
“Heating” <strong>operating</strong> mode 12<br />
7.3..3 “Auto” <strong>operating</strong> mode (weekly programme)<br />
12<br />
8. Cleaning <strong>and</strong> maintenance work 13<br />
8.1. Cleaning the surface 13<br />
8.2. Cleaning the glass panel 13<br />
8.3. Cleaning the combustion pot 13<br />
8.4. Removing the ash from the combustion chamber<br />
14<br />
8.5. Cleaning the pellet container 14<br />
8.6. Cleaning the flue gas passes <strong>and</strong> the flue tubes 15<br />
8.7. Cleaning the induced draught housing <strong>and</strong> fan 15<br />
2