Installation and operating instructions - Haas + Sohn
Installation and operating instructions - Haas + Sohn
Installation and operating instructions - Haas + Sohn

Create successful ePaper yourself
Turn your PDF publications into a flip-book with our unique Google optimized e-Paper software.
The pellet stove may only be operated with st<strong>and</strong>ard<br />
wood pellets (6 mm diameter). (See Section 7.1<br />
“Fuel”).<br />
The protective grille located in the pellet container<br />
must not be removed.<br />
Attention! The Pelletto stove may only be<br />
operated with the tank cover closed.<br />
Placing non-heat-resistant materials or objects on<br />
the stove or within the specified minimum distances<br />
is forbidden. Here please note in particular that<br />
during “St<strong>and</strong>by” <strong>operating</strong> status, the stove may<br />
unexpectedly <strong>and</strong> unintentionally start heating when<br />
the room temperature falls below the desired<br />
temperature.<br />
Never use liquid fuels to ignite the pellet stove or to<br />
revive existing embers.<br />
With the burning up of fuels, heat energy is<br />
released, leading to strong heating of the heating<br />
device’s surfaces (e.g. doors, door <strong>and</strong> control<br />
h<strong>and</strong>les, viewing window panels, side walls, front<br />
wall, flue tubes). Touching these parts without<br />
suitable heat protection gloves or a tool is to be<br />
avoided!<br />
The device ignites by itself in “St<strong>and</strong>by” mode.<br />
Because of the heat generated on the panel, make<br />
sure that no-one who is unfamiliar with the operation<br />
of the pellet stove is unsupervised in the room where<br />
it is installed.<br />
Bring these risks to your children’s <strong>and</strong> guests<br />
attention!<br />
In particular, any cleaning staff should be informed<br />
<strong>and</strong> instructed regarding the possible unexpected<br />
heating up of the stove.<br />
Placing non-heat-resistant objects on or near the<br />
heating device (even when it is cold, since it can<br />
ignite again by itself) is forbidden!<br />
Do not lay any laundry on the stove to dry!<br />
Clotheshorses for drying clothes <strong>and</strong> the like must<br />
be positioned at sufficient distance from the heating<br />
device – fire risk!<br />
When <strong>operating</strong> your heating device, it is forbidden<br />
to work with highly flammable or explosive<br />
substances in the same room or an adjacent one!<br />
3. <strong>Installation</strong> of the pellet stove <strong>and</strong><br />
connection to the chimney<br />
The packaging on your new pellet stove gives it optimum<br />
protection against damage. Nevertheless, damage may<br />
have occurred to the stove or to accessories in transit.<br />
Please therefore check your stove after unpacking for<br />
damage <strong>and</strong> completeness! Report any defects or<br />
anything missing to your specialist stove dealer without<br />
delay!<br />
Remark: Combustion chamber cladding that is loose or<br />
has come off its fastenings <strong>and</strong> the like are not defects.<br />
(See Section 7.2. “Commissioning your pellet stove”).<br />
The packaging on your stove is by <strong>and</strong> large<br />
environmentally neutral. The timber packaging is not<br />
untreated. The timber, the cardboard <strong>and</strong> the films can<br />
be taken without problems to your local recycling centre.<br />
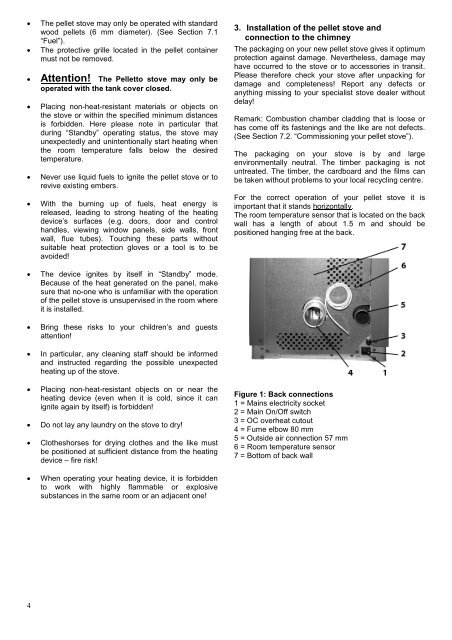
For the correct operation of your pellet stove it is<br />
important that it st<strong>and</strong>s horizontally.<br />
The room temperature sensor that is located on the back<br />
wall has a length of about 1.5 m <strong>and</strong> should be<br />
positioned hanging free at the back.<br />
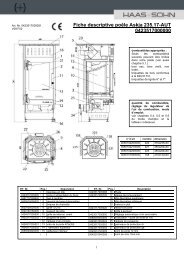
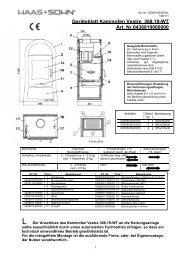
Figure 1: Back connections<br />
1 = Mains electricity socket<br />
2 = Main On/Off switch<br />
3 = OC overheat cutout<br />
4 = Fume elbow 80 mm<br />
5 = Outside air connection 57 mm<br />
6 = Room temperature sensor<br />
7 = Bottom of back wall<br />
4