


You also want an ePaper? Increase the reach of your titles
YUMPU automatically turns print PDFs into web optimized ePapers that Google loves.
AVR<br />
Set Up the Remote Control<br />
ENGLISH<br />
Set Up the Remote Control<br />
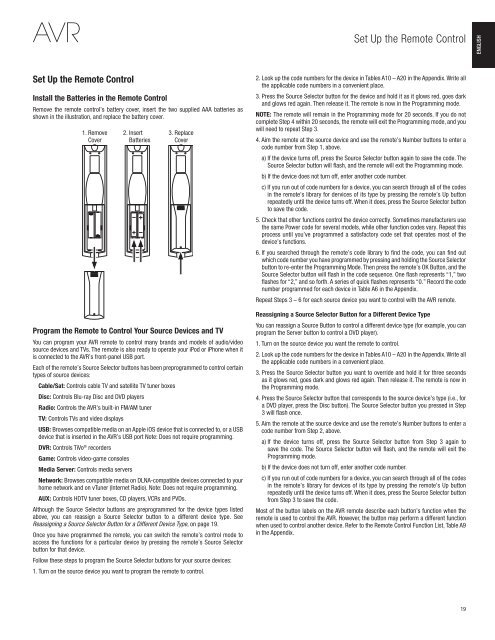
Install the Batteries in the Remote Control<br />
Remove the remote control’s battery cover, insert the two supplied AAA batteries as<br />
shown in the illustration, and replace the battery cover.<br />
1. Remove<br />
Cover<br />
2. Insert<br />
Batteries<br />
3. Replace<br />
Cover<br />
Program the Remote to Control Your Source Devices and TV<br />
You can program your AVR remote to control many brands and models of audio/video<br />
source devices and TVs. The remote is also ready to operate your iPod or iPhone when it<br />
is connected to the AVR’s front-panel USB port.<br />
Each of the remote’s Source Selector buttons has been preprogrammed to control certain<br />
types of source devices:<br />
Cable/Sat: Controls cable TV and satellite TV tuner boxes<br />
Disc: Controls Blu-ray Disc and DVD players<br />
Radio: Controls the AVR’s built-in FM/AM tuner<br />
TV: Controls TVs and video displays<br />
USB: Browses compatible media on an Apple iOS device that is connected to, or a USB<br />
device that is inserted in the AVR’s USB port Note: Does not require programming.<br />
DVR: Controls TiVo ® recorders<br />
Game: Controls video-game consoles<br />
Media Server: Controls media servers<br />
Network: Browses compatible media on DLNA-compatible devices connected to your<br />
home network and on vTuner (Internet Radio). Note: Does not require programming.<br />
AUX: Controls HDTV tuner boxes, CD players, VCRs and PVDs.<br />
Although the Source Selector buttons are preprogrammed for the device types listed<br />
above, you can reassign a Source Selector button to a different device type. See<br />
Reassigning a Source Selector Button for a Different Device Type, on page 19.<br />
Once you have programmed the remote, you can switch the remote’s control mode to<br />
access the functions for a particular device by pressing the remote’s Source Selector<br />
button for that device.<br />
Follow these steps to program the Source Selector buttons for your source devices:<br />
1. Turn on the source device you want to program the remote to control.<br />
2. Look up the code numbers for the device in Tables A10 – A20 in the Appendix. Write all<br />
the applicable code numbers in a convenient place.<br />
3. Press the Source Selector button for the device and hold it as it glows red, goes dark<br />
and glows red again. Then release it. The remote is now in the Programming mode.<br />
NOTE: The remote will remain in the Programming mode for 20 seconds. If you do not<br />
complete Step 4 within 20 seconds, the remote will exit the Programming mode, and you<br />
will need to repeat Step 3.<br />
4. Aim the remote at the source device and use the remote’s Number buttons to enter a<br />
code number from Step 1, above.<br />
a) If the device turns off, press the Source Selector button again to save the code. The<br />
Source Selector button will flash, and the remote will exit the Programming mode.<br />
b) If the device does not turn off, enter another code number.<br />
c) If you run out of code numbers for a device, you can search through all of the codes<br />
in the remote’s library for dervices of its type by pressing the remote’s Up button<br />
repeatedly until the device turns off. When it does, press the Source Selector button<br />
to save the code.<br />
5. Check that other functions control the device correctly. Sometimes manufacturers use<br />
the same Power code for several models, while other function codes vary. Repeat this<br />
process until you’ve programmed a satisfactory code set that operates most of the<br />
device’s functions.<br />
6. If you searched through the remote’s code library to find the code, you can find out<br />
which code number you have programmed by pressing and holding the Source Selector<br />
button to re-enter the Programming Mode. Then press the remote’s OK Button, and the<br />
Source Selector button will flash in the code sequence. One flash represents “1,” two<br />
flashes for “2,” and so forth. A series of quick flashes represents “0.” Record the code<br />
number programmed for each device in Table A6 in the Appendix.<br />
Repeat Steps 3 – 6 for each source device you want to control with the AVR remote.<br />
Reassigning a Source Selector Button for a Different Device Type<br />
You can reassign a Source Button to control a different device type (for example, you can<br />
program the Server button to control a DVD player).<br />
1. Turn on the source device you want the remote to control.<br />
2. Look up the code numbers for the device in Tables A10 – A20 in the Appendix. Write all<br />
the applicable code numbers in a convenient place.<br />
3. Press the Source Selector button you want to override and hold it for three seconds<br />
as it glows red, goes dark and glows red again. Then release it. The remote is now in<br />
the Programming mode.<br />
4. Press the Source Selector button that corresponds to the source device’s type (i.e., for<br />
a DVD player, press the Disc button). The Source Selector button you pressed in Step<br />
3 will flash once.<br />
5. Aim the remote at the source device and use the remote’s Number buttons to enter a<br />
code number from Step 2, above.<br />
a) If the device turns off, press the Source Selector button from Step 3 again to<br />
save the code. The Source Selector button will flash, and the remote will exit the<br />
Programming mode.<br />
b) If the device does not turn off, enter another code number.<br />
c) If you run out of code numbers for a device, you can search through all of the codes<br />
in the remote’s library for devices of its type by pressing the remote’s Up button<br />
repeatedly until the device turns off. When it does, press the Source Selector button<br />
from Step 3 to save the code.<br />
Most of the button labels on the AVR remote describe each button’s function when the<br />
remote is used to control the AVR. However, the button may perform a different function<br />
when used to control another device. Refer to the Remote Control Function List, Table A9<br />
in the Appendix.<br />
19


