


You also want an ePaper? Increase the reach of your titles
YUMPU automatically turns print PDFs into web optimized ePapers that Google loves.
AVR<br />
Set Up the AVR and<br />
Operating Your AVR<br />
ENGLISH<br />
6. If you have not selected an HDMI connector for Video In, select “Audio In” and select the<br />
audio input connector you want to assign to the source button. Press the OK button.<br />
should automatically assign the AVR an IP address, and the AVR should automatically join<br />
your network.<br />
If your AVR does not automatically join your network (in which case the AVR will display a<br />
“Not Connected” message when you press the Network source button):<br />
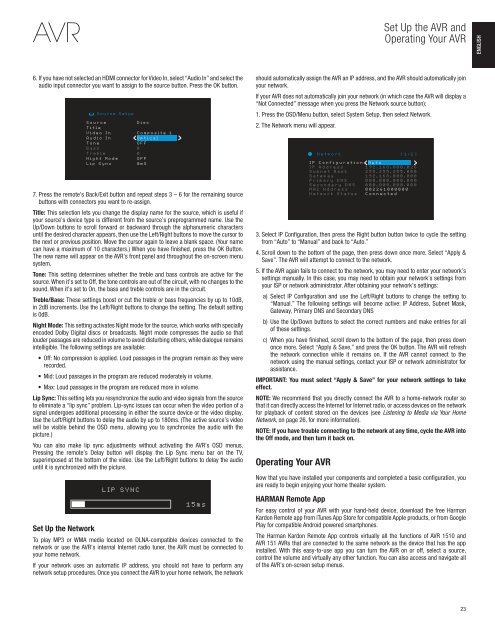
1. Press the OSD/Menu button, select System Setup, then select Network.<br />
2. The Network menu will appear.<br />
7. Press the remote’s Back/Exit button and repeat steps 3 – 6 for the remaining source<br />
buttons with connectors you want to re-assign.<br />
Title: This selection lets you change the display name for the source, which is useful if<br />
your source’s device type is different from the source’s preprogrammed name. Use the<br />
Up/Down buttons to scroll forward or backward through the alphanumeric characters<br />
until the desired character appears, then use the Left/Right buttons to move the cursor to<br />
the next or previous position. Move the cursor again to leave a blank space. (Your name<br />
can have a maximum of 10 characters.) When you have finished, press the OK Button.<br />
The new name will appear on the AVR’s front panel and throughout the on-screen menu<br />
system.<br />
Tone: This setting determines whether the treble and bass controls are active for the<br />
source. When it’s set to Off, the tone controls are out of the circuit, with no changes to the<br />
sound. When it’s set to On, the bass and treble controls are in the circuit.<br />
Treble/Bass: These settings boost or cut the treble or bass frequencies by up to 10dB,<br />
in 2dB increments. Use the Left/Right buttons to change the setting. The default setting<br />
is 0dB.<br />
Night Mode: This setting activates Night mode for the source, which works with specially<br />
encoded Dolby Digital discs or broadcasts. Night mode compresses the audio so that<br />
louder passages are reduced in volume to avoid disturbing others, while dialogue remains<br />
intelligible. The following settings are available:<br />
Off: No compression is applied. Loud passages in the program remain as they were<br />
recorded.<br />
Mid: Loud passages in the program are reduced moderately in volume.<br />
Max: Loud passages in the program are reduced more in volume.<br />
Lip Sync: This setting lets you resynchronize the audio and video signals from the source<br />
to eliminate a “lip sync” problem. Lip-sync issues can occur when the video portion of a<br />
signal undergoes additional processing in either the source device or the video display.<br />
Use the Left/Right buttons to delay the audio by up to 180ms. (The active source’s video<br />
will be visible behind the OSD menu, allowing you to synchronize the audio with the<br />
picture.)<br />
You can also make lip sync adjustments without activating the AVR’s OSD menus.<br />
Pressing the remote’s Delay button will display the Lip Sync menu bar on the TV,<br />
superimposed at the bottom of the video. Use the Left/Right buttons to delay the audio<br />
until it is synchronized with the picture.<br />
Set Up the Network<br />
To play MP3 or WMA media located on DLNA-compatible devices connected to the<br />
network or use the AVR’s internal Internet radio tuner, the AVR must be connected to<br />
your home network.<br />
If your network uses an automatic IP address, you should not have to perform any<br />
network setup procedures. Once you connect the AVR to your home network, the network<br />
3. Select IP Configuration, then press the Right button button twice to cycle the setting<br />
from “Auto” to “Manual” and back to “Auto.”<br />
4. Scroll down to the bottom of the page, then press down once more. Select “Apply &<br />
Save”. The AVR will attempt to connect to the network.<br />
5. If the AVR again fails to connect to the network, you may need to enter your network’s<br />
settings manually. In this case, you may need to obtain your network’s settings from<br />
your ISP or network administrator. After obtaining your network’s settings:<br />
a) Select IP Configuration and use the Left/Right buttons to change the setting to<br />
“Manual.” The following settings will become active: IP Address, Subnet Mask,<br />
Gateway, Primary DNS and Secondary DNS<br />
b) Use the Up/Down buttons to select the correct numbers and make entries for all<br />
of these settings.<br />
c) When you have finished, scroll down to the bottom of the page, then press down<br />
once more. Select “Apply & Save,” and press the OK button. The AVR will refresh<br />
the network connection while it remains on. If the AVR cannot connect to the<br />
network using the manual settings, contact your ISP or network administrator for<br />
assistance.<br />
IMPORTANT: You must select “Apply & Save” for your network settings to take<br />
effect.<br />
NOTE: We recommend that you directly connect the AVR to a home-network router so<br />
that it can directly access the Internet for Internet radio, or access devices on the network<br />
for playback of content stored on the devices (see Listening to Media via Your Home<br />
Network, on page 26, for more information).<br />
NOTE: If you have trouble connecting to the network at any time, cycle the AVR into<br />
the Off mode, and then turn it back on.<br />
Operating Your AVR<br />
Now that you have installed your components and completed a basic configuration, you<br />
are ready to begin enjoying your home theater system.<br />
HARMAN Remote App<br />
For easy control of your AVR with your hand-held device, download the free <strong>Harman</strong><br />
<strong>Kardon</strong> Remote app from iTunes App Store for compatible Apple products, or from Google<br />
Play for compatible Android powered smartphones.<br />
The <strong>Harman</strong> <strong>Kardon</strong> Remote App controls virtually all the functions of AVR 1510 and<br />
AVR 151 AVRs that are connected to the same network as the device that has the app<br />
installed. With this easy-to-use app you can turn the AVR on or off, select a source,<br />
control the volume and virtually any other function. You can also access and navigate all<br />
of the AVR’s on-screen setup menus.<br />
23


