


You also want an ePaper? Increase the reach of your titles
YUMPU automatically turns print PDFs into web optimized ePapers that Google loves.
AVR<br />
Set Up the AVR<br />
While making adjustments, you can measure the channel levels in one of these ways:<br />
Preferably, use a handheld SPL meter set to the C-weighting, slow scale. Adjust each<br />
speaker so that the meter reads 75dB when the AVR’s built-in test noise is playing.<br />
By ear. Adjust the levels so that the test tone sounds equally loud to you when it plays<br />
through each speaker.<br />
To set your levels using the AVR’s internal test tone, select the menu’s Test Tone line and<br />
use the Left/Right buttons to turn the test tone on. Then select the Test Tone SEQ line to<br />
select between Auto and Manual:<br />
Auto: The test tone will automatically circulate to all speakers, as indicated by the<br />
highlight bar. Use the Left/Right buttons to adjust the level for any speaker when the test<br />
tone is paused there. Use the Up/Down buttons to move the highlight bar to another line,<br />
and the test tone will follow the bar. To stop the test tone, use the Up/Down buttons to<br />
move the cursor out of the screen’s speaker listings area.<br />
Manual: The test tone will stay on the selected speaker until you use the Up/Down<br />
buttons to move it to another speaker. Use the Left/Right buttons to adjust the level for<br />
the speaker through which the test tone is playing.<br />
If you are using an external source to set your output levels, set Test Tone to Off, use the<br />
Up/Down buttons to navigate to each speaker, and use the Left/Right buttons to adjust<br />
the speaker’s level while the source plays.<br />
NOTE: If you are using a handheld SPL meter with external source material, such as a<br />
test disc or an audio selection, play it and adjust the AVR’s master volume control until<br />
the meter measures 75dB. Then adjust the individual speaker levels.<br />
Output Reset: To reset all levels to their factory defaults of 0dB, scroll down to this line<br />
and press the OK button.<br />
When you have finished adjusting the speaker levels, record the settings in Table A2 in<br />
the Appendix. Then press the Back/Exit Button.<br />
Notes on Setting Speaker Volumes in Home Theater Systems:<br />
While setting your system’s individual speaker volume levels is ultimately up to your<br />
personal taste, here are some ideas you may find helpful:<br />
For films and video-music programs, your overall goal should be to create an<br />
enveloping, realistic sound field that draws you into the film or music program<br />
without drawing your attention away from the action on the screen.<br />
For multichannel music recordings, some music producers will create a sound field<br />
that places the musicians all around you; others will create a sound field that places<br />
the musicians in front of you, with more subtle ambience in the surround speakers<br />
(as you would experience in a concert hall).<br />
In most multi-channel film soundtracks, the surround speakers are not intended<br />
to be as loud or as active as the front speakers. Adjusting the surround speakers<br />
so they are always as loud as the front speakers could make dialogue difficult to<br />
understand and will make some sound effects sound unrealistically loud.<br />
Notes on Setting Subwoofer Volume:<br />
Sometimes the ideal subwoofer volume setting for music is too loud for films, while<br />
the ideal setting for films is too quiet for music. When setting the subwoofer volume,<br />
listen to both music and films with strong bass content and find a “middle ground”<br />
volume level that works for both.<br />
If your subwoofer always seems too loud or too quiet, you may want to place it in<br />
a different location. Placing the subwoofer in a corner will always tend to increase<br />
its bass output, while placing it away from any walls or corners will always tend to<br />
reduce its bass output.<br />
Set Up Your Sources<br />
The Source Setup menu lets you assign the correct physical audio and video connections<br />
to each source and lets you set many audio and video playback features for each source.<br />
IMPORTANT: The “Video In” and “Audio In” settings are not optional and must<br />
be adjusted before you use your AVR to enable playback of each source. You can<br />
adjust the other settings later. See System Settings, on page 29, for complete information<br />
about adjusting all of the Settings menu options.<br />
1. Review the input connections you listed on the Source Buttons and Assigned<br />
Connectors table, on page 15. Note what changes (if any) you want to make from the<br />
default connector assignments that appear on the list.<br />
2. Turn on your TV and select the TV input where you connected the AVR in Connect Your<br />
TV or Video Display, on page 14.<br />
3. Press the remote control’s OSD/Menu button. The AVR’s OSD setup menu will appear<br />
on the TV. (Note: If you have used a composite video connection to your TV, the OSD<br />
menus will not appear on your TV. Follow the steps below using the AVR’s front-panel<br />
display.)<br />
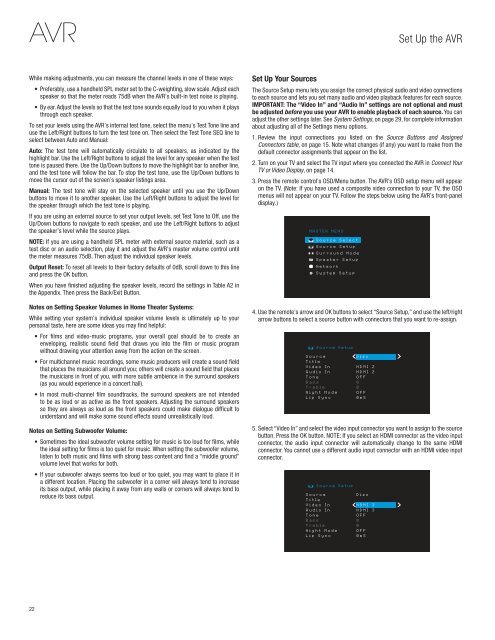
4. Use the remote’s arrow and OK buttons to select “Source Setup,” and use the left/right<br />
arrow buttons to select a source button with connectors that you want to re-assign.<br />
5. Select “Video In” and select the video input connector you want to assign to the source<br />
button. Press the OK button. NOTE: If you select an HDMI connector as the video input<br />
connector, the audio input connector will automatically change to the same HDMI<br />
connector. You cannot use a different audio input connector with an HDMI video input<br />
connector.<br />
22


