Hurlcon Gas Fired Hot Water Boiler H120 & H150 ... - Hurlcon Heating
Hurlcon Gas Fired Hot Water Boiler H120 & H150 ... - Hurlcon Heating
Hurlcon Gas Fired Hot Water Boiler H120 & H150 ... - Hurlcon Heating

Create successful ePaper yourself
Turn your PDF publications into a flip-book with our unique Google optimized e-Paper software.
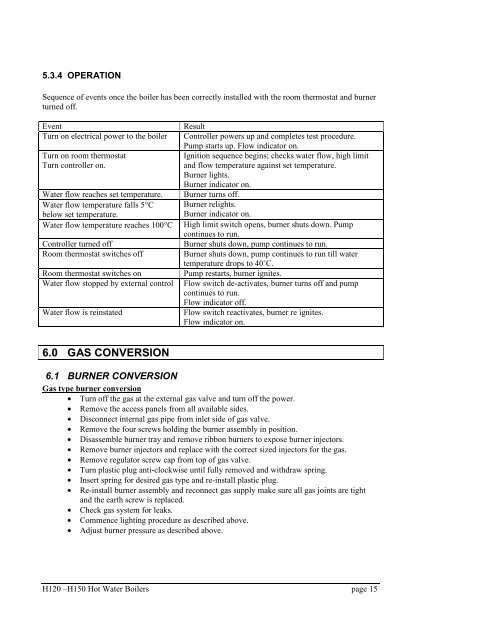
5.3.4 OPERATION<br />
Sequence of events once the boiler has been correctly installed with the room thermostat and burner<br />
turned off.<br />
Event<br />
Turn on electrical power to the boiler<br />
Turn on room thermostat<br />
Turn controller on.<br />
<strong>Water</strong> flow reaches set temperature.<br />
<strong>Water</strong> flow temperature falls 5°C<br />
below set temperature.<br />
<strong>Water</strong> flow temperature reaches 100°C<br />
Controller turned off<br />
Room thermostat switches off<br />
Room thermostat switches on<br />
<strong>Water</strong> flow stopped by external control<br />
<strong>Water</strong> flow is reinstated<br />
Result<br />
Controller powers up and completes test procedure.<br />
Pump starts up. Flow indicator on.<br />
Ignition sequence begins; checks water flow, high limit<br />
and flow temperature against set temperature.<br />
Burner lights.<br />
Burner indicator on.<br />
Burner turns off.<br />
Burner relights.<br />
Burner indicator on.<br />
High limit switch opens, burner shuts down. Pump<br />
continues to run.<br />
Burner shuts down, pump continues to run.<br />
Burner shuts down, pump continues to run till water<br />
temperature drops to 40˚C.<br />
Pump restarts, burner ignites.<br />
Flow switch de-activates, burner turns off and pump<br />
continues to run.<br />
Flow indicator off.<br />
Flow switch reactivates, burner re ignites.<br />
Flow indicator on.<br />
6.0 GAS CONVERSION<br />
6.1 BURNER CONVERSION<br />
<strong>Gas</strong> type burner conversion<br />
• Turn off the gas at the external gas valve and turn off the power.<br />
• Remove the access panels from all available sides.<br />
• Disconnect internal gas pipe from inlet side of gas valve.<br />
• Remove the four screws holding the burner assembly in position.<br />
• Disassemble burner tray and remove ribbon burners to expose burner injectors.<br />
• Remove burner injectors and replace with the correct sized injectors for the gas.<br />
• Remove regulator screw cap from top of gas valve.<br />
• Turn plastic plug anti-clockwise until fully removed and withdraw spring.<br />
• Insert spring for desired gas type and re-install plastic plug.<br />
• Re-install burner assembly and reconnect gas supply make sure all gas joints are tight<br />
and the earth screw is replaced.<br />
• Check gas system for leaks.<br />
• Commence lighting procedure as described above.<br />
• Adjust burner pressure as described above.<br />
<strong>H120</strong> –<strong>H150</strong> <strong>Hot</strong> <strong>Water</strong> <strong>Boiler</strong>s page 15